
:max_bytes(150000):strip_icc():format(webp)/frenchopen-4d320297828b413f84f9940d5bd258f9.jpg)
A Quick Guide to Purging Watched YouTube Videos
A Quick Guide to Purging Watched YouTube Videos
How to Remove YouTube Videos

Richard Bennett
Mar 27, 2024• Proven solutions
There are quite a few different reasons for which you might want to consider removing your YouTube video. From outdated content to mistakes in editing – the reasons are quite extensive. In the part 1, we will teach you how to remove your own videos on YouTube and things you should note when removing. The part 2 will tell you how to remove the videos from other YouTube channel.
If you need more advanced features like PIP, Green Screen, or audio mixing, check this easy to use and powerful video editor-Wondershare Filmora , and ignite your video by clicks.
 Download Mac Version ](https://tools.techidaily.com/wondershare/filmora/download/ )
You may also like:What is YouTube Creative Commons and How to Use it >>
Part 1: How to Remove YouTube Videos that You’ve Uploaded
You may also like:How to Edit Uploaded YouTube Videos >>
The first thing that we are going to show you is how to remove your own videos. This might be needed if you have uploaded content quite some time ago and it is already outdated. Or, if you have too many videos on your channel and you need to clear up those who aren’t that interesting.
The fact of the matter is that it’s quite easy to remove YouTube videos. The first thing that you would need to do is going ahead and hop on the website and log into your account. Afterwards, you need to go to the “My Channel” option and click on the “Video Manager”.
Upon doing this, a new page is going to pop up, and you are going to see a list of all the videos that you’ve uploaded.

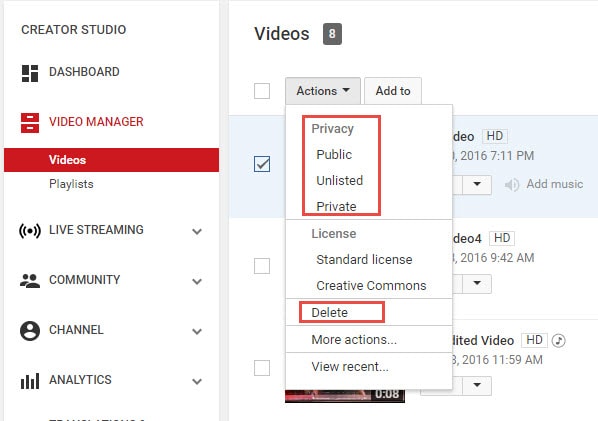
There are little tick boxes on the left side which you can click in order to mark. Mark the videos that you want to edit and click on the “Actions” button on top. There is going to be a drop-down menu, and you can click on the delete option to remove the video permanently. Furthermore, you can also hide the video if you don’t want to delete it but only to hide it away from your subscribers. In order to do so, you should simply click on the Private or Unlisted button.
That’s pretty much it – there’s nothing further to it, and the entire thing is rather comprehensive and easy to carry out, which makes it convenient to go through.
Part 2: How to Remove YouTube Videos on Other Channels
Now that we’ve covered how to remove videos from your own channel, it’s time to dig a little bit deeper. There are certain instances in which you might want to remove YouTube videos from other channels as well. The reasons for this are usually rather personal. For instance – someone has uploaded a video including you or something yours without your consent, and this harms your reputation. Furthermore, it may display sensitive information that you don’t want to reveal to anyone else – the reasons are rather different, but they are related to your own individual privacy which is an important legal right.
You may also like:How to Blur Faces in YouTube Videos >>
The first thing you can do is contact the person who uploaded the video and kindly asks him to remove it using the procedure that we described above. This is going to be the best choice because it’s going to achieve the result quickly and without any hassle. However, in certain cases, the person might not be active, or he might disagree with you and keep the video posted. If that’s the case, you have one option which is likely to be the best alternative.
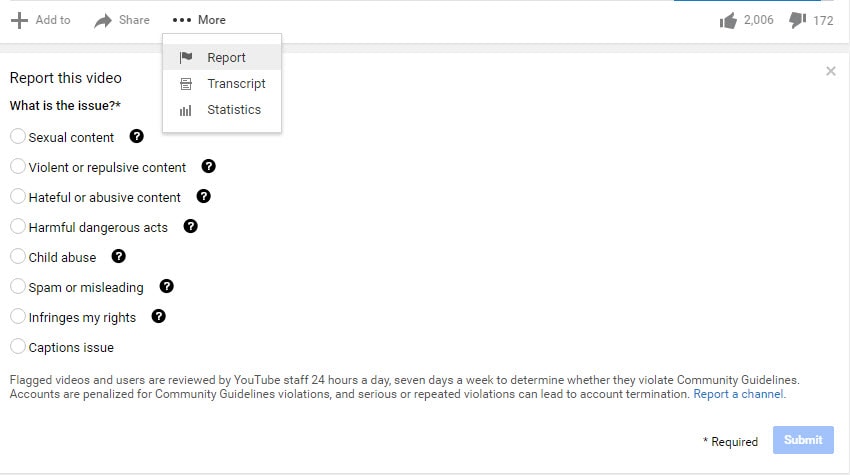
You need to report the video as an inappropriate and flag it with the remark that it’s invading your privacy. This is going to lead you to the page of the YouTube Safety Center. You will have to explain the issue in details in a six-step wizard which extensively asks you about how the video is invasive to your privacy rights. The process is quite comprehensive, and it’s easy to go through. However, you will have to wait for the YouTube support team to assess it and make the decision for the removal.
The truth is that being able to remove YouTube videos is something important that you should be able to do. It’s going to ensure that your channel is perfectly updated, aligned and structured while at the same time making sure that everything is in line with your privacy. YouTube is a powerful website, and you need to be able to stay in control in order to be protected.
Richard Bennett
Richard Bennett is a writer and a lover of all things video.
Follow @Richard Bennett
Richard Bennett
Mar 27, 2024• Proven solutions
There are quite a few different reasons for which you might want to consider removing your YouTube video. From outdated content to mistakes in editing – the reasons are quite extensive. In the part 1, we will teach you how to remove your own videos on YouTube and things you should note when removing. The part 2 will tell you how to remove the videos from other YouTube channel.
If you need more advanced features like PIP, Green Screen, or audio mixing, check this easy to use and powerful video editor-Wondershare Filmora , and ignite your video by clicks.
Download Mac Version ](https://tools.techidaily.com/wondershare/filmora/download/ )
You may also like:What is YouTube Creative Commons and How to Use it >>
Part 1: How to Remove YouTube Videos that You’ve Uploaded
You may also like:How to Edit Uploaded YouTube Videos >>
The first thing that we are going to show you is how to remove your own videos. This might be needed if you have uploaded content quite some time ago and it is already outdated. Or, if you have too many videos on your channel and you need to clear up those who aren’t that interesting.
The fact of the matter is that it’s quite easy to remove YouTube videos. The first thing that you would need to do is going ahead and hop on the website and log into your account. Afterwards, you need to go to the “My Channel” option and click on the “Video Manager”.
Upon doing this, a new page is going to pop up, and you are going to see a list of all the videos that you’ve uploaded.
There are little tick boxes on the left side which you can click in order to mark. Mark the videos that you want to edit and click on the “Actions” button on top. There is going to be a drop-down menu, and you can click on the delete option to remove the video permanently. Furthermore, you can also hide the video if you don’t want to delete it but only to hide it away from your subscribers. In order to do so, you should simply click on the Private or Unlisted button.
That’s pretty much it – there’s nothing further to it, and the entire thing is rather comprehensive and easy to carry out, which makes it convenient to go through.
Part 2: How to Remove YouTube Videos on Other Channels
Now that we’ve covered how to remove videos from your own channel, it’s time to dig a little bit deeper. There are certain instances in which you might want to remove YouTube videos from other channels as well. The reasons for this are usually rather personal. For instance – someone has uploaded a video including you or something yours without your consent, and this harms your reputation. Furthermore, it may display sensitive information that you don’t want to reveal to anyone else – the reasons are rather different, but they are related to your own individual privacy which is an important legal right.
You may also like:How to Blur Faces in YouTube Videos >>
The first thing you can do is contact the person who uploaded the video and kindly asks him to remove it using the procedure that we described above. This is going to be the best choice because it’s going to achieve the result quickly and without any hassle. However, in certain cases, the person might not be active, or he might disagree with you and keep the video posted. If that’s the case, you have one option which is likely to be the best alternative.
You need to report the video as an inappropriate and flag it with the remark that it’s invading your privacy. This is going to lead you to the page of the YouTube Safety Center. You will have to explain the issue in details in a six-step wizard which extensively asks you about how the video is invasive to your privacy rights. The process is quite comprehensive, and it’s easy to go through. However, you will have to wait for the YouTube support team to assess it and make the decision for the removal.
The truth is that being able to remove YouTube videos is something important that you should be able to do. It’s going to ensure that your channel is perfectly updated, aligned and structured while at the same time making sure that everything is in line with your privacy. YouTube is a powerful website, and you need to be able to stay in control in order to be protected.
Richard Bennett
Richard Bennett is a writer and a lover of all things video.
Follow @Richard Bennett
Create Effective YouTube Advertisements on a Budget
How to Create Video Ads for Free in YouTube Video Builder
Richard Bennett
Mar 27, 2024• Proven solutions
Many people find it challenging to create compelling video advertisements for their brand promotions. While some of the creative tools might be expensive, the easy ones have a steep learning curve, and engaging a professional designer wouldn’t be something you might be ready for. YouTube Video Builder is a great solution for any such situation.
With that being said, the following sections talk about what YouTube Video Builder is, how is it useful, what advantages does it offer, and how can you create professional video adverts using the tool.
- Part 1: What Is YouTube Video Builder?
- Part 2: How Does YouTube Video Builder Work?
- Part 3: How to Get YouTube Video Builder?
- Part 4: How to Make Video Ads for Free with YouTube Video Builder?
- Part 5: Tips for Making Good Video Ads with YouTube Video Builder
Part 1: What Is YouTube Video Builder?
YouTube recently came up with an online tool, YouTube Video Builder, that, as the name suggests, enables you as an organization to prepare videos for free. These videos could be anywhere from 6 to 15 seconds long and are most appropriate for advertisements. Once created, the films can be used in the campaigns to promote your brand and/or products online.
However, you must keep the following few things handy before starting with YouTube Video Builder to prepare a video advertisement:
- Logo
You must have a good-quality photo of your brand logo that you want to add to the video as a watermark. This gives your organization online recognition.
- HD Images
At the time of this writing, YouTube Video Builder only allows you to add still images. The tool compiles these photos using a theme that you select, and enables you to add background music to make the advert more engaging. Therefore, it is imperative to have high-definition images of your product(s) that you want to create a promotional video for.
- Google Chrome Browser
You must have the latest version of the Google Chrome web browser installed on your computer.
- YouTube Channel
Because YouTube Video Builder will publish your video advertisements on YouTube itself, you must have your own YouTube Channel created , configured, and properly functioning so the posting process remains smooth and seamless.
- Availability of the Tool and Features
YouTube Video Builder is still in the Beta phase, and therefore you may not have access to all the features that the tool has to offer. However, this majorly depends on the region of your residence. As of now, the utility is not even available in some countries of the world.
Part 2: How Does YouTube Video Builder Work?
As explained earlier, YouTube Video Builder is an online tool that works on the latest version of the Google Chrome browser. The web interface of the utility has separate blocks (or placeholders if you want to call them) for different types of images. For instance, there is a placeholder for your logo, and a couple of other blank slots where you can import the photos from your computer.
There are some text input fields that you can populate with the relevant information such as the name of the video, the product’s name that you wish to promote, and many other things. There is a storyboard at the bottom of the interface that helps give your video a theme and the alignment of the ingredients that you have imported from your computer.
Finally, you can add background music to the video from the royalty-free tracks that can be accessed from the built-in library, and you are all set to go.
Part 3: How Can I Get YouTube Video Builder?
Because YouTube Video Builder is in its Beta phase, at the time of this writing you are required to send an access request to Google using your account that you want to use to create the videos from. You can send your requests to: https://services.google.com/fb/forms/videobuilderbeta/ .
Once your request is approved, you can then use the same Google account to sign in to the YouTube Video Builder portal, and start preparing your video advertisements. Here, it is important to understand that the Google account that you use to send an access request and prepare the videos must be the same ID that has your active and functional YouTube Channel.
Part 4: How to Make Video Ads for Free with YouTube Video Builder?
Once you have access to the Beta version of YouTube Video Builder, you can start creating the video ads for free. You can learn the process of how this can be done by following the simple instructions given below:
Step 1: Prepare a Console
After signing in to your YouTube Video Builder account, on the main interface, click Select Layout from the navigation bar at the right if not already selected, pick a layout that best suits your needs, and click Use Layout.

Next, from the Color & Logo section, choose the base (background) and text colors using their corresponding tools from under the Brand colors section.
![]()
After this, insert an image of your brand logo in the block under the Logos category.
![]()
Step 2: Add the Ingredients
When you are on the Images & Text section of the navigation bar, pick the high-definition photos from the Storyboard at the bottom, and add them to the Image 1, Image 2, and Image 3 boxes accordingly.

Now, scroll down to the Text section, and add the relevant content in the available text input fields. Make sure to add a compelling Call to action text to give the viewers a free passage to connect with you.

Step 3: Make Cosmetic Manipulations
From the Pick a Font section of the navigation bar, click the Google Fonts catalog link to search for a unique font, and once found, type its name in the available field to use that font.

Alternatively, you can leave the default one selected. When on the Select Music section, choose your preferred background music from the drop-down list that is present under the section.

Finally, click Create video, and wait while YouTube Video Builder takes you to the Preview, Save, Share section, and generates your video.

Step 4: Save the Video and Begin Promotion
After the video is generated, play to preview the film. If everything looks good, click Save video.

On the next page, click Copy to copy the video link, and share it with your friends, colleagues, and family members for their feedback.

Next, scroll down to get to the Create Campaign section of the navigation bar, and from the left screen, click Create campaign to begin a campaign to promote your brand and/or product(s).

Part 5: Tips for Making Good Video Ads with YouTube Video Builder
The whole point here is to prepare your video adverts with the least investment and almost no effort. The following few tips would help you achieve this with ease:
- Make sure to gather all the ingredients such as the photos of the products, brand logo, etc. before starting with the video creation process
- Set a layout, font, theme color, and background music that compliments the product(s) you wish to promote
- Remain consistent with the theme color, fonts, etc. throughout the video
- Make sure to include a catchy ‘Call for action’ text in your video ad
- Make as many modifications as you want before publishing the ad on your YouTube Channel. Avoid doing any amendments after the ad has been posted
- Share the link of your video with as many people as you possibly can to make your product(s) and brand visible and popular
- Make sure to use the ad in your campaigns to make people aware of your brand/product(s)
Conclusion
The bitter truth is, producing videos, especially for brand promotions requires expert creators, expensive tools, and a good amount of work experience. Although all these can be managed if you have some spare funds, YouTube Video Builder helps you create advertising videos of up to 15 seconds with ease and for free. All you need is access to YouTube Video Builder, your own YouTube Channel, your brand logo, and high-definition photos of your product(s).
Richard Bennett
Richard Bennett is a writer and a lover of all things video.
Follow @Richard Bennett
Richard Bennett
Mar 27, 2024• Proven solutions
Many people find it challenging to create compelling video advertisements for their brand promotions. While some of the creative tools might be expensive, the easy ones have a steep learning curve, and engaging a professional designer wouldn’t be something you might be ready for. YouTube Video Builder is a great solution for any such situation.
With that being said, the following sections talk about what YouTube Video Builder is, how is it useful, what advantages does it offer, and how can you create professional video adverts using the tool.
- Part 1: What Is YouTube Video Builder?
- Part 2: How Does YouTube Video Builder Work?
- Part 3: How to Get YouTube Video Builder?
- Part 4: How to Make Video Ads for Free with YouTube Video Builder?
- Part 5: Tips for Making Good Video Ads with YouTube Video Builder
Part 1: What Is YouTube Video Builder?
YouTube recently came up with an online tool, YouTube Video Builder, that, as the name suggests, enables you as an organization to prepare videos for free. These videos could be anywhere from 6 to 15 seconds long and are most appropriate for advertisements. Once created, the films can be used in the campaigns to promote your brand and/or products online.
However, you must keep the following few things handy before starting with YouTube Video Builder to prepare a video advertisement:
- Logo
You must have a good-quality photo of your brand logo that you want to add to the video as a watermark. This gives your organization online recognition.
- HD Images
At the time of this writing, YouTube Video Builder only allows you to add still images. The tool compiles these photos using a theme that you select, and enables you to add background music to make the advert more engaging. Therefore, it is imperative to have high-definition images of your product(s) that you want to create a promotional video for.
- Google Chrome Browser
You must have the latest version of the Google Chrome web browser installed on your computer.
- YouTube Channel
Because YouTube Video Builder will publish your video advertisements on YouTube itself, you must have your own YouTube Channel created , configured, and properly functioning so the posting process remains smooth and seamless.
- Availability of the Tool and Features
YouTube Video Builder is still in the Beta phase, and therefore you may not have access to all the features that the tool has to offer. However, this majorly depends on the region of your residence. As of now, the utility is not even available in some countries of the world.
Part 2: How Does YouTube Video Builder Work?
As explained earlier, YouTube Video Builder is an online tool that works on the latest version of the Google Chrome browser. The web interface of the utility has separate blocks (or placeholders if you want to call them) for different types of images. For instance, there is a placeholder for your logo, and a couple of other blank slots where you can import the photos from your computer.
There are some text input fields that you can populate with the relevant information such as the name of the video, the product’s name that you wish to promote, and many other things. There is a storyboard at the bottom of the interface that helps give your video a theme and the alignment of the ingredients that you have imported from your computer.
Finally, you can add background music to the video from the royalty-free tracks that can be accessed from the built-in library, and you are all set to go.
Part 3: How Can I Get YouTube Video Builder?
Because YouTube Video Builder is in its Beta phase, at the time of this writing you are required to send an access request to Google using your account that you want to use to create the videos from. You can send your requests to: https://services.google.com/fb/forms/videobuilderbeta/ .
Once your request is approved, you can then use the same Google account to sign in to the YouTube Video Builder portal, and start preparing your video advertisements. Here, it is important to understand that the Google account that you use to send an access request and prepare the videos must be the same ID that has your active and functional YouTube Channel.
Part 4: How to Make Video Ads for Free with YouTube Video Builder?
Once you have access to the Beta version of YouTube Video Builder, you can start creating the video ads for free. You can learn the process of how this can be done by following the simple instructions given below:
Step 1: Prepare a Console
After signing in to your YouTube Video Builder account, on the main interface, click Select Layout from the navigation bar at the right if not already selected, pick a layout that best suits your needs, and click Use Layout.
Next, from the Color & Logo section, choose the base (background) and text colors using their corresponding tools from under the Brand colors section.
![]()
After this, insert an image of your brand logo in the block under the Logos category.
![]()
Step 2: Add the Ingredients
When you are on the Images & Text section of the navigation bar, pick the high-definition photos from the Storyboard at the bottom, and add them to the Image 1, Image 2, and Image 3 boxes accordingly.
Now, scroll down to the Text section, and add the relevant content in the available text input fields. Make sure to add a compelling Call to action text to give the viewers a free passage to connect with you.
Step 3: Make Cosmetic Manipulations
From the Pick a Font section of the navigation bar, click the Google Fonts catalog link to search for a unique font, and once found, type its name in the available field to use that font.
Alternatively, you can leave the default one selected. When on the Select Music section, choose your preferred background music from the drop-down list that is present under the section.
Finally, click Create video, and wait while YouTube Video Builder takes you to the Preview, Save, Share section, and generates your video.
Step 4: Save the Video and Begin Promotion
After the video is generated, play to preview the film. If everything looks good, click Save video.
On the next page, click Copy to copy the video link, and share it with your friends, colleagues, and family members for their feedback.
Next, scroll down to get to the Create Campaign section of the navigation bar, and from the left screen, click Create campaign to begin a campaign to promote your brand and/or product(s).
Part 5: Tips for Making Good Video Ads with YouTube Video Builder
The whole point here is to prepare your video adverts with the least investment and almost no effort. The following few tips would help you achieve this with ease:
- Make sure to gather all the ingredients such as the photos of the products, brand logo, etc. before starting with the video creation process
- Set a layout, font, theme color, and background music that compliments the product(s) you wish to promote
- Remain consistent with the theme color, fonts, etc. throughout the video
- Make sure to include a catchy ‘Call for action’ text in your video ad
- Make as many modifications as you want before publishing the ad on your YouTube Channel. Avoid doing any amendments after the ad has been posted
- Share the link of your video with as many people as you possibly can to make your product(s) and brand visible and popular
- Make sure to use the ad in your campaigns to make people aware of your brand/product(s)
Conclusion
The bitter truth is, producing videos, especially for brand promotions requires expert creators, expensive tools, and a good amount of work experience. Although all these can be managed if you have some spare funds, YouTube Video Builder helps you create advertising videos of up to 15 seconds with ease and for free. All you need is access to YouTube Video Builder, your own YouTube Channel, your brand logo, and high-definition photos of your product(s).
Richard Bennett
Richard Bennett is a writer and a lover of all things video.
Follow @Richard Bennett
Also read:
- Diving Into the World of Youtubers Starting Your Channel, Earning Cash
- Discovering the Best 10 YouTube Channels for Current Affairs for 2024
- In 2024, Clearing Up Confusion Addressing YouTube Short Concerns
- Mastering the Art of Creating Top-Quality Edu-Videos for Learning Platforms
- Beware The Risk in Fake Followers on YouTube for 2024
- In 2024, Boredom's Ender The Ultimate List of Jovial YouTube Content
- Coordinating Multiple Channels on One Screen
- Navigating Day-to-Day Streams Key Do's & Don'ts
- [New] Command the Stage of YouTube with Studio Skills
- In 2024, Becoming a Wealthy Beauty Channel Host
- Essential Guide Top 10 Steps for Instructors on YouTube Channels for 2024
- 2024 Approved Capturing Cultures A Step-by-Step Guide for Aspiring Travel Vloggers
- 2024 Approved Control YouTube Audio Mobile/Desktop Approach
- [Updated] Enhance Visibility 11 Must-Know YouTube Video SEO Tactics
- [Updated] End-Screen Essentials for Social Media Success on YouTube
- [Updated] Best of Breed Top-Rated Youtuber's Streaming Arsenal
- Seamlessly Incorporating YT Clips in Slideshows via PPT
- YouTube Ultimates Subscribers Leaderboard
- [New] Best Alternative to YouTube IOS & Android's 10 Leading Video Sites
- [Updated] Boosting Bank Balance Crafting Commercial Video Content
- In 2024, Elevate Narrative Flow Expert Tips on Using Jump Cuts
- Avoiding Pitfalls Smart Strategies for Acquiring Youtubes for 2024
- In 2024, Download YouTube Beats on Android The Ultimate 6-App Guide
- Scaling YouTube Earnings Device-Independent Studio Tactics
- 2024 Approved Aligning Spotify Selections for a Unified YouTube Music Experience
- Download YouTube Videos to MP4 without Breaching Laws
- Epicurean Epiphanies Filming Feast Creation
- The Creator’s Currency How To Turn Streams Into Dollars
- Skyrocketing Your Presence on YouTube with Live Games
- Unified Video Ventures Selecting an MCN
- Enhance Click-Through Rates with Good Thumbnails for 2024
- 2024 Approved Cutting-Edge Computers Optimal Machines for Media Creation
- [Updated] Accelerating or Slowing Down YouTube Videos Playback
- Dance Directives Finding Ideal DJ Templates for 2024
- In 2024, Breakdown of YouTube's Monetization Update
- Cutting-Edge Openings at No Cost The Best YouTube Intro Makers
- Digital Detective Finding and Watching YT Archives for 2024
- [Updated] Essential Strategies for Uploading Video Quality 4K on YouTub
- Discover the Best Top 10 No-Cost Cinema Treasures Online
- Bite-Sized Beginnings Easy Steps to Launch Personal/Business Channels From Phones for 2024
- [New] Capitalizing on Hairstyle Demonstrations
- 2024 Approved Editor's Assistant Top 5 Portable Devices for VFX Artists
- 2024 Approved Avoiding Common Pitfalls in PC-Based YouTube Video Editing
- Do Fake Followers Negatively Affect Your Brand?
- 2024 Approved Elevate Your Brand Explore These 10 Essential YouTube Creators
- Gameplay Recording Must-Haves
- Content Creation Evolution Studio Vs. Innovative Beta
- Zoom Call Management A Step-by-Step Guide for 2024
- How to Sign Out of Apple ID From iPhone 12 Pro Max without Password?
- All You Need To Know About Mega Greninja For Oppo Reno 8T 5G | Dr.fone
- New How to Extract Audio From Videos on Win/Mac/Phone for 2024
- In 2024, Here Are Some Reliable Ways to Get Pokemon Go Friend Codes For Apple iPhone XS | Dr.fone
- [New] 2024 Approved Top 12 Best Tycoon Games Guaranteed to Hook You
- Become a GIF Expert in Snapchat Today
- In 2024, How to Unlock Itel S23 Phone without PIN
- Guide on How To Remove Apple ID From Apple iPhone 12 Pro Max
- 2024 Approved Detailed Analysis and Overview of Du Recorder’s Capabilities
- [New] Transform Ordinary to Outstanding Creating Captivating Square Videos on FB
- How to Transfer Photos From Xiaomi Redmi 12 to Samsung Galaxy S21 Ultra | Dr.fone
- In 2024, Crafting Rings with Scripture-Inspired Melodies Guide
- Cross-Promoting Platforms From Twitter Vids to Insta Audience
- Forgot Pattern Lock? Heres How You Can Unlock Vivo Y100t Pattern Lock Screen
- New In 2024, Top 10 Movie Trailer Apps for iPhones and iPads
- [New] Leveraging TikTok's Potential Cutting-Edge Advertising Strategies for 2024
- Title: A Quick Guide to Purging Watched YouTube Videos
- Author: Brian
- Created at : 2024-05-25 11:17:06
- Updated at : 2024-05-26 11:17:06
- Link: https://youtube-video-recordings.techidaily.com/a-quick-guide-to-purging-watched-youtube-videos/
- License: This work is licensed under CC BY-NC-SA 4.0.
