

"A Filmmaker's Companion The Journey From Capturing to Post-Production of 360 Videos"
A Filmmaker’s Companion: The Journey From Capturing to Post-Production of 360 Videos
360 Video Editors: How to Upload 360 Video to YouTube

Richard Bennett
Mar 27, 2024• Proven solutions
360 degree videos have become incredibly popular on the Internet. Not only do they give people a complete look at a scene, but they also allow for a lot of artistic freedom. Those who are using VR-capable devices can get an even more immersive experience. It is why many content creators want to learn about the best 360 video editor they can use on their computers.
Here is a look at the 5 best 360 video converter and editor programs that you can use on your Windows or Mac computer.
Part 1: 5 Best 360 Video Editor for You
1. Movavi
Movavi is an affordable 360 degree video editor that makes it easy for you to create, edit and share these videos online. You can even add filters, titles and transitions to your videos, while soundtrack addition is also possible.
You can use the preview window in the program to see how your video will look if it is published as is. Plus you can use the software with both Windows and Mac, depending on the version that you download.
Pros:
- Works with all mainstream video formats
- Features support for 4K videos
- Includes color adjustment and picture in picture, even in 360 videos
- Speed adjustment capabilities

2. Premiere Pro
Adobe Premiere Pro CC is seen by many as the leading product that you can get if you want to edit high quality videos, including 360 degree content.
Any type of video format will be compatible. You should have no issues editing different segments of the content that you are creating, as Premiere Pro CC is known for having very efficient workflow screens.
Pros:
- Tools to adjust color, audio and graphics
- Works seamlessly with other Adobe apps
- Possible to create and edit content on the go using smartphones

3. After Effects
If you are attempting to add many unique graphics and transitions to your videos, then you will want to use Adobe After Effects. Most would recommend that be combined with Premiere Pro to get the best experience.
After Effects is ideal for adding introductions, end credits, transitions and other effects to the content that you have produced. You can use it to take the videos that you have created to the next level.
Pros:
- Support for movie titles, introductions, transitions and end credits
- Possible to animate logos and characters
- Works with Adobe Premiere Pro

4. Final Cut Pro X
Mac users who want to use their laptop or desktop to edit 360 videos will be happy to know that it is supported in Final Cut Pro X. It is one of the fastest and most powerful programs to use on a Mac, as it is completely optimized for the operating system and hardware.
It is possible to edit and playback 360 videos using a VR headset. It allows creators to not only put in great videos and edit them, but also see how they look after various adjustments.
Pros:
- Advanced color grading options
- Full HDR and 4K support
- View files with VR headset
- Optimized for Macs
- Includes free trial
Cons:
- Little bit expensive

5. Molanis VR
Molanis VR is ideal for anyone who wants to create 360 video that will look incredible when viewed through VR glasses. It is one of the most flexible software options, as it is inexpensive and includes many great features.
IT is possible to trim, cut and fade, include text and images, add effects and make other changes to videos on the fly. The software is intuitive to use, which is great for beginners who have not edited much in the past.
Pros:
- Support for 4K videos
- Options to add text, images and effects to videos
- Can manage color, correct horizon and stabilize 360 videos
- Includes a tree trial
Cons:
- Not as many tutorials on how to use the software compared to bigger brands

Part 2: How to Upload 360 Degree Videos to YouTube
It is possible to add 360 degree videos onto YouTube . Using YouTube to promote such content is sensible, as it is one of the largest streaming video platforms in the world. These videos can be seen on any of the major browsers and on certain mobile devices. But they must be uploaded from a desktop.
YouTube 360 Video Specification
The first step of the process is to create a video that YouTube will approve as a 360 submission. Such a video should be either 24, 25, 30, 48, 50, or 60 frames per second. Do not go any higher or it will not be approved.
It is also a good idea to have videos that are between 7168x3584 and 8192x4096 in resolution. Any lower and the quality of the video will not be good enough to provide a pleasant viewing experience to the audience.
How to Upload to YouTube
Now that you have your video edited, you are a step closer to uploading it onto YouTube. But there are some steps that you must follow . These include downloading the 360 Video Metadata app on your Mac or Windows device.
Then you will choose the file, check the Spherical box and save it. Make sure that 3D top-bottom is not checked when you save the file. The file should be created in the folder where the original was located. Now you can upload that file to YouTube.
Read More to Get : YouTube Video Dimensions/Size: Guide for Upload Settings
Conclusion
If you want to upload 360 video to YouTube or some other platform, using a 360 video editor is the way to go. The best 360 video converter and editor program will let you take the raw footage that you have shot and turn it into a stunning video that anyone can enjoy.
Richard Bennett
Richard Bennett is a writer and a lover of all things video.
Follow @Richard Bennett
Richard Bennett
Mar 27, 2024• Proven solutions
360 degree videos have become incredibly popular on the Internet. Not only do they give people a complete look at a scene, but they also allow for a lot of artistic freedom. Those who are using VR-capable devices can get an even more immersive experience. It is why many content creators want to learn about the best 360 video editor they can use on their computers.
Here is a look at the 5 best 360 video converter and editor programs that you can use on your Windows or Mac computer.
Part 1: 5 Best 360 Video Editor for You
1. Movavi
Movavi is an affordable 360 degree video editor that makes it easy for you to create, edit and share these videos online. You can even add filters, titles and transitions to your videos, while soundtrack addition is also possible.
You can use the preview window in the program to see how your video will look if it is published as is. Plus you can use the software with both Windows and Mac, depending on the version that you download.
Pros:
- Works with all mainstream video formats
- Features support for 4K videos
- Includes color adjustment and picture in picture, even in 360 videos
- Speed adjustment capabilities
2. Premiere Pro
Adobe Premiere Pro CC is seen by many as the leading product that you can get if you want to edit high quality videos, including 360 degree content.
Any type of video format will be compatible. You should have no issues editing different segments of the content that you are creating, as Premiere Pro CC is known for having very efficient workflow screens.
Pros:
- Tools to adjust color, audio and graphics
- Works seamlessly with other Adobe apps
- Possible to create and edit content on the go using smartphones
3. After Effects
If you are attempting to add many unique graphics and transitions to your videos, then you will want to use Adobe After Effects. Most would recommend that be combined with Premiere Pro to get the best experience.
After Effects is ideal for adding introductions, end credits, transitions and other effects to the content that you have produced. You can use it to take the videos that you have created to the next level.
Pros:
- Support for movie titles, introductions, transitions and end credits
- Possible to animate logos and characters
- Works with Adobe Premiere Pro
4. Final Cut Pro X
Mac users who want to use their laptop or desktop to edit 360 videos will be happy to know that it is supported in Final Cut Pro X. It is one of the fastest and most powerful programs to use on a Mac, as it is completely optimized for the operating system and hardware.
It is possible to edit and playback 360 videos using a VR headset. It allows creators to not only put in great videos and edit them, but also see how they look after various adjustments.
Pros:
- Advanced color grading options
- Full HDR and 4K support
- View files with VR headset
- Optimized for Macs
- Includes free trial
Cons:
- Little bit expensive
5. Molanis VR
Molanis VR is ideal for anyone who wants to create 360 video that will look incredible when viewed through VR glasses. It is one of the most flexible software options, as it is inexpensive and includes many great features.
IT is possible to trim, cut and fade, include text and images, add effects and make other changes to videos on the fly. The software is intuitive to use, which is great for beginners who have not edited much in the past.
Pros:
- Support for 4K videos
- Options to add text, images and effects to videos
- Can manage color, correct horizon and stabilize 360 videos
- Includes a tree trial
Cons:
- Not as many tutorials on how to use the software compared to bigger brands
Part 2: How to Upload 360 Degree Videos to YouTube
It is possible to add 360 degree videos onto YouTube . Using YouTube to promote such content is sensible, as it is one of the largest streaming video platforms in the world. These videos can be seen on any of the major browsers and on certain mobile devices. But they must be uploaded from a desktop.
YouTube 360 Video Specification
The first step of the process is to create a video that YouTube will approve as a 360 submission. Such a video should be either 24, 25, 30, 48, 50, or 60 frames per second. Do not go any higher or it will not be approved.
It is also a good idea to have videos that are between 7168x3584 and 8192x4096 in resolution. Any lower and the quality of the video will not be good enough to provide a pleasant viewing experience to the audience.
How to Upload to YouTube
Now that you have your video edited, you are a step closer to uploading it onto YouTube. But there are some steps that you must follow . These include downloading the 360 Video Metadata app on your Mac or Windows device.
Then you will choose the file, check the Spherical box and save it. Make sure that 3D top-bottom is not checked when you save the file. The file should be created in the folder where the original was located. Now you can upload that file to YouTube.
Read More to Get : YouTube Video Dimensions/Size: Guide for Upload Settings
Conclusion
If you want to upload 360 video to YouTube or some other platform, using a 360 video editor is the way to go. The best 360 video converter and editor program will let you take the raw footage that you have shot and turn it into a stunning video that anyone can enjoy.
Richard Bennett
Richard Bennett is a writer and a lover of all things video.
Follow @Richard Bennett
Digital Converters Showcase: Optimal YTVideo Text Extraction
Have you ever wondered why there is a need to transcribe YouTube videos? Well, let us enlighten you! Turning content from YouTube to text is essential for numerous content creators as it allows them to gain more views. Recent studies have shown that around 33% of the audience watching YouTube videos do not necessarily watch them in English. So, by converting them to text, translation becomes a whole lot easier and subtitles can be generated more efficiently.
In this article, we will explore the procedure through how one can convert a YouTube video to text, and learn about numerous effective online YouTube video to text software.
In this article
01 How to Convert YouTube Video to Texts by Copy/Paste YouTube Transcript
02 Best YouTube Video to Text Converters Online
Part 1: How to Convert YouTube Video to Texts by Copy/Paste YouTube Transcript
When people think “Get the transcript from YouTube” they believe it is going to be a daunting and lengthy procedure. Well, let us tell you that it is certainly not! All you have to do is follow the steps outlined below to transcribe YouTube video to text - that too through the YouTube player itself.
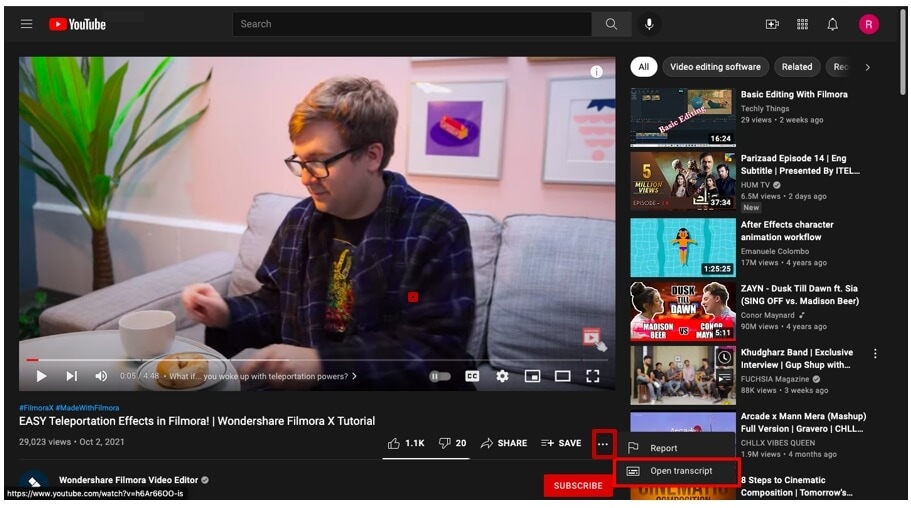
First what you have to do is open YouTube and select any video for which you require the transcript. Once you have selected the video, wait for it to load and then click the three dots located beneath the video, as shown in the image below.
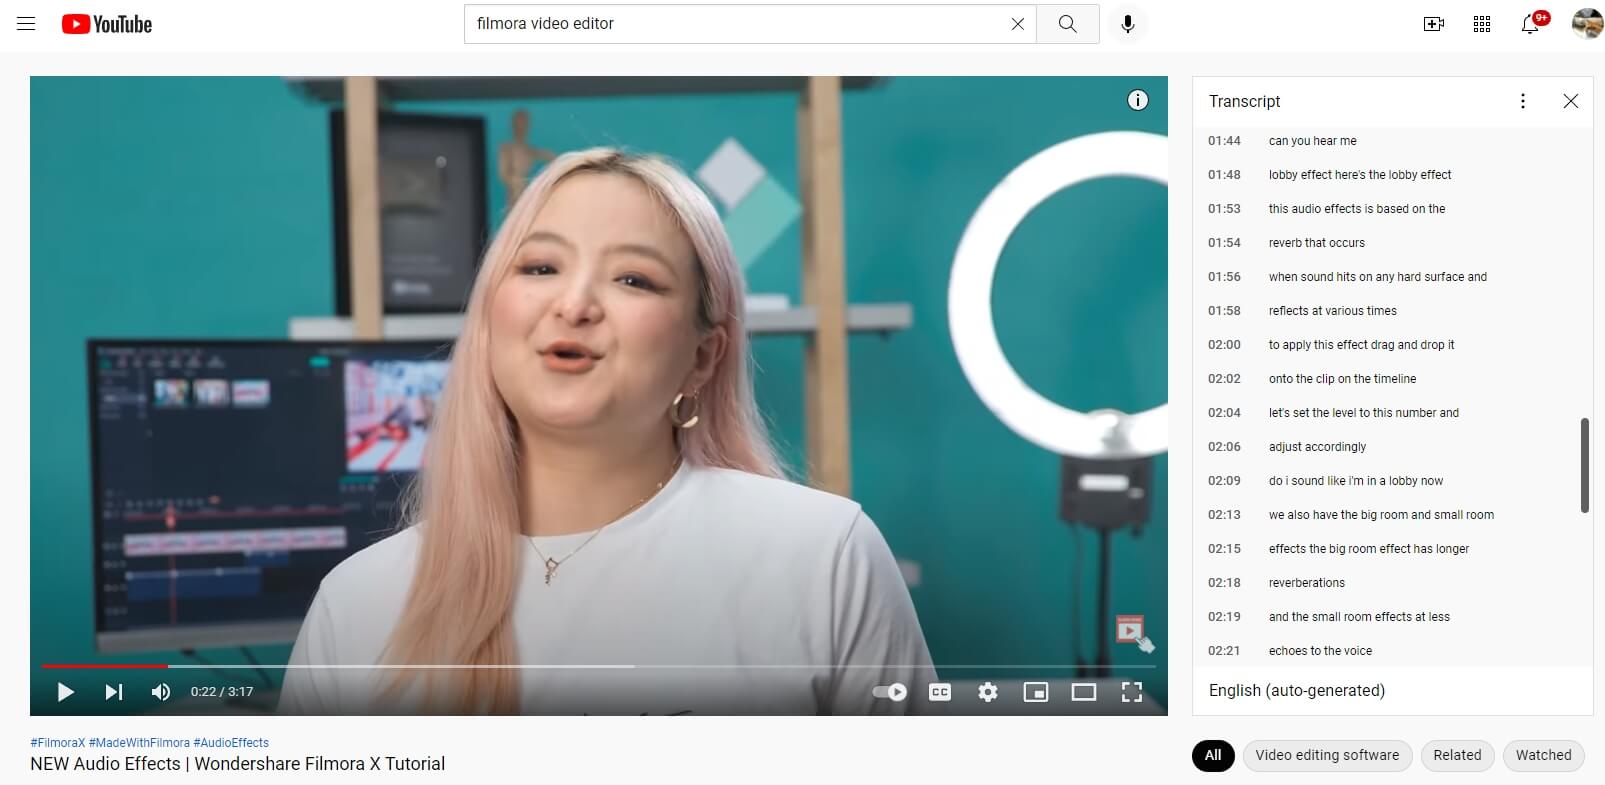
Following that, a menu will appear, just select the “Open Transcript” option and the transcription will open on the top right side of your screen.
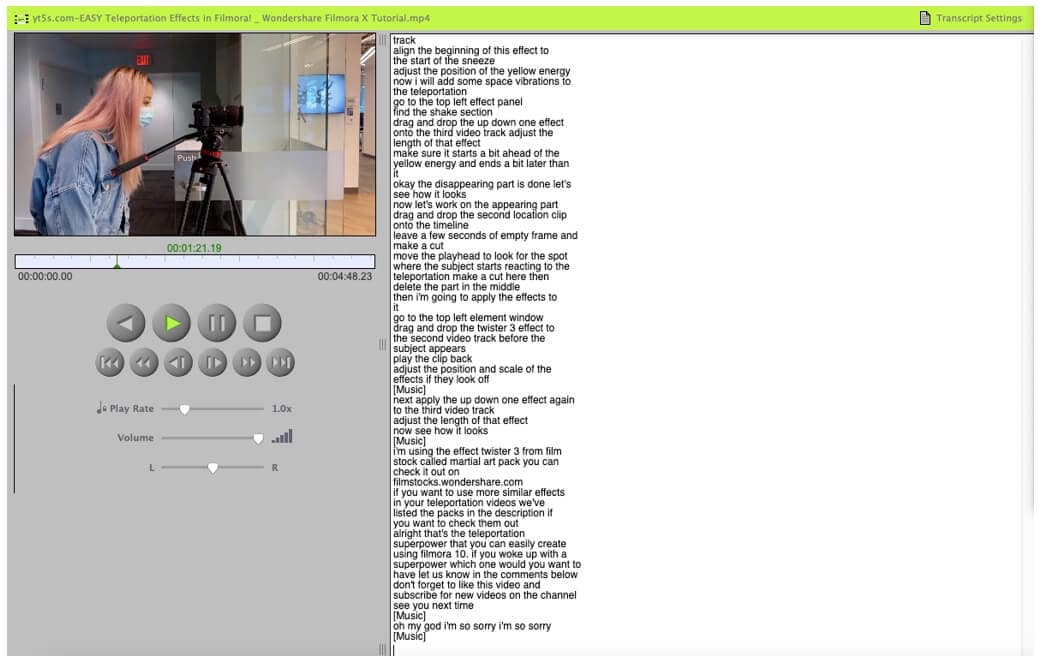
Simply select the entire transcript using your mouse, then copy and paste it into a new Word Document or Google Document. If you don’t need the timestamps, you can click the three-dot icon to toggle timestamps off.

By following the steps outlined above, you can convert a YouTube video to text in less than five seconds!
Part 2: Best YouTube Video to Text Converters Online
Aside from the basic method of getting the transcription from YouTube itself, many individuals make use of effective YouTube video to text converter online free. This allows them to get the complete video into text, small parts of the video to text, as well as options to convert the text into multiple languages. Below are some of the best software to convert YouTube video to text online.
1. Inqscribe
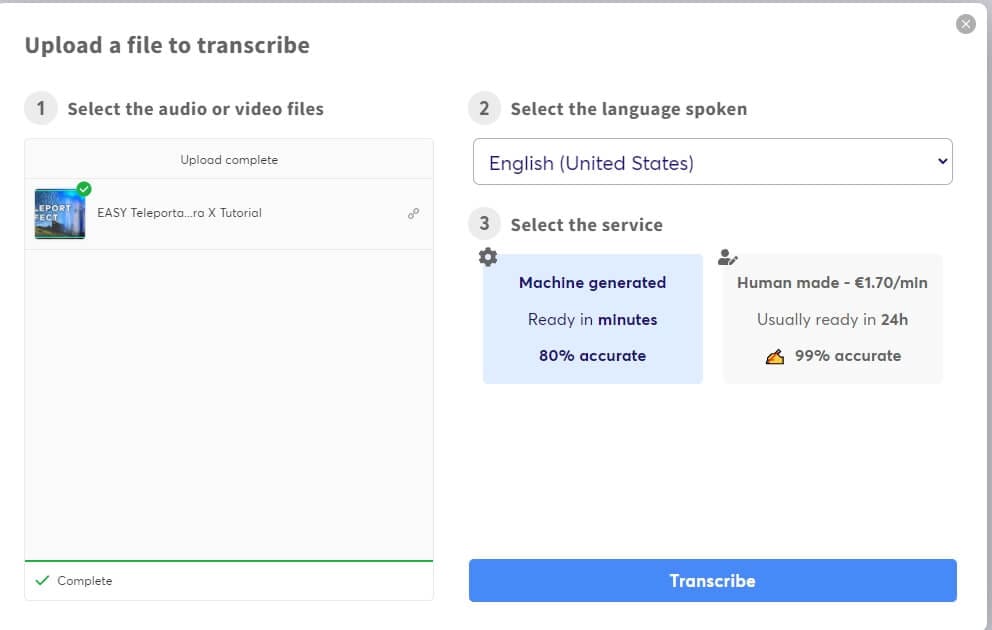
This high-quality cross-platform tool allows users to transcribe audio and video files into text . Whether it is a meeting recording or a YouTube video - you can convert them all to text. Making use of this free online software is extremely easy, all one has to do is just upload their file and click the process. Then the system will automatically transcribe the video into a text document for you. The software is uni code so all file formats are supported such as txt, XML, HTML, WebVTT, and more. The only drawback of this online software is that video files that are larger than a certain limit cannot be accepted.
2. Sonix
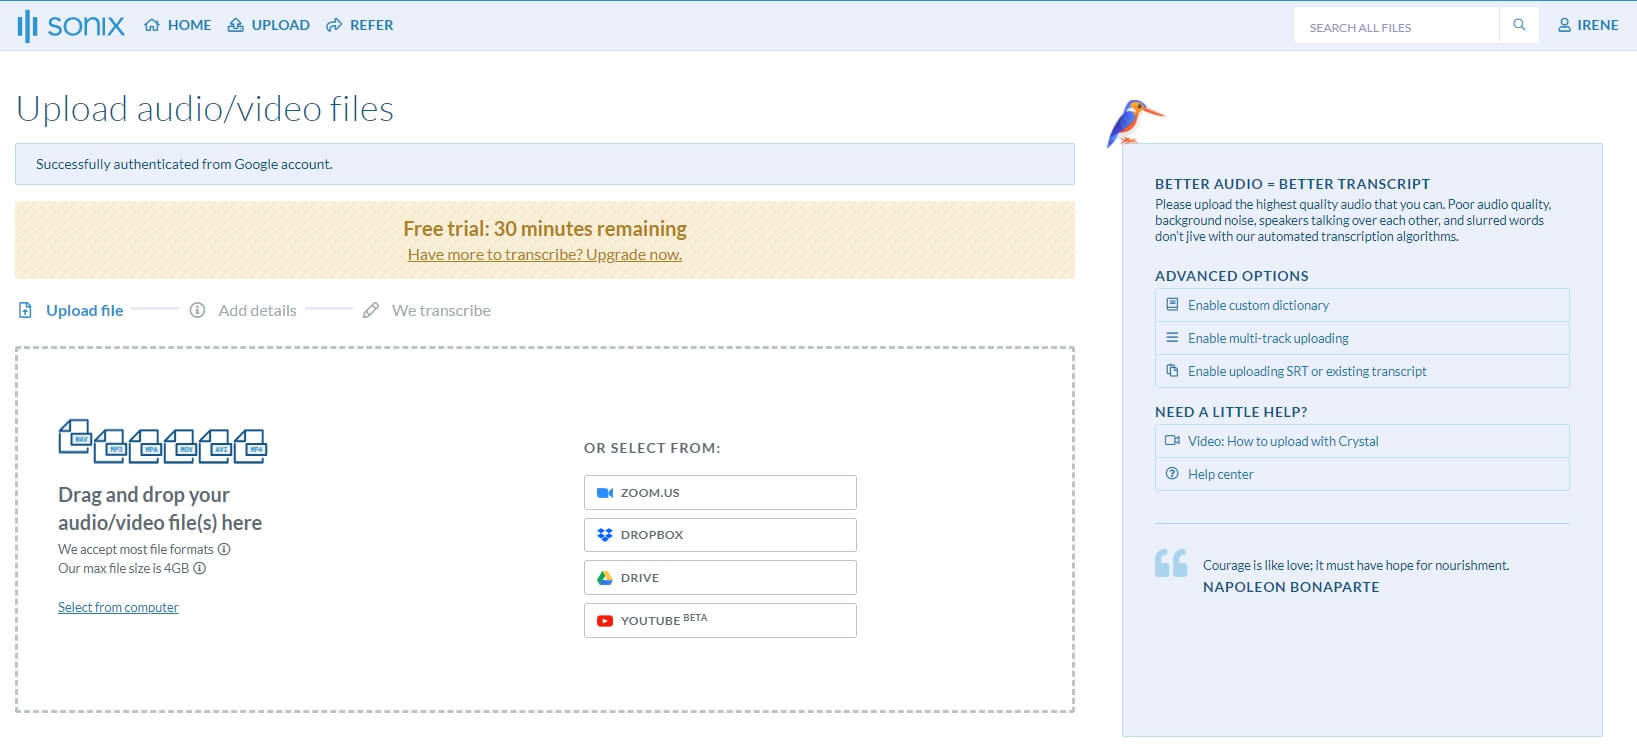
For individuals who have premium quality audio transcription, a tool by the name of Sonix is the right choice for you. This tool enables users to turn all types of YouTube videos into text. All they have to do is simply download the YouTube video they need to transcribe and then upload it to the online interface. From there, this software uses its comprehensive text reader to convert the video to text. This platform supports more than 40 different language choice inputs and outputs. Users are allowed to transcribe up to five videos for free, then they must pay a subscription fee.
3. Otter
This video-to-text converter works best in real-time. Simply play the audio of a YouTube video and let Otter do its magic. In real-time it will convert audio into text. Moreover, if you would like to only convert some parts of the audio to text, that is possible with this tool as well.
All you need to do is play the audio accordingly and the text will automatically generate itself. The AVI (Ambient Voice Intelligence) of this tool allows it to accurately understand what the audio is saying to transcribe the video. While many do find this tool handy, learning how to use it can be a tiny bit tedious and confusing.
Note: Currently, Otter doesn’t support uploading YouTube video link, you may need to download the YouTube video first and then upload it from desktop.
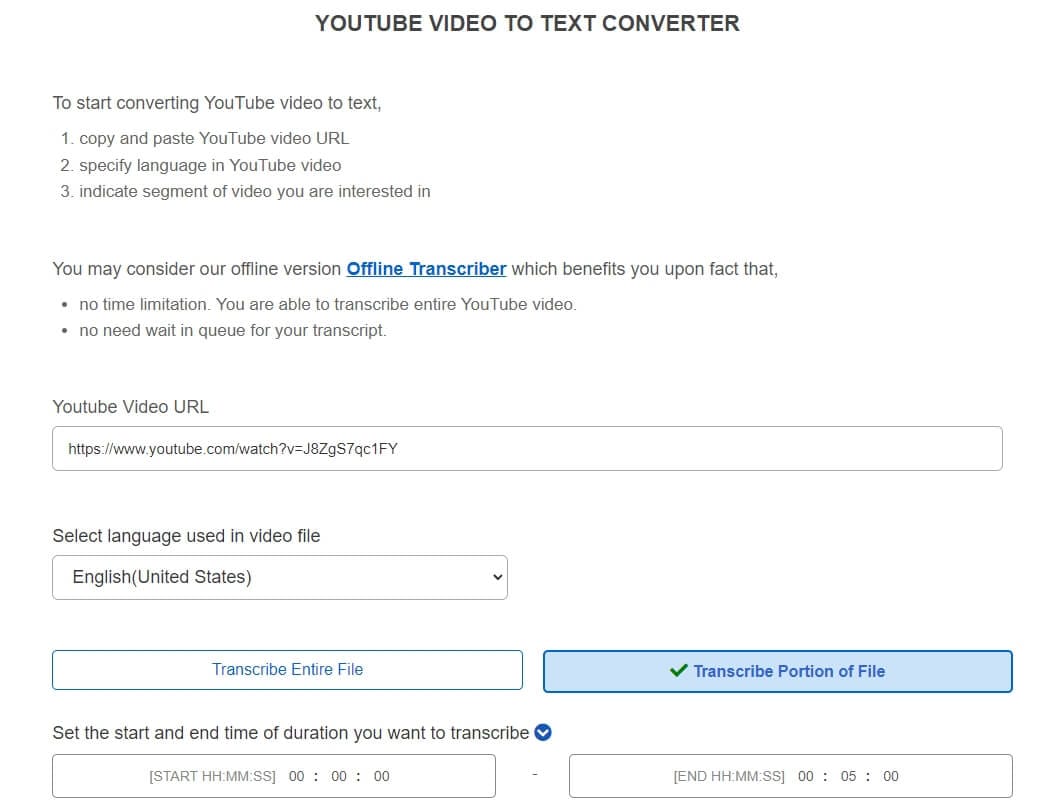
4. oTranscribe
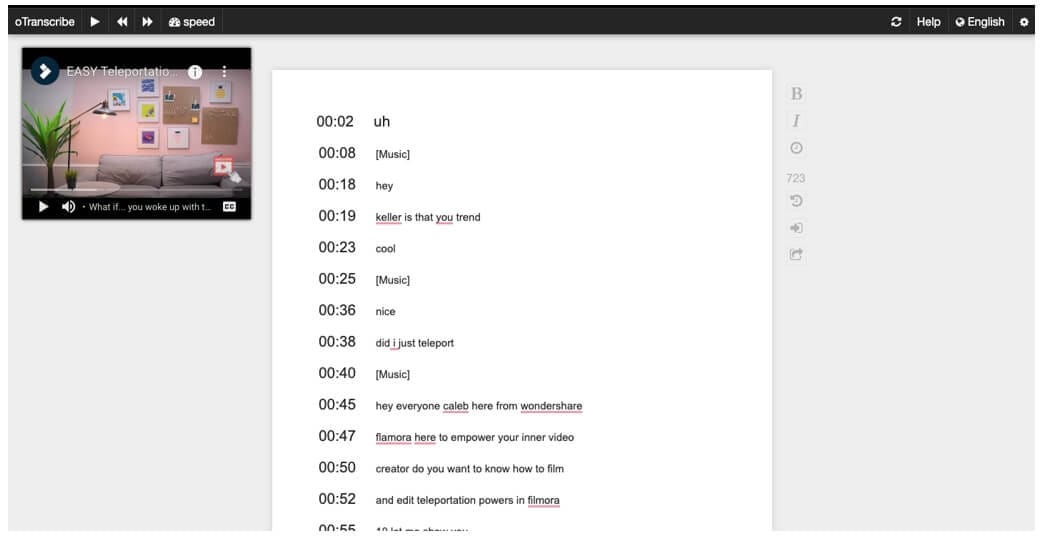
This online transcription tool is extremely easy and convenient to use - and it is entirely free! All you need to do is head on over to its homepage and drop a link to the YouTube video that you would like to transcribe. Then from there, you can access the video and text all at the same time, without having to switch between videos.
The best part is that you can record and translate text according to your need, cut and miss parts that you do not require. This tool supports all file formats which just adds to convince. The only challenge is that it will only accept videos and translate them into English.
5. Go Transcribe
If you are looking to convert any sort of video format to text, then Go Transcribe might just be the tool that you require. This tool makes use of the latest voice technology to convert videos to text - and gives you the output in the form of an SRT, PDF, or DOC, which are all editable. All you need to do is upload the video in one of the formats below,
- 3PG
- FLV
- AVI
- MOV
- MPG
- MPEG
Then simply click the processing options and your video will be generated into a text file within minutes. However, this software may require a subscription fee.
files. Moreover, the output format is PDF which individuals cannot edit unless they convert the PDF to a TXT file online using different software.
6. Trint
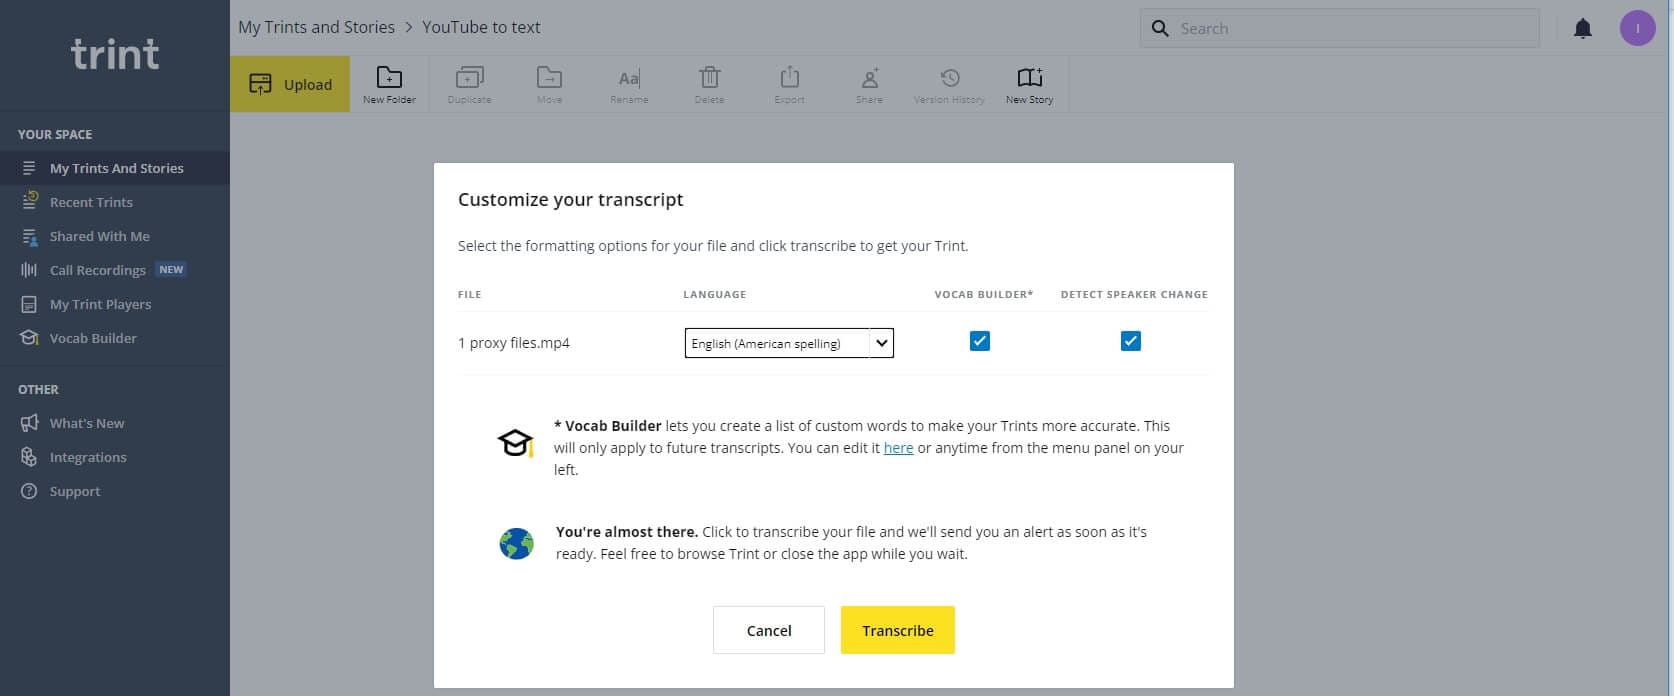
Turn your speech to text through magic - or in other words, through state-of-the-art technology. Trint is an online transcription tool that allows individuals to turn video files into text. People can download and upload numerous video files at once and turn them into text documents.
This is an extremely handy tool to have considering it comes with numerous options such as editing the text, only inducing certain parts of the video in the text, and so much more. This tool only has one shortcoming, it only accepts English language videos.
7. Happy Scribe
If you are wondering how, you will convert YouTube video to text, then we have just the answer for you. Make use of Happy Scribe to automatically transcribe all sorts of audio and video into comprehensive and readable text. You can get numerous features and options in this tool such as advanced grammatical functions as well as timestamps.
If your videos are in different languages, do not worry because Happy Scribe has more than 60 language formats. However, to make use of added features, individuals will need to pay for the tool and upgrade to the pro version.
8. 360Converter
360Converter, as its name suggests is a video to text converter which individuals can use online and offline. All you need to do is download and then upload the YouTube video that you would like to transcribe and the tool will automatically generate the text for you. The supported video formats include 3GP, MP4, MOV, AVI, and many more. This tool uses advanced technology to get accurate language and grammatical transcriptions, so everything is word to word - the exact same as the video. While this tool is extremely user-friendly, many state that it takes a while to process videos to text.
Key Takeaways!
Technology has come a long way which is why we now have numerous options available online to help us convert YouTube videos to text in less than 5-10 minutes. All you have to do is upload the file and let the tool do its magic! You can transcribe in different languages, segments, and so much more now!
Transform Long Videos into Short Ones Instantly
Turn long videos into viral clips. Effortlessly transform lengthy videos into engaging, shareable clips.

02 Best YouTube Video to Text Converters Online
Part 1: How to Convert YouTube Video to Texts by Copy/Paste YouTube Transcript
When people think “Get the transcript from YouTube” they believe it is going to be a daunting and lengthy procedure. Well, let us tell you that it is certainly not! All you have to do is follow the steps outlined below to transcribe YouTube video to text - that too through the YouTube player itself.
First what you have to do is open YouTube and select any video for which you require the transcript. Once you have selected the video, wait for it to load and then click the three dots located beneath the video, as shown in the image below.
Following that, a menu will appear, just select the “Open Transcript” option and the transcription will open on the top right side of your screen.
Simply select the entire transcript using your mouse, then copy and paste it into a new Word Document or Google Document. If you don’t need the timestamps, you can click the three-dot icon to toggle timestamps off.
By following the steps outlined above, you can convert a YouTube video to text in less than five seconds!
Part 2: Best YouTube Video to Text Converters Online
Aside from the basic method of getting the transcription from YouTube itself, many individuals make use of effective YouTube video to text converter online free. This allows them to get the complete video into text, small parts of the video to text, as well as options to convert the text into multiple languages. Below are some of the best software to convert YouTube video to text online.
1. Inqscribe
This high-quality cross-platform tool allows users to transcribe audio and video files into text . Whether it is a meeting recording or a YouTube video - you can convert them all to text. Making use of this free online software is extremely easy, all one has to do is just upload their file and click the process. Then the system will automatically transcribe the video into a text document for you. The software is uni code so all file formats are supported such as txt, XML, HTML, WebVTT, and more. The only drawback of this online software is that video files that are larger than a certain limit cannot be accepted.
2. Sonix
For individuals who have premium quality audio transcription, a tool by the name of Sonix is the right choice for you. This tool enables users to turn all types of YouTube videos into text. All they have to do is simply download the YouTube video they need to transcribe and then upload it to the online interface. From there, this software uses its comprehensive text reader to convert the video to text. This platform supports more than 40 different language choice inputs and outputs. Users are allowed to transcribe up to five videos for free, then they must pay a subscription fee.
3. Otter
This video-to-text converter works best in real-time. Simply play the audio of a YouTube video and let Otter do its magic. In real-time it will convert audio into text. Moreover, if you would like to only convert some parts of the audio to text, that is possible with this tool as well.
All you need to do is play the audio accordingly and the text will automatically generate itself. The AVI (Ambient Voice Intelligence) of this tool allows it to accurately understand what the audio is saying to transcribe the video. While many do find this tool handy, learning how to use it can be a tiny bit tedious and confusing.
Note: Currently, Otter doesn’t support uploading YouTube video link, you may need to download the YouTube video first and then upload it from desktop.
4. oTranscribe
This online transcription tool is extremely easy and convenient to use - and it is entirely free! All you need to do is head on over to its homepage and drop a link to the YouTube video that you would like to transcribe. Then from there, you can access the video and text all at the same time, without having to switch between videos.
The best part is that you can record and translate text according to your need, cut and miss parts that you do not require. This tool supports all file formats which just adds to convince. The only challenge is that it will only accept videos and translate them into English.
5. Go Transcribe
If you are looking to convert any sort of video format to text, then Go Transcribe might just be the tool that you require. This tool makes use of the latest voice technology to convert videos to text - and gives you the output in the form of an SRT, PDF, or DOC, which are all editable. All you need to do is upload the video in one of the formats below,
- 3PG
- FLV
- AVI
- MOV
- MPG
- MPEG
Then simply click the processing options and your video will be generated into a text file within minutes. However, this software may require a subscription fee.
files. Moreover, the output format is PDF which individuals cannot edit unless they convert the PDF to a TXT file online using different software.
6. Trint
Turn your speech to text through magic - or in other words, through state-of-the-art technology. Trint is an online transcription tool that allows individuals to turn video files into text. People can download and upload numerous video files at once and turn them into text documents.
This is an extremely handy tool to have considering it comes with numerous options such as editing the text, only inducing certain parts of the video in the text, and so much more. This tool only has one shortcoming, it only accepts English language videos.
7. Happy Scribe
If you are wondering how, you will convert YouTube video to text, then we have just the answer for you. Make use of Happy Scribe to automatically transcribe all sorts of audio and video into comprehensive and readable text. You can get numerous features and options in this tool such as advanced grammatical functions as well as timestamps.
If your videos are in different languages, do not worry because Happy Scribe has more than 60 language formats. However, to make use of added features, individuals will need to pay for the tool and upgrade to the pro version.
8. 360Converter
360Converter, as its name suggests is a video to text converter which individuals can use online and offline. All you need to do is download and then upload the YouTube video that you would like to transcribe and the tool will automatically generate the text for you. The supported video formats include 3GP, MP4, MOV, AVI, and many more. This tool uses advanced technology to get accurate language and grammatical transcriptions, so everything is word to word - the exact same as the video. While this tool is extremely user-friendly, many state that it takes a while to process videos to text.
Key Takeaways!
Technology has come a long way which is why we now have numerous options available online to help us convert YouTube videos to text in less than 5-10 minutes. All you have to do is upload the file and let the tool do its magic! You can transcribe in different languages, segments, and so much more now!
Transform Long Videos into Short Ones Instantly
Turn long videos into viral clips. Effortlessly transform lengthy videos into engaging, shareable clips.
Also read:
- [Updated] Cinematic Dialogue Assembler
- Transforming Ideas Into Viral Video Hits on YouTube
- Empowering Your Business Communication Google Meet to YouTube Steps for 2024
- Maximizing Traffic with Effective YouTube Titles
- [New] Comedy Classics A Curated 15-Channel Collection for Humor
- Digital Artisans Gathering Haven for 2024
- Achieving Financial Gain Through YouTube Videos for 2024
- 2024 Approved Broadcast Easily 3 Steps to Post MP3 on YouTube
- [Updated] Elevating Video Quality Tips for Breathtaking Unboxing Experiences
- In 2024, Captivate Audiences Techniques for Livestreaming Video in Spherical Views on YouTube
- [New] Breakneck Broadcast Channel Your YouTube List
- [Updated] Cutting-Edge Guide to YouTube Video Distribution via Facebook
- In 2024, Deconstructing the Revenue Stream of TSeries in YouTube Economy
- [New] Deciphering Ad Revenue and Affiliate Opportunities on YouTube
- [New] Earth's Highest-Paid Online Video Personality
- Discovering 2023'S Cinematic Hidden Gems
- In 2024, Beyond YouTube IPhone/Android's Best Viewing App Options
- [Updated] Essential List of Free Rippers For Video Conversion
- 2024 Approved Building Awesome Channel Art for Your YouTube Presence
- Optimizing Audience Retention Through Engaging Shorts
- 2024 Approved Crafting Engaging Content with Google Trends Analytics
- [Updated] In 2024, Eye on the Social Scene Top Tweets of 2023
- [Updated] In 2024, Cross-Device IPTV Broadcasting
- Navigating Through Non-GoPro Cam Options A Guide
- How to Bypass Google FRP Lock from Itel S23+ Devices
- Discovering Dazzling Images A Guide to Pexels Mastery
- Updated In 2024, Harmonizing Music and Imagery Best AE Lyric Video Blueprints
- In 2024, Activate Windows 11'S Automatic High Dynamic Range (Auto HDR)
- [New] 2024 Approved Viral Visionaries Top 10 TikTok Secrets
- In 2024, This Is a Recommendation About Bandicut. If You Are Confused, Please Check It Out
- [Updated] The Complete Guide to Prevent and Repair FB Video Issues for 2024
- Possible solutions to restore deleted videos from Storm 5G
- [Updated] Chuckle-Champions Twitter’s Comedy Corner for 2024
- Title: "A Filmmaker's Companion The Journey From Capturing to Post-Production of 360 Videos"
- Author: Brian
- Created at : 2024-06-09 08:54:53
- Updated at : 2024-06-10 08:54:53
- Link: https://youtube-video-recordings.techidaily.com/a-filmmakers-companion-the-journey-from-capturing-to-post-production-of-360-videos/
- License: This work is licensed under CC BY-NC-SA 4.0.
