
:max_bytes(150000):strip_icc()/business-3070472_1920-5b9c0a4fc9e77c0050a5ab9a.jpg)
A Filmmaker's Approach to YouTube Splitscreen Videos for 2024
A Filmmaker’s Approach to YouTube Splitscreen Videos
How to Make a Creative Split-screen Video for YouTube?

Liza Brown
Oct 26, 2023• Proven solutions
If we talk about post-production techniques and visual effects, then Split Screen has to be one of the smartest picks. After all, it lets us narrate our story via two (or more) screens and gives our audience a superior viewing experience. Though, a lot of users find it hard to implement the split-screen effect on YouTube videos. Here, I will let you know how to come up with all kinds of YouTube split-screen videos by using a professional video editor.
Part 1: The Diverse Applications of Split-screen Videos
Before we discuss how to work on YouTube split-screen videos, let’s quickly consider some major applications of this video effect.
One of the most popular applications of split-screen videos is for comparing two or more instances or perspectives in the same frame. For example, you might wish to depict the lifestyle of two people from different parts of the world or simply compare the effect of various seasons in a single video.

Videos are the best visual storytelling tools and just like any story, they can also have different perspectives. Ideally, the split-screen effect would be one of the best ways to show your audience all kinds of perspectives that can take place in your story.
One of the best examples was depicted in the movie “500 Days of Summer” in which we got several Expectations vs. Reality shots. These split-screen shots depicted the two major perspectives of the story in a single frame.

Have you ever wondered how filmmakers create a clone of a person in movies? To do that, we make the protagonist record both the scenes in front of the same background. Later, we implement a split-screen effect in which both the clips are combined in such a way that it makes the audience believe as if the scene has both, the character and their clone placed flawlessly.

Watch Video! Use Split-Screen for Your YouTube Videos
Part 2: How to Make Creative YouTube Split-screen Videos with Wondershare Filmora ?
If you want to come up with professional YouTube split-screen videos, then consider using a resourceful tool like Wondershare Filmora. Recently, the company has launched Wondershare Filmora for Mac V10.2 with an upgraded set of newly-added split-screen templates . Therefore, you can simply use the wide range of split-screen templates in Filmora and drag-and-drop your videos to implement the effect.
- Wondershare Filmora has recently added an extensive range of split-screen templates that you can instantly use and customize to meet your requirements.
- Apart from YouTube split-screen templates, you can also find options for other social platforms such as Instagram, Facebook, TikTok, etc.
- Without undergoing any technical hassle, you can just drag and drop your videos to the split-screen template and further make the needed changes.
- There are also dedicated options to edit the split-screen video, apply color correction, and even implement different stunning animated effects.
- Besides that, you can use Filmora to access numerous other editing options like motion tracking, keyframing, audio ducking, auto reframing, action cam editing, and more.


Creating or editing YouTube split-screen videos in Wondershare Filmora is extremely easy and can be done in the following way:
Step 1: Import the Videos You Want to Edit to Wondershare Filmora
Before you edit your YouTube split-screen video, you need to import clips to the application. To do this, just launch Wondershare Filmora on your system and click on the “Import” button to load your videos. You can also go to its Menu > File > Import Media to do the same.

Step 2: Select the Split-screen Template and Add Your Videos
Great! Once you have loaded the interface of Filmora, you can locate a “Split Screen” section from the top. Just click on it to browse a wide range of split-screen video templates for YouTube to include two, three, or more clips. You can just double-click any template to get its preview and drag-and-drop it to the timeline to start working on it.

If you want, you can take the playhead and drag the pointer to adjust the length of the split-screen template on the timeline. To add your clips, just double-click on the split-screen template and click on the drop icon from the preview window. Now, click on the source clip to add it to the template and adjust its position to get the desired effects.

Step 3: Edit Your YouTube Split-screen Video
Following the same drill, you can include multiple clips to the YouTube split-screen template. You can further go to its editing features and explore the “Video” tab to scale, reposition, or rotate your clips. There are also options to add borders in the split-screen effect to separate the clips distinctively in the video.

Apart from that, you can also go to the “Color” section to access various color correction features. From here, you can adjust the brightness, temperature, saturation, tint, and other effects in the video.

If you want to make your YouTube split-screen video more appealing, then go to the “Motion” feature. Here, you can easily implement any existing animated template for transitions and other effects.

Besides that, you can also click on the edit icon from the bottom panel of the Preview section to edit your videos separately.

Step 4: Export the YouTube Split-screen Video
That’s it! Once you are done editing the split-screen video, you can export it from Filmora and save it on your Mac. Just click on the Export option and select a location to save the YouTube split-screen video. There are also additional features to save the video in different formats, video resolutions, and frame rates here that you can explore.

There you go! After following this guide, you would be able to come up with all kinds of YouTube split-screen videos on your Mac. Ideally, with the help of a resourceful tool like Wondershare Filmora, working on a split-screen video is an effortless task. Since the tool has numerous split-screen templates for YouTube, you can just select any template, and customize it to create a stunning YouTube split-screen video in minutes.
Liza Brown
Liza Brown is a writer and a lover of all things video.
Follow @Liza Brown
Liza Brown
Oct 26, 2023• Proven solutions
If we talk about post-production techniques and visual effects, then Split Screen has to be one of the smartest picks. After all, it lets us narrate our story via two (or more) screens and gives our audience a superior viewing experience. Though, a lot of users find it hard to implement the split-screen effect on YouTube videos. Here, I will let you know how to come up with all kinds of YouTube split-screen videos by using a professional video editor.
Part 1: The Diverse Applications of Split-screen Videos
Before we discuss how to work on YouTube split-screen videos, let’s quickly consider some major applications of this video effect.
One of the most popular applications of split-screen videos is for comparing two or more instances or perspectives in the same frame. For example, you might wish to depict the lifestyle of two people from different parts of the world or simply compare the effect of various seasons in a single video.
Videos are the best visual storytelling tools and just like any story, they can also have different perspectives. Ideally, the split-screen effect would be one of the best ways to show your audience all kinds of perspectives that can take place in your story.
One of the best examples was depicted in the movie “500 Days of Summer” in which we got several Expectations vs. Reality shots. These split-screen shots depicted the two major perspectives of the story in a single frame.
Have you ever wondered how filmmakers create a clone of a person in movies? To do that, we make the protagonist record both the scenes in front of the same background. Later, we implement a split-screen effect in which both the clips are combined in such a way that it makes the audience believe as if the scene has both, the character and their clone placed flawlessly.
Watch Video! Use Split-Screen for Your YouTube Videos
Part 2: How to Make Creative YouTube Split-screen Videos with Wondershare Filmora ?
If you want to come up with professional YouTube split-screen videos, then consider using a resourceful tool like Wondershare Filmora. Recently, the company has launched Wondershare Filmora for Mac V10.2 with an upgraded set of newly-added split-screen templates . Therefore, you can simply use the wide range of split-screen templates in Filmora and drag-and-drop your videos to implement the effect.
- Wondershare Filmora has recently added an extensive range of split-screen templates that you can instantly use and customize to meet your requirements.
- Apart from YouTube split-screen templates, you can also find options for other social platforms such as Instagram, Facebook, TikTok, etc.
- Without undergoing any technical hassle, you can just drag and drop your videos to the split-screen template and further make the needed changes.
- There are also dedicated options to edit the split-screen video, apply color correction, and even implement different stunning animated effects.
- Besides that, you can use Filmora to access numerous other editing options like motion tracking, keyframing, audio ducking, auto reframing, action cam editing, and more.
Creating or editing YouTube split-screen videos in Wondershare Filmora is extremely easy and can be done in the following way:
Step 1: Import the Videos You Want to Edit to Wondershare Filmora
Before you edit your YouTube split-screen video, you need to import clips to the application. To do this, just launch Wondershare Filmora on your system and click on the “Import” button to load your videos. You can also go to its Menu > File > Import Media to do the same.
Step 2: Select the Split-screen Template and Add Your Videos
Great! Once you have loaded the interface of Filmora, you can locate a “Split Screen” section from the top. Just click on it to browse a wide range of split-screen video templates for YouTube to include two, three, or more clips. You can just double-click any template to get its preview and drag-and-drop it to the timeline to start working on it.
If you want, you can take the playhead and drag the pointer to adjust the length of the split-screen template on the timeline. To add your clips, just double-click on the split-screen template and click on the drop icon from the preview window. Now, click on the source clip to add it to the template and adjust its position to get the desired effects.
Step 3: Edit Your YouTube Split-screen Video
Following the same drill, you can include multiple clips to the YouTube split-screen template. You can further go to its editing features and explore the “Video” tab to scale, reposition, or rotate your clips. There are also options to add borders in the split-screen effect to separate the clips distinctively in the video.
Apart from that, you can also go to the “Color” section to access various color correction features. From here, you can adjust the brightness, temperature, saturation, tint, and other effects in the video.
If you want to make your YouTube split-screen video more appealing, then go to the “Motion” feature. Here, you can easily implement any existing animated template for transitions and other effects.
Besides that, you can also click on the edit icon from the bottom panel of the Preview section to edit your videos separately.
Step 4: Export the YouTube Split-screen Video
That’s it! Once you are done editing the split-screen video, you can export it from Filmora and save it on your Mac. Just click on the Export option and select a location to save the YouTube split-screen video. There are also additional features to save the video in different formats, video resolutions, and frame rates here that you can explore.
There you go! After following this guide, you would be able to come up with all kinds of YouTube split-screen videos on your Mac. Ideally, with the help of a resourceful tool like Wondershare Filmora, working on a split-screen video is an effortless task. Since the tool has numerous split-screen templates for YouTube, you can just select any template, and customize it to create a stunning YouTube split-screen video in minutes.
Liza Brown
Liza Brown is a writer and a lover of all things video.
Follow @Liza Brown
Enhance Youtubes’ Conversations with Emojis
How to Add Emojis on YouTube Comments

Richard Bennett
Mar 27, 2024• Proven solutions
Emojis are a great way to make your videos and comments stand out from the rest. You may also be able to catch the attention of millennials and improve your YouTube and Google ranking. Beginners can use emojis as a great strategy to improve YouTube SEO performance and get ahead of others. Experts suggest using emojis wisely; that is not to overload or spam whole titles or comments with smileys!
Here are some great ways to add YouTube comments emojis:
Part 1: How to Type Emojis in a YouTube Comment on Windows
Here are several ways to type emojis in YouTube comments. Follow the instructions below to write YouTube comments with emojis:
1. Adding Emojis to YouTube Videos on Windows with Keyboard
If you are using Windows 10, then you can use the keyboard shortcut to open the emoji icons. Press Windows + ; (semi-colon) or Windows + . (period) to open the emoji keyboard. And you will see the emojis.
Currently, there are 6 types of emojis you can add on Windows, including smiley faces and animals, people, celebrities and objects, foods and plants, transportation and places, and symbols.
You can then click the emoji that you’d like to add to the YouTube video directly.
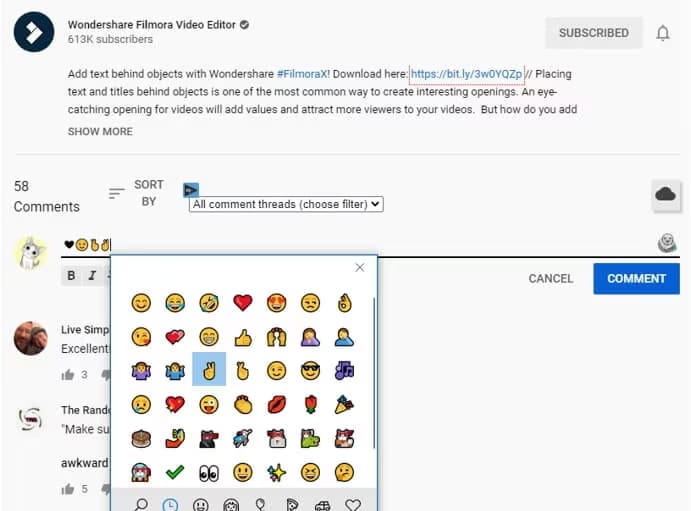
2. Copy and Paste Emojis from Websites
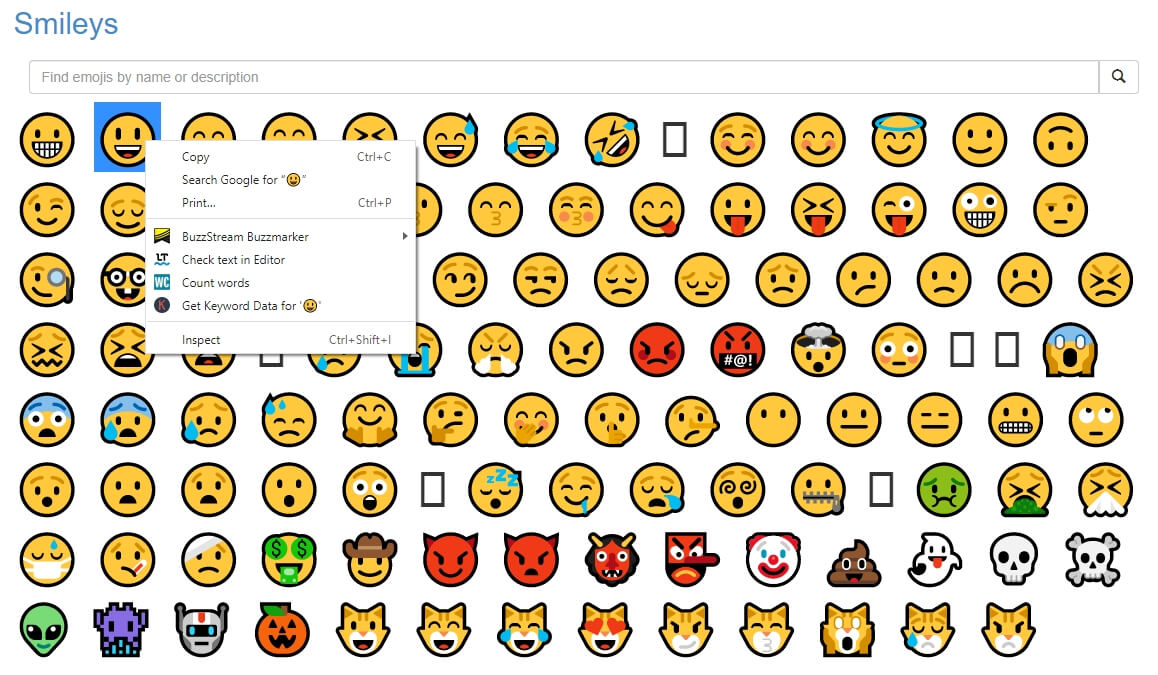
One of the easiest ways to add emojis to YouTube comments is to copy-paste them from an emoji database. You can right-click on the emoji and then select “copy.”
Now, go to your YouTube comment and right-click again. Scroll down and click on “paste” to use the emoji.
Here are some of the best websites to download emojis that you may need. In these websites, you can get a range of smileys and icons to use for your YouTube comments. You can start with smiley faces that help you express many emotions. Then you can get emojis of objects like cars, mountains, drinks, fruits, bells, guitars, and more.
The list is just endless, and you will never face any shortage of emojis.
Part 2: How to Add Emojis to YouTube Comments on Mac?
Mac users enjoy a wide selection of emojis without any hassles and can easily add emojis to comments they type on YouTube. Just follow the steps below to add emoji to YouTube comments.
You can select any emoji from the emoji resources website and ctrl-click your mouse to copy it. Now, navigate to your YouTube comment and ctrl-click your mouse. Click on “paste” to add the smiley to your comments.
If you want to use your keyboard, select the emoji and press “Command” and “C.” Now, press “Command” and “V” to paste the emoji in your YouTube comment.
Your emoji is now added to your YouTube comments.
You can also use your Mac’s inbuilt emojis in your YouTube comments. Start typing your YouTube comment and then use your keyboard shortcut Command + Control + Space to access the emoji list.
You can now double-click on any emoji to include it in your comment. The free emoji lists are full of smileys, animal faces, everyday objects and things, sports emojis, vehicles, and more. and more. You will find an emoji to suit every comment you type on YouTube.
If your Mac has a Touch Bar, then you can tap the smile face and then tap an emoji to add to YouTube video comments.
YouTuber Javier Mercedes has made a quick tutorial and introduced many more ways to typing emojis on Mac. Check it below and find the best way based on your preferences.
Part 3: How to Add Emoji to YouTube Comments with TubeBuddy?
TubeBuddy is a suite of tools for YouTubers to grow their success. You can access a range of tools, including YouTube comments emojis to improve your visual appeal. It is a free browser extension that you can add to Chrome, Opera, Firefox, and more.
TubeBuddy provides a large collection of emojis and smileys for you to use in your YouTube comments. Additionally, you don’t need to copy-paste anything. The plugin lets you insert emojis from a list with a click. Here are the steps to add emojis to YouTube comments using TubeBuddy:
Step 1: Install TubeBuddy
Visit the TubeBuddy website and install the plugin for your browser. TubeBuddy is available on both Chrome, FireFox, Opera, and Edge, as well as iOS and Android devices.
Step 2: Sign in to YouTube
Sign in to your YouTube account to allow TubeBuddy access to your comments. You will find the TubeBuddy icon beside the YouTube search bar on your browser.
Step 3: Add Emojis at Commenting
A window with a list of emojis will appear on YouTube as you type your comments. You can select any emoji and add it to your comments.
Types of Emojis in TubeBuddy
TubeBuddy is home to a large collection of emojis. You won’t find many emojis anywhere else on the internet. All emojis are grouped under categories like smileys, places, food and drinks, buildings, and more.
You can quickly select a category and then add emoji to YouTube comments. The tool also adds new emojis daily.
Bonus: How to Add Emojis to YouTube Video Title and Description?
You can add cool emojis to your video titles and descriptions for more innovation. People will also be more likely to choose your video as they pop-out on the search results or playlists.
Here is how you can add emojis to YouTube video titles and descriptions:
You can access any list of YouTube comments emojis and select the one you like. Then use your mouse to copy the emoji and paste it into your YouTube titles and description. Or press “Ctrl” + “C” for Windows and “Command” + “C” for Mac to copy your emoji.
Now go to your title or description and press “Ctrl” + “V” for Windows and “Command” + “V” for Mac to paste the emoji.
FAQs about YouTube Video Comments
- Are Emojis Harmful to Use for YouTube?
We all have heard rumors of using emojis in YouTube video titles or comments may damage views or reputation. However, it’s not true, and emojis have no negative consequences on YouTube.
Rather, you can attract more viewers and even improve YouTube SEO by using emojis. Google also allows emojis in search results, and data shows they rank better. You can use emojis for YouTube with complete peace of mind.
In my opinion, there will be no harmful effects on your views, subscribers, or credibility. Instead, you may be able to appeal to a younger crowd and get more clicks.
- Will adding Emojis Impact YouTube SEO?
Many people don’t use emojis in their YouTube videos, fearing a negative impact. But all the rumors out there are just rumors without any truth. YouTube doesn’t penalize you in any way if you use emojis in comments, titles, or descriptions. You will not experience any penal actions by including emojis on YouTube.
Google is also friendly with emojis, and many websites use them to stand apart from the crowd. Using emojis on YouTube can be an excellent way to improve your SEO performance. Your videos will also have a chance to show up on Google results and YouTube. Emojis also help your videos look innovative to draw in more views.
Final Thoughts
Using emojis in YouTube comments is a great way to boost the popularity of your videos. You can also use emojis in your video titles and descriptions to appear more innovative. Additionally, emojis can improve your YouTube SEO performance and even help you rank on Google search results.
Copy-pasting emojis is a simple way to use them, but you can also go for other methods. TubeBuddy is a great choice if you want to eliminate the whole copy-paste scenario and include more types of emojis in your comments directly.
Richard Bennett
Richard Bennett is a writer and a lover of all things video.
Follow @Richard Bennett
Richard Bennett
Mar 27, 2024• Proven solutions
Emojis are a great way to make your videos and comments stand out from the rest. You may also be able to catch the attention of millennials and improve your YouTube and Google ranking. Beginners can use emojis as a great strategy to improve YouTube SEO performance and get ahead of others. Experts suggest using emojis wisely; that is not to overload or spam whole titles or comments with smileys!
Here are some great ways to add YouTube comments emojis:
Part 1: How to Type Emojis in a YouTube Comment on Windows
Here are several ways to type emojis in YouTube comments. Follow the instructions below to write YouTube comments with emojis:
1. Adding Emojis to YouTube Videos on Windows with Keyboard
If you are using Windows 10, then you can use the keyboard shortcut to open the emoji icons. Press Windows + ; (semi-colon) or Windows + . (period) to open the emoji keyboard. And you will see the emojis.
Currently, there are 6 types of emojis you can add on Windows, including smiley faces and animals, people, celebrities and objects, foods and plants, transportation and places, and symbols.
You can then click the emoji that you’d like to add to the YouTube video directly.
2. Copy and Paste Emojis from Websites
One of the easiest ways to add emojis to YouTube comments is to copy-paste them from an emoji database. You can right-click on the emoji and then select “copy.”
Now, go to your YouTube comment and right-click again. Scroll down and click on “paste” to use the emoji.
Here are some of the best websites to download emojis that you may need. In these websites, you can get a range of smileys and icons to use for your YouTube comments. You can start with smiley faces that help you express many emotions. Then you can get emojis of objects like cars, mountains, drinks, fruits, bells, guitars, and more.
The list is just endless, and you will never face any shortage of emojis.
Part 2: How to Add Emojis to YouTube Comments on Mac?
Mac users enjoy a wide selection of emojis without any hassles and can easily add emojis to comments they type on YouTube. Just follow the steps below to add emoji to YouTube comments.
You can select any emoji from the emoji resources website and ctrl-click your mouse to copy it. Now, navigate to your YouTube comment and ctrl-click your mouse. Click on “paste” to add the smiley to your comments.
If you want to use your keyboard, select the emoji and press “Command” and “C.” Now, press “Command” and “V” to paste the emoji in your YouTube comment.
Your emoji is now added to your YouTube comments.
You can also use your Mac’s inbuilt emojis in your YouTube comments. Start typing your YouTube comment and then use your keyboard shortcut Command + Control + Space to access the emoji list.
You can now double-click on any emoji to include it in your comment. The free emoji lists are full of smileys, animal faces, everyday objects and things, sports emojis, vehicles, and more. and more. You will find an emoji to suit every comment you type on YouTube.
If your Mac has a Touch Bar, then you can tap the smile face and then tap an emoji to add to YouTube video comments.
YouTuber Javier Mercedes has made a quick tutorial and introduced many more ways to typing emojis on Mac. Check it below and find the best way based on your preferences.
Part 3: How to Add Emoji to YouTube Comments with TubeBuddy?
TubeBuddy is a suite of tools for YouTubers to grow their success. You can access a range of tools, including YouTube comments emojis to improve your visual appeal. It is a free browser extension that you can add to Chrome, Opera, Firefox, and more.
TubeBuddy provides a large collection of emojis and smileys for you to use in your YouTube comments. Additionally, you don’t need to copy-paste anything. The plugin lets you insert emojis from a list with a click. Here are the steps to add emojis to YouTube comments using TubeBuddy:
Step 1: Install TubeBuddy
Visit the TubeBuddy website and install the plugin for your browser. TubeBuddy is available on both Chrome, FireFox, Opera, and Edge, as well as iOS and Android devices.
Step 2: Sign in to YouTube
Sign in to your YouTube account to allow TubeBuddy access to your comments. You will find the TubeBuddy icon beside the YouTube search bar on your browser.
Step 3: Add Emojis at Commenting
A window with a list of emojis will appear on YouTube as you type your comments. You can select any emoji and add it to your comments.
Types of Emojis in TubeBuddy
TubeBuddy is home to a large collection of emojis. You won’t find many emojis anywhere else on the internet. All emojis are grouped under categories like smileys, places, food and drinks, buildings, and more.
You can quickly select a category and then add emoji to YouTube comments. The tool also adds new emojis daily.
Bonus: How to Add Emojis to YouTube Video Title and Description?
You can add cool emojis to your video titles and descriptions for more innovation. People will also be more likely to choose your video as they pop-out on the search results or playlists.
Here is how you can add emojis to YouTube video titles and descriptions:
You can access any list of YouTube comments emojis and select the one you like. Then use your mouse to copy the emoji and paste it into your YouTube titles and description. Or press “Ctrl” + “C” for Windows and “Command” + “C” for Mac to copy your emoji.
Now go to your title or description and press “Ctrl” + “V” for Windows and “Command” + “V” for Mac to paste the emoji.
FAQs about YouTube Video Comments
- Are Emojis Harmful to Use for YouTube?
We all have heard rumors of using emojis in YouTube video titles or comments may damage views or reputation. However, it’s not true, and emojis have no negative consequences on YouTube.
Rather, you can attract more viewers and even improve YouTube SEO by using emojis. Google also allows emojis in search results, and data shows they rank better. You can use emojis for YouTube with complete peace of mind.
In my opinion, there will be no harmful effects on your views, subscribers, or credibility. Instead, you may be able to appeal to a younger crowd and get more clicks.
- Will adding Emojis Impact YouTube SEO?
Many people don’t use emojis in their YouTube videos, fearing a negative impact. But all the rumors out there are just rumors without any truth. YouTube doesn’t penalize you in any way if you use emojis in comments, titles, or descriptions. You will not experience any penal actions by including emojis on YouTube.
Google is also friendly with emojis, and many websites use them to stand apart from the crowd. Using emojis on YouTube can be an excellent way to improve your SEO performance. Your videos will also have a chance to show up on Google results and YouTube. Emojis also help your videos look innovative to draw in more views.
Final Thoughts
Using emojis in YouTube comments is a great way to boost the popularity of your videos. You can also use emojis in your video titles and descriptions to appear more innovative. Additionally, emojis can improve your YouTube SEO performance and even help you rank on Google search results.
Copy-pasting emojis is a simple way to use them, but you can also go for other methods. TubeBuddy is a great choice if you want to eliminate the whole copy-paste scenario and include more types of emojis in your comments directly.
Richard Bennett
Richard Bennett is a writer and a lover of all things video.
Follow @Richard Bennett
Also read:
- Alternative Cinema Choices for Every Fan for 2024
- The Essential Guide to Merging YouTube & TikTok Content Flows
- [New] Essential Free MCB Theme Templates
- Beginner's Guide Adding Text Overlays on YouTube
- Add Fantastic Backgrounds for YouTube Thumbnails
- Brief Overview of the Quickest Chroma Key Tricks
- Enhancing Exposure Do Buy Views Accelerate Channel Growth for 2024
- In 2024, Avoid These 8 Steps that Newcomers Often Miss on YouTube
- Ace Your Youtube Finances Secrets for Profits at the 500-Subscriber Milestone for 2024
- [New] Downloader Essentials The Best Tools For Offline Viewing
- In 2024, Elevate Engagement Natural Ways to Popularize Your Videos
- In 2024, Earnings Escalation via YouTube Channel Initiatives
- [New] Effortless Guide for Turning YouTube Shorts Into Mp4 Videos
- 2024 Approved Crafting the Perfect Introduction 15 Viral YouTube Video Intros
- Selecting Android's Best YouTube Video Extractors
- 2024 Approved Audiovisual Quality Its Significance in Video Ranking
- Love in Motion Discovering YouTube & Vimeo's Top 7 Wedding Films
- 2024 Approved Budget-Conscious Broadcayer's Guide to Cheap Mics
- Updated 2024 Approved Top Characteristics of Mac Audio Processing Tools
- New Uncover the Best Ways to Download Instagram Audio
- Tips and Tricks for Apple ID Locked Issue On Apple iPhone 6s Plus
- [Updated] 2024 Approved Navigating SnapAds A Business Strategy Guide
- [Updated] 50+ Trending TikTok Hashtags to Get More Views and Likes
- In 2024, How Can I Catch the Regional Pokémon without Traveling On Honor 100 Pro | Dr.fone
- How To Unlock Stolen Apple iPhone SE In Different Conditionsin
- Updated 2024 Approved 10 Most Memorable Japanese Cat Cartoons
- Unseen Snapper's Guide The Art of Stealthy Picture Recording
- [New] 2023'S Leading TwitVideos The Year's Hottest Tweets
- [New] In 2024, Guide to Initiating and Archiving Webinars Economically
- All You Need To Know About Mega Greninja For Realme 12 Pro+ 5G | Dr.fone
- Title: A Filmmaker's Approach to YouTube Splitscreen Videos for 2024
- Author: Brian
- Created at : 2024-05-25 11:16:41
- Updated at : 2024-05-26 11:16:41
- Link: https://youtube-video-recordings.techidaily.com/a-filmmakers-approach-to-youtube-splitscreen-videos-for-2024/
- License: This work is licensed under CC BY-NC-SA 4.0.
