

5 Critical Equipment Items to Start Your Channel Right for 2024
5 Critical Equipment Items to Start Your Channel Right
Essential YouTube Equipment For Starting Your Channel - What Do You Really Need?

Richard Bennett
Oct 26, 2023• Proven solutions
Check out our most updated guide on this topic: YouTube Equipment Starter Guide For Beginners .
The first thing to make sure of before starting a YouTube channel is having all that you need to record and upload high-quality videos regularly. That doesn’t mean you have to take out a loan and spend thousands to purchase a brand new camera and all other gadgets that professional filmmakers use.
The smartest way to get started is to go through a list of necessary equipment for YouTube and check whether or not you already own some of it. Once your channel starts growing, you can then start thinking about whether you want to invest in upgraded equipment. Here is a quick overview of all items that you need to start entertaining your online audience and gaining subscribers to your YouTube channel:
- Your YouTube Camera
- Microphones and Audio
- Lighting Gear for YouTube
- Tripods and Camera Stands
- Smartphone Camera Gear
YouTube Cameras
The short version: Use whatever you already have, even if it’s your phone or webcam. It’s nice to have sharp, fine-tuned, 4K footage, but viewers will forgive lower visual quality if your content is good.
The long version: You will need a camera, but there are a lot of different devices you can use including DSLRs, point and shoots, webcams, and your smartphone.
Your choice of camera will have a tremendous impact on the visual quality of your content and might drive your decisions regarding other pieces of equipment. However, you shouldn’t feel obliged to work with a top-notch camera from day one, especially since cheaper options can produce great results if used the right way.
On one end of the spectrum, you have basic smartphone cameras and web cameras, which are easy to come by and simple to operate. These days, high-end phones come equipped with quite powerful cameras that are more than sufficient for the needs of the average YouTuber. Better webcams can also do the job, although high-performance webcam models can get pretty expensive too. It is probably wise to resist the urge to start broadcasting with the built-in camera in your laptop and at least get a webcam or use your phone, but your computer’s camera is still always an option. Not having a better camera should never stop you from making YouTube videos.
If you already have a DSLR camera then it’s a good idea to familiarize yourself with it. You have far more freedom to adjust the settings and achieve a professional look for your videos with a DSLR, but that does mean it’ll take some time to become an expert at using it. Ultra-high resolution is not required for YouTube, but it certainly won’t hurt to have additional sharpness and more detail in the scene. If you’re shopping for a DSLR, look for one with a flip screen that allows you to quickly check what your viewers see.
YouTube Microphone and Audio
The short version: Audio quality is extremely important. If you can buy either a new camera or an external microphone, but not both, it might be better to go for the microphone. Click here for advice on upping your audio quality without an external microphone.
The long version: Sound capturing is every bit as important for your success as your video feed. In fact, poor audio can be even more damaging to your subscriber count than grainy video, since people won’t spend their time listening to something they have to put effort into understanding.
Again, most YouTube video makers have a limited budget at their disposal, so professional microphones are mostly off the table. However, investing in a directional microphone (‘shotgun mic’) that can pick up your voice clearly and without background noise is certainly a smart move. Such microphones can be pointed towards you while you speak, and since most YouTubers sit still while doing their shows there won’t be too much need for in-session adjustments.
If you’re not ready to invest in a shotgun mic, you can also find very inexpensive (often under $20) LAV mics. These small microphones can be pinned to your shirt, which allows them to record very clear dialogue because they’re so close to your mouth.
Lights for YouTube
The short version: You need as much light as you can get. Lighting kits can be affordable on Amazon, but you can also achieve a great look using daylight/windows and ‘daylight’ lightbulbs.
The long version: If you’ve ever tried to make a video indoors, you already know that it’s necessary to have additional light. Often just filming with the normal lights in a room will cause your footage to look dark and grainy, and possibly be tinted orange. To overcome these problems you need to increase the amount of light you have available.
Sometimes, it is enough to film near windows and/or bring more household lamps into your filming area. For any household lamps or lighting fixtures you use, make sure to put in white or ‘daylight’ lightbulbs instead of using the orange/tungsten bulbs that you might have for everyday use (this is how you avoid tinting things orange).
If you have the budget available to get some lighting equipment, you can find softbox lights or LED panel lights available fairly inexpensively online. Softbox lights are great because they provide even, diffused, light.
Another useful piece of lighting equipment to have is a reflector. A reflector is usually a piece of white, silver, or gold fabric stretched over a frame. You can use it to bounce light from one light source back towards yourself (this is a great way to fill shadows cast by your main light). Reflectors tend to be inexpensive, but you can also use white cardboard or tinfoil in place of purchasing a reflector.
Tripods and Camera Stands
The short version: You need something to hold your camera. If you mostly film in your own home that can be a desk or a stack of books, but if you make a lot of videos while you’re on the go you probably need a tripod or gimbal. Heavier cameras need heavier tripods.
The long version: While handheld cameras can deliver solid results for vloggers and casual streamers, viewers do expect reasonably stable footage. For many types of videos, the camera needs to be completely still and flatly positioned on a horizontal plane. Tripods and camera stands can cost very little, so it’s a good idea to look into getting some kind of stabilizer.
When you are choosing a tripod, pay attention to how much it weighs. If the camera that needs to be mounted on it is very heavy (like some DSLR models), you want to ensure that the structure itself weighs enough not to be easily tipped over. Too thin tripods can put your camera at risk, and that’s the last thing you want. Smaller cameras such as GoPros are more flexible in this regard and can be placed on a wider range of tripods.
Even if you are using a phone or a webcam to record YouTube videos, you should consider mounting the device on a stable stand. It is possible to find mini tripods ideal for smartphones for as little as $10. These tripods are small enough to carry in your pocket, so you will be prepared to start making a video no matter where your adventures take you. If you are using a web camera, you should attach it to the stand so that it won’t move accidentally after you touch the surface it is placed on.
Smartphone Camera Gear 
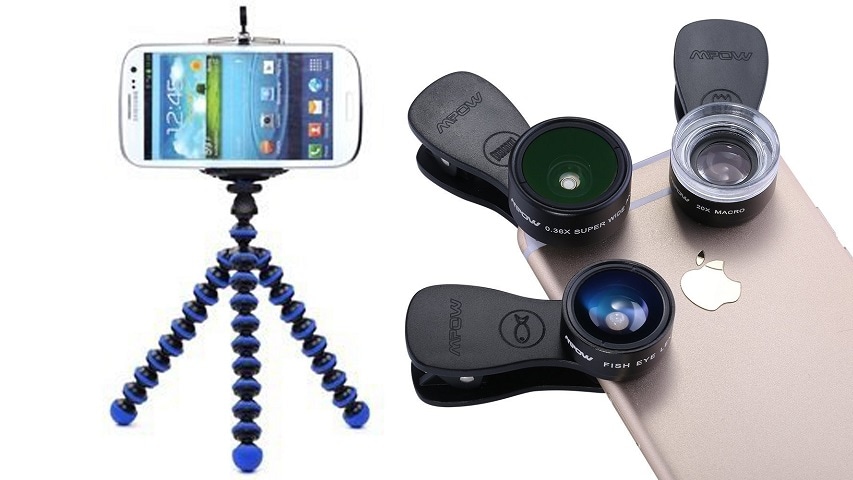
The short version: There’s a lot of gear out there designed with smartphone photos and videos in mind, including clip-on lenses, tripod mounts, phone-mounted LED lights, and inexpensive microphones that plug into the audio jack.
The long version: Recording your videos with a mobile phone can be a good decision. It all depends on the phone you have and the range of add-ons and apps that you complement it with. Almost every high-end model released in the past five years can shoot videos in 1080p or higher. Some can even produce 4K footage. If you perfect your smartphone filming technique, your YouTube videos could look as if they were made with pro equipment.
On the flip side, smartphone cameras typically perform poorly in low light. It is possible to download an app that lets you play around with settings to overcome this, but a phone-mounted LED light is probably a better solution. An external microphone might also be a necessity, but there are some good (inexpensive) options that can simply be plugged in through the headphone jack.
Another common downside of smartphone cameras is that most of them use digital zoom, which is vastly inferior to optical zoom. If you intend to shoot anything that’s further away than a few feet, you need a clip-on lens that goes on top of the built-in camera. This inexpensive device will give you a lot of freedom to work in space, and allow you to make spectacular shots even without high-end YouTube equipment.
Equipment with Easy-to-Use Video Editor


Richard Bennett
Richard Bennett is a writer and a lover of all things video.
Follow @Richard Bennett
Richard Bennett
Oct 26, 2023• Proven solutions
Check out our most updated guide on this topic: YouTube Equipment Starter Guide For Beginners .
The first thing to make sure of before starting a YouTube channel is having all that you need to record and upload high-quality videos regularly. That doesn’t mean you have to take out a loan and spend thousands to purchase a brand new camera and all other gadgets that professional filmmakers use.
The smartest way to get started is to go through a list of necessary equipment for YouTube and check whether or not you already own some of it. Once your channel starts growing, you can then start thinking about whether you want to invest in upgraded equipment. Here is a quick overview of all items that you need to start entertaining your online audience and gaining subscribers to your YouTube channel:
- Your YouTube Camera
- Microphones and Audio
- Lighting Gear for YouTube
- Tripods and Camera Stands
- Smartphone Camera Gear
YouTube Cameras
The short version: Use whatever you already have, even if it’s your phone or webcam. It’s nice to have sharp, fine-tuned, 4K footage, but viewers will forgive lower visual quality if your content is good.
The long version: You will need a camera, but there are a lot of different devices you can use including DSLRs, point and shoots, webcams, and your smartphone.
Your choice of camera will have a tremendous impact on the visual quality of your content and might drive your decisions regarding other pieces of equipment. However, you shouldn’t feel obliged to work with a top-notch camera from day one, especially since cheaper options can produce great results if used the right way.
On one end of the spectrum, you have basic smartphone cameras and web cameras, which are easy to come by and simple to operate. These days, high-end phones come equipped with quite powerful cameras that are more than sufficient for the needs of the average YouTuber. Better webcams can also do the job, although high-performance webcam models can get pretty expensive too. It is probably wise to resist the urge to start broadcasting with the built-in camera in your laptop and at least get a webcam or use your phone, but your computer’s camera is still always an option. Not having a better camera should never stop you from making YouTube videos.
If you already have a DSLR camera then it’s a good idea to familiarize yourself with it. You have far more freedom to adjust the settings and achieve a professional look for your videos with a DSLR, but that does mean it’ll take some time to become an expert at using it. Ultra-high resolution is not required for YouTube, but it certainly won’t hurt to have additional sharpness and more detail in the scene. If you’re shopping for a DSLR, look for one with a flip screen that allows you to quickly check what your viewers see.
YouTube Microphone and Audio
The short version: Audio quality is extremely important. If you can buy either a new camera or an external microphone, but not both, it might be better to go for the microphone. Click here for advice on upping your audio quality without an external microphone.
The long version: Sound capturing is every bit as important for your success as your video feed. In fact, poor audio can be even more damaging to your subscriber count than grainy video, since people won’t spend their time listening to something they have to put effort into understanding.
Again, most YouTube video makers have a limited budget at their disposal, so professional microphones are mostly off the table. However, investing in a directional microphone (‘shotgun mic’) that can pick up your voice clearly and without background noise is certainly a smart move. Such microphones can be pointed towards you while you speak, and since most YouTubers sit still while doing their shows there won’t be too much need for in-session adjustments.
If you’re not ready to invest in a shotgun mic, you can also find very inexpensive (often under $20) LAV mics. These small microphones can be pinned to your shirt, which allows them to record very clear dialogue because they’re so close to your mouth.
Lights for YouTube
The short version: You need as much light as you can get. Lighting kits can be affordable on Amazon, but you can also achieve a great look using daylight/windows and ‘daylight’ lightbulbs.
The long version: If you’ve ever tried to make a video indoors, you already know that it’s necessary to have additional light. Often just filming with the normal lights in a room will cause your footage to look dark and grainy, and possibly be tinted orange. To overcome these problems you need to increase the amount of light you have available.
Sometimes, it is enough to film near windows and/or bring more household lamps into your filming area. For any household lamps or lighting fixtures you use, make sure to put in white or ‘daylight’ lightbulbs instead of using the orange/tungsten bulbs that you might have for everyday use (this is how you avoid tinting things orange).
If you have the budget available to get some lighting equipment, you can find softbox lights or LED panel lights available fairly inexpensively online. Softbox lights are great because they provide even, diffused, light.
Another useful piece of lighting equipment to have is a reflector. A reflector is usually a piece of white, silver, or gold fabric stretched over a frame. You can use it to bounce light from one light source back towards yourself (this is a great way to fill shadows cast by your main light). Reflectors tend to be inexpensive, but you can also use white cardboard or tinfoil in place of purchasing a reflector.
Tripods and Camera Stands
The short version: You need something to hold your camera. If you mostly film in your own home that can be a desk or a stack of books, but if you make a lot of videos while you’re on the go you probably need a tripod or gimbal. Heavier cameras need heavier tripods.
The long version: While handheld cameras can deliver solid results for vloggers and casual streamers, viewers do expect reasonably stable footage. For many types of videos, the camera needs to be completely still and flatly positioned on a horizontal plane. Tripods and camera stands can cost very little, so it’s a good idea to look into getting some kind of stabilizer.
When you are choosing a tripod, pay attention to how much it weighs. If the camera that needs to be mounted on it is very heavy (like some DSLR models), you want to ensure that the structure itself weighs enough not to be easily tipped over. Too thin tripods can put your camera at risk, and that’s the last thing you want. Smaller cameras such as GoPros are more flexible in this regard and can be placed on a wider range of tripods.
Even if you are using a phone or a webcam to record YouTube videos, you should consider mounting the device on a stable stand. It is possible to find mini tripods ideal for smartphones for as little as $10. These tripods are small enough to carry in your pocket, so you will be prepared to start making a video no matter where your adventures take you. If you are using a web camera, you should attach it to the stand so that it won’t move accidentally after you touch the surface it is placed on.
Smartphone Camera Gear
The short version: There’s a lot of gear out there designed with smartphone photos and videos in mind, including clip-on lenses, tripod mounts, phone-mounted LED lights, and inexpensive microphones that plug into the audio jack.
The long version: Recording your videos with a mobile phone can be a good decision. It all depends on the phone you have and the range of add-ons and apps that you complement it with. Almost every high-end model released in the past five years can shoot videos in 1080p or higher. Some can even produce 4K footage. If you perfect your smartphone filming technique, your YouTube videos could look as if they were made with pro equipment.
On the flip side, smartphone cameras typically perform poorly in low light. It is possible to download an app that lets you play around with settings to overcome this, but a phone-mounted LED light is probably a better solution. An external microphone might also be a necessity, but there are some good (inexpensive) options that can simply be plugged in through the headphone jack.
Another common downside of smartphone cameras is that most of them use digital zoom, which is vastly inferior to optical zoom. If you intend to shoot anything that’s further away than a few feet, you need a clip-on lens that goes on top of the built-in camera. This inexpensive device will give you a lot of freedom to work in space, and allow you to make spectacular shots even without high-end YouTube equipment.
Equipment with Easy-to-Use Video Editor
Richard Bennett
Richard Bennett is a writer and a lover of all things video.
Follow @Richard Bennett
Essential Apps: Best 10 Software to Capture Your Screens
Best 10 Screen Recorders for YouTube
Richard Bennett
Mar 27, 2024• Proven solutions
If you are interested in making tutorial videos by capturing videos from your computer screen then following details will definitely help you. It is possible to share wonderful details with screen recorder tools that are discussed below in this article:
Looking for Screen recorders for your smartphone? Kindly check this screen recorder Apps for iPhone>>
![]()

The All-in-One Screen Recorder & Video Editor
- Record desktop screen, voiceover, and webcam simultaneously
- Edit recorded clips quickly with a wide range of professional tools
- Built-in plentiful templates and effects
- Export to MP4, MOV, MKV, GIF and multiple formats
For Win 7 or later (64-bit)
For macOS 10.12 or later  Secure Download
Top 10 Screen Recorders for YouTube video creators
Note: We resolutely oppose all forms of copyright-infringing downloads. This tutorial is only for downloading YouTube videos/audio materials from your own channel.
For Windows
1. Wondershare Filmora
Wondershare Filmora is an easy-to-use while light screen recorder for PC and Mac. It allows you to record desktop screen by customizing areas you like, and you can record popular games at up to 120fps without lagging. What’s more, Filmora also offers you a built-in video editing tool that allows you to add annotations, personalize cursor effects, and crop, trim, cut your recorded footage as you like.
Price:
Free trial/$49.99 per year/$79.99 for perpetual
2. Cam Studio:
It is an open-source screen recorder for YouTube that can be learned within few minutes and results in higher quality video outcomes. Offers a small file size along with the facility to convert from AVI to SWF.
Pros:
It allows users to add captions to videos and possesses a built-in help file.
Cons:
The website suffers from few bugs.
Price:
It is 100% free for use.
3. iSpring Free Cam:
Users are likely to get built in type video/audio editor with this screen recorder that has intuitive interface with professional screencasts.
Pros:
High Quality resolution with no time limits and it also records user’s voice along with computer sounds.
Cons:
Do not allow webcam type recording and output file format use to be WMV only.
Price:
Free tool for screen recording needs.
4. ShareX:
ShareX is a well-known open source type ad free tool that comes with numerous customization features. It is targeted for professional video developers who need advanced editing options.
Pros:
Custom colour effects with watermarks where you can easily import existing photos, music or videos from your device.
Cons:
It does not possess video editor, webcam recording feature and is little complicated to use for beginners.
Price:
Can be used for free.
5. MadCap Mimic:
Here is a highly advanced multimedia tool with interactive simulation options. Users can access this screen recorder for YouTube with three different modes as like full motion, automatic and manual.
Pros:
Automatically saved content for future needs, wide variety of video effects, fast technical support and results in highly interactive content.
Cons:
Occasional bugs are reported and users can access free trial only for 30 days.
Price:
For full year version you need to pay $144 whereas life time access can be obtained by paying only $428.
For Mac
1. Camtasia 2:
This is a comprehensive tool for your screen recording needs where you can also connect external devices for input. Users will be able to enjoy smooth editing features with its studio like platform, layered timeline and fast mixing.
Pros:
It is fully interactive screen recorder that can be used as an interactive mobile application. This tool is supported by Windows, Android and iPhone devices.
Cons:
Aimed for professional users only.
Price:
Although free trial is available for few days but actual featured version can be accessed after payment of $99.
2. ScreenFlow:
Here is a popular paid offering for all professionals who are interested to create interactive educational videos. There are unlimited powerful features with easy to use interface and one can import input from externally connected devices as like iPad, iPod and iPhones etc.
Pros:
High class motion control features with attractive zooming facility so that you can manage videos from all views.
Cons:
Difficult to use for beginners due to advanced design tools.
Price:
Screen Flow packages are available on payment of $99 and more.
3. Snapz Pro X:
Snapz Pro X offers various tutorials along with training videos so that users can avail resizable video creation options with a straightforward type interface. The live preview feature allows users to generate customized videos with easy corrections. Snapz Pro X is commonly used by professionals for learning and training related video creations as it offers lesser mistakes.
Pros:
It offers live preview, selective region capture facility and high end pixel perfection services.
Cons:
Free or trial version comes with unwanted watermarks.
Price:
Cheaper option as compared to above two tools as it can be accessed by paying only $69.
4. Screencast-o-Matic:
You will be glad to know about this online screen recorder for YouTube that can be accessed by anyone with installation of a specially designed launcher. The screen recording length can go up to 15 minutes and resolution quality offered goes up to 720p. The free version can be accessed by anyone but if you need advanced features then you have to spend some money.
Pros:
Offers real time editing as well as recording for video shooting; users need not to download this tool on their personal device rather it can be accessed online with ease.
Cons:
Video quality is little poor as compared to other tools.
Price:
The free version is available with limited features whereas fully featured tool is accessible with a payment of $15/ year.
5. QuickTime:
It is one of the latest screen recorder tool for all Mac users that can grab audio from microphone but not compatible with system audio. If you need to use a video creator tool without spending even a single penny then QuickTime software is best option for you.
Pros:
It is available for free and can be used by beginners as well as professionals easily. QuickTime is compatible with almost all versions of Mac devices.
Cons:
It is a restricted solution for screen recording with limited tools and features. QuickTime is not preferred for game recording videos due to low-resolution outputs.
Price:
Available for free.
Richard Bennett
Richard Bennett is a writer and a lover of all things video.
Follow @Richard Bennett
Richard Bennett
Mar 27, 2024• Proven solutions
If you are interested in making tutorial videos by capturing videos from your computer screen then following details will definitely help you. It is possible to share wonderful details with screen recorder tools that are discussed below in this article:
Looking for Screen recorders for your smartphone? Kindly check this screen recorder Apps for iPhone>>
![]()
The All-in-One Screen Recorder & Video Editor
- Record desktop screen, voiceover, and webcam simultaneously
- Edit recorded clips quickly with a wide range of professional tools
- Built-in plentiful templates and effects
- Export to MP4, MOV, MKV, GIF and multiple formats
For Win 7 or later (64-bit)
For macOS 10.12 or later Secure Download
Top 10 Screen Recorders for YouTube video creators
Note: We resolutely oppose all forms of copyright-infringing downloads. This tutorial is only for downloading YouTube videos/audio materials from your own channel.
For Windows
1. Wondershare Filmora
Wondershare Filmora is an easy-to-use while light screen recorder for PC and Mac. It allows you to record desktop screen by customizing areas you like, and you can record popular games at up to 120fps without lagging. What’s more, Filmora also offers you a built-in video editing tool that allows you to add annotations, personalize cursor effects, and crop, trim, cut your recorded footage as you like.
Price:
Free trial/$49.99 per year/$79.99 for perpetual
2. Cam Studio:
It is an open-source screen recorder for YouTube that can be learned within few minutes and results in higher quality video outcomes. Offers a small file size along with the facility to convert from AVI to SWF.
Pros:
It allows users to add captions to videos and possesses a built-in help file.
Cons:
The website suffers from few bugs.
Price:
It is 100% free for use.
3. iSpring Free Cam:
Users are likely to get built in type video/audio editor with this screen recorder that has intuitive interface with professional screencasts.
Pros:
High Quality resolution with no time limits and it also records user’s voice along with computer sounds.
Cons:
Do not allow webcam type recording and output file format use to be WMV only.
Price:
Free tool for screen recording needs.
4. ShareX:
ShareX is a well-known open source type ad free tool that comes with numerous customization features. It is targeted for professional video developers who need advanced editing options.
Pros:
Custom colour effects with watermarks where you can easily import existing photos, music or videos from your device.
Cons:
It does not possess video editor, webcam recording feature and is little complicated to use for beginners.
Price:
Can be used for free.
5. MadCap Mimic:
Here is a highly advanced multimedia tool with interactive simulation options. Users can access this screen recorder for YouTube with three different modes as like full motion, automatic and manual.
Pros:
Automatically saved content for future needs, wide variety of video effects, fast technical support and results in highly interactive content.
Cons:
Occasional bugs are reported and users can access free trial only for 30 days.
Price:
For full year version you need to pay $144 whereas life time access can be obtained by paying only $428.
For Mac
1. Camtasia 2:
This is a comprehensive tool for your screen recording needs where you can also connect external devices for input. Users will be able to enjoy smooth editing features with its studio like platform, layered timeline and fast mixing.
Pros:
It is fully interactive screen recorder that can be used as an interactive mobile application. This tool is supported by Windows, Android and iPhone devices.
Cons:
Aimed for professional users only.
Price:
Although free trial is available for few days but actual featured version can be accessed after payment of $99.
2. ScreenFlow:
Here is a popular paid offering for all professionals who are interested to create interactive educational videos. There are unlimited powerful features with easy to use interface and one can import input from externally connected devices as like iPad, iPod and iPhones etc.
Pros:
High class motion control features with attractive zooming facility so that you can manage videos from all views.
Cons:
Difficult to use for beginners due to advanced design tools.
Price:
Screen Flow packages are available on payment of $99 and more.
3. Snapz Pro X:
Snapz Pro X offers various tutorials along with training videos so that users can avail resizable video creation options with a straightforward type interface. The live preview feature allows users to generate customized videos with easy corrections. Snapz Pro X is commonly used by professionals for learning and training related video creations as it offers lesser mistakes.
Pros:
It offers live preview, selective region capture facility and high end pixel perfection services.
Cons:
Free or trial version comes with unwanted watermarks.
Price:
Cheaper option as compared to above two tools as it can be accessed by paying only $69.
4. Screencast-o-Matic:
You will be glad to know about this online screen recorder for YouTube that can be accessed by anyone with installation of a specially designed launcher. The screen recording length can go up to 15 minutes and resolution quality offered goes up to 720p. The free version can be accessed by anyone but if you need advanced features then you have to spend some money.
Pros:
Offers real time editing as well as recording for video shooting; users need not to download this tool on their personal device rather it can be accessed online with ease.
Cons:
Video quality is little poor as compared to other tools.
Price:
The free version is available with limited features whereas fully featured tool is accessible with a payment of $15/ year.
5. QuickTime:
It is one of the latest screen recorder tool for all Mac users that can grab audio from microphone but not compatible with system audio. If you need to use a video creator tool without spending even a single penny then QuickTime software is best option for you.
Pros:
It is available for free and can be used by beginners as well as professionals easily. QuickTime is compatible with almost all versions of Mac devices.
Cons:
It is a restricted solution for screen recording with limited tools and features. QuickTime is not preferred for game recording videos due to low-resolution outputs.
Price:
Available for free.
Richard Bennett
Richard Bennett is a writer and a lover of all things video.
Follow @Richard Bennett
Also read:
- In 2024, Crafting a YouTube Empire 26 Successful Techniques
- [Updated] 10 Budget-Friendly Platforms for YouTube Branding Mastery
- Transform Your Channels With Any of the Top 11 Budget-Friendly Naming Solutions
- In 2024, Elite Gamers' Capturing Solutions
- Engaging Audiences Crafting YouTube Trailers via Filmora
- Mastering Cinematography YouTube Guides by Aspiring Directors
- [Updated] Crafting a Legacy YouTuber’s Playbook for Success
- From Blank Canvas to Biggest Hit Mastering YouTube Thumbnail Sizes
- In 2024, Evolving Tactics for Crafting Immersive Mukbang Sessions
- [New] Analyzing YouTube's Creator Rewards Regularity
- The Professional's Guide Adding YouTube to Google Slides
- Enhance Visibility, Amplify Impact (Video SEO) for 2024
- Steps to Restore Your YouTube Shorts' Thumbnails
- Achieving Video Popularity Mastering YouTube Thumbnail Selection for 2024
- Tailored Tunes Creating Custom Youtube Playlists
- Unshakeable Video Quality - Best Stabilizers
- Elevate Your Video Content with Desktop/Mobile Timestamps for 2024
- Simplify Creating YouTube Thumbnails Now
- Compreranly Insightful Study on VTubers and Beyond
- Climbing to YouTube Zenith A Step-by-Step Guide to Creative Studio Mastery for 2024
- How To Get Thousands of YouTube Views in 30 Days
- In 2024, Earnings Escalation via YouTube Channel Initiatives
- 2024 Approved Crafting a Viral Video Journey 6 Key Strategies on YouTube
- A Comprehensive Guide to Making GIFs From YouTube Tracks
- [New] Elevate Video Consumption Constructing an Ideal 'Watch Later' List on YouTube
- Premier Selector Exclusive App Selection for Your Videos
- Digital Dominion #1 to #10 Most Watched YouTube Videos in a Day
- Unleashing Your Creative Spark Stylistic Self-Discovery [High CTR]
- [New] Busting the Top 10 Vloggers' Fears Strategies for Success
- Essential Selection The Greatest Free Editing Software
- 2024 Approved Beat Your Content Up a Notch Music Addition in YouTube Videos
- Explore & Download 50 FREE YouTube Banners
- [Updated] How to Easily Disable/Remove YouTube Shorts Permanently?
- [New] Break Free From Youtube Top 5 Innovative Video Editing Tools
- 2024 Approved Demystifying the Process of Submitting Videos on YouTube
- [Updated] Break Free From Youtube Top 5 Innovative Video Editing Tools
- Brain Mechanisms Guiding High-Stakes Business Conclusions
- Craft the Ultimate Outro with Pro Maker Advice for 2024
- In 2024, 15 Best Funny YouTube Channels to Watch When You're Bored
- Designing Distinctive Denouements for 2024
- Eliminate YouTube Short Headaches with These Tips for 2024
- In 2024, Content Creators' Revenue Gain From Each Click
- [Updated] How to Convert YouTube Videos to GIFs [No Download]
- Understanding YouTube's Content Crafting Environment
- In 2024, Elevating Engagement Optimal Size & Ratio on YouTube
- 2024 Approved Audit Your Channel's Financial Success
- [Updated] Digital Classrooms Prime Ed Tutorials Online
- The Ultimate Guide to the Best 7 Android AdBlock Tools
- Jump Into Sub4sub - Guide Awaits to Ensure Success
- [New] Collaborative Video Creation & Growth Tips
- Updated 2024 Approved Advanced Digital Music Composer & Cutter Platform
- How to Share/Fake Location on WhatsApp for Infinix Smart 8 Plus | Dr.fone
- [New] In 2024, Elevate Video Views Twitter to Facebook Transition
- The way to get back lost music from Samsung Galaxy Z Flip 5
- Calls on Vivo Y100 Go Straight to Voicemail? 12 Fixes | Dr.fone
- The Most Effective Ways to Bypass Apple iPhone 11 Pro Max Activation Lock
- [New] 2024 Approved The Visual Vault In-Depth Recorder Comparisons
- [Updated] Precision Window Photography in WinOSes for 2024
- [New] Unlocking Archived Stories From Facebook A Digital Handbook for 2024
- In 2024, How to Fix when Apple Account Locked From iPhone 15 Plus?
- In 2024, Ride the Viral Wave Mixing TikTok Flair Into Instagram Reels
- [New] Fine-Tuning Your OBS Live Feeds for Facebook Audience
- Updated Best AVI Video Editor for Windows 8 Latest 2023 Features for 2024
- The Most Useful Tips for Pokemon Go Ultra League On Google Pixel 8 | Dr.fone
- In 2024, Is pgsharp legal when you are playing pokemon On Poco M6 5G? | Dr.fone
- [New] Maximizing Your Tech Efforts A Detailed Look at ShowMore’s Features
- In 2024, How To Fix iPhone 11 Unavailable Issue With Ease | Dr.fone
- Updated 2024 Approved How to Make a Smooth Speed Ramping in Premiere Pro?
- 2024 Approved Pioneering Practices Leading the Way in Facecam Filming
- [New] In 2024, 17 Easy Ways Grab Your Webinars Without Financial Investment
- Are You Searching for the Best Cinematic LUTs for Premiere Pro? You Are in the Right Place because This Article Is Dedicated to LUTs
- All You Need To Know About Mega Greninja For Realme 12 5G | Dr.fone
- [Updated] Principled Steps in Logging Live YouTube Videos for 2024
- [Updated] Pioneering Soundtracks for Stellar Instagram Reels
- Get Pure Video Streams From TikTok Directly Online for 2024
- In 2024, Bypassing Google Account With vnROM Bypass For Motorola Edge 2023
- 2024 Approved How to Download and Save TikTok Videos without Apple' Writes
- [Updated] Affordable Cameras Where to Buy Economical GoPros
- [Updated] Crafting Captivating Facebook Biographies - A Comprehensive Guide
- A Complete Guide To OEM Unlocking on Realme GT 3
- 2024 Approved Step Into the Future Mastering Instagram Filters for Enhanced Imagery
- In 2024, 8 Best Apps for Screen Mirroring Nubia Red Magic 8S Pro+ PC | Dr.fone
- [New] 2024 Approved A+ PowerPoint to Cinema Suites
- [Updated] In 2024, Top 5 Tools for Viewing Insta Stories Unseen
- How To Activate and Use Life360 Ghost Mode On Tecno Spark 10 5G | Dr.fone
- Title: 5 Critical Equipment Items to Start Your Channel Right for 2024
- Author: Brian
- Created at : 2024-06-26 00:20:54
- Updated at : 2024-06-27 00:20:54
- Link: https://youtube-video-recordings.techidaily.com/5-critical-equipment-items-to-start-your-channel-right-for-2024/
- License: This work is licensed under CC BY-NC-SA 4.0.
