

"2024 Approved Top 10 VR Videos on YouTube to Have Immersive Experience"
Top 10 VR Videos on YouTube to Have Immersive Experience
Versatile YouTube Video Editor - Filmora
An easy yet powerful editor
Numerous effects to choose from
Detailed tutorials provided by the official channel
The pandemic in 2020 was a significant event that disrupted everyone globally. Video calls and virtual events became the run-to for most workers. This caused a lot of people to embrace the idea of virtualization.
Viewers needed new ways to experience performances and shows. Then, new virtual reality (VR) headsets entered the market, making people amazed as they did the best of what an average standalone headset could do. VR videos give real-like visual effects that will amaze and make you feel in the same surrounding as in the video background. And with the arrival of futuristic VR video Youtubers, creative videos are coming all around. Through this article, let’s look over the best YouTube VR Videos and understand how YouTube VR 360 videos differ from each other.
In this article
01 What is a VR video on YouTube?
02 10 Best VR Videos on YouTube for 2021
03 Where to Watch VR Videos besides YouTube?
04 Choose High-Quality VR Headsets
Part 1: What is a VR video on YouTube?
Firstly, it is essential to understand a VR Video on YouTube and how it differs from 360 videos?
VR Videos YouTube – For VR Videos with the YouTube mobile app, you can watch VR videos alongside cardboard. You will have an immersive feeling while watching this as you feel present in the scene actions while having your field of vision covered with a viewing device.
Though both YouTube VR and 360 give an immersive viewing experience with 360-degree coverage, still YouTube 360 videos reflect live actions with modified cameras accessible through 360-degree video-compatible devices. YouTube 360 videos are also viewable on devices such as smartphones, computers, etc., that are compatible. However, here, video progression is not under viewers’ control.
On the other hand, VR videos with VR headsets give options to control the viewing experience, such as interacting, running, walk with the video from the viewer’s end.
Part 2: 10 Best VR Videos on YouTube for 2021
You must be eager to start your voyage to VR YouTube videos. So let’s move ahead with the below-mentioned options that cover the ten best YouTuber VR Videos.
1. 360° VR GALACTUS EVENT | The End of season Fortnite Event
The production of VR videos from the 360 worlds games is becoming a live event model, making video creators keep these incredible experiences with this end-of-season Fortnite event.
2. Around the Planet in 2 Minutes
This video offers viewers a glimpse of other travel videos on the channel while leading them to various locations worldwide.
3. Ascension by David Blaine (YouTube 360 Video)
This version of the YouTube 360 video gives viewers a view of it from the first-person point of view. This video broke YouTube records with its 22+million views within a short while.
4. Beautifully Broken by Warren Haynes and Danny Louis
In this video, Warren Haynes and Danny Louis mirrored the constraints of the moment implicitly, taking their craft outdoors.
5. China, One week before Coronavirus Lockdown
This experience gives one the view of different structures like plants, people, and nature at large.
6. The Dawn of Art; AVirtual Journey inside Chauvet Cave
This animated tour is being narrated into a cave by Daisy Ridley. The video is known for holding the best figurative cave painting in the world kept for 36,000 years.
7. Guardians of the Kingdom
This video exposes the relationship between whales and humans by the incidences between two mothers; a human and a whale.
8. HowVolcanoes Affect Earth’s Climate over Millions of Years
Here, viewers get to see how volcanoes spew carbon dioxide and other gases into the air, changing the earth’s climate through that.
9. Inside NYC’s Skinniest Supertall Skyscraper
In this video, the viewers see the views of the central park and the iconic US metropolis.
10. Lockdown Around the World | National Geographic
This video is from National Geographic. It exposes a view of crowded cities in an unprecedented period like the lockdown.
Part 3: Where to Watch VR Videos besides YouTube?
You may wonder whether there are other platforms where you can watch VR videos.
The good news is: Yes! Besides YouTube, we have platforms where viewers can watch VR videos and have an immersive experience. Read on to know them.
1. Vimeo 360
This platform allows users to upload, play, and even share their VR videos with their friends on apps like Facebook and YouTube.
2. Oculus Gear VR store
Users can watch their YouTube VR Oculus videos on this platform with apps like Samsung XR, Skybox VR video player, etc. They are also allowed to download games apps.
3. Steam Powered
Steam Powered is known for VR titles and gets support from good VR headsets.
Part 4: Choose High-Quality VR Headsets
There are quite a good number of VR Headsets, but we have the option of choosing a high-quality VR headset that should be able to deliver a wonderful experience. This is what every user wants. Let’s take a good look at a few of them.
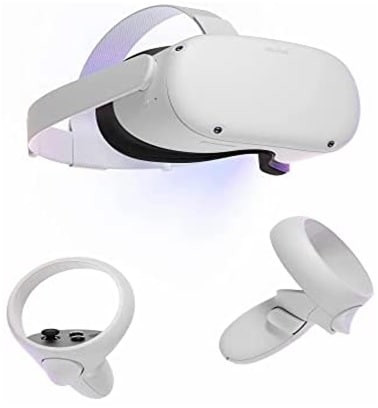
1. Oculus Quest 2
This VR headset is top-notch. Its impressive flexibility, backed by its shocking price, will make one not want to look elsewhere.
No need to worry about screen-door effects as the headset possesses a high per-eye resolution—smooth 90Hz refreshing rate just like the Rift CV1 Oculus. Based on the Qualcomm Snapdragon chipset, XR2 resulted in excellent standalone performance. It’s also capable of linking up with gaming PC for desktop experiences.
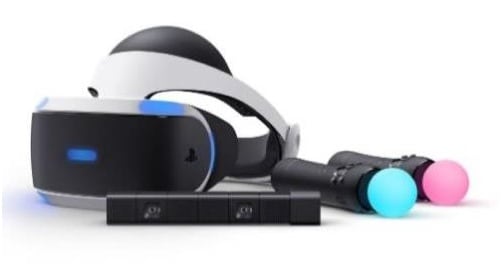
2. PlayStation VR
A lot of VR games have come out on PlayStation VR. The PlayStation VR gives PS4 users an excellent and quality experience. However, it doesn’t have the highest resolution displays and cannot go for wild, room-scale tracking.
It has a 960 x 1,080 per-eye resolution and offers a 120Hz refresh rate for quality experiences. Its 100-degree field of view, motion controllers, and separate camera are suitable for unlocking immersive gameplay. A fantastic thing about it is that although it was for the PS4 and PS4 Pro, Sony ensured it’ll also run on the PS5.
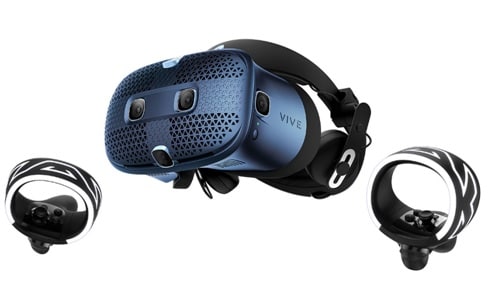
3. HTC Vive Cosmos
The HTC Vive Cosmos is the latest HTC headset in town. Overall combined 2,880 x 1,700 resolution provides optimally sharp resolution for the eyes that is 1,440 x 1,700.
This headset has an easy-to-wear halo-style headband and attached headphones for spatial audio. It’s a highly versatile headset that allows users to switch which version of the Cosmos they’re using by simply swapping out the faceplate, controllers, and any tracking base station.
Part 5: FAQs about VR Videos
Let’s take a look at some questions by VR viewers.
Who is the Most Popular VR YouTuber?
‘Nathie’ is the most popular VR YouTuber today. He is a Netherland-based content creator whose niche is VR technology. His channel has stupendous 600k subscribers.
Is VR Bad for Your Eyes?
According to research, there is evidence that wearing VR Headsets can cause the eyesight to deteriorate, causing eye strain, discomfort, and making the vision blur.
What is the Future of VR?
VR is known for giving immersive experiences in various aspects of life and career. Education, Sports events, technology, and lots more are fields where VR is in use with artificial intelligence.
Over time, it has been a lifesaver, being helpful to many in various locations worldwide and has been even more accessible than it used to be. The future of VR holds more opportunities for us as it evolves daily.
So, the end is not coming to it anytime soon.
Conclusion
In the world today, everyone has the opportunity to experience technology at its best through VR, and the good thing is that its rapid evolvement is an assurance that it’s not ending soon. Every man and business needs VR to grow as its opportunities are massive. Whether with YouTube VR Oculus or any other platform, getting the real essence of visualization creates a big difference.
The future holds more great ways and opportunities to make things easy for us with VR. Thus, through the article, you will get to know many YouTube 360 videos and VR Videos YouTube platforms so that entertainment does not end with simple videos but goes beyond expectations.
The pandemic in 2020 was a significant event that disrupted everyone globally. Video calls and virtual events became the run-to for most workers. This caused a lot of people to embrace the idea of virtualization.
Viewers needed new ways to experience performances and shows. Then, new virtual reality (VR) headsets entered the market, making people amazed as they did the best of what an average standalone headset could do. VR videos give real-like visual effects that will amaze and make you feel in the same surrounding as in the video background. And with the arrival of futuristic VR video Youtubers, creative videos are coming all around. Through this article, let’s look over the best YouTube VR Videos and understand how YouTube VR 360 videos differ from each other.
In this article
01 What is a VR video on YouTube?
02 10 Best VR Videos on YouTube for 2021
03 Where to Watch VR Videos besides YouTube?
04 Choose High-Quality VR Headsets
Part 1: What is a VR video on YouTube?
Firstly, it is essential to understand a VR Video on YouTube and how it differs from 360 videos?
VR Videos YouTube – For VR Videos with the YouTube mobile app, you can watch VR videos alongside cardboard. You will have an immersive feeling while watching this as you feel present in the scene actions while having your field of vision covered with a viewing device.
Though both YouTube VR and 360 give an immersive viewing experience with 360-degree coverage, still YouTube 360 videos reflect live actions with modified cameras accessible through 360-degree video-compatible devices. YouTube 360 videos are also viewable on devices such as smartphones, computers, etc., that are compatible. However, here, video progression is not under viewers’ control.
On the other hand, VR videos with VR headsets give options to control the viewing experience, such as interacting, running, walk with the video from the viewer’s end.
Part 2: 10 Best VR Videos on YouTube for 2021
You must be eager to start your voyage to VR YouTube videos. So let’s move ahead with the below-mentioned options that cover the ten best YouTuber VR Videos.
1. 360° VR GALACTUS EVENT | The End of season Fortnite Event
The production of VR videos from the 360 worlds games is becoming a live event model, making video creators keep these incredible experiences with this end-of-season Fortnite event.
2. Around the Planet in 2 Minutes
This video offers viewers a glimpse of other travel videos on the channel while leading them to various locations worldwide.
3. Ascension by David Blaine (YouTube 360 Video)
This version of the YouTube 360 video gives viewers a view of it from the first-person point of view. This video broke YouTube records with its 22+million views within a short while.
4. Beautifully Broken by Warren Haynes and Danny Louis
In this video, Warren Haynes and Danny Louis mirrored the constraints of the moment implicitly, taking their craft outdoors.
5. China, One week before Coronavirus Lockdown
This experience gives one the view of different structures like plants, people, and nature at large.
6. The Dawn of Art; AVirtual Journey inside Chauvet Cave
This animated tour is being narrated into a cave by Daisy Ridley. The video is known for holding the best figurative cave painting in the world kept for 36,000 years.
7. Guardians of the Kingdom
This video exposes the relationship between whales and humans by the incidences between two mothers; a human and a whale.
8. HowVolcanoes Affect Earth’s Climate over Millions of Years
Here, viewers get to see how volcanoes spew carbon dioxide and other gases into the air, changing the earth’s climate through that.
9. Inside NYC’s Skinniest Supertall Skyscraper
In this video, the viewers see the views of the central park and the iconic US metropolis.
10. Lockdown Around the World | National Geographic
This video is from National Geographic. It exposes a view of crowded cities in an unprecedented period like the lockdown.
Part 3: Where to Watch VR Videos besides YouTube?
You may wonder whether there are other platforms where you can watch VR videos.
The good news is: Yes! Besides YouTube, we have platforms where viewers can watch VR videos and have an immersive experience. Read on to know them.
1. Vimeo 360
This platform allows users to upload, play, and even share their VR videos with their friends on apps like Facebook and YouTube.
2. Oculus Gear VR store
Users can watch their YouTube VR Oculus videos on this platform with apps like Samsung XR, Skybox VR video player, etc. They are also allowed to download games apps.
3. Steam Powered
Steam Powered is known for VR titles and gets support from good VR headsets.
Part 4: Choose High-Quality VR Headsets
There are quite a good number of VR Headsets, but we have the option of choosing a high-quality VR headset that should be able to deliver a wonderful experience. This is what every user wants. Let’s take a good look at a few of them.
1. Oculus Quest 2
This VR headset is top-notch. Its impressive flexibility, backed by its shocking price, will make one not want to look elsewhere.
No need to worry about screen-door effects as the headset possesses a high per-eye resolution—smooth 90Hz refreshing rate just like the Rift CV1 Oculus. Based on the Qualcomm Snapdragon chipset, XR2 resulted in excellent standalone performance. It’s also capable of linking up with gaming PC for desktop experiences.
2. PlayStation VR
A lot of VR games have come out on PlayStation VR. The PlayStation VR gives PS4 users an excellent and quality experience. However, it doesn’t have the highest resolution displays and cannot go for wild, room-scale tracking.
It has a 960 x 1,080 per-eye resolution and offers a 120Hz refresh rate for quality experiences. Its 100-degree field of view, motion controllers, and separate camera are suitable for unlocking immersive gameplay. A fantastic thing about it is that although it was for the PS4 and PS4 Pro, Sony ensured it’ll also run on the PS5.
3. HTC Vive Cosmos
The HTC Vive Cosmos is the latest HTC headset in town. Overall combined 2,880 x 1,700 resolution provides optimally sharp resolution for the eyes that is 1,440 x 1,700.
This headset has an easy-to-wear halo-style headband and attached headphones for spatial audio. It’s a highly versatile headset that allows users to switch which version of the Cosmos they’re using by simply swapping out the faceplate, controllers, and any tracking base station.
Part 5: FAQs about VR Videos
Let’s take a look at some questions by VR viewers.
Who is the Most Popular VR YouTuber?
‘Nathie’ is the most popular VR YouTuber today. He is a Netherland-based content creator whose niche is VR technology. His channel has stupendous 600k subscribers.
Is VR Bad for Your Eyes?
According to research, there is evidence that wearing VR Headsets can cause the eyesight to deteriorate, causing eye strain, discomfort, and making the vision blur.
What is the Future of VR?
VR is known for giving immersive experiences in various aspects of life and career. Education, Sports events, technology, and lots more are fields where VR is in use with artificial intelligence.
Over time, it has been a lifesaver, being helpful to many in various locations worldwide and has been even more accessible than it used to be. The future of VR holds more opportunities for us as it evolves daily.
So, the end is not coming to it anytime soon.
Conclusion
In the world today, everyone has the opportunity to experience technology at its best through VR, and the good thing is that its rapid evolvement is an assurance that it’s not ending soon. Every man and business needs VR to grow as its opportunities are massive. Whether with YouTube VR Oculus or any other platform, getting the real essence of visualization creates a big difference.
The future holds more great ways and opportunities to make things easy for us with VR. Thus, through the article, you will get to know many YouTube 360 videos and VR Videos YouTube platforms so that entertainment does not end with simple videos but goes beyond expectations.
Fashion Your YT Snapshits with Illuminated Borders
Your YouTube video, or any other clip published on any forum, gets a larger number of hits if it has an attractive thumbnail. And, the fact is, a thumbnail becomes 10x more attractive when the main character that the image has have a neon border around it.
With that said, in the following sections, you will learn a couple of methods on how to add a YouTube thumbnail border around the main characters and/or objects that are significant to the clip.
In this article
01 Add Glowing Neon Border to YouTube Thumbnail with Filmora
02 Add a Glowing Neon Border in YouTube Thumbnail with Canva
03 Outline a Person in a YouTube Thumbnail with Photoshop
Part 1: How to Add Neon Border to YouTube Thumbnail for Free with Filmora
Being one of the most versatile and intuitive post-production tools available in the market today, Wondershare Filmora X allows you to add a neon border to a YouTube thumbnail quite conveniently. You can learn how to get this done on Windows or Mac by following the steps given below.
For Win 7 or later (64-bit)
For macOS 10.12 or later
Step 1: Define Project Settings and Add Image to the Timeline
Launch Wondershare Filmora X on your PC (a MacBook Pro M1 is used here), ensure that the project aspect ratio is set to 16:9 (Widescreen) on the splash screen, and click New Project. On the main interface, click the Preview quality and display settings icon from the upper-right area of the Timeline, click Change Project Aspect Ratio, click to select 1280 x 720 (HD) from the Resolution menu of the Project Settings box, and click OK to save the custom project settings.

Then select My Media from the menu bar if not already selected, click Project Media from the navigation pane, and click Import from the Media box to select and import the image of the main character or object that you want to use in the thumbnail.

Now, drag the image from the Media box to the Timeline at the bottom.

Step 2: Clear Image Background, Add Border, and Add Custom Background
Go to Effects from the menu bar, click to select the Default tab and then AI Portrait from the navigation pane, and click and drag the Human Segmentation preset from the right box, and place it over the image track in the Timeline.

Double-click the image layer, scroll down the upper-left box to the Video Effects section, and use the Edge Thickness and Edge Feather sliders to adjust the character’s edges to make them as realistic as possible. Click OK when done.

Next, click and drag the Human Border preset over the image track in the Timeline, and follow the same procedure to customize the border. This will give the character a neon border effect.

Now, use the method explained earlier to import a custom image for the background, and drag and place it under the previous track in the Timeline.

If you are running the latest version of Filmora, you will find there are some neon light effects available under AI Portrait as well.

Step 3: Add Titles to Thumbnail
Go to Titles from the menu bar, click to select the Default tab and then Lower 3rds from the navigation pane, and click and drag your preferred lower-third preset from the right window to a separate layer in the Timeline. Double-click the lower-third layer, and use the available options in the upper-left window to change the text, its color, etc., and drag the textbox to place it to your preferred position on the image as well. Click OK to save the changes.
Next, click to select Titles from the navigation pane, and drag your preferred title from the right window to the upper-most track in the Timeline. Now use the method explained earlier to edit the text, its color, position, etc. to make it look professional.

For more tips and tricks for creating YouTube thumbnail, you can check this You Tube thumbnail creating guide .
Step 4: Get the Neon Border Thumbnail
Click the Snapshot (Camera) icon from the upper-right area of the Timeline, go to My Media from the menu bar, right-click the thumbnail of the screenshot you captured, and click Reveal in Finder (on Mac) or Reveal in Explorer (on Windows) to get to the folder the YouTube thumbnail border is saved in.

Part 2: How to Add a Glowing Neon Border in Your YouTube Thumbnail with Canva
Canva is another intuitive editing program that works on the web interface rather than having you download and install an app on your PC. You can add a neon border for YouTube thumbnails using Canva by following the instructions given below:
Step 1: Define Project Settings and Add a Background
After signing in to your Canva account, click Create a design from the top-right corner of the page, click Custom size from the bottom, define 1280 and 720 in the Width and Height fields on the box that appears respectively, and click Create new design.

Now, click to select Background from the navigation bar on the left (if the Background tool is not visible, click More and then choose Background from the expanded list), and click to select a background from the images available in the center pane.

Step 2: Upload an Image and Add Effects
Click Uploads from the navigation bar, click the More icon from the right of the Upload media button present at the top of the center pane, choose your preferred method to upload the image (with the transparent background) that you want to use, upload the image, and drag it from the center pane to the Canvas.
Note: You can use any of the tools available online to remove the background from your image for free.

To add a YouTube thumbnail border, make sure that the image that you added to the Canvas is selected, click the Duplicate icon from the upper-right area, and use the scaling handles of the copy of the image to increase its size a bit. Reposition the image back to its original location as well.
Then, click Edit image from the upper-left corner of the Canvas, click Duotone from the Edit image pane at the center, if need be, click See all, choose your preferred duotone effect to apply on the image, choose your preferred highlight and shadow colors from the box that appears next, and click Back from the top of the pane.

Next, click See all next to the Adjust section from the center pane, and drag the Blur slider to the right to increase the blur effect on the image.

Step 3: Position the Layers
While keeping the duplicate image selected, click the Position button from the upper-right area of the Canvas, and click Background to send the second image behind the first one to get the neon border effect for the photo.

Part 3: How to Outline a Person in a YouTube Thumbnail with Photoshop
Because YouTube thumbnails are nothing but static images, creating YouTube thumbnail border with Adobe Photoshop is comparatively easier. The process of doing this is given below:
Step 1: Define Document Preferences and Import an Image
Launch Adobe Photoshop on your PC, click Create new, and on the New Document customization box, define the width and height values to 1280 and 720 pixels respectively. Select Transparent from the Background Contents menu as well if not already selected. Click Create from the bottom to create a new Photoshop document with the specified document settings. Next, open the folder that contains the source image, drag the photo to Photoshop, and press Enter to place the photo.

Step 2: Remove Background from the Image
Make sure that the image layer is selected in the Layers panel on the right, go to Select from the menu bar at the top, and click Subject. From the bottom of the Layers panel, click the Add a mask icon to get rid of the background, leaving only the human on the Canvas.

Step 3: Add a Custom Background and an Outline Around the Subject
Use the method explained earlier to import a background image of your choice to Photoshop. Drag the background image layer to the bottom in the Layers panel. Double-click the masked layer, click to select Stroke from the left pane of the Layer Style box, and use the options available on the right to manage the size, color, position, etc. of the stroke that has been added around the human subject. Click OK when done, and then export the image normally to use it as a YouTube thumbnail border.

Summary
It is important to know that the default resolution of a YouTube thumbnail is 1280 x 720 pixels that is usually written and referred to as 720p. While adding a YouTube thumbnail border, it is also imperative to have a good sense of color combination and fonts. Furthermore, a decent tool like Wondershare Filmora X must be used to add an appealing neon border around the main subject in the thumbnail image easily and quickly.
02 Add a Glowing Neon Border in YouTube Thumbnail with Canva
03 Outline a Person in a YouTube Thumbnail with Photoshop
Part 1: How to Add Neon Border to YouTube Thumbnail for Free with Filmora
Being one of the most versatile and intuitive post-production tools available in the market today, Wondershare Filmora X allows you to add a neon border to a YouTube thumbnail quite conveniently. You can learn how to get this done on Windows or Mac by following the steps given below.
For Win 7 or later (64-bit)
For macOS 10.12 or later
Step 1: Define Project Settings and Add Image to the Timeline
Launch Wondershare Filmora X on your PC (a MacBook Pro M1 is used here), ensure that the project aspect ratio is set to 16:9 (Widescreen) on the splash screen, and click New Project. On the main interface, click the Preview quality and display settings icon from the upper-right area of the Timeline, click Change Project Aspect Ratio, click to select 1280 x 720 (HD) from the Resolution menu of the Project Settings box, and click OK to save the custom project settings.
Then select My Media from the menu bar if not already selected, click Project Media from the navigation pane, and click Import from the Media box to select and import the image of the main character or object that you want to use in the thumbnail.
Now, drag the image from the Media box to the Timeline at the bottom.
Step 2: Clear Image Background, Add Border, and Add Custom Background
Go to Effects from the menu bar, click to select the Default tab and then AI Portrait from the navigation pane, and click and drag the Human Segmentation preset from the right box, and place it over the image track in the Timeline.
Double-click the image layer, scroll down the upper-left box to the Video Effects section, and use the Edge Thickness and Edge Feather sliders to adjust the character’s edges to make them as realistic as possible. Click OK when done.
Next, click and drag the Human Border preset over the image track in the Timeline, and follow the same procedure to customize the border. This will give the character a neon border effect.
Now, use the method explained earlier to import a custom image for the background, and drag and place it under the previous track in the Timeline.
If you are running the latest version of Filmora, you will find there are some neon light effects available under AI Portrait as well.
Step 3: Add Titles to Thumbnail
Go to Titles from the menu bar, click to select the Default tab and then Lower 3rds from the navigation pane, and click and drag your preferred lower-third preset from the right window to a separate layer in the Timeline. Double-click the lower-third layer, and use the available options in the upper-left window to change the text, its color, etc., and drag the textbox to place it to your preferred position on the image as well. Click OK to save the changes.
Next, click to select Titles from the navigation pane, and drag your preferred title from the right window to the upper-most track in the Timeline. Now use the method explained earlier to edit the text, its color, position, etc. to make it look professional.
For more tips and tricks for creating YouTube thumbnail, you can check this You Tube thumbnail creating guide .
Step 4: Get the Neon Border Thumbnail
Click the Snapshot (Camera) icon from the upper-right area of the Timeline, go to My Media from the menu bar, right-click the thumbnail of the screenshot you captured, and click Reveal in Finder (on Mac) or Reveal in Explorer (on Windows) to get to the folder the YouTube thumbnail border is saved in.
Part 2: How to Add a Glowing Neon Border in Your YouTube Thumbnail with Canva
Canva is another intuitive editing program that works on the web interface rather than having you download and install an app on your PC. You can add a neon border for YouTube thumbnails using Canva by following the instructions given below:
Step 1: Define Project Settings and Add a Background
After signing in to your Canva account, click Create a design from the top-right corner of the page, click Custom size from the bottom, define 1280 and 720 in the Width and Height fields on the box that appears respectively, and click Create new design.
Now, click to select Background from the navigation bar on the left (if the Background tool is not visible, click More and then choose Background from the expanded list), and click to select a background from the images available in the center pane.
Step 2: Upload an Image and Add Effects
Click Uploads from the navigation bar, click the More icon from the right of the Upload media button present at the top of the center pane, choose your preferred method to upload the image (with the transparent background) that you want to use, upload the image, and drag it from the center pane to the Canvas.
Note: You can use any of the tools available online to remove the background from your image for free.
To add a YouTube thumbnail border, make sure that the image that you added to the Canvas is selected, click the Duplicate icon from the upper-right area, and use the scaling handles of the copy of the image to increase its size a bit. Reposition the image back to its original location as well.
Then, click Edit image from the upper-left corner of the Canvas, click Duotone from the Edit image pane at the center, if need be, click See all, choose your preferred duotone effect to apply on the image, choose your preferred highlight and shadow colors from the box that appears next, and click Back from the top of the pane.
Next, click See all next to the Adjust section from the center pane, and drag the Blur slider to the right to increase the blur effect on the image.
Step 3: Position the Layers
While keeping the duplicate image selected, click the Position button from the upper-right area of the Canvas, and click Background to send the second image behind the first one to get the neon border effect for the photo.
Part 3: How to Outline a Person in a YouTube Thumbnail with Photoshop
Because YouTube thumbnails are nothing but static images, creating YouTube thumbnail border with Adobe Photoshop is comparatively easier. The process of doing this is given below:
Step 1: Define Document Preferences and Import an Image
Launch Adobe Photoshop on your PC, click Create new, and on the New Document customization box, define the width and height values to 1280 and 720 pixels respectively. Select Transparent from the Background Contents menu as well if not already selected. Click Create from the bottom to create a new Photoshop document with the specified document settings. Next, open the folder that contains the source image, drag the photo to Photoshop, and press Enter to place the photo.
Step 2: Remove Background from the Image
Make sure that the image layer is selected in the Layers panel on the right, go to Select from the menu bar at the top, and click Subject. From the bottom of the Layers panel, click the Add a mask icon to get rid of the background, leaving only the human on the Canvas.
Step 3: Add a Custom Background and an Outline Around the Subject
Use the method explained earlier to import a background image of your choice to Photoshop. Drag the background image layer to the bottom in the Layers panel. Double-click the masked layer, click to select Stroke from the left pane of the Layer Style box, and use the options available on the right to manage the size, color, position, etc. of the stroke that has been added around the human subject. Click OK when done, and then export the image normally to use it as a YouTube thumbnail border.
Summary
It is important to know that the default resolution of a YouTube thumbnail is 1280 x 720 pixels that is usually written and referred to as 720p. While adding a YouTube thumbnail border, it is also imperative to have a good sense of color combination and fonts. Furthermore, a decent tool like Wondershare Filmora X must be used to add an appealing neon border around the main subject in the thumbnail image easily and quickly.
Also read:
- [Updated] Crafting Dynamic Collab Videos with Content Partners on YouTube
- Best Movie Swaps Top 7 Alternate Films
- Expert Calls Merging YouTube & Sustainable Backgrounds
- In 2024, Discovering Your Dream Makeup Routine with YouTube's Leaders
- Creative Vlog Ideas for Daily Use for 2024
- [Updated] Acquire High-Quality Sounds for Media Creators
- Unveiling Video Capabilities DSLR or Mirrorless?
- [Updated] Eco-Friendly Tactics for YouTube Call Conversions
- Unleash Pure Content How to Block YouTube Ads Effectively
- 2024 Approved Adding Clear Timestamps to Your YouTube Channel's Live Streams
- Boost Views with Smart YouTube Backlink Tactics for 2024
- [Updated] A Deep Dive Into the Top 9 YouTube Downloader Apps for Android
- Best iPhone & Android Photo & Video Capture Applications Reviewed
- YouTube Revenue The Unfavorable Guidelines
- [Updated] Detailed Look Into YouTube's Featured Community Dialogue
- 2024 Approved Deep Dive Into the Rise of Online Performing Artists
- [Updated] Cut Buffering Time – Turn On AV1 in YouTube Settings
- 30 Tips & Tricks to Take Your YouTube Shorts Templates to the Next Level for 2024
- 2024 Approved Best 7 LIVE Streaming Apps to Amplify Your YouTube Presence on iPhone and Android
- How to Turn on AV1 Settings on YouTube and Why You Should Do It
- In 2024, Enhancing Your YouTube Reach with FameBit Ad Sponsorships
- YouTube Earnings Estimator Tools
- [New] Elevate Your Profit with These Top 10 Simplified YouTube Business Channels
- Charting Success with These Top 15 YouTube Introduction Techniques
- Precision in Sound Cutting Out Unwanted Volume
- [New] Creating Convincing News Final Buzzes
- Mastering YouTube's Vista An In-Depth Tutorial on Video Submissions
- [New] Essential Guide for Prime Webcams in YouTube Live Broadcasts
- Cutting-Edge Content Sharing Your Guide to YouTube+TikTok Linkup
- Updated In 2024, Unbiased Review How to Obtain Filmora Without Resorting to Piracy
- [Updated] Maintaining Image Integrity Effective Instagram Photowatermarking
- Updated In 2024, How to Make Eye Zoom Transition Effect with Filmora
- [New] 2024 Approved Comprehensively Reviewing Top 10 No-Cost Video Communication Apps for Professional and Academic Needs
- [Updated] Amp Up Illumination Basic Steps to Lighten iPhone Films
- Understanding Syma X8C Sensor Technology
- [New] 2024 Approved Elevate Visuals Best Practices for Impactful IG Video Loops
- [Updated] In 2024, Cutting-Edge Marketing Anticipating FB's Trends of the New Decade
- In 2024, Latest Guide on iPad 2/3 and iPhone 15 Pro iCloud Activation Lock Bypass
- How to Fix when Apple Account Locked From iPhone 7?
- 2024 Approved Experience Legendary PS3 Gaming on Your PC Today
- Acclaimed AI Lyrics Converters and Their Rankings for 2024
- [Updated] Crafting Quality Content for YouTube Success for 2024
- Title: "2024 Approved Top 10 VR Videos on YouTube to Have Immersive Experience"
- Author: Brian
- Created at : 2024-06-26 00:20:49
- Updated at : 2024-06-27 00:20:49
- Link: https://youtube-video-recordings.techidaily.com/2024-approved-top-10-vr-videos-on-youtube-to-have-immersive-experience/
- License: This work is licensed under CC BY-NC-SA 4.0.
