
:max_bytes(150000):strip_icc()/womanchargingcarwithdognearby_RyanJLane_Getty-60af98b715d241ea8be4252d5bf1e967.jpg)
"2024 Approved Essential Steps to Add Custom Imagery in YouTube Videos"
Essential Steps to Add Custom Imagery in YouTube Videos
How To Add Custom Thumbnails to Your YouTube Videos

Richard Bennett
Mar 27, 2024• Proven solutions
YouTube custom thumbnails are a great way to get people’s attention to your YouTube video. It’s a pretty simple process but if you are wondering how to create a thumbnail and add the thumbnail to YouTube video and customize it with the correct size. You have come to the right place. While in this article, I will show you how to create and add a thumbnail to a YouTube video and how to customize the YouTube video thumbnail. Follow these easy steps below and add eyecatching customed thumbnails to your YouTube videos in no time.
- Part 1: Create and Add Custom Thumbnails to YouTube
- Part 2: Tools to Create Custom YouTube Video Thumbnails
- Part 3: How to Change A Thumbnail On YouTube
- Part 4: Things You Need to Know Before Making a YouTube Custom Thumbnail
- Part 5: Tips on How to Make Good YouTube Thumbnails to Get More Clicks
- Part 6: YouTube Thumbnail FAQs
How To Add Custom Thumbnails to Your YouTube Videos [Steps, Tools and Tips]
We have just made a video tutorial about how to make a YouTube video thumbnail, check it below to find out the tips and tricks of making customized YouTube thumbnail.


Part 1: How to Make a Thumbnail for YouTube and Add Custom Thumbnails to YouTube
After you’ve verified your account and made your thumbnail, it’s finally time to upload it to your video and make a custom thumbnail. To do this, go to Creator Studio and then Video Manager. You’ll see a button labeled “Edit” next to each video, and an arrow pointing down. Click Thumbnail Editor.
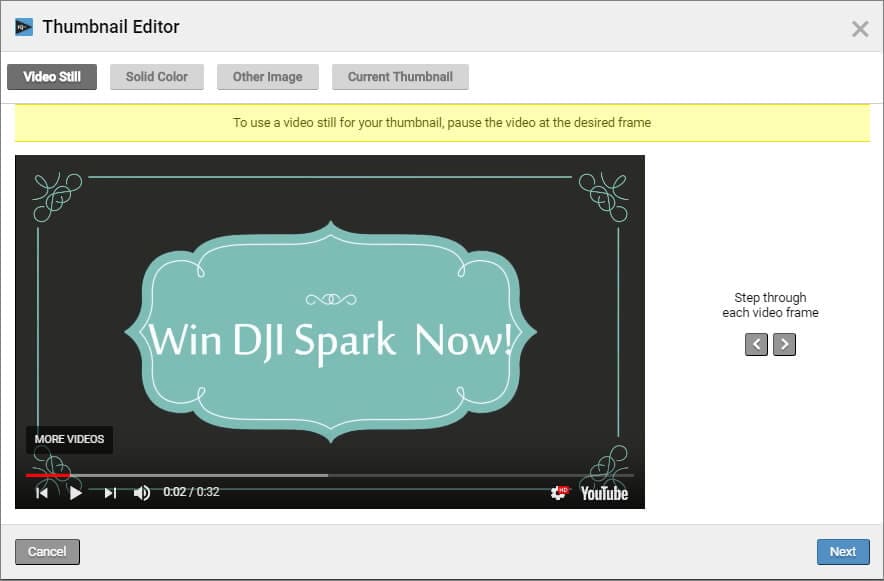
In Thumbnail Editor, you can use the still images in the video as a thumbnail, choose a solid background color for the thumbnail, or add other images from your computer. I will show you the steps of how to customize the video still as a video thumbnail.
1. Preview the video and choose the target video still. You can click the Playback button and check the video and pause it at the desired frame. Or, you can step through each frame by clicking the Preview Frame button and Next Frame icon. Click Next to continue.
2. And now, you can add text, image and shape overlays to the thumbnail. You can change the text font, size, opacity and more.
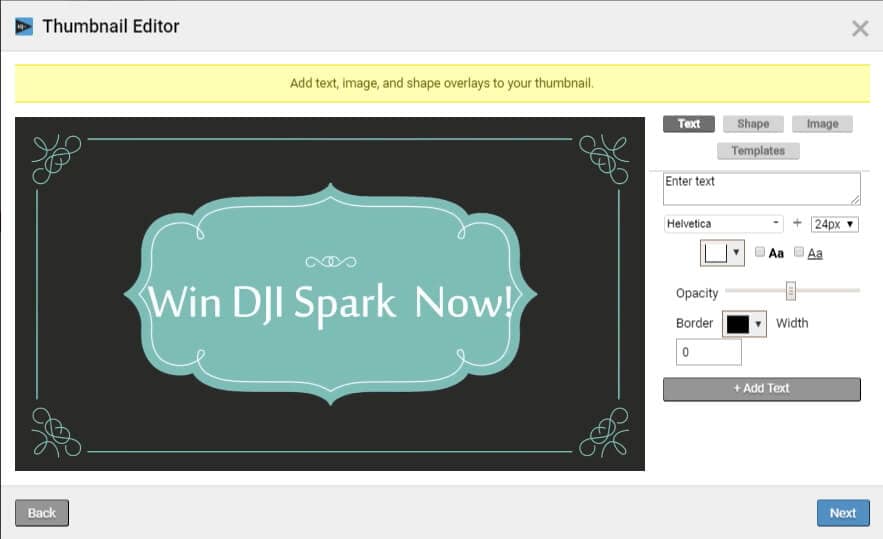
3. Click Next to save the thumbnail and you will see how the thumbnail displays on different platforms such as YouTube, Facebook and Twitter. Click Save to save the video thumbnail.
In this way, you can add a custom thumbnail to the new videos and change the video thumbnail of the previously uploaded videos.
Part 2: Thumbnail Makers to Create Custom YouTube Thumbnails
Of course, you can use some of the best tools to make a YouTube video thumbnail. In this part, we will show you some of the best tools to create custom YouTube thumbnails.
Download Mac Version ](https://tools.techidaily.com/wondershare/filmora/download/ )
1. Create YouTube Thumbnail with Online solution - Canva
Canva is a free, powerful online image editing program with tons of great templates to get you started. One of their templates just happens to be YouTube thumbnails. Open Canva and select the “YouTube Thumbnail” design type. Use your own photo or choose from a huge library, then add text and effects to really make it stand out. Save and share — easy as that.
Check this video tutorial to see how to Make a Youtube Thumbnail using Canva.
You may also like: Best online Photo Editor
2. Design YouTube thumbnail with a Desktop solution - Gimp
Gimp is one of the most popular image editing programs around for one very simple reason: it’s powerful and free! Where Canva uses a lot of templates, Gimp gives you absolute, full control over how you want your image to look. Make a 1280x720 image and start putting together your eye-catching thumbnail exactly how you want to.
Check this video tutorial to see how to make professional Thumbnails for YouTube Videos with Gimp:
Part 3: How to Change A Thumbnail On YouTube
Note: YouTube allows verified YouTube accounts (accounts that provided YouTube with a working phone number) to upload custom thumbnail images and change them accordingly.
In this part, we’ll be going over how to change a thumbnail image on YouTube. There are pictures to make it easy to follow along.
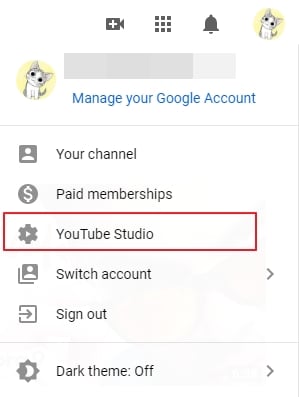
- After signing into YouTube with your Google account, click on your profile on the top right corner. Click on YouTube Studio from the drop-down menu.
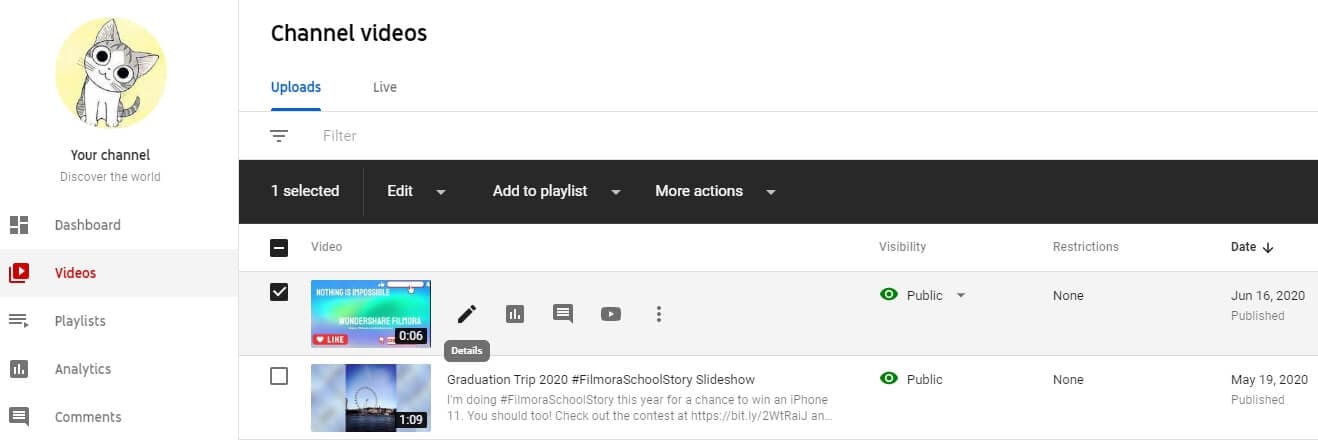
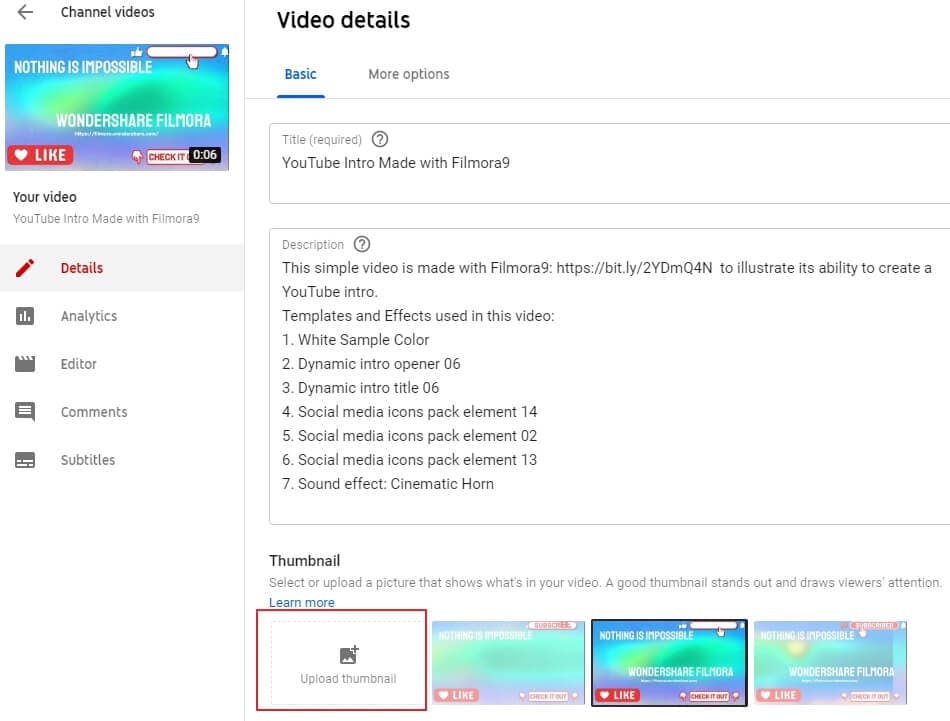
- On the left side of the page, click on Videos and then find your video and click on the details button.
- Find the Thumbnail section in the basic video details tab, and then click the Upload thumbnail to select the image that you want to upload.
- Finally, click on the Save button on the right upper corner. And just like that, in seven easy steps, we’re done changing the thumbnail of a YouTube video.
If you don’t have an image to upload but you want to check out some online resources to make your own, check out our Top YouTube Thumbnail Makers .
Part 4: Things You Need to Know Before Making a Custom Thumbnail
- About the proper YouTube video thumbnail size: Your thumbnail should be 1280x720 pixels in size and be less than 2MB. The minimum width of the image is 640 pixels.
- About the YouTube Image thumbnail format: Use .JPG, .PNG, .GIF or .BMP files for your thumbnail image.
- You’ll want your thumbnails to stand out. Bright colored text is a simple, easy way to draw people’s attention. Red, white, yellow, or orange are all popular choices.
- You can even do a little homework to see what colors others are using for similar videos to yours, and then choose different colors to stand out.
One word of warning: your thumbnail should be related to the content of your video. Misleading thumbnail images, if reported, will reflect poorly on your channel. You’ll get a negative rating in the community status part of your channel. This can actually remove your ability to use custom thumbnails, so keep it honest!
You may also like: How to Make YouTube Channel Art
To make a creative YouTube video, you may also need a powerful video editing software. Check how to edit a YouTube video in Filmora video editor and download it to try.
You may also like: Best video editing software for YouTube
Part 5: Tips on How to Make Good YouTube Thumbnails - Get More Clicks
The thumbnails of your videos play a huge role in convincing people to watch them; a good YouTube thumbnail will get you more views and more potential subscribers. This part will give you 6 tips on creating thumbnails that help grow your channel. Now let’s learn how to make thumbnails using Wondershare PixStudio.
1. Stay On Topic
Your thumbnail should tell a story; it should be clear from looking at it what viewers will get out of watching the video, be it knowledge or entertainment. If your thumbnail sets expectations that your video doesn’t deliver on, people will click away quickly. You may get views quickly, but you won’t get much watch time. That will tell YouTube’s search algorithm ‘people aren’t getting what they want from this, rank it lower’. That leads to fewer views over time, and gives the people who do manage to find your video a negative opinion of your channel.
Very few people intentionally use thumbnails that have nothing to do with the content of their videos – i.e, most people understand not to use a picture of a kitten in the thumbnail for their tech review, unless maybe their kitten is the one doing the review (which would be adorable, someone should do that). People who want serious advice won’t click, and people who click to see a kitten will click away fast.

This thumbnail had better be for a kitten’s iPhone review video or people will click away. Fast.
A mistake a lot of creators do make is creating a thumbnail that is meant to evoke an emotion which the video itself does not justify. For example, if you see a picture of a YouTuber looking nervous alongside text that reads ‘My Secret’, you will think they are going to share something deeply personal. You will be curious, and you may even be worried about them. You’ll probably click. Then, if their secret is that they don’t like pineapple on pizza, you’ll probably be angry. This technique gets clicks, but not a lot of watch time and it will lose you subs in the long run.
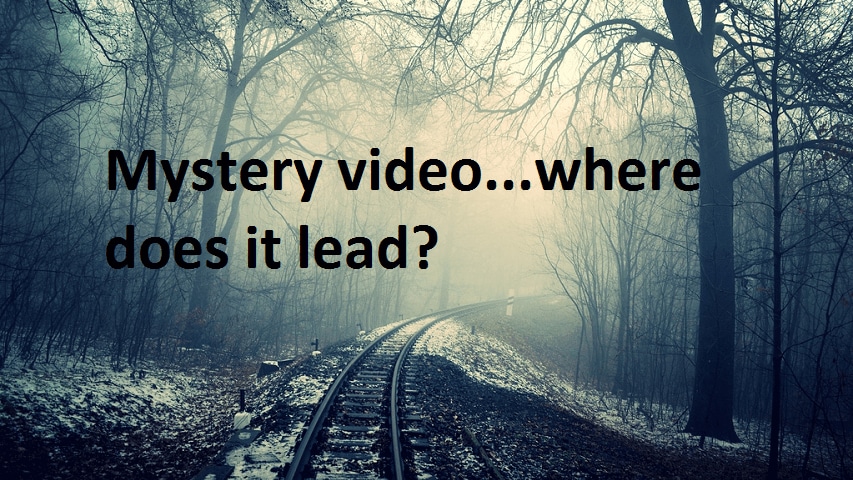
2. Don’t Be Mysterious
A good thumbnail doesn’t make people guess. Your thumbnail should tell people what’s in your video, not make them wonder about it. People want to know what they’re being asked to spend time watching.
Often, they will be looking for the answer to a specific question and will completely ignore anything that doesn’t show – in the thumbnail – that it has their answer.
Sometimes big channels can get away with stuff like this, because large portions of their audiences are interested in them as people and will already be curious about anything they post. This technique will not bring in new viewers, though.
If this came up in a search for ‘smoky eye tutorial’, would you click it?
When people want answers, they want to feel confident that they video they click on will have those answers. If you have great content, then let people know it!
3. People Like People
Viewers are more likely to click on a thumbnail if they feel a connection when they look at it. One of the best ways to create a feeling of connection is through eye contact, and you can apply that principle to your YouTube thumbnails easily.
Just make sure you’re in them.
You can either compose a photo to use as your thumbnail, or use a screenshot from your video. Ideally, the image of you will convey the emotional tone of the video and tell potential viewers what it is about, besides you.
So, if you want to post a funny video that is also about making brownies, maybe a picture of you smiling while holding up a tray of brownies would be a better direction than just showing the brownies?
4. Check Out The Competition
Before you post your video, type your topic into YouTube’s search engine and see what comes up. This will give you insight into what kinds of thumbnails are performing well for other people, as well as what you can do to stand out in comparison.
Phil starts talking about thumbnails at 6:09, and he has great tips on checking out your competition!
For example, if all five of the top-ranked videos for the search ‘how to build a cabinet’ show images of the YouTuber smiling while holding a power tool, then your thumbnail for a video on the same topic should also be a picture of you smiling and holding a power tool. You know that works, so why not do it?
5. Use Color in Interesting Ways
You want to use colors that will help you stand out from the other search results. While checking out your competition if you notice that all the people in the other thumbnails are wearing black or navy blue, it will be a good idea for you to wear a brighter color for your shoot to grab a bit more attention.
Beyond simply using colors that are different from other people’s colors, you should consider the emotions different colors trigger.
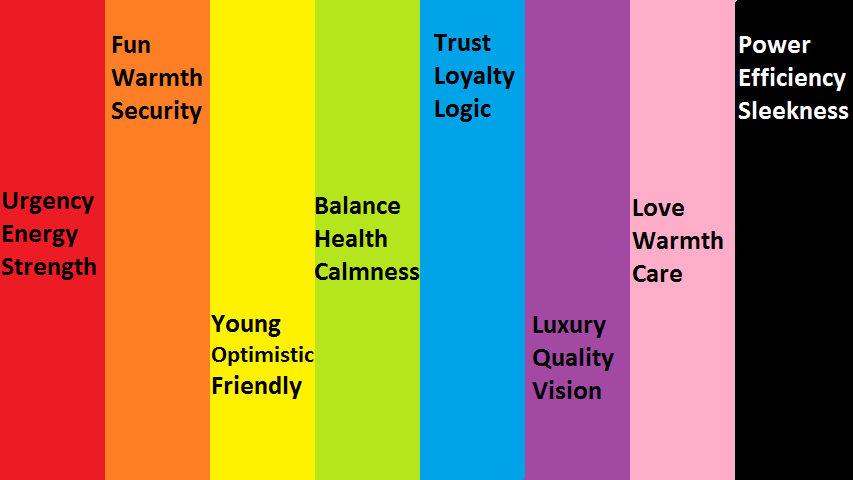
Maybe don’t use a lot of green and yellow in the thumbnail for your angry video rant?
6. Make Your Text Huge
Usually, you’ll want to use a bit of text in your thumbnail. It might be the full title of your video, or just a keyword or phrase. You don’t want to use a full sentence because you won’t have room for it if you’re using huge text.
The reason you should use huge text is so that people can read it. Remember that when people see your thumbnail in their search results, it will be much smaller than it will look while you are creating it. Text that looks big enough while you are creating your thumbnail will be much smaller when people are actually trying to read it, and that goes double for viewers watching on their small smartphone screens.
Frequently Asked Questions about YouTube Thumbnail
1. What is YouTube Thumbnail?
When you upload a video on YouTube, YouTube gives you three images to choose from in the selection of your video’s thumbnail image. These three images are just freeze-frame snapshots from different parts of your video, which may not tell your viewers what your video is really all about.
2. Can You Change YouTube Thumbnail After Publishing?
Yes, you can replace the auto-generated thumbnail with the customized thumbnail you like. But YouTube only allows verified YouTube accounts to upload custom thumbnail images.
3. How Long Does It Take for a Thumbnail to Change on YouTube?
Normally, if you have a good internet connection, you can see the thumbnail is changed within 10 seconds.
4. Why YouTube Thumbnail is Important?
When you get more people watching your video for longer, it increases your watch time and tells YouTube’s search algorithm ‘people like this, rank it higher’. Being ranked higher gets you more views, and even more watch time. It’s a wonderful cycle that all begins with a great thumbnail (paired with a good title and the right tags).
Richard Bennett
Richard Bennett is a writer and a lover of all things video.
Follow @Richard Bennett
Richard Bennett
Mar 27, 2024• Proven solutions
YouTube custom thumbnails are a great way to get people’s attention to your YouTube video. It’s a pretty simple process but if you are wondering how to create a thumbnail and add the thumbnail to YouTube video and customize it with the correct size. You have come to the right place. While in this article, I will show you how to create and add a thumbnail to a YouTube video and how to customize the YouTube video thumbnail. Follow these easy steps below and add eyecatching customed thumbnails to your YouTube videos in no time.
- Part 1: Create and Add Custom Thumbnails to YouTube
- Part 2: Tools to Create Custom YouTube Video Thumbnails
- Part 3: How to Change A Thumbnail On YouTube
- Part 4: Things You Need to Know Before Making a YouTube Custom Thumbnail
- Part 5: Tips on How to Make Good YouTube Thumbnails to Get More Clicks
- Part 6: YouTube Thumbnail FAQs
How To Add Custom Thumbnails to Your YouTube Videos [Steps, Tools and Tips]
We have just made a video tutorial about how to make a YouTube video thumbnail, check it below to find out the tips and tricks of making customized YouTube thumbnail.
Part 1: How to Make a Thumbnail for YouTube and Add Custom Thumbnails to YouTube
After you’ve verified your account and made your thumbnail, it’s finally time to upload it to your video and make a custom thumbnail. To do this, go to Creator Studio and then Video Manager. You’ll see a button labeled “Edit” next to each video, and an arrow pointing down. Click Thumbnail Editor.
In Thumbnail Editor, you can use the still images in the video as a thumbnail, choose a solid background color for the thumbnail, or add other images from your computer. I will show you the steps of how to customize the video still as a video thumbnail.
1. Preview the video and choose the target video still. You can click the Playback button and check the video and pause it at the desired frame. Or, you can step through each frame by clicking the Preview Frame button and Next Frame icon. Click Next to continue.
2. And now, you can add text, image and shape overlays to the thumbnail. You can change the text font, size, opacity and more.
3. Click Next to save the thumbnail and you will see how the thumbnail displays on different platforms such as YouTube, Facebook and Twitter. Click Save to save the video thumbnail.
In this way, you can add a custom thumbnail to the new videos and change the video thumbnail of the previously uploaded videos.
Part 2: Thumbnail Makers to Create Custom YouTube Thumbnails
Of course, you can use some of the best tools to make a YouTube video thumbnail. In this part, we will show you some of the best tools to create custom YouTube thumbnails.
Download Mac Version ](https://tools.techidaily.com/wondershare/filmora/download/ )
1. Create YouTube Thumbnail with Online solution - Canva
Canva is a free, powerful online image editing program with tons of great templates to get you started. One of their templates just happens to be YouTube thumbnails. Open Canva and select the “YouTube Thumbnail” design type. Use your own photo or choose from a huge library, then add text and effects to really make it stand out. Save and share — easy as that.
Check this video tutorial to see how to Make a Youtube Thumbnail using Canva.
You may also like: Best online Photo Editor
2. Design YouTube thumbnail with a Desktop solution - Gimp
Gimp is one of the most popular image editing programs around for one very simple reason: it’s powerful and free! Where Canva uses a lot of templates, Gimp gives you absolute, full control over how you want your image to look. Make a 1280x720 image and start putting together your eye-catching thumbnail exactly how you want to.
Check this video tutorial to see how to make professional Thumbnails for YouTube Videos with Gimp:
Part 3: How to Change A Thumbnail On YouTube
Note: YouTube allows verified YouTube accounts (accounts that provided YouTube with a working phone number) to upload custom thumbnail images and change them accordingly.
In this part, we’ll be going over how to change a thumbnail image on YouTube. There are pictures to make it easy to follow along.
- After signing into YouTube with your Google account, click on your profile on the top right corner. Click on YouTube Studio from the drop-down menu.
- On the left side of the page, click on Videos and then find your video and click on the details button.
- Find the Thumbnail section in the basic video details tab, and then click the Upload thumbnail to select the image that you want to upload.
- Finally, click on the Save button on the right upper corner. And just like that, in seven easy steps, we’re done changing the thumbnail of a YouTube video.
If you don’t have an image to upload but you want to check out some online resources to make your own, check out our Top YouTube Thumbnail Makers .
Part 4: Things You Need to Know Before Making a Custom Thumbnail
- About the proper YouTube video thumbnail size: Your thumbnail should be 1280x720 pixels in size and be less than 2MB. The minimum width of the image is 640 pixels.
- About the YouTube Image thumbnail format: Use .JPG, .PNG, .GIF or .BMP files for your thumbnail image.
- You’ll want your thumbnails to stand out. Bright colored text is a simple, easy way to draw people’s attention. Red, white, yellow, or orange are all popular choices.
- You can even do a little homework to see what colors others are using for similar videos to yours, and then choose different colors to stand out.
One word of warning: your thumbnail should be related to the content of your video. Misleading thumbnail images, if reported, will reflect poorly on your channel. You’ll get a negative rating in the community status part of your channel. This can actually remove your ability to use custom thumbnails, so keep it honest!
You may also like: How to Make YouTube Channel Art
To make a creative YouTube video, you may also need a powerful video editing software. Check how to edit a YouTube video in Filmora video editor and download it to try.
You may also like: Best video editing software for YouTube
Part 5: Tips on How to Make Good YouTube Thumbnails - Get More Clicks
The thumbnails of your videos play a huge role in convincing people to watch them; a good YouTube thumbnail will get you more views and more potential subscribers. This part will give you 6 tips on creating thumbnails that help grow your channel. Now let’s learn how to make thumbnails using Wondershare PixStudio.
1. Stay On Topic
Your thumbnail should tell a story; it should be clear from looking at it what viewers will get out of watching the video, be it knowledge or entertainment. If your thumbnail sets expectations that your video doesn’t deliver on, people will click away quickly. You may get views quickly, but you won’t get much watch time. That will tell YouTube’s search algorithm ‘people aren’t getting what they want from this, rank it lower’. That leads to fewer views over time, and gives the people who do manage to find your video a negative opinion of your channel.
Very few people intentionally use thumbnails that have nothing to do with the content of their videos – i.e, most people understand not to use a picture of a kitten in the thumbnail for their tech review, unless maybe their kitten is the one doing the review (which would be adorable, someone should do that). People who want serious advice won’t click, and people who click to see a kitten will click away fast.
This thumbnail had better be for a kitten’s iPhone review video or people will click away. Fast.
A mistake a lot of creators do make is creating a thumbnail that is meant to evoke an emotion which the video itself does not justify. For example, if you see a picture of a YouTuber looking nervous alongside text that reads ‘My Secret’, you will think they are going to share something deeply personal. You will be curious, and you may even be worried about them. You’ll probably click. Then, if their secret is that they don’t like pineapple on pizza, you’ll probably be angry. This technique gets clicks, but not a lot of watch time and it will lose you subs in the long run.
2. Don’t Be Mysterious
A good thumbnail doesn’t make people guess. Your thumbnail should tell people what’s in your video, not make them wonder about it. People want to know what they’re being asked to spend time watching.
Often, they will be looking for the answer to a specific question and will completely ignore anything that doesn’t show – in the thumbnail – that it has their answer.
Sometimes big channels can get away with stuff like this, because large portions of their audiences are interested in them as people and will already be curious about anything they post. This technique will not bring in new viewers, though.
If this came up in a search for ‘smoky eye tutorial’, would you click it?
When people want answers, they want to feel confident that they video they click on will have those answers. If you have great content, then let people know it!
3. People Like People
Viewers are more likely to click on a thumbnail if they feel a connection when they look at it. One of the best ways to create a feeling of connection is through eye contact, and you can apply that principle to your YouTube thumbnails easily.
Just make sure you’re in them.
You can either compose a photo to use as your thumbnail, or use a screenshot from your video. Ideally, the image of you will convey the emotional tone of the video and tell potential viewers what it is about, besides you.
So, if you want to post a funny video that is also about making brownies, maybe a picture of you smiling while holding up a tray of brownies would be a better direction than just showing the brownies?
4. Check Out The Competition
Before you post your video, type your topic into YouTube’s search engine and see what comes up. This will give you insight into what kinds of thumbnails are performing well for other people, as well as what you can do to stand out in comparison.
Phil starts talking about thumbnails at 6:09, and he has great tips on checking out your competition!
For example, if all five of the top-ranked videos for the search ‘how to build a cabinet’ show images of the YouTuber smiling while holding a power tool, then your thumbnail for a video on the same topic should also be a picture of you smiling and holding a power tool. You know that works, so why not do it?
5. Use Color in Interesting Ways
You want to use colors that will help you stand out from the other search results. While checking out your competition if you notice that all the people in the other thumbnails are wearing black or navy blue, it will be a good idea for you to wear a brighter color for your shoot to grab a bit more attention.
Beyond simply using colors that are different from other people’s colors, you should consider the emotions different colors trigger.
Maybe don’t use a lot of green and yellow in the thumbnail for your angry video rant?
6. Make Your Text Huge
Usually, you’ll want to use a bit of text in your thumbnail. It might be the full title of your video, or just a keyword or phrase. You don’t want to use a full sentence because you won’t have room for it if you’re using huge text.
The reason you should use huge text is so that people can read it. Remember that when people see your thumbnail in their search results, it will be much smaller than it will look while you are creating it. Text that looks big enough while you are creating your thumbnail will be much smaller when people are actually trying to read it, and that goes double for viewers watching on their small smartphone screens.
Frequently Asked Questions about YouTube Thumbnail
1. What is YouTube Thumbnail?
When you upload a video on YouTube, YouTube gives you three images to choose from in the selection of your video’s thumbnail image. These three images are just freeze-frame snapshots from different parts of your video, which may not tell your viewers what your video is really all about.
2. Can You Change YouTube Thumbnail After Publishing?
Yes, you can replace the auto-generated thumbnail with the customized thumbnail you like. But YouTube only allows verified YouTube accounts to upload custom thumbnail images.
3. How Long Does It Take for a Thumbnail to Change on YouTube?
Normally, if you have a good internet connection, you can see the thumbnail is changed within 10 seconds.
4. Why YouTube Thumbnail is Important?
When you get more people watching your video for longer, it increases your watch time and tells YouTube’s search algorithm ‘people like this, rank it higher’. Being ranked higher gets you more views, and even more watch time. It’s a wonderful cycle that all begins with a great thumbnail (paired with a good title and the right tags).
Richard Bennett
Richard Bennett is a writer and a lover of all things video.
Follow @Richard Bennett
A Step-by-Step Guide to Elevate Your Stream on YouTube
Create High-Quality Video - Wondershare Filmora
An easy and powerful YouTube video editor
Numerous video and audio effects to choose from
Detailed tutorials provided by the official channel
Amidst many online applications is Twitch. This live streaming platform takes your experience to another level. You can use it to make crafts, play games, attract broadcasters, and many more. Twitch was launched in 2011, and since then, it has attracted millions of users, managing a database of about 4 million broadcasters by early 2020. With it, users can stream their activities as others watch in real-time. Just browse a category to find a stream.
You can also follow streamers that you like on the platform and get updates and notifications immediately after they are posted. But how do you start a career on a platform like Twitch? You need to broadcast and gather a large following. You can use built-in audiences from other platforms like Facebook. Let’s dive into the core of the matter and look at how to upload Twitch streams to YouTube and build your platform.

In this article
02 What is the benefit of uploading your Twitch Streams to YouTube
03 How to upload your Twitch Streams to YouTube
What is Twitch VOD?
Twitch Video on Demand (VOD) is a recording of previously streamed content. It provides briefings if you missed catching the Twitch live stream. Just watch the VOD from your favorite streamer and be engaged the best way possible. However, VODs don’t last forever. They are removed after two weeks of broadcast. But streamers with Partner Status can have their VODs last up to 60 days.
- How to enable Twitch VOD?
VODs are the best form to archive streams that your fans missed. Even though they are not enabled by default, you can manually enable them and not let your fans miss any important event from your channel. They’ll find it under the “Videos” tab on any Twitch channel. Follow these steps to enable VOD on your channel.
Step 1. Go to your profile icon in the top right corner of Twitch
Check in the “Channel & Video” section and locate the “Stream Key & Preferences” menu.

Step 2. Click on “Creator Dashboard”
Remember, you can enable VODs from your creator dashboard. Just go under the “Settings” tab and click on the “Stream section” of the creator dashboard. Check under the subtitle “VOD Settings” and get the option to store past broadcasts. You can also toggle the slider to store your past broadcasts.

Step 3 Click on the “Settings” tab on the left-hand side and go to Stream
You’ll get various drop-down menu options. Click on the “Settings” tab and choose the “Stream” option. The system will navigate to a new page, thus setting your preferences for VODs and clips.
Step 4. Go to “VOD Settings” and toggle on the “Store Past Broadcast.”
Ensure you have the toggle option turned ON under the “VOD Settings.” If it’s “ON,” you’ll realize the toggle will be purple, with a checkmark in it. Twitch will be confirmed to be enabled if it’s purple.

- Frequently Asked Question about Twitch VOD
These are some questions frequently asked by Twitch users.
1. How long will Twitch store my VOD
Your Twitch can either be stored for 14 or 60 days, depending on your level. For Twitch Prime, Twitch Partner or a Twitch Turbo user has their past broadcasts automatically saved for 60 days before deletion. But if you are not connected to these three options, your past broadcasts will be saved for only 14 days before deletion.
Since your past broadcasts cannot be live for more than 60 days, you have the option to download the video to your computer before the validity days expire and Twitch deletes it. You can use an External Hard drive to save the past broadcast content. Likewise, it is possible to turn your past broadcast content into Highlight and, in turn, permanently store them on Twitch.
2. What is the difference between Twitch VOD, Highlights, and Clips
Twitch VOD is a previously saved video of your live stream content. You choose to save either part or the entire content of your previously streamed content. More so, you don’t need any additional requirements to use VOD.
Highlights are short videos that have been edited from your past broadcast content. You can save them on Twitch permanently. Streamers majorly use highlights to save video game achievements. Unlike VOD Twitch that can be saved up to 60 days, Highlights usually lasts no more than 3 minutes.
- To make Highlights on Twitch, first, navigate to your Dashboard.
- Then scroll down and click on “Content” > “Video Producer.
- Next, press on “All Videos” to change them to “Past Broadcasts.”
- Now press the “Highlight” button, and Twitch will immediately open a new tab for “Twitch Highlighter Tool.”
- Then select the video part to include as “Highlight” and press the “Create Highlights” button.
- Wait a while for the process to be completed, and Voila! You have your Highlights created.
When it comes to Twitch Clip, you can capture special moments in a stream you are currently watching. On the same note, you can share clips with friends and other users on social media platforms. Such shared clips contain a link where others view the source or video from.
The clips you create will automatically be saved on the streamer’s channel on the “Clips” page, where other viewers can see them too. Nonetheless, you can download “clips” to your computer and, in turn, upload them whenever you want to. And note that you can help your stream grow via “Clips” by letting your viewers clip and share your stream moments.
- To create “Clips” on Twitch, identify which Streamers channel you wish to create a clip from.
- Then click on the “Clapper board” icon. Next, edit your clip between 5 and 60 seconds long.
- Finally, create a title and publish your Clip. You’ll also enjoy the privilege to share your clip’s link to other social media networks.
What is the benefit of uploading your Twitch Streams to YouTube
You stand to gain a lot when you upload your Twitch Streams to YouTube.
1) To enlighten your followers
Your followers will see your streams and make the best decisions. Viewers can check out your recordings and other highlights from past streams. It will help them decide whether they like what they see and probably join your live streams.
2) Twitch provides content for you to share and monetize on YouTube
Since Twitch streaming is more popular nowadays, many people throng it for content. It is not wise to rely entirely on Twitch to discover as a Twitch Streamer. Posting to YouTube will make it known within a short time. You would have announced your streams most nobly and kept your followers up to date, attracting new ones as well.
3) To keep your followers engaged even when you are offline
Even though live streaming is important, some viewers may not attend the live sessions due to different time zones or other commitments. In this regard, when uploaded to YouTube, Twitch will give them a chance to watch your content just whenever they log in. They, therefore, have the option to watch a Twitch VOD of the live stream they missed.
How to upload your Twitch Streams to YouTube
Check how to upload Twitch streams to YouTube from the Twitch website.
Step 1. Identify the little arrow next to your name on the Twitch website and click on it. Then click on the “Video Producer” to take you to a list of your Twitch videos.

Step 2. Check out and click on the “three-dots” on the video you wish to upload to YouTube. Click on the “Export” tab.
Step 3. A menu will then pop up. Here, you can fill in the description, title, and tags that you would like to appear on the YouTube video. There is an option for Twitch to split your video automatically. If you wish so, then tick the “Checkbox” to enable it. Then click on the “Start Export” option to export your Twitch streams to YouTube.

Bouns! Edit Your Twitch Video with Filmora
The quality of your video matters when it comes to uploading Twitch Streams to YouTube. Using a third-party tool to edit your video is the first step in ensuring your videos communicate meaningful content. Filmora comes in handy to bring your imaginations to life. Use it for simple creation without limits, even for beginners.
- Use it to track moving objects in video clips
- Easily match any image of the selected clip
- Its powerful tools let you edit your video by cropping, splitting, adjusting speed, etc
- The video keyframe easily indicates the beginning and end of the parameters
For Win 7 or later (64-bit)
For macOS 10.12 or later
Conclusion
● Don’t just focus on how to upload Twitch streams to YouTube but also consider the quality of video you are posting to YouTube. Remember, your video quality will speak much more of you than any other description. So, strive to produce quality videos using the best tool, Filmora. The app is easy to use and will elevate your views and imaginations through your video in the most impactful way.
Amidst many online applications is Twitch. This live streaming platform takes your experience to another level. You can use it to make crafts, play games, attract broadcasters, and many more. Twitch was launched in 2011, and since then, it has attracted millions of users, managing a database of about 4 million broadcasters by early 2020. With it, users can stream their activities as others watch in real-time. Just browse a category to find a stream.
You can also follow streamers that you like on the platform and get updates and notifications immediately after they are posted. But how do you start a career on a platform like Twitch? You need to broadcast and gather a large following. You can use built-in audiences from other platforms like Facebook. Let’s dive into the core of the matter and look at how to upload Twitch streams to YouTube and build your platform.
In this article
02 What is the benefit of uploading your Twitch Streams to YouTube
03 How to upload your Twitch Streams to YouTube
What is Twitch VOD?
Twitch Video on Demand (VOD) is a recording of previously streamed content. It provides briefings if you missed catching the Twitch live stream. Just watch the VOD from your favorite streamer and be engaged the best way possible. However, VODs don’t last forever. They are removed after two weeks of broadcast. But streamers with Partner Status can have their VODs last up to 60 days.
- How to enable Twitch VOD?
VODs are the best form to archive streams that your fans missed. Even though they are not enabled by default, you can manually enable them and not let your fans miss any important event from your channel. They’ll find it under the “Videos” tab on any Twitch channel. Follow these steps to enable VOD on your channel.
Step 1. Go to your profile icon in the top right corner of Twitch
Check in the “Channel & Video” section and locate the “Stream Key & Preferences” menu.
Step 2. Click on “Creator Dashboard”
Remember, you can enable VODs from your creator dashboard. Just go under the “Settings” tab and click on the “Stream section” of the creator dashboard. Check under the subtitle “VOD Settings” and get the option to store past broadcasts. You can also toggle the slider to store your past broadcasts.
Step 3 Click on the “Settings” tab on the left-hand side and go to Stream
You’ll get various drop-down menu options. Click on the “Settings” tab and choose the “Stream” option. The system will navigate to a new page, thus setting your preferences for VODs and clips.
Step 4. Go to “VOD Settings” and toggle on the “Store Past Broadcast.”
Ensure you have the toggle option turned ON under the “VOD Settings.” If it’s “ON,” you’ll realize the toggle will be purple, with a checkmark in it. Twitch will be confirmed to be enabled if it’s purple.
- Frequently Asked Question about Twitch VOD
These are some questions frequently asked by Twitch users.
1. How long will Twitch store my VOD
Your Twitch can either be stored for 14 or 60 days, depending on your level. For Twitch Prime, Twitch Partner or a Twitch Turbo user has their past broadcasts automatically saved for 60 days before deletion. But if you are not connected to these three options, your past broadcasts will be saved for only 14 days before deletion.
Since your past broadcasts cannot be live for more than 60 days, you have the option to download the video to your computer before the validity days expire and Twitch deletes it. You can use an External Hard drive to save the past broadcast content. Likewise, it is possible to turn your past broadcast content into Highlight and, in turn, permanently store them on Twitch.
2. What is the difference between Twitch VOD, Highlights, and Clips
Twitch VOD is a previously saved video of your live stream content. You choose to save either part or the entire content of your previously streamed content. More so, you don’t need any additional requirements to use VOD.
Highlights are short videos that have been edited from your past broadcast content. You can save them on Twitch permanently. Streamers majorly use highlights to save video game achievements. Unlike VOD Twitch that can be saved up to 60 days, Highlights usually lasts no more than 3 minutes.
- To make Highlights on Twitch, first, navigate to your Dashboard.
- Then scroll down and click on “Content” > “Video Producer.
- Next, press on “All Videos” to change them to “Past Broadcasts.”
- Now press the “Highlight” button, and Twitch will immediately open a new tab for “Twitch Highlighter Tool.”
- Then select the video part to include as “Highlight” and press the “Create Highlights” button.
- Wait a while for the process to be completed, and Voila! You have your Highlights created.
When it comes to Twitch Clip, you can capture special moments in a stream you are currently watching. On the same note, you can share clips with friends and other users on social media platforms. Such shared clips contain a link where others view the source or video from.
The clips you create will automatically be saved on the streamer’s channel on the “Clips” page, where other viewers can see them too. Nonetheless, you can download “clips” to your computer and, in turn, upload them whenever you want to. And note that you can help your stream grow via “Clips” by letting your viewers clip and share your stream moments.
- To create “Clips” on Twitch, identify which Streamers channel you wish to create a clip from.
- Then click on the “Clapper board” icon. Next, edit your clip between 5 and 60 seconds long.
- Finally, create a title and publish your Clip. You’ll also enjoy the privilege to share your clip’s link to other social media networks.
What is the benefit of uploading your Twitch Streams to YouTube
You stand to gain a lot when you upload your Twitch Streams to YouTube.
1) To enlighten your followers
Your followers will see your streams and make the best decisions. Viewers can check out your recordings and other highlights from past streams. It will help them decide whether they like what they see and probably join your live streams.
2) Twitch provides content for you to share and monetize on YouTube
Since Twitch streaming is more popular nowadays, many people throng it for content. It is not wise to rely entirely on Twitch to discover as a Twitch Streamer. Posting to YouTube will make it known within a short time. You would have announced your streams most nobly and kept your followers up to date, attracting new ones as well.
3) To keep your followers engaged even when you are offline
Even though live streaming is important, some viewers may not attend the live sessions due to different time zones or other commitments. In this regard, when uploaded to YouTube, Twitch will give them a chance to watch your content just whenever they log in. They, therefore, have the option to watch a Twitch VOD of the live stream they missed.
How to upload your Twitch Streams to YouTube
Check how to upload Twitch streams to YouTube from the Twitch website.
Step 1. Identify the little arrow next to your name on the Twitch website and click on it. Then click on the “Video Producer” to take you to a list of your Twitch videos.
Step 2. Check out and click on the “three-dots” on the video you wish to upload to YouTube. Click on the “Export” tab.
Step 3. A menu will then pop up. Here, you can fill in the description, title, and tags that you would like to appear on the YouTube video. There is an option for Twitch to split your video automatically. If you wish so, then tick the “Checkbox” to enable it. Then click on the “Start Export” option to export your Twitch streams to YouTube.
Bouns! Edit Your Twitch Video with Filmora
The quality of your video matters when it comes to uploading Twitch Streams to YouTube. Using a third-party tool to edit your video is the first step in ensuring your videos communicate meaningful content. Filmora comes in handy to bring your imaginations to life. Use it for simple creation without limits, even for beginners.
- Use it to track moving objects in video clips
- Easily match any image of the selected clip
- Its powerful tools let you edit your video by cropping, splitting, adjusting speed, etc
- The video keyframe easily indicates the beginning and end of the parameters
For Win 7 or later (64-bit)
For macOS 10.12 or later
Conclusion
● Don’t just focus on how to upload Twitch streams to YouTube but also consider the quality of video you are posting to YouTube. Remember, your video quality will speak much more of you than any other description. So, strive to produce quality videos using the best tool, Filmora. The app is easy to use and will elevate your views and imaginations through your video in the most impactful way.
Also read:
- The Ultimate Pathway to Successful Uploads on YouTube
- [New] Early Bird's Youtube Strategies for Channel and Revenue
- Crafting a Digital Identity Simple Steps to Create Business/Personal YouTube Channels on Smartphones for 2024
- [New] Best 8 YouTube Marketing Apps & Solutions
- In 2024, Captivate Viewers, Create Success A Strategy for Gamers' Channels
- 2024 Approved Essential YouTube Short Content Techniques Unveiled
- Android Users, Discover the Top YouTube Video Clips
- [New] Easily Download Specific YouTube Sections
- [Updated] Break Bot Patterns, Enhance Organic Video Reach
- In 2024, Channel Expansion Through Smart YouTube Link-Building Methods
- A Closer Look at YouTube's Payment System and Its Potential
- The Hottest YouTube-to-MP3 Software Picks (Top 10)
- [Updated] Enhance Visibility The Power of Customized YouTube Templates
- [Updated] Analytics Unlocked Your Step-by-Step YouTube Guide
- Your Path to YouTube Earnings Setting Up and Selling Content
- In 2024, Essential Guide for YouTube Video Clips
- Craft the Ultimate Outro with Pro Maker Advice for 2024
- Top 15 YouTube Channels for Stock Market to Follow
- 2024 Approved Elevate Your Video Popularity Essential SEO Techniques for Success
- [New] Backward Playmanship A Guide to Reversed YouTube Videos
- 2024 Approved Essential Tactics for YouTube Advertising with Banners
- In 2024, Editing Workshop Portal
- 2024 Approved Enhance Youtubes' Conversations with Emojis
- Unparalleled Selection of Budget Stock Media Sites
- Understanding and Proficiently Implementing CC Copyrights
- [New] Cutting-Edge Camera Technology For YouTube Stars
- [Updated] Elevate Video Rankings Proven YouTube SEO Solutions
- [New] A Deep Dive Into YouTube View Counts and More
- Breaking Down Barriers to Inaccessible YouTube Content for 2024
- Tech-Savvy Gamers Hosting Smarter Views
- Unveiling Secrets Sharing Restricted YouTube Content via Email
- Achieve Financial Insight The Simple Three Steps To Assess YouTube Earning Potential for 2024
- Converting Twitch Livestreams for YouTube Success for 2024
- 2024 Approved Crafting Distinctive Video Stream Names Tips for Filmora Users
- Detailed guide of ispoofer for pogo installation On Realme Narzo N53 | Dr.fone
- [Updated] 2024 Approved Mastering Video Descriptions on Instagram
- [New] Best Unsung Free Speech-to-Text Apps for Your Mac
- Updated In 2024, Capture Every Move Top Motion Tracking Apps for Android and iOS
- New From Zero to Pro Integrating Audacity Into Your Chromebooks Ecosystem for 2024
- [Updated] In 2024, Tech Insight Pulling and Keeping Twitters Vids in Phone
- Everything You Need To Know About Unlocked Apple iPhone 13
- [Updated] Elevate Your Broadcast Game 4 Innovative Methods From Desktop Users on TikTok
- Elite 10 Survival Skirmishes
- Does Airplane Mode Turn off GPS Location On Vivo X Fold 2? | Dr.fone
- Perfect Your Snapchat Boomerangs Quickly for 2024
- [New] Digital Media Hacks Top 5 Online Techniques for Video Trimming on Vimeo for 2024
- [Updated] Correct FB Chat Display Revealed as Yourself for 2024
- New 2024 Approved Comparing Titans in Digital Audio Workstations Is MAGIX Samplitude at the Pinnacle?
- [New] Accuracy at Hand Editing TikTok's Personal Info
- New 2024 Approved How to Cut Audio in iMovie on Mac & iPhone?
- New In 2024, Say Goodbye to Frustration Easy Filmora Coupon Code Access
- 2024 Approved Alternatives to Xbox’s Game Bar for Gamers
- Overview of the Best Xiaomi Civi 3 Screen Mirroring App | Dr.fone
- In 2024, How to Mirror Your Infinix Smart 8 HD Screen to PC with Chromecast | Dr.fone
- Text Animation Intro Tutorial in Filmora
- [Updated] Maximizing Your TikTok Impact From Fans to Followers and Beyond
- Still Using Pattern Locks with Vivo V30 Pro? Tips, Tricks and Helpful Advice
- Updated The Freeloading Musicians Handbook Streaming and Downloading for FREE
- New In 2024, From Sound to Screen Revolutionary Ways to Auto-Synchronize in the Age of Digital Media Production
- [Updated] Warriors' Pantheon Valhalla Rebirth for 2024
- Complete Guide For Apple iPhone XR Lock Screen
- [New] Echoes in 280 Characters Viral Video Stories for 2024
- [New] 2024 Approved Effective Ways for Home-Based Podcasting
- Crush Your LinkedIn Video Goals The Importance of Aspect Ratios
- What is Geo-Blocking and How to Bypass it On Xiaomi 13T? | Dr.fone
- Easy steps to recover deleted pictures from Nokia .
- 4 Easy Ways for Your Vivo Y78 5G Hard Reset | Dr.fone
- Title: "2024 Approved Essential Steps to Add Custom Imagery in YouTube Videos"
- Author: Brian
- Created at : 2024-05-25 11:14:31
- Updated at : 2024-05-26 11:14:31
- Link: https://youtube-video-recordings.techidaily.com/2024-approved-essential-steps-to-add-custom-imagery-in-youtube-videos/
- License: This work is licensed under CC BY-NC-SA 4.0.
