
:max_bytes(150000):strip_icc()/buy-used-iphone-5717c2523df78c3fa23ddc70.jpg)
"2024 Approved Essential Illumination Products for Video Creators"
Essential Illumination Products for Video Creators
17 Best Lights and Lighting Equipment for YouTube Videos

Richard Bennett
Mar 27, 2024• Proven solutions
Great lighting is important if you want people to watch your YouTube videos from start to finish. Viewers want to be able to see you clearly and will click away if they cannot. Natural light works great, and it’s cheap, so if it is possible you might want to consider vlogging outside. Of course, not every type of vlog is suited to the outdoors.
Unfortunately, it is unlikely you will be able to get good quality light from the lamps and ceiling lights in your home. Floor lamps can be useful for filling shadows or backlighting but are not usually powerful enough to use as your main light. Natural light is, so one way you can get around needing a lot of lighting equipment is to use a window as your main light. This is not always possible, though. If you are going to vlog from inside your house then there is a good chance you will need to invest in some lighting equipment.
- Part 1: Best Types of Lightning Equipment for YouTube Videos
- Part 2: What Should Good Lighting Equipment Feature?
- Part 3: Best Lights and Lighting Equipment for YouTube Video Shooting
Part 1: Best Types of Lightning Equipment for YouTube Videos
Every video no matter how long or short depends on light, more than anything else. The natural light sources are often not powerful enough to light a scene you’re trying to capture, so to avoid having to deal with underexposed footage, the best solution is to use artificial lighting. Even if you want the light in your video to be completely natural, you still have to figure out a way to get rid of shadows, which brings us back to different types of lighting equipment that can be used to increase the quality of the footage you’re producing.
1. Softbox Lights
Shooting videos with only natural light will put a lot of challenges in front of you, and the best way to overcome them is to use softbox lights. These natural light emulators mimic the natural light by using diffusion panels to make the light look softer and less artificial.
Softbox lights enable you to direct light to the exact spot in the shot, and they make lighting subjects and particular parts of a scene much easier. Softboxes are available in all shapes and sizes at very reasonable prices, and they are a standard part of the equipment used for the production of YouTube videos.
2. Umbrella Lights
The newcomers to the world of YouTube video production are going to love using these lights. The umbrella lights provide a much broader source of light than the softbox lights and they are frequently used to light the entire scene. You can also add extra light on the video’s subject if you’re looking to get a more balanced shot.
They are portable and quite handy if you often shoot in different locations since you can easily pack and carry them to wherever you plan on shooting your next YouTube video.
3. Ring Lights
Although they are most frequently used for fashion and beauty videos, ring lights are a great option whenever you need to make sure that the subjects of the video are perfectly lit. These circular lights have an amount in the center, so the camera’s point of view is identical to the direction from which the light is coming.
Ring lights are powerful enough to provide light for an entire scene, and they also work nicely as a catch or fill light. Some of the most popular YouTubers like Casy Neistat or PewDiePie use ring lights in their videos.
Part 2: What Should Good Lighting Equipment Feature?
Now that you know which types of lights are commonly used on YouTube video sets, you can start looking at models that best fit your demands. There are thousands of different studio lights on the market, but only the best offer features that make the light setup process easier and faster. So before buying your lighting equipment, you should make sure that it has the following features.
1. Adjustable Beam Spread
The equipment you use should allow you to control how wide the light is spreading. This is particularly useful when you want to light just one subject in the shot while keeping the rest in the dark. Lights with an adjustable beam spread to give you versatility and enable you to adapt to a wider range of scenes.
2. The Height of the Light Stand
Most lighting kits include stands, but not all stands allow you to change the height at which the light is positioned. This can largely limit your options on the set, which is why you need to check if the stand is adjustable. You’ll also want to do a background check on the stand’s durability, because low-quality stands may cause damage to the lights and other equipment.
3. Portability
How portable your lighting equipment should be is directly related to the genre of YouTube videos you want to produce. If you are planning on shooting in studio conditions, then portability is not such an important factor, but if you want to shoot at a different location every day then portability becomes something you simply must consider.
4. Accessories
Most lightning kits include a number of handy accessories that help you achieve better results. Reflectors, barn doors, diffusers, scrims, and mounting accessories are all commonly featured in high-quality lighting kits, and you shouldn’t buy a kit that doesn’t offer at least some of the accessories we mentioned here.
5. All About Reflectors/Diffusers
White reflectors are used to simply bounce light. Silver reflectors make light a bit colder-looking, and gold reflectors give things a slightly warmer, more glamourous, look. Black and translucent ‘reflectors’ are not really for bouncing light. The black reflector blocks light, which is useful if you are trying to focus your main light so it is only lighting you and not everything behind you. The translucent reflector is actually a diffuser. Diffusers are usually set up between you and your main light to soften it and make it easier on your eyes.
Reflectors are used to bounce light towards your subject. They are great for filling shadows created by your main light. This reflector is five reflectors in one: silver, gold, black, white, and translucent.
Part 3: Best Lights and Lighting Equipment for YouTube Videos
Consumer-level camera sensors are nowhere close to being as sensitive to light as our eyes. So a scene that may look sufficiently lit to our eyes may be too dark for the camera. When you’re shooting video indoors, you’ll need additional lighting equipment. Here are some of the top seventeen best lighting equipment for YouTubers.
List of the Top 5 Best On-Camera LED Lights
What is an On-Camera LED Light?
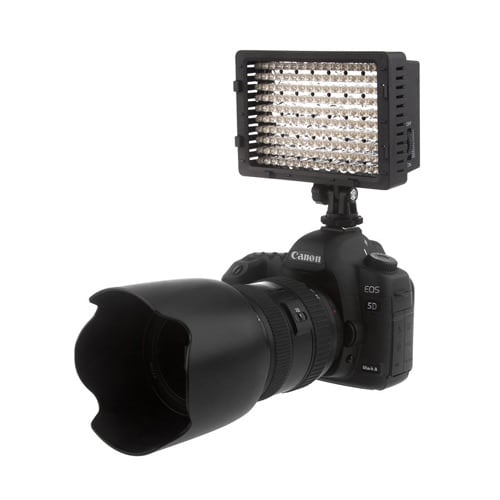
On-Camera LED lights are LED lights that can be mounted directly onto your camera’s hot/cold shoe (the little bracket on the top of a lot of DSLR cameras). On-camera LED lights are great for on-the-go YouTubers and YouTubers short on recording space because these lights are small and portable.
1. Julius Studio 160 LED Light with 4 Color Filters
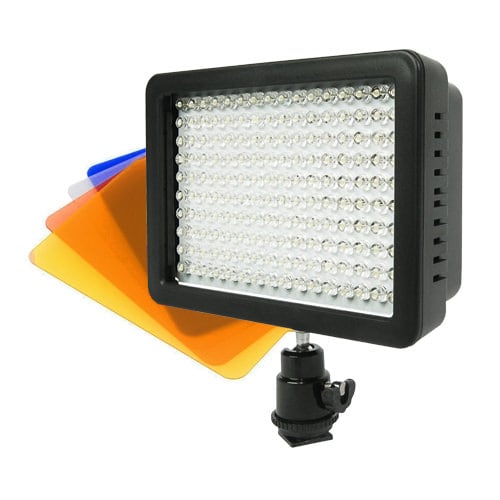
The Julius Studio 160 LED light not only can be mounted on any digital camera that has a hot/cold shoe but it can also be mounted on light stands so you can keep the same light setting even if you are moving the camera around. This lighting equipment also comes with four color filters so that you can control the color temperature of your light.
2. Viltrox L116B highest RA CRI95 LED Light Panel
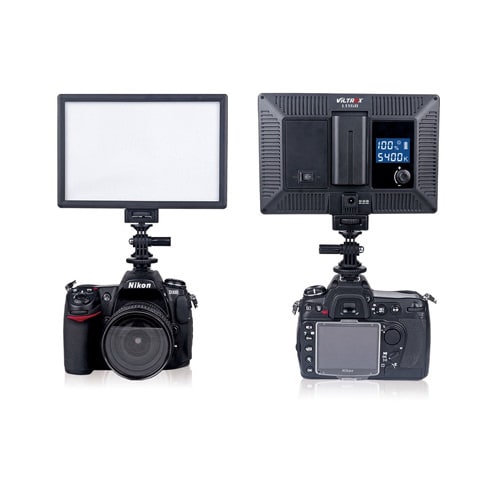
The VILTROX L116B LED light panel is a powerful piece of on-camera lighting equipment. As you can see from the back view of this light panel, you can see how much battery you have left as well as digitally set the color temperature of your light. It also features PWM light adjustment technology that reduces power consumption. As this equipment comes with an AC adapter, you can choose to use this outdoors or indoors.
3. Chromo Inc CI55000230 Macro Ring 48 LED Power Light
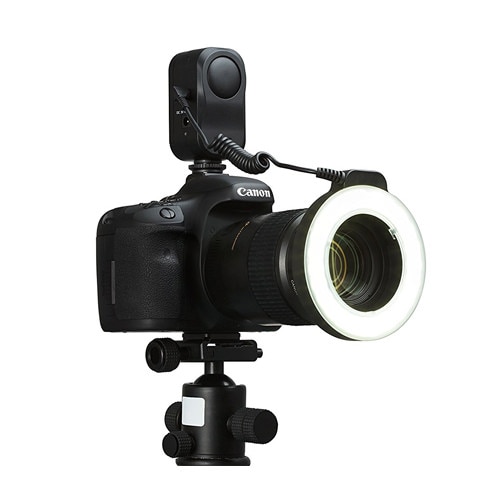
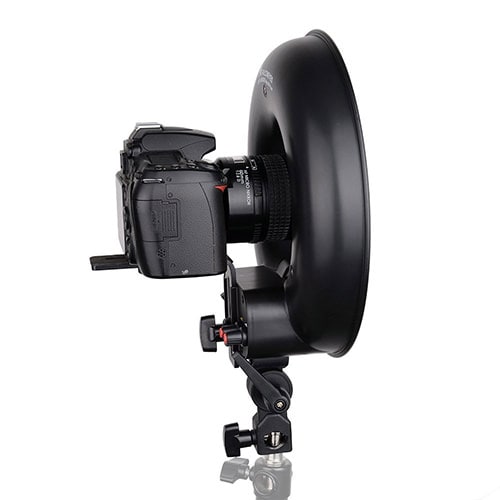
If you’re looking for an on-camera ring light, Chromo Inc’s macro ring light is a great option. This ring light mounts onto the lens of your SLR camera and its power source (two AA batteries) attaches to your camera’s hot/cold shoe. Get that nice-looking ring light reflection in your eyes as you film with this portable ring light!
4. Neewer CN-216 216PCS LED Dimmable Ultra High Power Panel
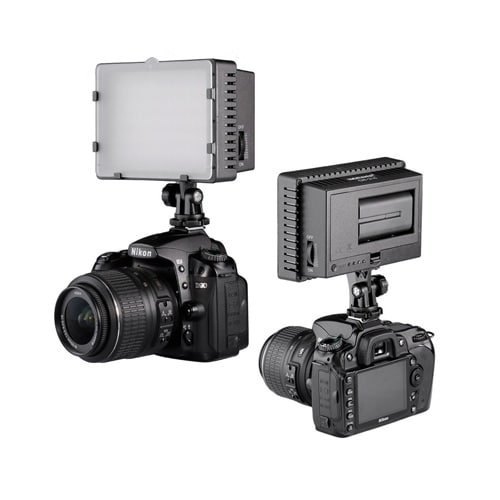
The Neewer 216 PCS LED dimmable light panel is powerful lighting equipment at a cheap price. You can adjust the color temperature of this light from 3200K up 5400K. This piece of equipment is only battery-powered, but you do have the option to either use six AA batteries or specific Sony NP series batteries, or Panasonic CGR-D16S rechargeable batteries.
5. Neewer 160 LED CN-160 Dimmable Ultra High Power Panel
This light is Neewer’s cheaper version of the CN-216. Instead of having 216 LED light bulbs, this light has 160 LED light bulbs. Other than the number of light bulbs, the two light panels are pretty much the same.
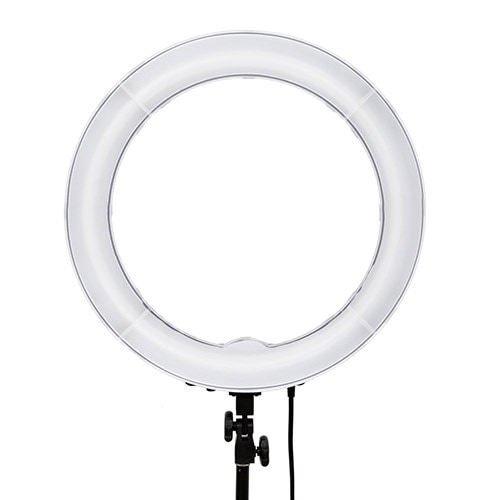
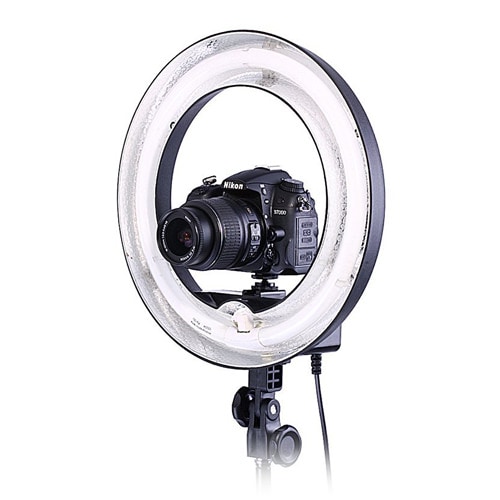
List of the Top 5 Best LED Ring Lights
LED ring lights are called ring lights because of their ring-like shape. The opening in the ring allows you to position your camera right in the center of this lighting equipment. These lights are great if you don’t have a lot of space.
1. Diva Ring Light Super Nova
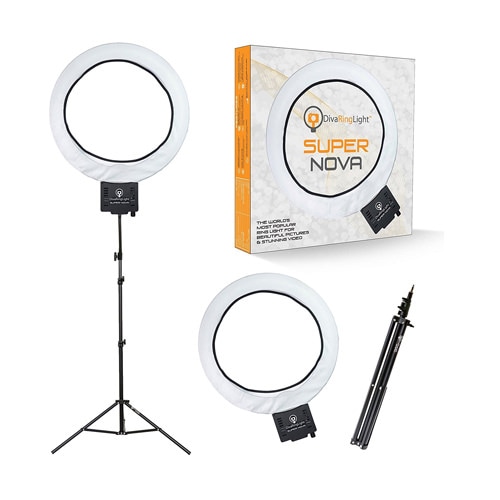
The Diva ring light is a great ring light for divas, make-up artists, and anyone else wanting to look good right in front of the camera! This LED ring light has a dimming knob so that you can adjust the brightness of your light. It also comes with a cloth for you to diffuse your light (so that your light will be softer) and a gooseneck and z-bracket attachment if you want to use your camera and ring light with just one tripod.
2. Prismatic Halo Ring Light
The Prismatic Halo ring light is another great ring light option. It comes with a canvas travel bag, making it easier to store away or take around with you. The 110-120 VAC, 5400K light bulb produces light that can be dimmed as well. The Prismatic Halo Ring kit doesn’t include a light stand.
3. Neewer Dimmable 18” Ring Light
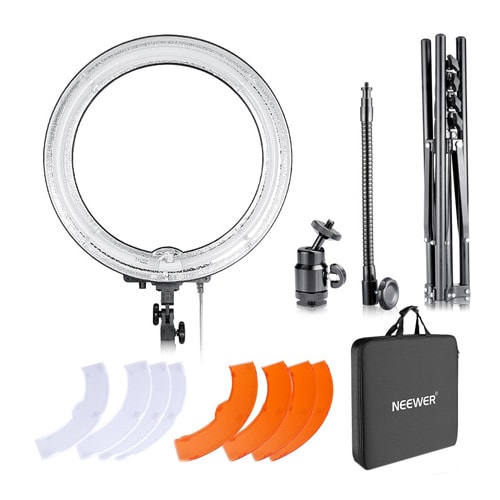
The 18-inch light ring uses fluorescent light. In addition, this kit includes a 59-inch light stand as well as white and orange filters and a hot shoe adapter that extends the capabilities of this affordable LED ring light kit.
4. FalconEyes DVR-300
With 300 pcs LED and 150 yellow color and 150 white-color lights, FalconEyes DVR-300 is one of the best ring lights currently available on the market. It also features two control dials that enable you to adjust the color of the light the device produces and a white diffuser that makes the light softer.
5. Neewer 14″ Ring Light
The 10-inch inner rim diameter may seem small when compared with larger ring lights that offer more room to operate. The Neewer Camera Ring Light is undimmable and has 50W power. The ring light uses an AC adapter, which makes it difficult to use when filming outside of a studio.
List of the Top 2 Best Softbox Video Lights
A softbox is commonly used by photographers and videographers to simulate natural light. This effect is achieved with the aid of a diffusion panel that is placed around the light source that produces continuous light. Softboxes are often less expensive than other professional lighting equipment which makes them a great option if you are working on a budget.
1. StudioFX 2400 Watt Softbox
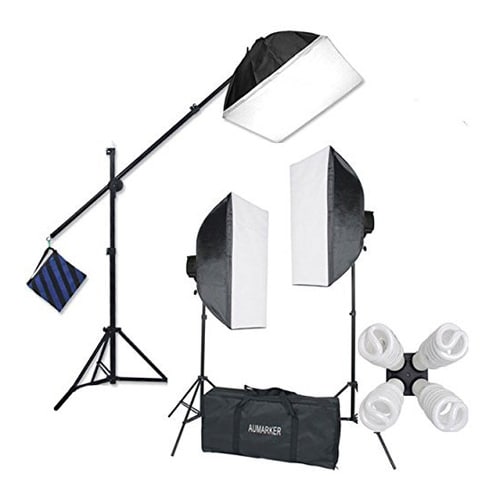
This lighting system contains two 16x24-inch softboxes and an overhead hair light boom softbox. The stands for all three softboxes are included in the kit. Each light head is capable of holding up to four bulbs.
2. Fancierstudio 2400 Watt Professional Lighting Kit
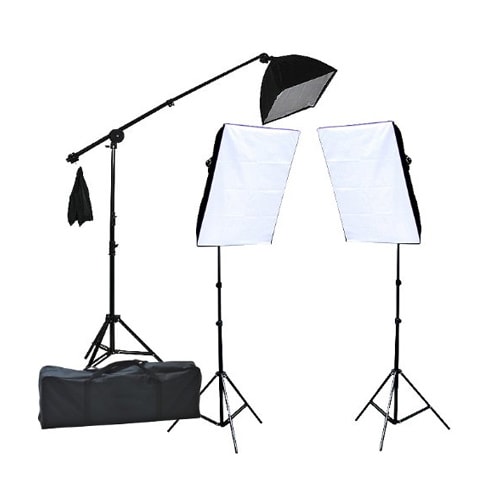
This is a standard light setup you want to use when recording interviews, product reviews, or vlogs. It contains two 16x24-inch and one 16x16-inch softbox light that all have their own stands. Each lighthead can hold four 5500K fluorescent or daylight bulbs that are perfectly suited for work in studio conditions.
List of the Top 5 Best Umbrella Video Lights
Unlike ring lights or softboxes that provide directional light, the umbrella video lights basically bounce the light off a reflecting surface onto a subject and enable you to get a more balanced light in your videos. They are often combined with other lighting equipment to create natural scenes without hard shadows.
1. LimoStudio 700W Photography Softbox Light Lighting Kit
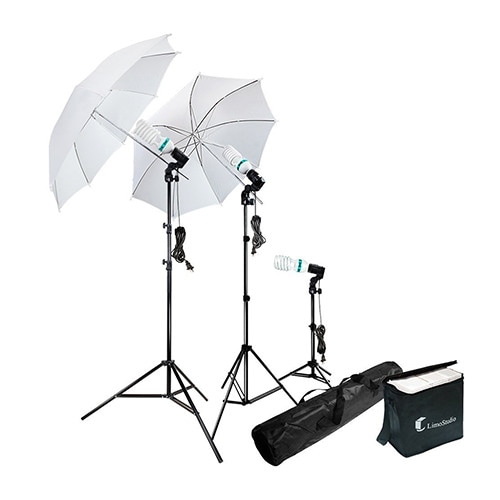
In addition to three lamps (two white umbrellas with 86-inch light stands and one 28-inch light stand), this kit also comes with three 45W CFL bulbs. The lamps can be tilted upward or downward, so you can find the best light position for your shot. The 9-foot cords can be used with standard 110/120V USA sockets.
2. Neewer 8.5ft x 10ft Background With 600W Umbrella Kit
Besides featuring two umbrellas and two softboxes, this kit also includes a 6x9 feet background that is perfectly suited for video production in a home-based studio. This umbrella kit uses 45W bulbs that generate natural light and have an approximate color value of 5500K. However, both umbrellas and softboxes can hold just one bulb.
3. Emart 600W Studio Photography Photo/Video Portrait Kit
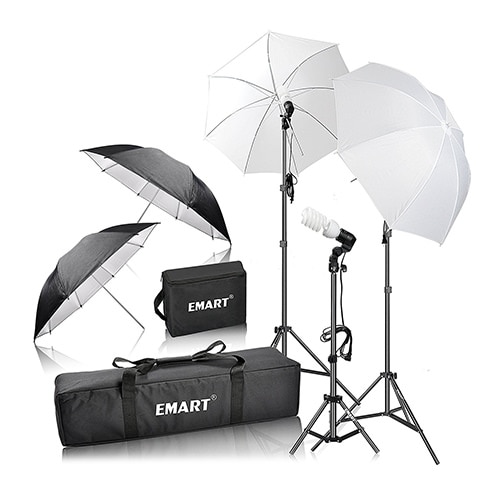
Chances are that you won’t need much more than what this photo/video kit has to offer. Emart’s 600W kit includes two white and two black/silver 33-inch umbrellas as well as two 83-inch light stands and a smaller 33-inch light stand. The heavy-duty carry case can store the entire kit.
4. LINCO 600W Photography/Video Continuous Lighting Kit
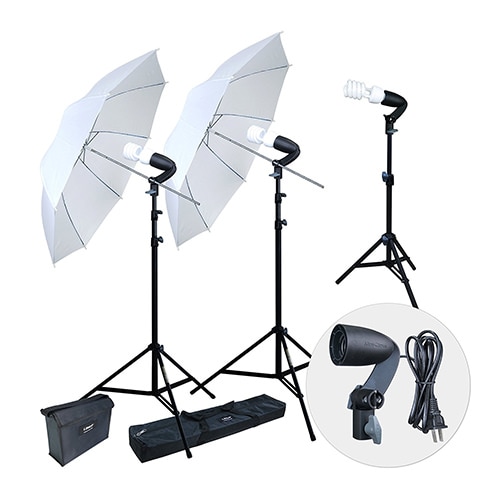
The Linco 600W continuous lighting kit contains two white translucent umbrellas that generate soft light, which is quite useful if you want to get even skin tones in your videos. The kit has three lamps that use 5500K 40W bulbs and light stands you can easily carry to any filming location.
5. Emart 1575W Umbrella Lighting Kit With Translucent White & Black/Silver & Black/Gold
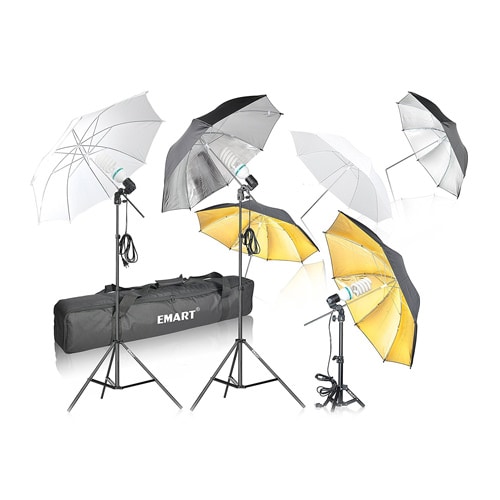
The greatest advantage of this Emart 1575 W Lightning kit is the three pairs of 33-inch diameter translucent/white, black/silver, and black/gold umbrellas. The 105W daylight bulbs provide enough light to work even under the most difficult light conditions, while the lightweight stands enable you to use this kit outside of your studio.
Besides the best lighting equipment, we have also summarized some tips and tricks for lighting , you should check it as well. If you find the video lighting isn’t good after recording the video, you can still improve it by adjusting brightness in post-production. Wondershare Filmora video editor features the Auto enhance feature, which can adjust the video color and brightness with one click. You can download the free trial to try it out.


Richard Bennett
Richard Bennett is a writer and a lover of all things video.
Follow @Richard Bennett
Richard Bennett
Mar 27, 2024• Proven solutions
Great lighting is important if you want people to watch your YouTube videos from start to finish. Viewers want to be able to see you clearly and will click away if they cannot. Natural light works great, and it’s cheap, so if it is possible you might want to consider vlogging outside. Of course, not every type of vlog is suited to the outdoors.
Unfortunately, it is unlikely you will be able to get good quality light from the lamps and ceiling lights in your home. Floor lamps can be useful for filling shadows or backlighting but are not usually powerful enough to use as your main light. Natural light is, so one way you can get around needing a lot of lighting equipment is to use a window as your main light. This is not always possible, though. If you are going to vlog from inside your house then there is a good chance you will need to invest in some lighting equipment.
- Part 1: Best Types of Lightning Equipment for YouTube Videos
- Part 2: What Should Good Lighting Equipment Feature?
- Part 3: Best Lights and Lighting Equipment for YouTube Video Shooting
Part 1: Best Types of Lightning Equipment for YouTube Videos
Every video no matter how long or short depends on light, more than anything else. The natural light sources are often not powerful enough to light a scene you’re trying to capture, so to avoid having to deal with underexposed footage, the best solution is to use artificial lighting. Even if you want the light in your video to be completely natural, you still have to figure out a way to get rid of shadows, which brings us back to different types of lighting equipment that can be used to increase the quality of the footage you’re producing.
1. Softbox Lights
Shooting videos with only natural light will put a lot of challenges in front of you, and the best way to overcome them is to use softbox lights. These natural light emulators mimic the natural light by using diffusion panels to make the light look softer and less artificial.
Softbox lights enable you to direct light to the exact spot in the shot, and they make lighting subjects and particular parts of a scene much easier. Softboxes are available in all shapes and sizes at very reasonable prices, and they are a standard part of the equipment used for the production of YouTube videos.
2. Umbrella Lights
The newcomers to the world of YouTube video production are going to love using these lights. The umbrella lights provide a much broader source of light than the softbox lights and they are frequently used to light the entire scene. You can also add extra light on the video’s subject if you’re looking to get a more balanced shot.
They are portable and quite handy if you often shoot in different locations since you can easily pack and carry them to wherever you plan on shooting your next YouTube video.
3. Ring Lights
Although they are most frequently used for fashion and beauty videos, ring lights are a great option whenever you need to make sure that the subjects of the video are perfectly lit. These circular lights have an amount in the center, so the camera’s point of view is identical to the direction from which the light is coming.
Ring lights are powerful enough to provide light for an entire scene, and they also work nicely as a catch or fill light. Some of the most popular YouTubers like Casy Neistat or PewDiePie use ring lights in their videos.
Part 2: What Should Good Lighting Equipment Feature?
Now that you know which types of lights are commonly used on YouTube video sets, you can start looking at models that best fit your demands. There are thousands of different studio lights on the market, but only the best offer features that make the light setup process easier and faster. So before buying your lighting equipment, you should make sure that it has the following features.
1. Adjustable Beam Spread
The equipment you use should allow you to control how wide the light is spreading. This is particularly useful when you want to light just one subject in the shot while keeping the rest in the dark. Lights with an adjustable beam spread to give you versatility and enable you to adapt to a wider range of scenes.
2. The Height of the Light Stand
Most lighting kits include stands, but not all stands allow you to change the height at which the light is positioned. This can largely limit your options on the set, which is why you need to check if the stand is adjustable. You’ll also want to do a background check on the stand’s durability, because low-quality stands may cause damage to the lights and other equipment.
3. Portability
How portable your lighting equipment should be is directly related to the genre of YouTube videos you want to produce. If you are planning on shooting in studio conditions, then portability is not such an important factor, but if you want to shoot at a different location every day then portability becomes something you simply must consider.
4. Accessories
Most lightning kits include a number of handy accessories that help you achieve better results. Reflectors, barn doors, diffusers, scrims, and mounting accessories are all commonly featured in high-quality lighting kits, and you shouldn’t buy a kit that doesn’t offer at least some of the accessories we mentioned here.
5. All About Reflectors/Diffusers
White reflectors are used to simply bounce light. Silver reflectors make light a bit colder-looking, and gold reflectors give things a slightly warmer, more glamourous, look. Black and translucent ‘reflectors’ are not really for bouncing light. The black reflector blocks light, which is useful if you are trying to focus your main light so it is only lighting you and not everything behind you. The translucent reflector is actually a diffuser. Diffusers are usually set up between you and your main light to soften it and make it easier on your eyes.
Reflectors are used to bounce light towards your subject. They are great for filling shadows created by your main light. This reflector is five reflectors in one: silver, gold, black, white, and translucent.
Part 3: Best Lights and Lighting Equipment for YouTube Videos
Consumer-level camera sensors are nowhere close to being as sensitive to light as our eyes. So a scene that may look sufficiently lit to our eyes may be too dark for the camera. When you’re shooting video indoors, you’ll need additional lighting equipment. Here are some of the top seventeen best lighting equipment for YouTubers.
List of the Top 5 Best On-Camera LED Lights
What is an On-Camera LED Light?
On-Camera LED lights are LED lights that can be mounted directly onto your camera’s hot/cold shoe (the little bracket on the top of a lot of DSLR cameras). On-camera LED lights are great for on-the-go YouTubers and YouTubers short on recording space because these lights are small and portable.
1. Julius Studio 160 LED Light with 4 Color Filters
The Julius Studio 160 LED light not only can be mounted on any digital camera that has a hot/cold shoe but it can also be mounted on light stands so you can keep the same light setting even if you are moving the camera around. This lighting equipment also comes with four color filters so that you can control the color temperature of your light.
2. Viltrox L116B highest RA CRI95 LED Light Panel
The VILTROX L116B LED light panel is a powerful piece of on-camera lighting equipment. As you can see from the back view of this light panel, you can see how much battery you have left as well as digitally set the color temperature of your light. It also features PWM light adjustment technology that reduces power consumption. As this equipment comes with an AC adapter, you can choose to use this outdoors or indoors.
3. Chromo Inc CI55000230 Macro Ring 48 LED Power Light
If you’re looking for an on-camera ring light, Chromo Inc’s macro ring light is a great option. This ring light mounts onto the lens of your SLR camera and its power source (two AA batteries) attaches to your camera’s hot/cold shoe. Get that nice-looking ring light reflection in your eyes as you film with this portable ring light!
4. Neewer CN-216 216PCS LED Dimmable Ultra High Power Panel
The Neewer 216 PCS LED dimmable light panel is powerful lighting equipment at a cheap price. You can adjust the color temperature of this light from 3200K up 5400K. This piece of equipment is only battery-powered, but you do have the option to either use six AA batteries or specific Sony NP series batteries, or Panasonic CGR-D16S rechargeable batteries.
5. Neewer 160 LED CN-160 Dimmable Ultra High Power Panel
This light is Neewer’s cheaper version of the CN-216. Instead of having 216 LED light bulbs, this light has 160 LED light bulbs. Other than the number of light bulbs, the two light panels are pretty much the same.
List of the Top 5 Best LED Ring Lights
LED ring lights are called ring lights because of their ring-like shape. The opening in the ring allows you to position your camera right in the center of this lighting equipment. These lights are great if you don’t have a lot of space.
1. Diva Ring Light Super Nova
The Diva ring light is a great ring light for divas, make-up artists, and anyone else wanting to look good right in front of the camera! This LED ring light has a dimming knob so that you can adjust the brightness of your light. It also comes with a cloth for you to diffuse your light (so that your light will be softer) and a gooseneck and z-bracket attachment if you want to use your camera and ring light with just one tripod.
2. Prismatic Halo Ring Light
The Prismatic Halo ring light is another great ring light option. It comes with a canvas travel bag, making it easier to store away or take around with you. The 110-120 VAC, 5400K light bulb produces light that can be dimmed as well. The Prismatic Halo Ring kit doesn’t include a light stand.
3. Neewer Dimmable 18” Ring Light
The 18-inch light ring uses fluorescent light. In addition, this kit includes a 59-inch light stand as well as white and orange filters and a hot shoe adapter that extends the capabilities of this affordable LED ring light kit.
4. FalconEyes DVR-300
With 300 pcs LED and 150 yellow color and 150 white-color lights, FalconEyes DVR-300 is one of the best ring lights currently available on the market. It also features two control dials that enable you to adjust the color of the light the device produces and a white diffuser that makes the light softer.
5. Neewer 14″ Ring Light
The 10-inch inner rim diameter may seem small when compared with larger ring lights that offer more room to operate. The Neewer Camera Ring Light is undimmable and has 50W power. The ring light uses an AC adapter, which makes it difficult to use when filming outside of a studio.
List of the Top 2 Best Softbox Video Lights
A softbox is commonly used by photographers and videographers to simulate natural light. This effect is achieved with the aid of a diffusion panel that is placed around the light source that produces continuous light. Softboxes are often less expensive than other professional lighting equipment which makes them a great option if you are working on a budget.
1. StudioFX 2400 Watt Softbox
This lighting system contains two 16x24-inch softboxes and an overhead hair light boom softbox. The stands for all three softboxes are included in the kit. Each light head is capable of holding up to four bulbs.
2. Fancierstudio 2400 Watt Professional Lighting Kit
This is a standard light setup you want to use when recording interviews, product reviews, or vlogs. It contains two 16x24-inch and one 16x16-inch softbox light that all have their own stands. Each lighthead can hold four 5500K fluorescent or daylight bulbs that are perfectly suited for work in studio conditions.
List of the Top 5 Best Umbrella Video Lights
Unlike ring lights or softboxes that provide directional light, the umbrella video lights basically bounce the light off a reflecting surface onto a subject and enable you to get a more balanced light in your videos. They are often combined with other lighting equipment to create natural scenes without hard shadows.
1. LimoStudio 700W Photography Softbox Light Lighting Kit
In addition to three lamps (two white umbrellas with 86-inch light stands and one 28-inch light stand), this kit also comes with three 45W CFL bulbs. The lamps can be tilted upward or downward, so you can find the best light position for your shot. The 9-foot cords can be used with standard 110/120V USA sockets.
2. Neewer 8.5ft x 10ft Background With 600W Umbrella Kit
Besides featuring two umbrellas and two softboxes, this kit also includes a 6x9 feet background that is perfectly suited for video production in a home-based studio. This umbrella kit uses 45W bulbs that generate natural light and have an approximate color value of 5500K. However, both umbrellas and softboxes can hold just one bulb.
3. Emart 600W Studio Photography Photo/Video Portrait Kit
Chances are that you won’t need much more than what this photo/video kit has to offer. Emart’s 600W kit includes two white and two black/silver 33-inch umbrellas as well as two 83-inch light stands and a smaller 33-inch light stand. The heavy-duty carry case can store the entire kit.
4. LINCO 600W Photography/Video Continuous Lighting Kit
The Linco 600W continuous lighting kit contains two white translucent umbrellas that generate soft light, which is quite useful if you want to get even skin tones in your videos. The kit has three lamps that use 5500K 40W bulbs and light stands you can easily carry to any filming location.
5. Emart 1575W Umbrella Lighting Kit With Translucent White & Black/Silver & Black/Gold
The greatest advantage of this Emart 1575 W Lightning kit is the three pairs of 33-inch diameter translucent/white, black/silver, and black/gold umbrellas. The 105W daylight bulbs provide enough light to work even under the most difficult light conditions, while the lightweight stands enable you to use this kit outside of your studio.
Besides the best lighting equipment, we have also summarized some tips and tricks for lighting , you should check it as well. If you find the video lighting isn’t good after recording the video, you can still improve it by adjusting brightness in post-production. Wondershare Filmora video editor features the Auto enhance feature, which can adjust the video color and brightness with one click. You can download the free trial to try it out.
Richard Bennett
Richard Bennett is a writer and a lover of all things video.
Follow @Richard Bennett
Craft Unforgettable Experiences for More Subscribers with These 6 Tips
6 Ways To Increase Audience Retention on YouTube
Richard Bennett
Mar 27, 2024• Proven solutions
Audience retention is one of your most important stats on YouTube. It is even more important than your view count. Your view count really only tells you how many people are finding and clicking on your videos, not whether they are actually watching them. Audience retention refers to how much of a video a viewer watches before clicking away, which is very useful information to have. If you know when people are leaving your videos then you know what you need to work on.
You May Also Like: How to analyse your and your competitors’ YouTube Channel >>
How to structure a YouTube video >>
- Part 1: What is Audience Retention?
- Part 2: How to See Your Audience Retention Report in YouTube?
- Part 3: What is a Good Audience Retention Rate on YouTube?
- Part 4: 6 Ways to Increase YouTube Audience Retention
Part 1: What is Audience Retention?
To put it in simple terms, YouTube audience retention is about how much of each video your viewers watch. It’s usually expressed as a percentage, so if your viewer gets half way through, they will have a retention of 50 per cent.
For YouTube analytics, audience retention is taken as a mean of the retention figures for each of your viewers. For example, if you post a ten-minute video and half your viewers get to the five-minute mark, that’s a retention of 50 per cent. If the other half watch it right to the end, that’s a retention of 100 per cent. The mean of these two figures is 75 per cent, and that’s what YouTube will use as your audience retention figure.
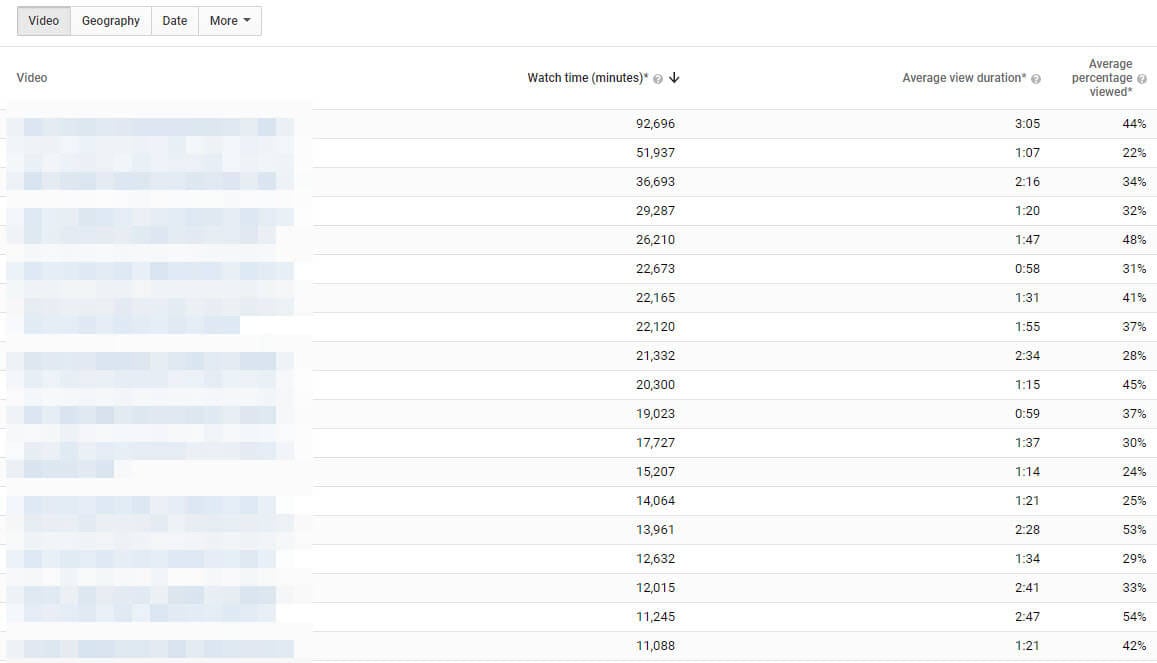
This retention rate affects how highly your video is ranked on YouTube, with videos boasting higher audience retention rates appearing higher in the search results than those which do not. This is because both YouTube and Google are highly focussed on customer satisfaction, and a long watch time means a very happy customer was watching that video. For this reason, it’s well worth considering how to increase YouTube audience retention as it demonstrates that you’re making great content as well as helping you get more viewers.
Part 2: How to See Your Audience Retention Report in YouTube?
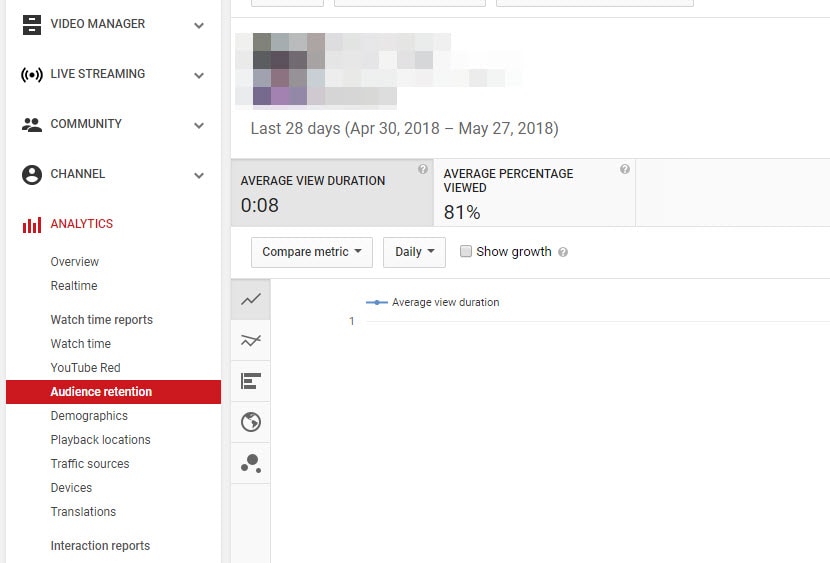
YouTube will produce reports to help you keep track of your audience retention. There are two types of audience retention reports; absolute and relative. Absolute allows you to view a graph of your video’s retention and see when people might be clicking away, or if they are skipping to later parts of your video. If you lose a lot of viewers in the first 15 seconds of your videos then that is a clear indication that your content is not what the viewers who find your videos really want. The relative report is where your video is compared to the average retention of similar videos.
Note that by ‘similar videos’, YouTube means videos of a similar length. There is no way to compare your videos only to other videos in your genre. The relative report will always be somewhat skewed because your videos will be measured against very different content.
To see an audience retention report log into your YouTube account and go to yourCreator Studio. There, selectAudience RetentionunderAnalytics.
Part 3: What is a Good Audience Retention Rate on YouTube?
When you’re considering how to increase YouTube audience retention, it can be good to have a goal in mind. Obviously 100 per cent is going to be the Holy Grail of retention rates, but how many videos are actually going to achieve that? It only takes for one person to ‘accidentally’ click on your video and rapidly click away, or for someone to have to stop for outside reasons, to drag your average down.
According to the YouTube community, a good goal to aim for is around 50 per cent, but as there is a lot which can affect your retention rate, that number may be different for you. Low view numbers sometimes get higher retention rates because it’s mainly subscribers watching, whereas channels with millions of views may suffer due to more people abandoning. Rather than setting yourself a golden number, focus instead on increasing your retention rate from wherever it is now, and celebrate your own success instead of measuring yourself against others.
Part 4: 6 Ways to Increase YouTube Audience Retention
If you’re serious about learning how to increase YouTube audience retention, here are five of the best ideas for you:
1. Compare your videos
Investigating your audience retention report will highlight the videos where you achieved maximum success. Think about what you did here, and work to replicate that technique. Perhaps you were talking about a product, or maybe your structured your video slightly differently. It’s up to you to dissect your video and find out what it was that kept people watching for longer, so that you can repeat this success in the future. You can also use some influencer marketing platform such as InflueNex to take a look at the videos in your similar channels, and learn the popular videos on their channels.
2. Get on with it
Research shows that YouTube viewers have an incredibly short attention span. Depending on who you believe, you could have as much as six seconds or as little as just three to grab their attention and compel them to carry on watching. If you want to improve your audience retention, coming in with an engaging, attention grabbing statement right at the start is crucial to your success. Nobody wants to waste their time watching someone waffle on for ages about their granny or their favorite hobbies, so get right down to it straight away, by telling them what’s in store.
3. Make it visually engaging
Perhaps all you’ve got is a presentation to make. You’re not a gamer, you’re not showing clips of your cat and you’re not doing a makeup tutorial, so surely all you need is a camera, good lighting and your face, right? Wrong. Viewers like to see the visual content changing, and videos which have a range of scenes are usually far more successful than those where it’s just a person talking to camera. Think about how you can insert cutaways, pop up text, different footage and other graphics to keep it interesting for your viewers.
4. Make it shorter
This one is a no brainer really. If you make a one-minute video, how hard is it going to be to keep viewers watching to the end compared to a 20-minute marathon. However, going too short can be negative too, unless you really do have something very quick and simple to showcase. Long videos work well for YouTubers in the gaming niche, in particular, because viewers want to know the end result, but for most of us, these sorts of viewing statistics are hard to reach.
If you consider a viewer who watches three minutes of your content, would you rather they watched three minutes of a ten-minute video and then clicked away bored, or would you rather they finished an entire video that was only three minutes long? Both in terms of audience retention and of your own reputation, having a viewer finish a short video is much more valuable to you than losing someone half way through a long one. That person probably enjoyed your content to the end and will more than likely watch another one of your videos. Conversely, the one you lost half way through was bored enough to stop watching and will probably not bother viewing any other videos of yours in future.
5. Keep them hooked
Think carefully about your YouTube video structure. Ideally, you will tell them at the very start that you’ve got something amazing to share with them later on. This could be a tip, a tutorial, a new product reveal or even something funny. Whatever it is, tell them they’re going to love it from the start, and keep reminding them to watch from the end to get this gift. That doesn’t mean you shouldn’t give them great content all the way through, just that you should save a carrot for the end of the ride to reward those loyal viewers.
So, now you know how to increase YouTube audience retention, what are you going to do about it? Have a go at modifying your videos to boost the numbers who will watch to the end and let us know how you got on.
6. Use an Excellent Video Editor
Content is the king. It is necessary to use a powerful video editor to help you edit videos. With an excellent video editor like Filmora, you can custom stunning videos effortlessly.
Richard Bennett
Richard Bennett is a writer and a lover of all things video.
Follow @Richard Bennett
Richard Bennett
Mar 27, 2024• Proven solutions
Audience retention is one of your most important stats on YouTube. It is even more important than your view count. Your view count really only tells you how many people are finding and clicking on your videos, not whether they are actually watching them. Audience retention refers to how much of a video a viewer watches before clicking away, which is very useful information to have. If you know when people are leaving your videos then you know what you need to work on.
You May Also Like: How to analyse your and your competitors’ YouTube Channel >>
How to structure a YouTube video >>
- Part 1: What is Audience Retention?
- Part 2: How to See Your Audience Retention Report in YouTube?
- Part 3: What is a Good Audience Retention Rate on YouTube?
- Part 4: 6 Ways to Increase YouTube Audience Retention
Part 1: What is Audience Retention?
To put it in simple terms, YouTube audience retention is about how much of each video your viewers watch. It’s usually expressed as a percentage, so if your viewer gets half way through, they will have a retention of 50 per cent.
For YouTube analytics, audience retention is taken as a mean of the retention figures for each of your viewers. For example, if you post a ten-minute video and half your viewers get to the five-minute mark, that’s a retention of 50 per cent. If the other half watch it right to the end, that’s a retention of 100 per cent. The mean of these two figures is 75 per cent, and that’s what YouTube will use as your audience retention figure.
This retention rate affects how highly your video is ranked on YouTube, with videos boasting higher audience retention rates appearing higher in the search results than those which do not. This is because both YouTube and Google are highly focussed on customer satisfaction, and a long watch time means a very happy customer was watching that video. For this reason, it’s well worth considering how to increase YouTube audience retention as it demonstrates that you’re making great content as well as helping you get more viewers.
Part 2: How to See Your Audience Retention Report in YouTube?
YouTube will produce reports to help you keep track of your audience retention. There are two types of audience retention reports; absolute and relative. Absolute allows you to view a graph of your video’s retention and see when people might be clicking away, or if they are skipping to later parts of your video. If you lose a lot of viewers in the first 15 seconds of your videos then that is a clear indication that your content is not what the viewers who find your videos really want. The relative report is where your video is compared to the average retention of similar videos.
Note that by ‘similar videos’, YouTube means videos of a similar length. There is no way to compare your videos only to other videos in your genre. The relative report will always be somewhat skewed because your videos will be measured against very different content.
To see an audience retention report log into your YouTube account and go to yourCreator Studio. There, selectAudience RetentionunderAnalytics.
Part 3: What is a Good Audience Retention Rate on YouTube?
When you’re considering how to increase YouTube audience retention, it can be good to have a goal in mind. Obviously 100 per cent is going to be the Holy Grail of retention rates, but how many videos are actually going to achieve that? It only takes for one person to ‘accidentally’ click on your video and rapidly click away, or for someone to have to stop for outside reasons, to drag your average down.
According to the YouTube community, a good goal to aim for is around 50 per cent, but as there is a lot which can affect your retention rate, that number may be different for you. Low view numbers sometimes get higher retention rates because it’s mainly subscribers watching, whereas channels with millions of views may suffer due to more people abandoning. Rather than setting yourself a golden number, focus instead on increasing your retention rate from wherever it is now, and celebrate your own success instead of measuring yourself against others.
Part 4: 6 Ways to Increase YouTube Audience Retention
If you’re serious about learning how to increase YouTube audience retention, here are five of the best ideas for you:
1. Compare your videos
Investigating your audience retention report will highlight the videos where you achieved maximum success. Think about what you did here, and work to replicate that technique. Perhaps you were talking about a product, or maybe your structured your video slightly differently. It’s up to you to dissect your video and find out what it was that kept people watching for longer, so that you can repeat this success in the future. You can also use some influencer marketing platform such as InflueNex to take a look at the videos in your similar channels, and learn the popular videos on their channels.
2. Get on with it
Research shows that YouTube viewers have an incredibly short attention span. Depending on who you believe, you could have as much as six seconds or as little as just three to grab their attention and compel them to carry on watching. If you want to improve your audience retention, coming in with an engaging, attention grabbing statement right at the start is crucial to your success. Nobody wants to waste their time watching someone waffle on for ages about their granny or their favorite hobbies, so get right down to it straight away, by telling them what’s in store.
3. Make it visually engaging
Perhaps all you’ve got is a presentation to make. You’re not a gamer, you’re not showing clips of your cat and you’re not doing a makeup tutorial, so surely all you need is a camera, good lighting and your face, right? Wrong. Viewers like to see the visual content changing, and videos which have a range of scenes are usually far more successful than those where it’s just a person talking to camera. Think about how you can insert cutaways, pop up text, different footage and other graphics to keep it interesting for your viewers.
4. Make it shorter
This one is a no brainer really. If you make a one-minute video, how hard is it going to be to keep viewers watching to the end compared to a 20-minute marathon. However, going too short can be negative too, unless you really do have something very quick and simple to showcase. Long videos work well for YouTubers in the gaming niche, in particular, because viewers want to know the end result, but for most of us, these sorts of viewing statistics are hard to reach.
If you consider a viewer who watches three minutes of your content, would you rather they watched three minutes of a ten-minute video and then clicked away bored, or would you rather they finished an entire video that was only three minutes long? Both in terms of audience retention and of your own reputation, having a viewer finish a short video is much more valuable to you than losing someone half way through a long one. That person probably enjoyed your content to the end and will more than likely watch another one of your videos. Conversely, the one you lost half way through was bored enough to stop watching and will probably not bother viewing any other videos of yours in future.
5. Keep them hooked
Think carefully about your YouTube video structure. Ideally, you will tell them at the very start that you’ve got something amazing to share with them later on. This could be a tip, a tutorial, a new product reveal or even something funny. Whatever it is, tell them they’re going to love it from the start, and keep reminding them to watch from the end to get this gift. That doesn’t mean you shouldn’t give them great content all the way through, just that you should save a carrot for the end of the ride to reward those loyal viewers.
So, now you know how to increase YouTube audience retention, what are you going to do about it? Have a go at modifying your videos to boost the numbers who will watch to the end and let us know how you got on.
6. Use an Excellent Video Editor
Content is the king. It is necessary to use a powerful video editor to help you edit videos. With an excellent video editor like Filmora, you can custom stunning videos effortlessly.
Richard Bennett
Richard Bennett is a writer and a lover of all things video.
Follow @Richard Bennett
Also read:
- 2024 Approved Access Top Shorter Video Downloads for FREE Online
- [New] Elevate Your Online Presence with Captivating Haul Videos
- [New] Crafting Chic Looks The Ultimate Cosmetic Compendium
- [Updated] Elevate Views Prime SEO Equipment for Videos
- Unleash Video Potential - Leading YouTube SEO Tools
- Breaking Through Boundaries Optimizing Videos for Maximum Traction
- [Updated] Amplify Your Storytelling Seamlessly Insert Music Into YouTube Videos
- Audience Allure Video Marketing Strategies for YouTube Trailers via Filmora for 2024
- [Updated] Brush Up Your Youtube Videos with Color Correction
- In 2024, A Tale of Two Approaches Polite vs Aggressive Asking
- Unveiling the 15 Most Enthralling Online Anime Spots
- Nailing the Desktop/Mobile YouTube Speed Control
- Yogic Vistas Top 10 Inspirational Yoga Videos
- 2024 Approved Boosting Engagement A Guide to More YouTube Shorts Success
- [Updated] Confirming YouTube Pro-Rated Earnings
- Crafting the Next Big Thing Your Guide to YouTube's Best Video Types
- Pause Non-Selected YouTube Video Suggestions
- 2024 Approved Boost Your Channels Top 5 YouTube Tricks for Increased Visibility
- In 2024, Elevating Your Vlogs A List of the Top 12 Professional Cameras
- Surge in Subscribers Effective YouTube Campaigns
- [Updated] Comprehensive Directory Extracting YT Template Videos Online
- Navigating YouTube's Revenue Tools for Mobile Creators
- The Ultimate Hack for Blocking YouTube Ads on All Browsers
- In 2024, Era's Endwatchers Top YouTube Viewership
- Bridging YouTube and iMovie with Seamless Audio Transfer for 2024
- Core Ethos Universal YouTube Guidelines for 2024
- 2024 Approved Efficiently Edit Your YouTube Videos Using Sony Vegas
- 2024 Approved Crafting Compelling End Screens in YouTube Videos
- 2024 Approved Demystifying Payment Systems in Shortform Creator Ecosystem
- The Premier of Popularity Worldwide Top Subscribed Creators
- Advanced Techniques for Efficient Media Navigation for 2024
- New In 2024, Quick Fix Techniques to Eliminate Unwanted Vocals From Video Recordings
- How to Mirror Apple iPhone 14 Plus to iPad? | Dr.fone
- Apple ID Unlock On Apple iPhone 13 Pro Max? How to Fix it?
- In 2024, Why Does Your FaceBook Message Feature a Blue Emoji? Uncovering Its Relevance
- [New] In 2024, How to Kickstart Your Zoom Webinar Journey
- New 2024 Approved Best 5 TikTok Voice Generators You Should Try
- About Oppo A59 5G FRP Bypass
- [Updated] In 2024, The Path to TikTok Stardom Increasing Your Views, Likes, and More
- In 2024, How to Unlock Vivo S17 PIN Code/Pattern Lock/Password
- New Transfer Videos to DVD A Comprehensive Guide for Windows and Mac Users for 2024
- [Updated] 2024 Approved The Art of Streaming Saved Media Easy IGTV Downloads on PC & Mac
- Title: "2024 Approved Essential Illumination Products for Video Creators"
- Author: Brian
- Created at : 2024-05-25 11:14:17
- Updated at : 2024-05-26 11:14:17
- Link: https://youtube-video-recordings.techidaily.com/2024-approved-essential-illumination-products-for-video-creators/
- License: This work is licensed under CC BY-NC-SA 4.0.
