
:max_bytes(150000):strip_icc()/travel-mountain-mountain-scenic-friends-mountains-style-outfit-of-the-day_t20_knPQl3-5c79582cc9e77c0001f57bec.jpg)
"2024 Approved Enhancing Quality without the Mic A Practical Guide"
Enhancing Quality without the Mic: A Practical Guide
How to Record Good Audio Without a Microphone?

Richard Bennett
Oct 26, 2023• Proven solutions
Audio quality is more important than video quality on YouTube. You’ve probably heard that before – viewers might forgive sub-par video quality if they’re interested in what you’re saying, but if it’s hard to understand what you’re saying they’ll click away.
Getting an external mic (even a $10 one-off Amazon ) is one of the best ways to improve your videos. That said, maybe your budget is $0. Or, maybe you just don’t happen to have a mic now and don’t want to wait to make videos. It could even be that you just don’t want to bother with an external mic.
Luckily, there are a lot of easy, free, things you can do to protect the quality of your audio recording even if you’re not using an external mic. Here are a few tips:
- 1. Keep Your Camera Close
- 2. Shoot Somewhere Quiet
- 3. Pick a Good Room
- 4. Protect your Built-In Mic from Wind
- 5. Use a Free Audio App
- 6. Do a Sound Check
1. Keep Your Camera Close (like, really close)
The biggest problem with the mic built into any camera or phone is just that, since it’s with the camera, it’s usually too far away from you. Built-in mics can record decent audio up close, but usually, your camera will be set up farther away from you than an external mic would be.
For example, your camera’s mic might be just as good as a clip-on LAV, but that LAV is right by your mouth and the camera is a couple of big steps away.
Moving your camera/smartphone physically closer to you will make it hard to include anything besides your head and shoulders in your shot, but it will get you significantly better audio.
2.Shoot Somewhere Quiet
The best way to limit the amount of background noise you pick up in your sound recording is to shoot somewhere where there’s no background noise. That probably seems really basic, but it’s something a lot of people just don’t do. It’s easy to default to recording in your home office, even though it’s right next to the kitchen where your family is bustling around, or in your bedroom even though there’s a busy street right outside your window.
Sometimes the best thing you can do for your audio is simply to scout out a quiet room in your house where the sound recording conditions are better. Speaking of recording conditions…
3. Pick a Good Room
There’s more that goes into picking a good room than how quiet it is. If you try to record in a room that’s too big your voice might sound to distant, and if you try to record in a room that’s too small your audio will be too echo-y. You need a room that’s just right.
You should also pay attention to what’s in the room you’re recording in. Avoid hard, reflective, surfaces like appliances and mirrors which your voice will bounce off of. The same conditions that make you sound great when you sing in the shower will – like recording in a small space -make your voiceover unpleasantly echo-y.
Look for a room that has a lot of soft things in it, like beds and sofas.
4. Protect your Built-In Mic from Wind
If you shoot outside, then the wind passing over your built-in mic will do terrible things to your audio. You can do a lot to counter-act this problem by physically blocking the wind.
There are a few ways to do this. If you’re doing hand-held shots you can partially cover your camera or phone’s mic with your finger. You don’t want to completely cover it/press down or your audio will be muffled. What you’re trying to do is create a barrier blocking out the wind.
On movie sets, they block out wind by covering the microphones with big fuzzy things called ‘dead cats’. You can also block out wind noise by attaching something fuzzy to your microphone. If your camera’s built-in mic is on front of it then you just need something big and fluffy you can loop around the lens. You can use a piece of a boa, a fuzzy novelty scrunchie – you can even murder a fuzzy stuffed animal! Do you have an old coat with a fuzz around the hood? That fuzz would do nicely.
The pompom used in this video cost $2, but you might already have something that would work!
If your built-in mic is on top of your camera you can get something called a ‘micromuff’. A micromuff is essentially a circular or rectangular piece of velcro with long strands of fluff on top. It’s open in the middle so it doesn’t actually cover your mic, but the surrounding fuzz blocks out the wind.

You use the adhesive backing to attach the base velcro to your camera. The other side of the velcro has your fluff attached to the back.
The only thing about a micromuff is that it costs about $30, and if you’re going to spend $30 on audio equipment then you could just buy yourself an inexpensive LAV mic. I only bring up the micromuff because it’s a very simple design you can probably DIY – you just need velcro with adhesive backing and any of the fluff-sources we just discussed.
5. Use a Free Audio App
If you’re recording on a smartphone, you can download a free app that will let you make adjustments to your audio as you record it. With the right app, you can adjust your gain (volume is how you control ‘output’ audio, and gain is for ‘input’ audio. By turning up your gain, you can make your mic more sensitive), tempo, and more. A lot of the time, your audio recording app will also let you edit your audio afterward.
Even if you’re not recording video from your smartphone, it might be a good idea to use your phone as your mic and record a separate audio file. You’ll be able to use an app to fine-tune your recording, and you can set your phone up closer to you the way you would an external mic while keeping your camera back a bit farther.
Free audio apps: Hi-Q MP3 Voice Recorder (Android), RecForge II (Android), Smart Voice Recorder (Android), Audio Memos (iOS), and Recorder Plus (iOS).
6. Do a Sound Check
Once you think you’ve got good audio set up – test it! You don’t want to do a whole video and find out when you play it back that your audio doesn’t sound good.
Do you have any of your own audio tips to pass on? Leave them in the comments!
This topic was suggested by RS Beauty over in the forums. Thanks for the idea!
Polish Your YouTube Videos with Filmora
As one of the most widely used video editing software in YouTube video editing, Filmora allows you to record voiceover and edit the recorded audio with mixer, equalizer and provides lots of templates and effects with an intuitive interface, which saves much time. Download the free trial version and get started now.


Richard Bennett
Richard Bennett is a writer and a lover of all things video.
Follow @Richard Bennett
Richard Bennett
Oct 26, 2023• Proven solutions
Audio quality is more important than video quality on YouTube. You’ve probably heard that before – viewers might forgive sub-par video quality if they’re interested in what you’re saying, but if it’s hard to understand what you’re saying they’ll click away.
Getting an external mic (even a $10 one-off Amazon ) is one of the best ways to improve your videos. That said, maybe your budget is $0. Or, maybe you just don’t happen to have a mic now and don’t want to wait to make videos. It could even be that you just don’t want to bother with an external mic.
Luckily, there are a lot of easy, free, things you can do to protect the quality of your audio recording even if you’re not using an external mic. Here are a few tips:
- 1. Keep Your Camera Close
- 2. Shoot Somewhere Quiet
- 3. Pick a Good Room
- 4. Protect your Built-In Mic from Wind
- 5. Use a Free Audio App
- 6. Do a Sound Check
1. Keep Your Camera Close (like, really close)
The biggest problem with the mic built into any camera or phone is just that, since it’s with the camera, it’s usually too far away from you. Built-in mics can record decent audio up close, but usually, your camera will be set up farther away from you than an external mic would be.
For example, your camera’s mic might be just as good as a clip-on LAV, but that LAV is right by your mouth and the camera is a couple of big steps away.
Moving your camera/smartphone physically closer to you will make it hard to include anything besides your head and shoulders in your shot, but it will get you significantly better audio.
2.Shoot Somewhere Quiet
The best way to limit the amount of background noise you pick up in your sound recording is to shoot somewhere where there’s no background noise. That probably seems really basic, but it’s something a lot of people just don’t do. It’s easy to default to recording in your home office, even though it’s right next to the kitchen where your family is bustling around, or in your bedroom even though there’s a busy street right outside your window.
Sometimes the best thing you can do for your audio is simply to scout out a quiet room in your house where the sound recording conditions are better. Speaking of recording conditions…
3. Pick a Good Room
There’s more that goes into picking a good room than how quiet it is. If you try to record in a room that’s too big your voice might sound to distant, and if you try to record in a room that’s too small your audio will be too echo-y. You need a room that’s just right.
You should also pay attention to what’s in the room you’re recording in. Avoid hard, reflective, surfaces like appliances and mirrors which your voice will bounce off of. The same conditions that make you sound great when you sing in the shower will – like recording in a small space -make your voiceover unpleasantly echo-y.
Look for a room that has a lot of soft things in it, like beds and sofas.
4. Protect your Built-In Mic from Wind
If you shoot outside, then the wind passing over your built-in mic will do terrible things to your audio. You can do a lot to counter-act this problem by physically blocking the wind.
There are a few ways to do this. If you’re doing hand-held shots you can partially cover your camera or phone’s mic with your finger. You don’t want to completely cover it/press down or your audio will be muffled. What you’re trying to do is create a barrier blocking out the wind.
On movie sets, they block out wind by covering the microphones with big fuzzy things called ‘dead cats’. You can also block out wind noise by attaching something fuzzy to your microphone. If your camera’s built-in mic is on front of it then you just need something big and fluffy you can loop around the lens. You can use a piece of a boa, a fuzzy novelty scrunchie – you can even murder a fuzzy stuffed animal! Do you have an old coat with a fuzz around the hood? That fuzz would do nicely.
The pompom used in this video cost $2, but you might already have something that would work!
If your built-in mic is on top of your camera you can get something called a ‘micromuff’. A micromuff is essentially a circular or rectangular piece of velcro with long strands of fluff on top. It’s open in the middle so it doesn’t actually cover your mic, but the surrounding fuzz blocks out the wind.
You use the adhesive backing to attach the base velcro to your camera. The other side of the velcro has your fluff attached to the back.
The only thing about a micromuff is that it costs about $30, and if you’re going to spend $30 on audio equipment then you could just buy yourself an inexpensive LAV mic. I only bring up the micromuff because it’s a very simple design you can probably DIY – you just need velcro with adhesive backing and any of the fluff-sources we just discussed.
5. Use a Free Audio App
If you’re recording on a smartphone, you can download a free app that will let you make adjustments to your audio as you record it. With the right app, you can adjust your gain (volume is how you control ‘output’ audio, and gain is for ‘input’ audio. By turning up your gain, you can make your mic more sensitive), tempo, and more. A lot of the time, your audio recording app will also let you edit your audio afterward.
Even if you’re not recording video from your smartphone, it might be a good idea to use your phone as your mic and record a separate audio file. You’ll be able to use an app to fine-tune your recording, and you can set your phone up closer to you the way you would an external mic while keeping your camera back a bit farther.
Free audio apps: Hi-Q MP3 Voice Recorder (Android), RecForge II (Android), Smart Voice Recorder (Android), Audio Memos (iOS), and Recorder Plus (iOS).
6. Do a Sound Check
Once you think you’ve got good audio set up – test it! You don’t want to do a whole video and find out when you play it back that your audio doesn’t sound good.
Do you have any of your own audio tips to pass on? Leave them in the comments!
This topic was suggested by RS Beauty over in the forums. Thanks for the idea!
Polish Your YouTube Videos with Filmora
As one of the most widely used video editing software in YouTube video editing, Filmora allows you to record voiceover and edit the recorded audio with mixer, equalizer and provides lots of templates and effects with an intuitive interface, which saves much time. Download the free trial version and get started now.
Richard Bennett
Richard Bennett is a writer and a lover of all things video.
Follow @Richard Bennett
Solutions to Solve Common Issues for YouTube Shorts
Create High Quality YouTube Video - Wondershare Filmora
An easy and powerful YouTube video editor
Numerous video and audio effects to choose from
Detailed tutorials provided by the official channel
YouTube streaming service has kept online users glued to their screens. You can access and share videos and music from any part of the world. Users resolve to YouTube for personal and business affairs. You can use it for a tutorial, promotional event, or just share the fun with other users. Several avenues are available for users to post and share their minds worldwide. So far, it has rolled out a short-form video service, Shorts, which was initially inspired by TikTok.
With Shorts, you can shoot videos, edit, and upload them for your audience. However, YouTube shorts not showing is a common issue for those wishing to share their videos in regular channel feed. You might be wondering how to solve such issues when pushed to the wall. Check out possible solutions in the next section. But first, let’s find out what really are YouTube Shorts.
In this article
02 Where can I find YouTube Shorts?
03 Here are the solutions for YouTube Common Issues
What is YouTube Shorts?
YouTube Shorts is an app that you can use to shoot and share short-form videos using your mobile phone. Furthermore, you can record and edit your videos as well as music overlays and video segmenting abilities. Viewers will access the videos for 60 seconds or less but will remain on your channel, unlike Stories that disappear after a short while. It was first released in September 2020, having started in the US and India. It has so far encroached many countries and is currently accessed by 6 billion users in over 100 countries.
Where can I find YouTube Shorts?
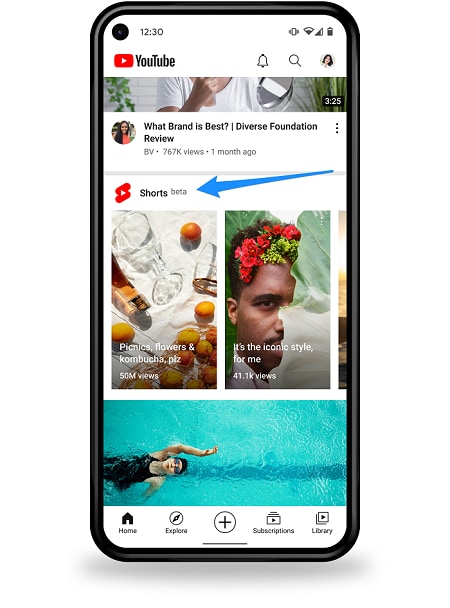
Many users are curious about how to make full use of YouTube Shorts. You can get the Short at the bottom of the YouTube app on either the homepage or on their channel page.
Is YouTube Shorts available on Google Play or App Store?
No. Unlike other streaming apps, you can’t find YouTube app on Google Play or App Store as it is not a standalone service. YouTube Shorts are found within the service’s main mobile app. It is, therefore, accessible from the YouTube app on your computer or phone at the bottom of the screen.
How to access YouTube Shorts on YouTube app
- First, go to the YouTube app at the bottom of the screen to find the “Shorts” button.
- You’ll then see a selection of thumbnails that harbors popular Shorts.
- Choose any video then click on it to bring you into the vertical video player.
- You can then watch the clip and like or dislike the video as it plays. Just use the “thumbs up” or “down” icon. Likewise, you can share and subscribe to the “Short creator’s” channel.
How to create YouTube Shorts
Do you wish to create YouTube Shorts but you don’t know how to? Here’s the kicker!
Step 1. You first need to install the YouTube app on your device then sign in to your account.
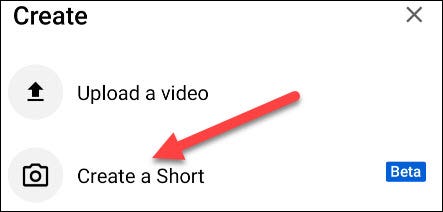
Step 2. Now, tap on the “Create” button. The icon is a “+” symbol in the bottom center of the screen.
Step 3. A pop-up window will open. Tap the “Create a Short” tab. If prompted, allow YouTube to use your phone’s camera and microphone.
Step 4. You’ll then land on the “YouTube Shorts” recording page.
Step 5. Set the length to 60 seconds and bellow. You have the option to slow down or speed up the recording by tapping the “Speed” icon on the right.
Step 6. Likewise, set a time for the camera to start recording automatically. Check below the “Speed” for the “Timer” for setting.
Step 7. Go ahead to edit your Short before posting. You can use “Filters” to apply visual effects.
Step 8. When your camera is set, hit the “Record” button. You can stop the recording by tapping on the Record button, then resume as you wish.

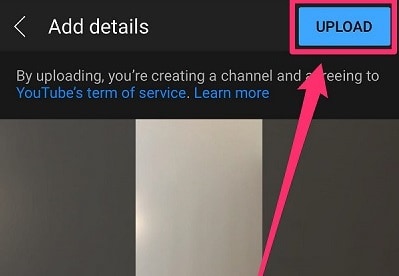
Step 9. Tap on the “Checkmark” when you are done recording. You can add some music and text as well. Then tap on the “Next” button to finish the recording.
Step 10. Then add a title and adjust “Sharing” settings. Also, add the “#shorts” to the title to make it promotional together with other Shorts videos.
Step 11. Finally, tap the “Upload” tab to add your “Shorts” to YouTube.
Here are the solutions for YouTube Common Issues
Since YouTube Shorts is still in the “Beta” mode, users are likely to experience issues while using it. Below are some fixes for YouTube shorts common issues like YouTube Shorts not showing up, unable to post video to YouTube Shorts and etc.
Solution 1. Update YouTube app
Remember apps are ever on the upgrade mode. You are likely to face some connection issues if you are operating on an older version. Here’s is how to update the YouTube app on your Android or iPhone device.
On Android device
- Launch Google Play Store.
- Next, tap on the “three diagonal lines” at the top section of your screen.
- Then select the “My Apps & Games” option.
- Search for YouTube app and tap on the “Update” button.
On iOS device
- Open the “App Store”
- Tap on your “Profile” icon.
- Then tap on the “Update” tab to fix the issue.
On your computer
- Search for YouTube streaming app from the Google Play Store.
- Here, you’ll see an update button in case your app needs an update.
- Next, click on the “Update” button and wait for the update to complete.
- Launch YouTube once more and see whether the YouTube Shorts not showing issue is resolved.
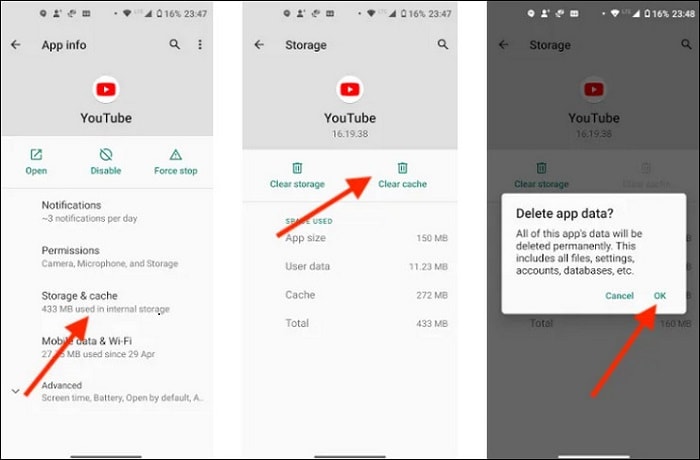
Solution 2. Clear Cache
A corrupt system may also cause issues with the normal operation of your application.
- Go to the “Settings” button on your phone.
- Then go to the “Apps” section and tap on “All Apps”
- Select the “YouTube” app from the list.
- Next, go to the “App Settings” and click on the “Storage” section.
- Tap on the “Clear cache and data” option.
- Finally, relaunch the YouTube app and check whether the issue is resolved.
Solution 3. Check if Shorts is available in your country
Remember that “Shorts” isn’t available in all the countries yet. So, you can confirm whether it is already in your country. If not, you can bypass GEO restrictions by using free VPNs.
- First, download and install a VPN app.
- Next, select the USA or India server location to fake a GPS location.
- Then clear the cache from the YouTube app and click it open.
- You should now find the option to view and even upload Shorts from your device.
Solution 4. Ensure your video is set as YouTube Shorts
Your video should be set as YouTube Shorts before posting.
- Identify the video that you wish to post.
- Add the “#shorts” in your title and description.
- See that each video is up to 60 seconds only.
- Post the video and see whether the issue isn’t reoccurring.
Conclusion
It’s a nice feeling to learn how to upload YouTube Shorts and share the fun with others worldwide. However, you may experience YouTube Shorts not showing due to restrictions in your country or other issues. We have tackled adequate solutions to solve such scenarios and make your Shorts go online. Nonetheless, check out the steps to access and create YouTube Shorts in just a few steps.
YouTube streaming service has kept online users glued to their screens. You can access and share videos and music from any part of the world. Users resolve to YouTube for personal and business affairs. You can use it for a tutorial, promotional event, or just share the fun with other users. Several avenues are available for users to post and share their minds worldwide. So far, it has rolled out a short-form video service, Shorts, which was initially inspired by TikTok.
With Shorts, you can shoot videos, edit, and upload them for your audience. However, YouTube shorts not showing is a common issue for those wishing to share their videos in regular channel feed. You might be wondering how to solve such issues when pushed to the wall. Check out possible solutions in the next section. But first, let’s find out what really are YouTube Shorts.
In this article
02 Where can I find YouTube Shorts?
03 Here are the solutions for YouTube Common Issues
What is YouTube Shorts?
YouTube Shorts is an app that you can use to shoot and share short-form videos using your mobile phone. Furthermore, you can record and edit your videos as well as music overlays and video segmenting abilities. Viewers will access the videos for 60 seconds or less but will remain on your channel, unlike Stories that disappear after a short while. It was first released in September 2020, having started in the US and India. It has so far encroached many countries and is currently accessed by 6 billion users in over 100 countries.
Where can I find YouTube Shorts?
Many users are curious about how to make full use of YouTube Shorts. You can get the Short at the bottom of the YouTube app on either the homepage or on their channel page.
Is YouTube Shorts available on Google Play or App Store?
No. Unlike other streaming apps, you can’t find YouTube app on Google Play or App Store as it is not a standalone service. YouTube Shorts are found within the service’s main mobile app. It is, therefore, accessible from the YouTube app on your computer or phone at the bottom of the screen.
How to access YouTube Shorts on YouTube app
- First, go to the YouTube app at the bottom of the screen to find the “Shorts” button.
- You’ll then see a selection of thumbnails that harbors popular Shorts.
- Choose any video then click on it to bring you into the vertical video player.
- You can then watch the clip and like or dislike the video as it plays. Just use the “thumbs up” or “down” icon. Likewise, you can share and subscribe to the “Short creator’s” channel.
How to create YouTube Shorts
Do you wish to create YouTube Shorts but you don’t know how to? Here’s the kicker!
Step 1. You first need to install the YouTube app on your device then sign in to your account.
Step 2. Now, tap on the “Create” button. The icon is a “+” symbol in the bottom center of the screen.
Step 3. A pop-up window will open. Tap the “Create a Short” tab. If prompted, allow YouTube to use your phone’s camera and microphone.
Step 4. You’ll then land on the “YouTube Shorts” recording page.
Step 5. Set the length to 60 seconds and bellow. You have the option to slow down or speed up the recording by tapping the “Speed” icon on the right.
Step 6. Likewise, set a time for the camera to start recording automatically. Check below the “Speed” for the “Timer” for setting.
Step 7. Go ahead to edit your Short before posting. You can use “Filters” to apply visual effects.
Step 8. When your camera is set, hit the “Record” button. You can stop the recording by tapping on the Record button, then resume as you wish.
Step 9. Tap on the “Checkmark” when you are done recording. You can add some music and text as well. Then tap on the “Next” button to finish the recording.
Step 10. Then add a title and adjust “Sharing” settings. Also, add the “#shorts” to the title to make it promotional together with other Shorts videos.
Step 11. Finally, tap the “Upload” tab to add your “Shorts” to YouTube.
Here are the solutions for YouTube Common Issues
Since YouTube Shorts is still in the “Beta” mode, users are likely to experience issues while using it. Below are some fixes for YouTube shorts common issues like YouTube Shorts not showing up, unable to post video to YouTube Shorts and etc.
Solution 1. Update YouTube app
Remember apps are ever on the upgrade mode. You are likely to face some connection issues if you are operating on an older version. Here’s is how to update the YouTube app on your Android or iPhone device.
On Android device
- Launch Google Play Store.
- Next, tap on the “three diagonal lines” at the top section of your screen.
- Then select the “My Apps & Games” option.
- Search for YouTube app and tap on the “Update” button.
On iOS device
- Open the “App Store”
- Tap on your “Profile” icon.
- Then tap on the “Update” tab to fix the issue.
On your computer
- Search for YouTube streaming app from the Google Play Store.
- Here, you’ll see an update button in case your app needs an update.
- Next, click on the “Update” button and wait for the update to complete.
- Launch YouTube once more and see whether the YouTube Shorts not showing issue is resolved.
Solution 2. Clear Cache
A corrupt system may also cause issues with the normal operation of your application.
- Go to the “Settings” button on your phone.
- Then go to the “Apps” section and tap on “All Apps”
- Select the “YouTube” app from the list.
- Next, go to the “App Settings” and click on the “Storage” section.
- Tap on the “Clear cache and data” option.
- Finally, relaunch the YouTube app and check whether the issue is resolved.
Solution 3. Check if Shorts is available in your country
Remember that “Shorts” isn’t available in all the countries yet. So, you can confirm whether it is already in your country. If not, you can bypass GEO restrictions by using free VPNs.
- First, download and install a VPN app.
- Next, select the USA or India server location to fake a GPS location.
- Then clear the cache from the YouTube app and click it open.
- You should now find the option to view and even upload Shorts from your device.
Solution 4. Ensure your video is set as YouTube Shorts
Your video should be set as YouTube Shorts before posting.
- Identify the video that you wish to post.
- Add the “#shorts” in your title and description.
- See that each video is up to 60 seconds only.
- Post the video and see whether the issue isn’t reoccurring.
Conclusion
It’s a nice feeling to learn how to upload YouTube Shorts and share the fun with others worldwide. However, you may experience YouTube Shorts not showing due to restrictions in your country or other issues. We have tackled adequate solutions to solve such scenarios and make your Shorts go online. Nonetheless, check out the steps to access and create YouTube Shorts in just a few steps.
Also read:
- Maximizing YouTube Shorts Income Strategies
- 2024 Approved Clip Groove Best BGM Choices For Today's Popular YT Shorts
- Unveiling the Ideal YouTube Subset of Viewers
- In 2024, Decision-Making in the Workplace A Neurological Approach to Efficacy and Ethics
- Beyond YouTube 3 Pioneering Online Video Platforms
- How to Choose Between Youtubers' Game Entrance Tutorials (Cost Included?)
- Enhance Visibility YouTube Thumbnails Made Simple
- [Updated] Enhancing YouTube Visibility with Featured Channels Techniques
- Dish on Titles Crafting Captivating Cookery Channel Names for 2024
- Say No to Latency Turn On AV1 in YouTube Settings
- Million-Viewer Milestones YouTube's Pay Structure
- Navigating Beyond YouTube A Selection of the Best 27 Streamers
- 2024 Approved Bend Reality with Your Own Animated Craftsmanship
- In 2024, Evaluating YouTube's Monthly Creator Payments
- Top Youtuber Earnings Worldwide
- Two Sides to Every Story – How to Create Balanced Reaction Videos on YouTube (2 POV Approach)
- Unlock Mastery The Beginner's Guide to Editing Excellence
- [Updated] How to Convert YouTube Videos to GIFs [No Download]
- In 2024, Affordable Gear Guide Choosing the Right Cam For You
- Streaming Sound Excellence 5 Top Headsets
- In 2024, Connect With Creators Unravel Your YouTube Subscriber Type with 6 Exciting Questionnaires
- 2024 Approved Becoming an Economic Force A Guide to Earning on YouTube
- [New] Essential Banner Design Rules for Top YouTube Channels
- Captivating Clips Keywords That Ignite Viral Shorts on YouTube for 2024
- [Updated] Efficient Trimming Made Simple with Top 10 Software
- [Updated] Escalate Your Content Reach Leveraging Synergistic YouTube Outros
- Content Kings & Queens 8 YT's Booming Stars for 2024
- Pinnacle Video Artist Audio-Visual Choreography
- In 2024, Deconstructing the Revenue Stream of TSeries in YouTube Economy
- Transform Viewing Habits The Top 6 Choices for Cost-Free & Online Short Film Downloads
- [Updated] Channel Up Your Wealth Profit From Effective Use of YouTube Shorts
- Updated 2024 Approved Perfecting Your Facebook Video Cover Tips for Ideal Sizing
- Integrating IGTV Videos with Your Facebook Network for 2024
- How to Reset a Tecno Camon 20 Pro 5G Phone That Is Locked | Dr.fone
- Subject Emphasis Background Cleanse
- [New] Pioneering Filmmakers Using Vimeo for Live Captures
- Unlock Your Samsung Galaxy S23+ Phone with Ease The 3 Best Lock Screen Removal Tools
- Here Are Some Reliable Ways to Get Pokemon Go Friend Codes For Xiaomi Redmi Note 12 4G | Dr.fone
- Essential Steps for Effective Online Engagement
- 2024 Approved Advanced Techniques for Convincing PPT Presentations on GMeet
- Snapchat Cameos Catch Up with the Trendiest Trick
- New Fast-Track MP3 Splitting A Convenient Guide to Rapidly Dividing Audio Files for 2024
- How Can I Share PS4 Screenshots Online
- In 2024, Organizing Your Skype Conversations Windows/Mac Edition
- In 2024, How to Screen Mirroring Nokia G22 to PC? | Dr.fone
- [Updated] Innovative Approaches to Record & Archive Roblox Gameplay on Apple Systems for 2024
- Fixing Persistent Pandora Crashes on Xiaomi Redmi Note 12R | Dr.fone
- 2024 Approved How to Turn Off a Discord Server Device-Wise
- New Top 10 Best Gaming Intro Makers for Windows and Mac Fee and Paid for 2024
- Title: "2024 Approved Enhancing Quality without the Mic A Practical Guide"
- Author: Brian
- Created at : 2024-05-25 11:13:29
- Updated at : 2024-05-26 11:13:29
- Link: https://youtube-video-recordings.techidaily.com/2024-approved-enhancing-quality-without-the-mic-a-practical-guide/
- License: This work is licensed under CC BY-NC-SA 4.0.
