
:max_bytes(150000):strip_icc()/how-to-upload-a-podcast-to-spotify-featured-c9d043ed37d04b0dac14c907747f6b54.jpg)
"2024 Approved Enhance Visibility The Power of Customized YouTube Templates"
Enhance Visibility: The Power of Customized YouTube Templates
YouTube Shorts are short, 60-second videos that can be shared across all social media platforms. They’re a great way to quickly and easily share your message with your audience. As a result, many creators are turning to YouTube Shorts Templates to help them create professional-looking videos that stand out.
YouTube Shorts Templates can create a wide variety of videos, from product demos and how-tos to vlogs and comedy skits. They can help you create polished and engaging videos without the need for expensive equipment or a lot of editing experience.

This article will explore everything you need to know about YouTube Shorts Templates, including how to use them, tips for creating great videos, and examples of how other creators use them to boost their views and reach.
Overview of YouTube Shorts
YouTube Shorts is a new feature launched by YouTube in September 2020, which allows users to create short, 15-second videos that can be shared across all social media platforms. According to the statistics of EarthWeb , YouTube Shorts has seen tremendous growth in popularity since its launch, with billions of views every day.
According to YouTube, in the U.S. alone, the watch time for Shorts has grown over 4x since November 2020, and by December 2021, daily active users of Shorts exceeded 200M. As per YouTube’s official blog, In India, Shorts watch time has grown by over 20x since its launch, and by the end of 2021, India had over 150M daily active users.
In addition to the strong growth in views and engagement, YouTube Shorts has also become a powerful tool for creators to reach new audiences and grow their channels.
According to a study by Influencer Marketing Hub, YouTube Shorts have a higher engagement rate than traditional YouTube videos, with Shorts receiving an average of 3x more comments and likes than regular videos. The study also shows that Shorts videos have a higher completion rate of 60% compared to traditional videos with 40%.
As a result of the popularity of YouTube Shorts, many creators are now turning to YouTube Shorts Templates to help them create professional-looking videos that stand out. YouTube Shorts Templates can create a wide variety of videos, from product demos and how-tos to vlogs and comedy skits. They can help you create polished and engaging videos without the need for expensive equipment or a lot of editing experience.
How To Get Profit from Short Videos
There are a few ways to monetize your YouTube Shorts videos and turn them into a source of profit. One way is through YouTube’s built-in monetization options, such as displaying ads on your videos, sponsorships, and affiliate marketing. Another way is to use your Shorts videos’ popularity to promote your products or services.
You can also use YouTube Shorts to drive traffic to your website, where you can sell products or services. Collaborating with brands and promoting their products in your videos can also be a great way to monetize your content. It’s important to remember that building a sizable audience and creating high-quality content is key to monetizing your YouTube Shorts.
Benefits of Using Templates to Create YouTube Shorts
There are several benefits to using templates to create YouTube Shorts, including:

- Time-saving: Templates provide a pre-designed structure for your video, which saves you time and effort in creating a polished and professional-looking video.
- Consistency: Templates can help you maintain a consistent look and feel for your videos, which helps to build your brand and make your videos easily recognizable.
- Cost-effective: Templates can be cost-effective, eliminating the need for expensive equipment or editing software.
- Increased engagement: Templates can help you create engaging videos that capture your audience’s attention and increase the likelihood of them watching and engaging with your content.
- Access to a wider audience: Templates can help increase your views and reach, which can help you grow your channel and reach a wider audience.
- Easy to use: Templates are easy to use, even if you have yet to gain any prior video editing experience.
Using templates allows you to quickly create high-quality, professional-looking videos while also saving money and reaching a wider audience.
How to Make YouTube Shorts Using a Video Editor With Templates
Creating YouTube Shorts using a video editor with templates is a great way to save time and effort while still producing polished, professional-looking videos. One great video editor that can be used for this purpose is Filmora. Filmora has desktop and mobile versions, so you can create YouTube Shorts using any device.
Video Templates Feature of Filmora
With Wondershare Filmora , users can access a variety of templates for YouTube Shorts, which can be easily customized to fit the style and theme of their videos. These templates include various themes such as travel, vlogs, product demos, and more.
Wondershare Filmora also provides a wide range of editing tools, such as text, music, and effects, to help users create engaging and visually appealing videos. Filmora’s templates are an easy and efficient way to create visually appealing and engaging YouTube Shorts that stand out from the rest.
Free Download For Win 7 or later(64-bit)
Free Download For macOS 10.14 or later
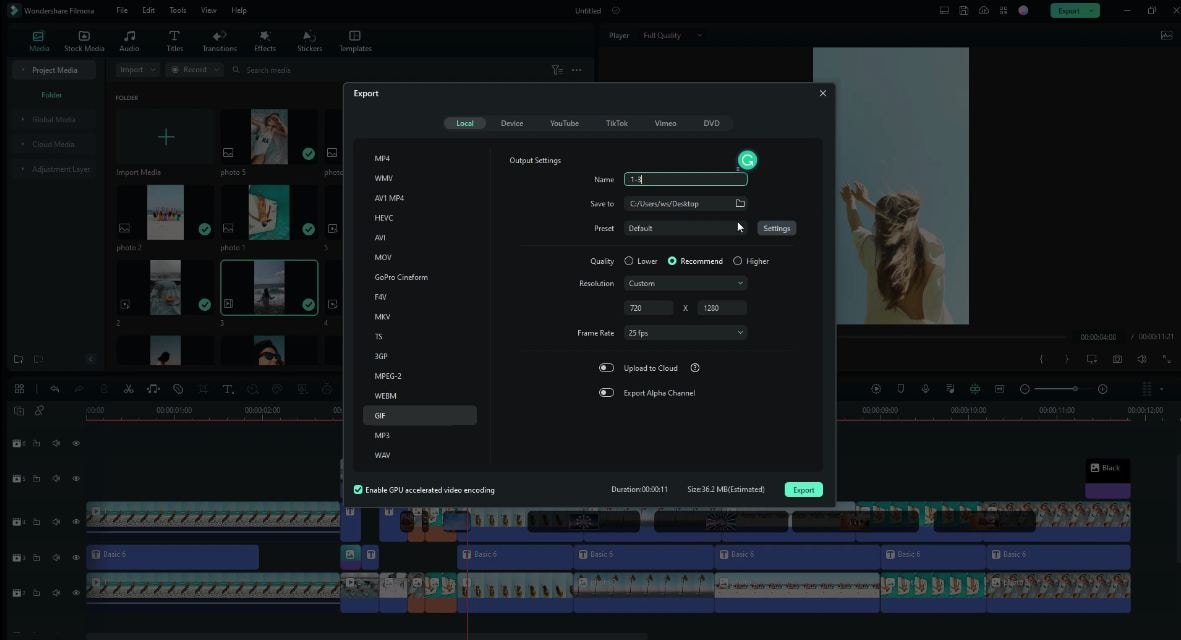
Step-by-Step Guide to Create YouTube Shorts With Templates Using Filmora for Desktop
Creating professional-looking YouTube Shorts can be time-consuming and daunting, especially if you have limited experience with video editing. However, using a video editor like Filmora, you can easily create high-quality YouTube Shorts using templates. This step-by-step guide will show you how to use Filmora’s video templates feature to create visually appealing YouTube Shorts on your desktop.
Step 1. Start Wondershare Filmora on your computer. On the “Templates” tab, you will find a variety of component templates to choose from.

Step 2. Select the template you want to use and place it on the timeline point.

Step 3. Add your videos, pictures, and audio files to the designated placeholders in the template to replace the sample ones.

Step 4. Trim, edit the clip or add other effects, texts and stickers as you like.

Step 5. Click the “Export“ button on the upper part to save your clip.
When creating YouTube Shorts, it is important to remember that these videos are vertical. You can easily find vertical video templates in Filmora’s template library. So select the one that best fits your needs and style.
Step-by-Step Guide to Use YouTube Shorts Video Templates With Filmora for Mobile
Creating professional-looking YouTube Shorts on mobile devices is now more accessible than ever. This step-by-step guide will show you how to use Filmora’s video templates feature to create visually appealing YouTube Shorts on your mobile device.
Step 1. Install the Filmora app on your device, then open it.

Step 2. Tap the “Template“ button on the screen’s bottom right.

Step 3. Select the template you wish to use.
Step 4. Press the “Make Video“ button to download the chosen template.

Step 5. Add the necessary footage to edit the template, then tap “Next.”

Step 6. You can preview the video and make any necessary changes.

Step 7. Tap the “Export“ button to save the completed video.

If you want to learn more about using Filmora’s video templates feature to create YouTube Shorts on your mobile device, we recommend watching this video tutorial:
YouTube Shorts Video Template Resources in Filmora
Filmora offers a wide variety of video templates that can be used to create YouTube Shorts. These templates include various themes such as an event, sports, fashion, lifestyle, and more. These templates can be found in Filmora’s library, making it easy for users to find the perfect template for their YouTube Short.
1. Event YouTube Shorts Template

Event YouTube Shorts Templates are an interactive way for creators to showcase their events dynamically and engagingly. These templates come with pre-designed elements such as animations, backgrounds, and text styles that are perfect for highlighting the key moments and creating excitement among the audience. It’s an effective way to make the event more engaging and interactive for the audience.
2. Sports YouTube Shorts Video Template
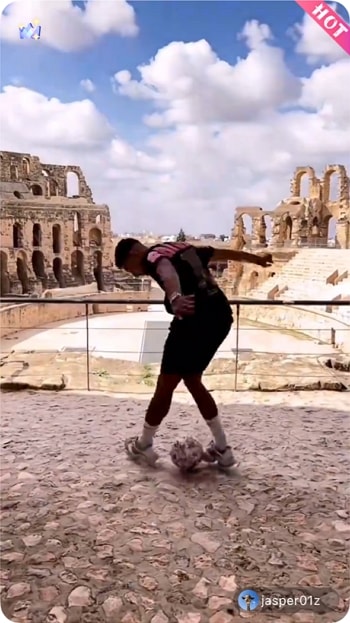
Sports YouTube Shorts video templates are pre-designed, customizable video templates for creating short, engaging sports-related content for YouTube’s Shorts feature. These templates often include scoreboards, team logos, and highlights footage and can be easily customized with your text, images, and videos. They are ideal for sports teams, athletes, and content creators looking to quickly and easily create professional-looking videos.
3. Fashion YouTube Shorts Template
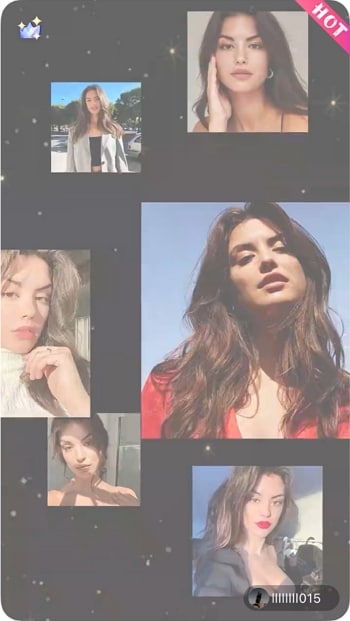
Fashion YouTube Shorts templates are pre-designed video templates that can be used to create visually appealing and engaging content for fashion-related YouTube Shorts. These templates often include elements such as fashion models, clothing and accessory displays, and trendy backgrounds and can be easily customized to suit the creator’s specific needs and aesthetic. They can be used to create various types of videos, including fashion lookbooks, product reviews, and styling tutorials.
4. Life Style Shorts Template

Lifestyle YouTube Shorts templates often include elements such as different lifestyle scenes, like traveling, cooking, home decor, and DIY projects, and can be easily customized to suit the creator’s specific needs and aesthetic. They can create various videos, including travel vlogs, recipe videos, and DIY tutorials.
Conclusion
YouTube Shorts are a great way to connect with your audience and promote your brand. Using a video editor like Filmora, you can easily create high-quality YouTube Shorts using templates. Filmora offers various video templates that can be used to create YouTube Shorts, including templates for events, sports, fashion, and lifestyle.
Filmora templates are fully customizable, meaning you can change the text, images, and colors to match your brand. These templates can be found in Filmora’s library, making it easy for users to find the perfect template for their YouTube Short. With the help of Filmora, you can easily create professional-looking YouTube Shorts that stand out and capture your audience’s attention.
Free Download For macOS 10.14 or later
Step-by-Step Guide to Create YouTube Shorts With Templates Using Filmora for Desktop
Creating professional-looking YouTube Shorts can be time-consuming and daunting, especially if you have limited experience with video editing. However, using a video editor like Filmora, you can easily create high-quality YouTube Shorts using templates. This step-by-step guide will show you how to use Filmora’s video templates feature to create visually appealing YouTube Shorts on your desktop.
Step 1. Start Wondershare Filmora on your computer. On the “Templates” tab, you will find a variety of component templates to choose from.
Step 2. Select the template you want to use and place it on the timeline point.
Step 3. Add your videos, pictures, and audio files to the designated placeholders in the template to replace the sample ones.
Step 4. Trim, edit the clip or add other effects, texts and stickers as you like.
Step 5. Click the “Export“ button on the upper part to save your clip.
When creating YouTube Shorts, it is important to remember that these videos are vertical. You can easily find vertical video templates in Filmora’s template library. So select the one that best fits your needs and style.
Step-by-Step Guide to Use YouTube Shorts Video Templates With Filmora for Mobile
Creating professional-looking YouTube Shorts on mobile devices is now more accessible than ever. This step-by-step guide will show you how to use Filmora’s video templates feature to create visually appealing YouTube Shorts on your mobile device.
Step 1. Install the Filmora app on your device, then open it.
Step 2. Tap the “Template“ button on the screen’s bottom right.
Step 3. Select the template you wish to use.
Step 4. Press the “Make Video“ button to download the chosen template.
Step 5. Add the necessary footage to edit the template, then tap “Next.”
Step 6. You can preview the video and make any necessary changes.
Step 7. Tap the “Export“ button to save the completed video.
If you want to learn more about using Filmora’s video templates feature to create YouTube Shorts on your mobile device, we recommend watching this video tutorial:
YouTube Shorts Video Template Resources in Filmora
Filmora offers a wide variety of video templates that can be used to create YouTube Shorts. These templates include various themes such as an event, sports, fashion, lifestyle, and more. These templates can be found in Filmora’s library, making it easy for users to find the perfect template for their YouTube Short.
1. Event YouTube Shorts Template
Event YouTube Shorts Templates are an interactive way for creators to showcase their events dynamically and engagingly. These templates come with pre-designed elements such as animations, backgrounds, and text styles that are perfect for highlighting the key moments and creating excitement among the audience. It’s an effective way to make the event more engaging and interactive for the audience.
2. Sports YouTube Shorts Video Template
Sports YouTube Shorts video templates are pre-designed, customizable video templates for creating short, engaging sports-related content for YouTube’s Shorts feature. These templates often include scoreboards, team logos, and highlights footage and can be easily customized with your text, images, and videos. They are ideal for sports teams, athletes, and content creators looking to quickly and easily create professional-looking videos.
3. Fashion YouTube Shorts Template
Fashion YouTube Shorts templates are pre-designed video templates that can be used to create visually appealing and engaging content for fashion-related YouTube Shorts. These templates often include elements such as fashion models, clothing and accessory displays, and trendy backgrounds and can be easily customized to suit the creator’s specific needs and aesthetic. They can be used to create various types of videos, including fashion lookbooks, product reviews, and styling tutorials.
4. Life Style Shorts Template
Lifestyle YouTube Shorts templates often include elements such as different lifestyle scenes, like traveling, cooking, home decor, and DIY projects, and can be easily customized to suit the creator’s specific needs and aesthetic. They can create various videos, including travel vlogs, recipe videos, and DIY tutorials.
Conclusion
YouTube Shorts are a great way to connect with your audience and promote your brand. Using a video editor like Filmora, you can easily create high-quality YouTube Shorts using templates. Filmora offers various video templates that can be used to create YouTube Shorts, including templates for events, sports, fashion, and lifestyle.
Filmora templates are fully customizable, meaning you can change the text, images, and colors to match your brand. These templates can be found in Filmora’s library, making it easy for users to find the perfect template for their YouTube Short. With the help of Filmora, you can easily create professional-looking YouTube Shorts that stand out and capture your audience’s attention.
Step-by-Step: Uploading Twitch Videos to YouTube Platform
Create High-Quality Video - Wondershare Filmora
An easy and powerful YouTube video editor
Numerous video and audio effects to choose from
Detailed tutorials provided by the official channel
Amidst many online applications is Twitch. This live streaming platform takes your experience to another level. You can use it to make crafts, play games, attract broadcasters, and many more. Twitch was launched in 2011, and since then, it has attracted millions of users, managing a database of about 4 million broadcasters by early 2020. With it, users can stream their activities as others watch in real-time. Just browse a category to find a stream.
You can also follow streamers that you like on the platform and get updates and notifications immediately after they are posted. But how do you start a career on a platform like Twitch? You need to broadcast and gather a large following. You can use built-in audiences from other platforms like Facebook. Let’s dive into the core of the matter and look at how to upload Twitch streams to YouTube and build your platform.

In this article
02 What is the benefit of uploading your Twitch Streams to YouTube
03 How to upload your Twitch Streams to YouTube
What is Twitch VOD?
Twitch Video on Demand (VOD) is a recording of previously streamed content. It provides briefings if you missed catching the Twitch live stream. Just watch the VOD from your favorite streamer and be engaged the best way possible. However, VODs don’t last forever. They are removed after two weeks of broadcast. But streamers with Partner Status can have their VODs last up to 60 days.
- How to enable Twitch VOD?
VODs are the best form to archive streams that your fans missed. Even though they are not enabled by default, you can manually enable them and not let your fans miss any important event from your channel. They’ll find it under the “Videos” tab on any Twitch channel. Follow these steps to enable VOD on your channel.
Step 1. Go to your profile icon in the top right corner of Twitch
Check in the “Channel & Video” section and locate the “Stream Key & Preferences” menu.

Step 2. Click on “Creator Dashboard”
Remember, you can enable VODs from your creator dashboard. Just go under the “Settings” tab and click on the “Stream section” of the creator dashboard. Check under the subtitle “VOD Settings” and get the option to store past broadcasts. You can also toggle the slider to store your past broadcasts.

Step 3 Click on the “Settings” tab on the left-hand side and go to Stream
You’ll get various drop-down menu options. Click on the “Settings” tab and choose the “Stream” option. The system will navigate to a new page, thus setting your preferences for VODs and clips.
Step 4. Go to “VOD Settings” and toggle on the “Store Past Broadcast.”
Ensure you have the toggle option turned ON under the “VOD Settings.” If it’s “ON,” you’ll realize the toggle will be purple, with a checkmark in it. Twitch will be confirmed to be enabled if it’s purple.

- Frequently Asked Question about Twitch VOD
These are some questions frequently asked by Twitch users.
1. How long will Twitch store my VOD
Your Twitch can either be stored for 14 or 60 days, depending on your level. For Twitch Prime, Twitch Partner or a Twitch Turbo user has their past broadcasts automatically saved for 60 days before deletion. But if you are not connected to these three options, your past broadcasts will be saved for only 14 days before deletion.
Since your past broadcasts cannot be live for more than 60 days, you have the option to download the video to your computer before the validity days expire and Twitch deletes it. You can use an External Hard drive to save the past broadcast content. Likewise, it is possible to turn your past broadcast content into Highlight and, in turn, permanently store them on Twitch.
2. What is the difference between Twitch VOD, Highlights, and Clips
Twitch VOD is a previously saved video of your live stream content. You choose to save either part or the entire content of your previously streamed content. More so, you don’t need any additional requirements to use VOD.
Highlights are short videos that have been edited from your past broadcast content. You can save them on Twitch permanently. Streamers majorly use highlights to save video game achievements. Unlike VOD Twitch that can be saved up to 60 days, Highlights usually lasts no more than 3 minutes.
- To make Highlights on Twitch, first, navigate to your Dashboard.
- Then scroll down and click on “Content” > “Video Producer.
- Next, press on “All Videos” to change them to “Past Broadcasts.”
- Now press the “Highlight” button, and Twitch will immediately open a new tab for “Twitch Highlighter Tool.”
- Then select the video part to include as “Highlight” and press the “Create Highlights” button.
- Wait a while for the process to be completed, and Voila! You have your Highlights created.
When it comes to Twitch Clip, you can capture special moments in a stream you are currently watching. On the same note, you can share clips with friends and other users on social media platforms. Such shared clips contain a link where others view the source or video from.
The clips you create will automatically be saved on the streamer’s channel on the “Clips” page, where other viewers can see them too. Nonetheless, you can download “clips” to your computer and, in turn, upload them whenever you want to. And note that you can help your stream grow via “Clips” by letting your viewers clip and share your stream moments.
- To create “Clips” on Twitch, identify which Streamers channel you wish to create a clip from.
- Then click on the “Clapper board” icon. Next, edit your clip between 5 and 60 seconds long.
- Finally, create a title and publish your Clip. You’ll also enjoy the privilege to share your clip’s link to other social media networks.
What is the benefit of uploading your Twitch Streams to YouTube
You stand to gain a lot when you upload your Twitch Streams to YouTube.
1) To enlighten your followers
Your followers will see your streams and make the best decisions. Viewers can check out your recordings and other highlights from past streams. It will help them decide whether they like what they see and probably join your live streams.
2) Twitch provides content for you to share and monetize on YouTube
Since Twitch streaming is more popular nowadays, many people throng it for content. It is not wise to rely entirely on Twitch to discover as a Twitch Streamer. Posting to YouTube will make it known within a short time. You would have announced your streams most nobly and kept your followers up to date, attracting new ones as well.
3) To keep your followers engaged even when you are offline
Even though live streaming is important, some viewers may not attend the live sessions due to different time zones or other commitments. In this regard, when uploaded to YouTube, Twitch will give them a chance to watch your content just whenever they log in. They, therefore, have the option to watch a Twitch VOD of the live stream they missed.
How to upload your Twitch Streams to YouTube
Check how to upload Twitch streams to YouTube from the Twitch website.
Step 1. Identify the little arrow next to your name on the Twitch website and click on it. Then click on the “Video Producer” to take you to a list of your Twitch videos.

Step 2. Check out and click on the “three-dots” on the video you wish to upload to YouTube. Click on the “Export” tab.
Step 3. A menu will then pop up. Here, you can fill in the description, title, and tags that you would like to appear on the YouTube video. There is an option for Twitch to split your video automatically. If you wish so, then tick the “Checkbox” to enable it. Then click on the “Start Export” option to export your Twitch streams to YouTube.

Bouns! Edit Your Twitch Video with Filmora
The quality of your video matters when it comes to uploading Twitch Streams to YouTube. Using a third-party tool to edit your video is the first step in ensuring your videos communicate meaningful content. Filmora comes in handy to bring your imaginations to life. Use it for simple creation without limits, even for beginners.
- Use it to track moving objects in video clips
- Easily match any image of the selected clip
- Its powerful tools let you edit your video by cropping, splitting, adjusting speed, etc
- The video keyframe easily indicates the beginning and end of the parameters
For Win 7 or later (64-bit)
For macOS 10.12 or later
Conclusion
● Don’t just focus on how to upload Twitch streams to YouTube but also consider the quality of video you are posting to YouTube. Remember, your video quality will speak much more of you than any other description. So, strive to produce quality videos using the best tool, Filmora. The app is easy to use and will elevate your views and imaginations through your video in the most impactful way.
Amidst many online applications is Twitch. This live streaming platform takes your experience to another level. You can use it to make crafts, play games, attract broadcasters, and many more. Twitch was launched in 2011, and since then, it has attracted millions of users, managing a database of about 4 million broadcasters by early 2020. With it, users can stream their activities as others watch in real-time. Just browse a category to find a stream.
You can also follow streamers that you like on the platform and get updates and notifications immediately after they are posted. But how do you start a career on a platform like Twitch? You need to broadcast and gather a large following. You can use built-in audiences from other platforms like Facebook. Let’s dive into the core of the matter and look at how to upload Twitch streams to YouTube and build your platform.
In this article
02 What is the benefit of uploading your Twitch Streams to YouTube
03 How to upload your Twitch Streams to YouTube
What is Twitch VOD?
Twitch Video on Demand (VOD) is a recording of previously streamed content. It provides briefings if you missed catching the Twitch live stream. Just watch the VOD from your favorite streamer and be engaged the best way possible. However, VODs don’t last forever. They are removed after two weeks of broadcast. But streamers with Partner Status can have their VODs last up to 60 days.
- How to enable Twitch VOD?
VODs are the best form to archive streams that your fans missed. Even though they are not enabled by default, you can manually enable them and not let your fans miss any important event from your channel. They’ll find it under the “Videos” tab on any Twitch channel. Follow these steps to enable VOD on your channel.
Step 1. Go to your profile icon in the top right corner of Twitch
Check in the “Channel & Video” section and locate the “Stream Key & Preferences” menu.
Step 2. Click on “Creator Dashboard”
Remember, you can enable VODs from your creator dashboard. Just go under the “Settings” tab and click on the “Stream section” of the creator dashboard. Check under the subtitle “VOD Settings” and get the option to store past broadcasts. You can also toggle the slider to store your past broadcasts.
Step 3 Click on the “Settings” tab on the left-hand side and go to Stream
You’ll get various drop-down menu options. Click on the “Settings” tab and choose the “Stream” option. The system will navigate to a new page, thus setting your preferences for VODs and clips.
Step 4. Go to “VOD Settings” and toggle on the “Store Past Broadcast.”
Ensure you have the toggle option turned ON under the “VOD Settings.” If it’s “ON,” you’ll realize the toggle will be purple, with a checkmark in it. Twitch will be confirmed to be enabled if it’s purple.
- Frequently Asked Question about Twitch VOD
These are some questions frequently asked by Twitch users.
1. How long will Twitch store my VOD
Your Twitch can either be stored for 14 or 60 days, depending on your level. For Twitch Prime, Twitch Partner or a Twitch Turbo user has their past broadcasts automatically saved for 60 days before deletion. But if you are not connected to these three options, your past broadcasts will be saved for only 14 days before deletion.
Since your past broadcasts cannot be live for more than 60 days, you have the option to download the video to your computer before the validity days expire and Twitch deletes it. You can use an External Hard drive to save the past broadcast content. Likewise, it is possible to turn your past broadcast content into Highlight and, in turn, permanently store them on Twitch.
2. What is the difference between Twitch VOD, Highlights, and Clips
Twitch VOD is a previously saved video of your live stream content. You choose to save either part or the entire content of your previously streamed content. More so, you don’t need any additional requirements to use VOD.
Highlights are short videos that have been edited from your past broadcast content. You can save them on Twitch permanently. Streamers majorly use highlights to save video game achievements. Unlike VOD Twitch that can be saved up to 60 days, Highlights usually lasts no more than 3 minutes.
- To make Highlights on Twitch, first, navigate to your Dashboard.
- Then scroll down and click on “Content” > “Video Producer.
- Next, press on “All Videos” to change them to “Past Broadcasts.”
- Now press the “Highlight” button, and Twitch will immediately open a new tab for “Twitch Highlighter Tool.”
- Then select the video part to include as “Highlight” and press the “Create Highlights” button.
- Wait a while for the process to be completed, and Voila! You have your Highlights created.
When it comes to Twitch Clip, you can capture special moments in a stream you are currently watching. On the same note, you can share clips with friends and other users on social media platforms. Such shared clips contain a link where others view the source or video from.
The clips you create will automatically be saved on the streamer’s channel on the “Clips” page, where other viewers can see them too. Nonetheless, you can download “clips” to your computer and, in turn, upload them whenever you want to. And note that you can help your stream grow via “Clips” by letting your viewers clip and share your stream moments.
- To create “Clips” on Twitch, identify which Streamers channel you wish to create a clip from.
- Then click on the “Clapper board” icon. Next, edit your clip between 5 and 60 seconds long.
- Finally, create a title and publish your Clip. You’ll also enjoy the privilege to share your clip’s link to other social media networks.
What is the benefit of uploading your Twitch Streams to YouTube
You stand to gain a lot when you upload your Twitch Streams to YouTube.
1) To enlighten your followers
Your followers will see your streams and make the best decisions. Viewers can check out your recordings and other highlights from past streams. It will help them decide whether they like what they see and probably join your live streams.
2) Twitch provides content for you to share and monetize on YouTube
Since Twitch streaming is more popular nowadays, many people throng it for content. It is not wise to rely entirely on Twitch to discover as a Twitch Streamer. Posting to YouTube will make it known within a short time. You would have announced your streams most nobly and kept your followers up to date, attracting new ones as well.
3) To keep your followers engaged even when you are offline
Even though live streaming is important, some viewers may not attend the live sessions due to different time zones or other commitments. In this regard, when uploaded to YouTube, Twitch will give them a chance to watch your content just whenever they log in. They, therefore, have the option to watch a Twitch VOD of the live stream they missed.
How to upload your Twitch Streams to YouTube
Check how to upload Twitch streams to YouTube from the Twitch website.
Step 1. Identify the little arrow next to your name on the Twitch website and click on it. Then click on the “Video Producer” to take you to a list of your Twitch videos.
Step 2. Check out and click on the “three-dots” on the video you wish to upload to YouTube. Click on the “Export” tab.
Step 3. A menu will then pop up. Here, you can fill in the description, title, and tags that you would like to appear on the YouTube video. There is an option for Twitch to split your video automatically. If you wish so, then tick the “Checkbox” to enable it. Then click on the “Start Export” option to export your Twitch streams to YouTube.
Bouns! Edit Your Twitch Video with Filmora
The quality of your video matters when it comes to uploading Twitch Streams to YouTube. Using a third-party tool to edit your video is the first step in ensuring your videos communicate meaningful content. Filmora comes in handy to bring your imaginations to life. Use it for simple creation without limits, even for beginners.
- Use it to track moving objects in video clips
- Easily match any image of the selected clip
- Its powerful tools let you edit your video by cropping, splitting, adjusting speed, etc
- The video keyframe easily indicates the beginning and end of the parameters
For Win 7 or later (64-bit)
For macOS 10.12 or later
Conclusion
● Don’t just focus on how to upload Twitch streams to YouTube but also consider the quality of video you are posting to YouTube. Remember, your video quality will speak much more of you than any other description. So, strive to produce quality videos using the best tool, Filmora. The app is easy to use and will elevate your views and imaginations through your video in the most impactful way.
Also read:
- Top 5 YouTube Video Editor Alternatives for 2024
- Essential Tips and Tricks for Creating Killer Short Videos on YT
- Enriching Vlog Topics to Share for 2024
- [Updated] Essential Tips and Tricks for Creating Killer Short Videos on YT
- 2024 Approved Designing a Memorable YouTube Sign-Off
- [Updated] Discovering 8 YouTube Channels on the Rise at Lightning Speed
- 2024 Approved Enhancing Clicks YouTube Thumbnail Sizes Explored
- Earning Equations Decoding the Mathematics Behind YouTube Income Monitoring for 2024
- [Updated] Affordable Subscriber Boost Buy & Sell YouTube Views
- Mastering the Art of Customizing Your YouTube Channel URL
- Top 10 Reasons Your YouTube Videos Have 0 Views & Solution
- Can You Receive a Monthly Check From YouTube, In 2024
- Essential 7 DSLRs to Elevate Virtual Presentations & Broadcasts for 2024
- DIY Video Mastery 10 Straightforward Concepts Everyone Should Try for 2024
- Transform Into an Ultimate Hit Essential SEO Tips for YouTube Videos
- In 2024, Behind-the-Camera Glory Spotlight on Top 10 Female YouTubers
- Uncovering Histories Student-Favored YouTubes on Historic Events
- Step-by-Step Video Creation with YouTube and More
- Reel Entertainment Top 20 YouTube Film Sources
- Setting Up Your YouTube Standings From Beginner to Beneficial Businesses
- [New] Essential Rules of Engagement on YouTube
- [Updated] Capturing Contentment A Practical Guide to Daily Vlogging
- 2024 Approved Charting the Differences in YouTube's Ownership and CC Models
- [New] SplitCam's Journey to Video Excellence An Overview for 2024
- [Updated] In 2024, The Art of Producing Captivating Facebook Video Content
- [New] Facilitating Instant Sharing TikTok Videos on Facebook
- Logitech Webcam 101 A Beginner's Guide to Video
- Updated Most Popular Background Scores for Films & Videos Updated List 2023
- In 2024, How To Bypass iCloud By Checkra1n Even From iPhone 13 mini If Youve Tried Everything
- In 2024, Three Ways to Sim Unlock Samsung Galaxy S23 Tactical Edition
- Updated 2024 Approved Chromecast Local Content How to Stream Videos From Your Computer or Mobile Device
- Updated Beat Blend Benders A Curated List of Highest-Rated Audio-Synchronization Editors, 2023
- [Updated] 2024 Approved Leveraging TikTok to Mirror Your Best Features
- New Building a Gradual Audio Fade-Out Feature in Multimedia Projects
- In 2024, ChuckleChief Easy Meme Design Tool
- Remove Google FRP Lock on HTC U23
- Title: "2024 Approved Enhance Visibility The Power of Customized YouTube Templates"
- Author: Brian
- Created at : 2024-05-25 11:13:19
- Updated at : 2024-05-26 11:13:19
- Link: https://youtube-video-recordings.techidaily.com/2024-approved-enhance-visibility-the-power-of-customized-youtube-templates/
- License: This work is licensed under CC BY-NC-SA 4.0.
