
:max_bytes(150000):strip_icc()/Roblox_MeepCity-5978fbc0054ad90010302587.jpg)
"2024 Approved Enhance Engagement Mastering Template-Based Video Description Writing"
Enhance Engagement: Mastering Template-Based Video Description Writing
Titles and thumbnails sometimes aren’t enough. Viewers need to know more about the video before they watch it. What do they do to get that information? They look at the video description. So don’t ignore that. But what if you are not confident with your writing skills? What should you do? It’s actually an easy problem to solve. You can use YouTube description templates!
Description templates will let you write descriptions very easily. All you have to do is replace the words to fit your video, and you are done! Learn more about them below.

Overview of YouTube Description
What are YouTube descriptions? There are two types: video description and channel description.
YouTube Video Description

The video description is the text below each video. Adding descriptions to your videos is not required. However, if you want success on YouTube, we highly recommend paying attention to video descriptions. It will give viewers more context about the video and will convince them to watch it.
YouTube Channel Description

This is the text on your About page. It explains to your visitors what your channel is all about. What can they expect from you? You should put this information in your channel description. It’s how you can get discovered by people looking for content exactly like what you offer. Basically, your channel description is like an ad. It tells other users why they should subscribe to your channel.
Tips for Creating an Amazing YouTube Description
YouTube is not only telling people that they should watch your content. It also tells YouTube to recommend the video to users searching for something to watch. YouTube crawls the description to rank your videos in search results. That said, you must do it right. Here are some tips you should keep in mind.
- Include the most important keywords in your video description.
- Inform viewers what to expect from the video. What is it about? Is it a travel blog, food review, or what?
- Add relevant hashtags to your video description.
- Add links (relevant resources, your socials, timestamps, links to your other videos, etc.)
- Ensure the hook is attention-grabbing. Otherwise, people would ignore it and your video altogether.
- Add a call-to-action to remind your viewers to like and subscribe.
- Note that only the first 200 characters will appear on the screen. Users need to click the “Show More” button to view the rest. So put what’s most important in the first 200 characters.
Benefits of Using a YouTube Description Templates
If you have a business or something on the internet that needs promotion, you think of SEO (Search Engine Optimization.) It makes the material appear more often and higher on searches.
When thinking about SEO, people think of Google. And rightly so. It is the largest search engine in the world. But SEO is also important on YouTube - the world’s second-largest search engine. The thing is that SEO for videos on YouTube is different from SEO for Google or other engines.
YouTube descriptions play a huge part in SEO. And description templates make writing appealing descriptions easier for content creators like you.
5 Best YouTube Video Description Template
Now, you are well aware of the importance of YouTube descriptions. That may have made you feel more pressured to write fantastic ones. Here are 5 YouTube description templates you can use so it would not be much of a problem.
1. YouTube Video Description About New Products
The [latest version of your product] is HERE! Download and Try [latest version of your product] now: [Download link]
Let’s embrace more features with [latest version of your product]!
If you’re new here, don’t forget to hit that subscribe button and the bell to stay updated on our next video release!
Join our Online Community!
FOLLOW us on Instagram: https://www.instagram.com/\[accountname\ ]
FOLLOW us on Twitter: https://twitter.com/\[accountname\ ]
FOLLOW us on Facebook: https://www.facebook.com/\[accountname\ ]
Do you have a business that sells products? You can use this template for your new product launches.
2. YouTube Video Description for Educational Videos
Hello! Today we will be discussing [topic.] We are joined by [guest, their title], and he’ll take you through [topic.]
It’s important that you learn this because [emphasize the importance of being well informed about the topic.]
If you’re unfamiliar with it, use this video as a guide. It will give you the information you need, like the how-tos, dos and don’ts, and the ins and outs.
Don’t forget to subscribe and activate the notification bell to learn more about interesting stuff.
Here’s what we’ll cover in this video:
[Timestamps]
Use this template when making an informative video. It could be how-tos, tutorials, or other educational stuff.
3. YouTube Video Description for Funneling Viewers Into Your Website
This video will show you a preview of [topic.] If you’re interested to learn more about this and what we do, please visit us at [website link.] You can also reach out to us at [contact information.]
Please note that this is not the whole description. Rather, it is only the first 200 characters of it. As you can see, it’s a CTA. It’s wise to put it there because that part is what people would see the most. They’d have to click the “See More” button to read the rest of the description. And not everyone will click that.
Tip: Use URL shorteners if your website URL is too long. Remember that you only have 200 characters to use. So every character you can remove counts.
4. YouTube Video Descriptions for How-To Videos With Products
Hello! Today I’m going to teach you how to [topic.] I regularly post things like this. So please subscribe and turn on your notifications to know when I post new content.
[Give more information about the topic.]
List of products used/mentioned in the video.
[List the products and include links.]
ONLINE SHOP: [Your online shop link]
Follow us on our other social media channels!
Facebook: [Your Facebook page link]
Twitter: [Your Twitter account link]
Instagram: [Your Instagram account link]
Use this template for how-to videos wherein you use or mention your products. For example, the makeup products you used in a makeup tutorial video.
5. YouTube Video Description for Travel Vlogs
Join me as I explore [location], a [more information about the location.] To know more about this place, you can visit: [website for the location.]
If you want to tour other places before going there, consider subscribing. I post travel videos every week!
You can also connect with me on other social media platforms:
[Plus your other socials.]
See you on my next vlog!
Use this template for videos where you travel to different places.
5 Best YouTube Channel Description Template
People who found your video interesting will likely visit your channel. Having a fantastic YouTube Channel description will help encourage them to subscribe. You can edit these channel description templates to make one.
1. YouTube Channel Description Template for Business Accounts
Suppose you are using YouTube for marketing purposes. You can use this template to make your channel description.
[Channel name] provides [your services].
Subscribe and join us for videos every week and meet those passionate who like [your product].
Download [your product] Now: [Download link]
2. YouTube Channel Description Template for Travel Vloggers
Is your content about traveling around places? If so, you can use this template.
Welcome to the [Channel Name] YouTube Channel!
I’m a hodophile. I love traveling worldwide, exploring places I’ve never been to, trying local food, and meeting new people.
Come join me on my adventures, and together, let’s discover the wonders of the world! Subscribe now, and don’t forget to turn on the notification bell.
You can also find me on Instagram to see pictures of the places I visit: [your Instagram link.]
3. YouTube Channel Description Template for Gaming Channels
Gaming is a popular category on YouTube. If that’s what your channel is for, you can try this template.
What’s up! This channel, [Channel Name], is dedicated to gaming, our favorite hobby. I will be uploading gameplay videos of [list the games you play.]
Subscribe, and let’s level up together!
You can also find me at:
[Insert your other socials]
4_._ YouTube Channel Description Templates for Beauty/Fashion Vloggers
If your videos are makeup tutorials, fashion vlogs, and GRWM videos, you can use this template to write your channel description.
Hi! I’m [Your Name] of the [Your channel name] YouTube Channel.
I help women look their best by suggesting what dresses and clothes to buy and sharing helpful fashion tips. Also, I post easy-to-follow makeup tutorials for different looks.
My style philosophy is [explain how you determine what looks good and what does not.]
If you are interested in learning some outfit ideas, hit the Subscribe button. Also, turn on your notification, so you don’t miss a video!
5. YouTube Channel Description Template for Couples
Some couples enjoy sharing their daily lives with their followers through vlogs. Are you among them? You can use this template if that is the case.
Welcome to our YouTube channel. We are two people in love who also love sharing our stories with others. And in this day and age, what’s a better way to do that than by making vlogs?
Hopefully, we can share the love through our videos and that you enjoy watching them as much as we enjoyed making them and our moments together.
We’ll react to shows and other videos, take you with us on our dates, and maybe prank each other. If you’re interested in this kind of stuff, hit the Subscribe button and the notification bell!
[Insert your socials.]
[Bonus] Create Awesome YouTube Videos With Filmora Video Editor
Of course, good video and channel descriptions are useless if your videos aren’t that good. Thus, we recommend using a powerful video editor to ensure your videos are high-quality. One of your best options is Wondershare Filmora .
Free Download For Win 7 or later(64-bit)
Free Download For macOS 10.14 or later

Wondershare Filmora is a budget-friendly, beginner-friendly, feature-rich video editor. It also gets regular updates. The latest one introduced fantastic features like enhanced keyframes, draw masks, switchable workspace layouts, and more AI tools. With these tools in your hands, you can transform your YouTube videos into masterpieces.
Conclusion
YouTube descriptions are crucial to the success of your YouTube channel. If you can’t write a good one by yourself, don’t worry. You can use YouTube description templates to make it easier.
With well-written descriptions and high-quality videos, your success on YouTube is guaranteed. And to ensure your videos are great, you should use a reliable video editor like Wondersahre Filmora. Its wide selection of features will help you express your creativity the best that you can.
Free Download For macOS 10.14 or later
Wondershare Filmora is a budget-friendly, beginner-friendly, feature-rich video editor. It also gets regular updates. The latest one introduced fantastic features like enhanced keyframes, draw masks, switchable workspace layouts, and more AI tools. With these tools in your hands, you can transform your YouTube videos into masterpieces.
Conclusion
YouTube descriptions are crucial to the success of your YouTube channel. If you can’t write a good one by yourself, don’t worry. You can use YouTube description templates to make it easier.
With well-written descriptions and high-quality videos, your success on YouTube is guaranteed. And to ensure your videos are great, you should use a reliable video editor like Wondersahre Filmora. Its wide selection of features will help you express your creativity the best that you can.
ScreenCast Pro: Efficient Recording, Mac/PC Upload to YouTube
10 Record Screen and Upload to YouTube Tools [PC, Mac, Online]

Richard Bennett
Mar 27, 2024• Proven solutions
Recording the screen, including the audio, can help you introduce your gaming flow, show how to perform a task on the computer, or create a presentation. You can also upload the screen record to YouTube for free. There are several solutions if you want to record your screen and upload it to YouTube. You can record the screen with some screen recording software on your Mac or your Windows PC or with some online screen recording software or the screen recording feature built-in YouTube itself. In this article, we will show you how to to record screens and upload to YouTube on Windows and Mac with some screen recorders , some of which are free to use, or freemium, which are built in your computer. Check it out now.
- Part 1: Record Screen and Upload to YouTube Directly on PC
- Part 2: Record Screen and Upload to YouTube Online
- Part 3: Record Screen and Upload it to YouTube on Mac
Recommended YouTube Screen Recorders to Record Screen and Upload to YouTube Directly [Windows & Mac]
The following YouTube screen recording software can be used on both Windows and Mac computers. You can record the entire screen or a particular portion of the screen, record your own voiceover or add music to the recorded video and then upload it to YouTube directly.
Using Wondershare Filmora
Filmora is an easy-to-use yet powerful enough video editing software which features the Recording tools. Using Filmora, you can record the desktop screen , audio and webcam simultaneously. But compared with Filmora, the highest frame rates that Filmora can capture at 1 second is 60FPS.

Launch Wondershare Filmora and choose Full Feature mode to begin a project. Go to the Record tab and choose Record PC Screen. There are three types of screen recording to choose from – Target Window, Full Screen and Custom. You can also choose to record computer system audio or record from microphone. Click the icons to turn them off or on accordingly. Click Settings to see if there’s anything you need to adjust before recording.
 Download Mac Version ](https://tools.techidaily.com/wondershare/filmora/download/ )
The recorded footage will be loaded to the Media panel directly, you can then cut out imperfect frames, add some texts and titles, or apply transitions and filters to it. To upload the recorded screen video, click the Export in the main interface, and then switch to YouTube tab in the Export window.

Sign in your YouTube account and complete the video info accordingly and then click the Export button to upload the recorded video to YouTube directly.
If you are looking for more screen recorders which can run on Windows, Mac, Linux, Android, iOS or online for different purposes, you can check our picks of the best screen recorders for all platforms based on different purposes.
Part 1: How to Record Screen on Windows PC and Upload to YouTube Directly
1. Bandicam
To record screen using Bandicam, select “Screen Recording” and a green-edged rectangle window will appear. Adjust the rectangle window on the video then play the video.
Clicking the REC button will change the green-edged line of the rectangle window to red. Click the stop button to stop recording. To watch the recorded video, go to the “General” tab and click “Open.”
You can also upload your desired videos to YouTube from Bandicam by clicking the “Upload” button found under Bandicam’s “Output” tab.

2. Using Microsoft Expression Encoder 4
You can download Microsoft Expression Encoder 4 to record the screen of your device and upload it to YouTube. The software has a screen capture tool and encoder. Install the software as you would usually do. There’ll be 2 shortcuts in the start menu – Microsoft Expression Encoder 4 Screen Capture (used to capture the screen) and Microsoft Expression Encoder 4 (converts the screen into a video that can be uploaded to YouTube).
3. Using Ezvid
Ezvid can record screen and audio simultaneously. It can also capture the whole area of the screen, making it perfect for tutorial videos. Ezvid also has speech synthesis that translates text captions into artificial human language, so it can easily produce human sound with only a click of a button.
4. Using Smartpixel
Smartpixel is a screen recorder for Android and Windows. It has a user-friendly interface and different editing as well as recording functions. Smartpixel can export various video formats such as 3gp, MP4, wmv, avi and flv. It also allows you to upload videos to different online platforms like GoPlay and YouTube.
Part 2: How to Record Screen Online
1. Using YouTube
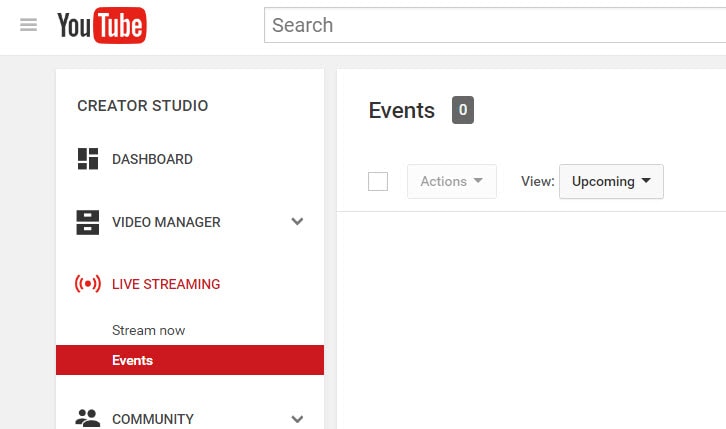
You can now also record desktop screen with the features in YouTube. To start recording the screen using YouTube, you just need to sign-in to the website using your Google Account. Click “Creator Studio”. Go to Live Streaming and choose “Events”. You’ll be directed to the “Create Event” page. Provide the title for your screencast video, set the video’s privacy to either Private or Unlisted.
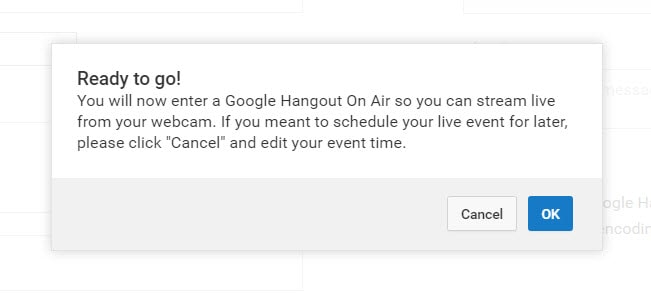
Click “Go Live Now” The Hangouts on Air page will open. Start the webcam from recording by clicking the camera icon. If you don’t want to record audio, you can just click the microphone icon.
Click “Screenshare” and choose a desktop window that you want to record for the screencast. Click “Start Screenshare” to share the screen then click the “Start Broadcast” button to begin recording the screen. When you’re done recording, just “Stop Broadcast” and go to the YouTube website. The new screencast video is stored in your YouTube video dashboard. You can share the video or download it to your Google Drive.
For more details, you can check How to record YouTube videos . If you’re looking for more online screen recorders for YouTube, you can check our picks of the 10 Best Free Online Screen Recorders .
2. Using FlexClip - Free Online Screen Recorder
FlexClip is a complete bundle of creativity. Why so? It is because it’s a web-based tool that helps you with image and video editing and post-production. It also offers a free online screen recording option.
FlexClip lets you record your webcam, screen, and audio with a simple click. Contrarily, you can also record simultaneous screens without a hitch! It can record almost anything that is being displayed on your computer screen. So be it gameplays, seminars, courses, presentations, or anything, you can always use this program to save your recording.
And once you’re done capturing the screen, FlexClip also allows you to edit your recording. You can add subtitles, highlights, overlays, and annotations to increase your video’s worth. So no wonder why FlexClip is one of the leading web-based software for free online screen capturing, especially if you want to make great YouTube videos.
The recording process is easy. All you need to do is visit the website and click the “Start Recording” button.
Then, choose your layout to start recording the screen and audio. When you’re finished, just hit the “Stop” button to end recording to edit the video in FlexClip’s built-in video editor. Lastly, download the screencast to upload it to your YouTube channel.
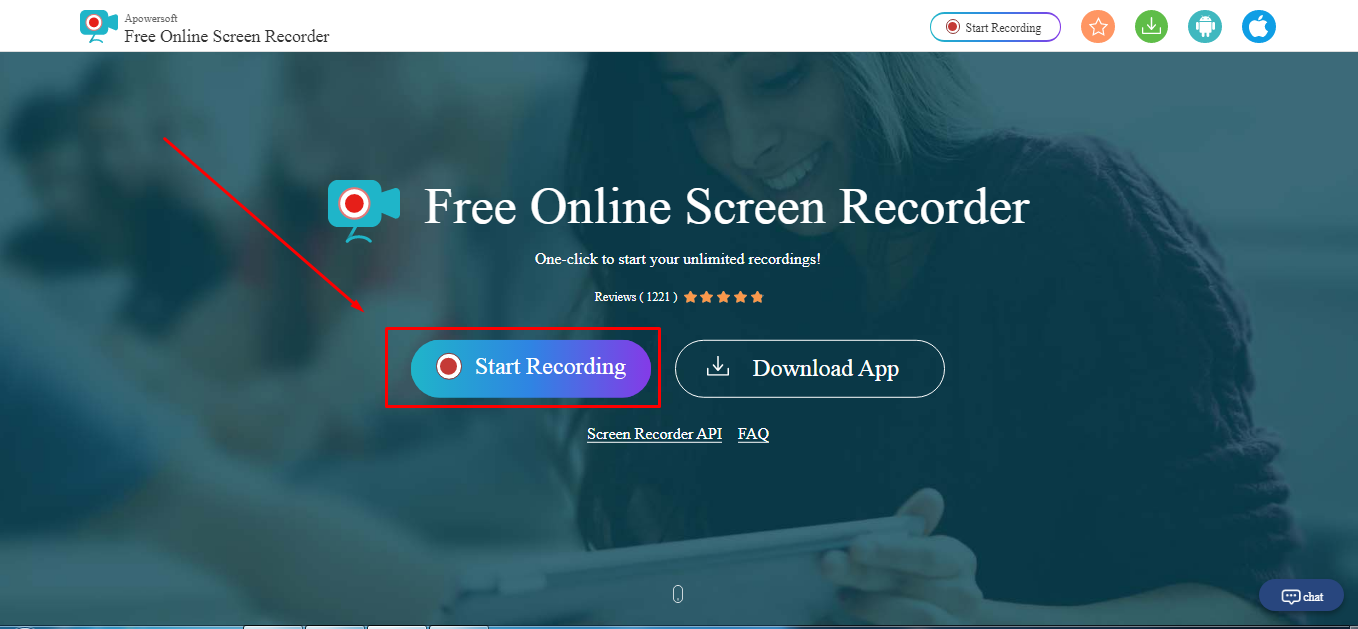
3. Using Apowersoft - Online Screen Recorder (Free)
Apowersoft is a renowned company that creates digital products, including file compressors, watermark removers, and more. Since there’s a growing demand for screen recorders for YouTube, the Apowersoft creators have also launched a “Free Online Screen Recorder.” Yup! You’re reading the right name.
Apowersoft – Free Online Screen Recorder eases the screen recording process. While it’s an online tool, you can also download the app on your Mac or Windows OS.
It’s a free program with simple features, such as a screen and webcam recording with audio. So if your YouTube content doesn’t require overlays, subtitles, or other editing stuff, this software is ideal due to its simplicity.
You can click the “Start Recording” button to get started.
.
Then, select the screen you wish to record, and save the captured screen to your local disk or cloud so you can upload the videos later to your YouTube channel.
Part 3: How to Record Screen for YouTube with Free Screen Recorder on Mac
1. Using QuickTime Player
QuickTime Player can be used to record movies from your camera or the screen of your iPad, iPod touch or iPhone. It can also record your Mac’s screen or record audio from your microphone. To record the screen of your Pad, iPod touch or iPhone, you should use the movie-recording function. You can use it to record the screen for YouTube video, or you can also record the YouTube video and empower it with your creativity.
For more details of using QuickTime Player to record YouTube videos, check our guide: How to record videos with Quicktime.
2. Using Screen Flow
Screen Flow is our second pick for Mac. Although it’s paid software, you can still enjoy the blessings of this screen recorder through the trial version. It’s a very handy tool that allows Mac screen recording and all iOS devices, such as iPhones and iPad.
Okay! So what’s good about screen flow? Let’s uncover. Firstly, it’s an editor + screen recorder specifically made for YouTube. You can capture the screen and edit the footage before uploading it to your channel.
Secondly, this software allows you to record simultaneous screens and your webcam. Plus, you can also record your voice through its mic recording option.
Another great thing about Screen Flow is that it has numerous video filters and a customizable title library. It also permits you to save screen recordings on your Mac or directly share them to your YouTube channel, other social media accounts, websites, or cloud storage in a few clicks.
Here’s a video to help you get started with screen recording on your Mac using Screen Flow:
3. Using Vmaker
Vmaker is another authentic software to record screens for your YouTube videos. It’s a free program, but you can buy premium versions to unlock more features.
The tool is trusted by many software review websites, such as “crozdesk.” It is available on both Mac and Windows OS. However, it seems like this software performs well on Mac operating systems.
Vmaker allows you to record your screen, your favorite YouTube videos, and the audio – all together! You can record the entire Mac screen or a specific portion in HD quality. Moreover, the software allows you to pick resolutions up to 4K to record the media.
This program also offers editing features like adding subtitles, music, flip, blur, trim, and more to create an awesome video. All videos are saved to your cloud workspace once you finish recording. Then, you can share the recorded video screens on your YouTube.
The tool is ideal for making tutorials, courses, demos, and product review videos. All you need to do is download Vmaker on your Mac. Choose a webcam, screen, or both with audio for recording. Start recording in the highest quality. Edit your video and share it on your YouTube channel.
Conclusion
Above are some screen recorders that you can use to record YouTube videos or record the screen and webcam simultaneously to make a video and upload it it to YouTube. If you want to record a screen video and edit it further, you should try Wondershare Filmora video editor.
Download Mac Version ](https://tools.techidaily.com/wondershare/filmora/download/ )
FAQs
Q1. How do you record your screen on a Mac for YouTube?
There are some great tools for screen recording on Mac for YouTube. The most loved and enjoyed program is Filmora by Wondershare. It’s a professional tool for screen recording and video editing. Most importantly, it has a user-friendly interface and records your screen in high quality.
Another option is the Quick Time Player. This program also allows screen recording. Likewise, Screen Flow is also a great program for screen capturing for YouTube on Mac.
Q2. Can I screen-record and upload it to YouTube?
There are two ways to do it. First, you can download the free or paid screen recording software on your Windows or macOS. Second, you can look for online screen recorders like FlexClip or the built-in YouTube recorder and directly share the recorded video to your channel.
Some tools, like Apowersoft and Vmaker, save screen recordings to the cloud or local disk. And there’s no direct sharing of the recorded screens to your YouTube channel. So if you’re using such programs, you will need to sign in to your YouTube channel and upload the file from your computer hard drive.
Q3. How do I record my computer screen for 2022?
Some of the greatest video editing and screen recording tools like Filmora, Bandicam, and FlexClip allow you to record your computer screen. Depending on the software, you can directly share the video to your YouTube channel. Or, save the video on your computer and then upload it on your channel.
Richard Bennett
Richard Bennett is a writer and a lover of all things video.
Follow @Richard Bennett
Richard Bennett
Mar 27, 2024• Proven solutions
Recording the screen, including the audio, can help you introduce your gaming flow, show how to perform a task on the computer, or create a presentation. You can also upload the screen record to YouTube for free. There are several solutions if you want to record your screen and upload it to YouTube. You can record the screen with some screen recording software on your Mac or your Windows PC or with some online screen recording software or the screen recording feature built-in YouTube itself. In this article, we will show you how to to record screens and upload to YouTube on Windows and Mac with some screen recorders , some of which are free to use, or freemium, which are built in your computer. Check it out now.
- Part 1: Record Screen and Upload to YouTube Directly on PC
- Part 2: Record Screen and Upload to YouTube Online
- Part 3: Record Screen and Upload it to YouTube on Mac
Recommended YouTube Screen Recorders to Record Screen and Upload to YouTube Directly [Windows & Mac]
The following YouTube screen recording software can be used on both Windows and Mac computers. You can record the entire screen or a particular portion of the screen, record your own voiceover or add music to the recorded video and then upload it to YouTube directly.
Using Wondershare Filmora
Filmora is an easy-to-use yet powerful enough video editing software which features the Recording tools. Using Filmora, you can record the desktop screen , audio and webcam simultaneously. But compared with Filmora, the highest frame rates that Filmora can capture at 1 second is 60FPS.
Launch Wondershare Filmora and choose Full Feature mode to begin a project. Go to the Record tab and choose Record PC Screen. There are three types of screen recording to choose from – Target Window, Full Screen and Custom. You can also choose to record computer system audio or record from microphone. Click the icons to turn them off or on accordingly. Click Settings to see if there’s anything you need to adjust before recording.
Download Mac Version ](https://tools.techidaily.com/wondershare/filmora/download/ )
The recorded footage will be loaded to the Media panel directly, you can then cut out imperfect frames, add some texts and titles, or apply transitions and filters to it. To upload the recorded screen video, click the Export in the main interface, and then switch to YouTube tab in the Export window.
Sign in your YouTube account and complete the video info accordingly and then click the Export button to upload the recorded video to YouTube directly.
If you are looking for more screen recorders which can run on Windows, Mac, Linux, Android, iOS or online for different purposes, you can check our picks of the best screen recorders for all platforms based on different purposes.
Part 1: How to Record Screen on Windows PC and Upload to YouTube Directly
1. Bandicam
To record screen using Bandicam, select “Screen Recording” and a green-edged rectangle window will appear. Adjust the rectangle window on the video then play the video.
Clicking the REC button will change the green-edged line of the rectangle window to red. Click the stop button to stop recording. To watch the recorded video, go to the “General” tab and click “Open.”
You can also upload your desired videos to YouTube from Bandicam by clicking the “Upload” button found under Bandicam’s “Output” tab.
2. Using Microsoft Expression Encoder 4
You can download Microsoft Expression Encoder 4 to record the screen of your device and upload it to YouTube. The software has a screen capture tool and encoder. Install the software as you would usually do. There’ll be 2 shortcuts in the start menu – Microsoft Expression Encoder 4 Screen Capture (used to capture the screen) and Microsoft Expression Encoder 4 (converts the screen into a video that can be uploaded to YouTube).
3. Using Ezvid
Ezvid can record screen and audio simultaneously. It can also capture the whole area of the screen, making it perfect for tutorial videos. Ezvid also has speech synthesis that translates text captions into artificial human language, so it can easily produce human sound with only a click of a button.
4. Using Smartpixel
Smartpixel is a screen recorder for Android and Windows. It has a user-friendly interface and different editing as well as recording functions. Smartpixel can export various video formats such as 3gp, MP4, wmv, avi and flv. It also allows you to upload videos to different online platforms like GoPlay and YouTube.
Part 2: How to Record Screen Online
1. Using YouTube
You can now also record desktop screen with the features in YouTube. To start recording the screen using YouTube, you just need to sign-in to the website using your Google Account. Click “Creator Studio”. Go to Live Streaming and choose “Events”. You’ll be directed to the “Create Event” page. Provide the title for your screencast video, set the video’s privacy to either Private or Unlisted.
Click “Go Live Now” The Hangouts on Air page will open. Start the webcam from recording by clicking the camera icon. If you don’t want to record audio, you can just click the microphone icon.
Click “Screenshare” and choose a desktop window that you want to record for the screencast. Click “Start Screenshare” to share the screen then click the “Start Broadcast” button to begin recording the screen. When you’re done recording, just “Stop Broadcast” and go to the YouTube website. The new screencast video is stored in your YouTube video dashboard. You can share the video or download it to your Google Drive.
For more details, you can check How to record YouTube videos . If you’re looking for more online screen recorders for YouTube, you can check our picks of the 10 Best Free Online Screen Recorders .
2. Using FlexClip - Free Online Screen Recorder
FlexClip is a complete bundle of creativity. Why so? It is because it’s a web-based tool that helps you with image and video editing and post-production. It also offers a free online screen recording option.
FlexClip lets you record your webcam, screen, and audio with a simple click. Contrarily, you can also record simultaneous screens without a hitch! It can record almost anything that is being displayed on your computer screen. So be it gameplays, seminars, courses, presentations, or anything, you can always use this program to save your recording.
And once you’re done capturing the screen, FlexClip also allows you to edit your recording. You can add subtitles, highlights, overlays, and annotations to increase your video’s worth. So no wonder why FlexClip is one of the leading web-based software for free online screen capturing, especially if you want to make great YouTube videos.
The recording process is easy. All you need to do is visit the website and click the “Start Recording” button.
Then, choose your layout to start recording the screen and audio. When you’re finished, just hit the “Stop” button to end recording to edit the video in FlexClip’s built-in video editor. Lastly, download the screencast to upload it to your YouTube channel.
3. Using Apowersoft - Online Screen Recorder (Free)
Apowersoft is a renowned company that creates digital products, including file compressors, watermark removers, and more. Since there’s a growing demand for screen recorders for YouTube, the Apowersoft creators have also launched a “Free Online Screen Recorder.” Yup! You’re reading the right name.
Apowersoft – Free Online Screen Recorder eases the screen recording process. While it’s an online tool, you can also download the app on your Mac or Windows OS.
It’s a free program with simple features, such as a screen and webcam recording with audio. So if your YouTube content doesn’t require overlays, subtitles, or other editing stuff, this software is ideal due to its simplicity.
You can click the “Start Recording” button to get started.
.
Then, select the screen you wish to record, and save the captured screen to your local disk or cloud so you can upload the videos later to your YouTube channel.
Part 3: How to Record Screen for YouTube with Free Screen Recorder on Mac
1. Using QuickTime Player
QuickTime Player can be used to record movies from your camera or the screen of your iPad, iPod touch or iPhone. It can also record your Mac’s screen or record audio from your microphone. To record the screen of your Pad, iPod touch or iPhone, you should use the movie-recording function. You can use it to record the screen for YouTube video, or you can also record the YouTube video and empower it with your creativity.
For more details of using QuickTime Player to record YouTube videos, check our guide: How to record videos with Quicktime.
2. Using Screen Flow
Screen Flow is our second pick for Mac. Although it’s paid software, you can still enjoy the blessings of this screen recorder through the trial version. It’s a very handy tool that allows Mac screen recording and all iOS devices, such as iPhones and iPad.
Okay! So what’s good about screen flow? Let’s uncover. Firstly, it’s an editor + screen recorder specifically made for YouTube. You can capture the screen and edit the footage before uploading it to your channel.
Secondly, this software allows you to record simultaneous screens and your webcam. Plus, you can also record your voice through its mic recording option.
Another great thing about Screen Flow is that it has numerous video filters and a customizable title library. It also permits you to save screen recordings on your Mac or directly share them to your YouTube channel, other social media accounts, websites, or cloud storage in a few clicks.
Here’s a video to help you get started with screen recording on your Mac using Screen Flow:
3. Using Vmaker
Vmaker is another authentic software to record screens for your YouTube videos. It’s a free program, but you can buy premium versions to unlock more features.
The tool is trusted by many software review websites, such as “crozdesk.” It is available on both Mac and Windows OS. However, it seems like this software performs well on Mac operating systems.
Vmaker allows you to record your screen, your favorite YouTube videos, and the audio – all together! You can record the entire Mac screen or a specific portion in HD quality. Moreover, the software allows you to pick resolutions up to 4K to record the media.
This program also offers editing features like adding subtitles, music, flip, blur, trim, and more to create an awesome video. All videos are saved to your cloud workspace once you finish recording. Then, you can share the recorded video screens on your YouTube.
The tool is ideal for making tutorials, courses, demos, and product review videos. All you need to do is download Vmaker on your Mac. Choose a webcam, screen, or both with audio for recording. Start recording in the highest quality. Edit your video and share it on your YouTube channel.
Conclusion
Above are some screen recorders that you can use to record YouTube videos or record the screen and webcam simultaneously to make a video and upload it it to YouTube. If you want to record a screen video and edit it further, you should try Wondershare Filmora video editor.
Download Mac Version ](https://tools.techidaily.com/wondershare/filmora/download/ )
FAQs
Q1. How do you record your screen on a Mac for YouTube?
There are some great tools for screen recording on Mac for YouTube. The most loved and enjoyed program is Filmora by Wondershare. It’s a professional tool for screen recording and video editing. Most importantly, it has a user-friendly interface and records your screen in high quality.
Another option is the Quick Time Player. This program also allows screen recording. Likewise, Screen Flow is also a great program for screen capturing for YouTube on Mac.
Q2. Can I screen-record and upload it to YouTube?
There are two ways to do it. First, you can download the free or paid screen recording software on your Windows or macOS. Second, you can look for online screen recorders like FlexClip or the built-in YouTube recorder and directly share the recorded video to your channel.
Some tools, like Apowersoft and Vmaker, save screen recordings to the cloud or local disk. And there’s no direct sharing of the recorded screens to your YouTube channel. So if you’re using such programs, you will need to sign in to your YouTube channel and upload the file from your computer hard drive.
Q3. How do I record my computer screen for 2022?
Some of the greatest video editing and screen recording tools like Filmora, Bandicam, and FlexClip allow you to record your computer screen. Depending on the software, you can directly share the video to your YouTube channel. Or, save the video on your computer and then upload it on your channel.
Richard Bennett
Richard Bennett is a writer and a lover of all things video.
Follow @Richard Bennett
Also read:
- Perfect Your Channel Info A Template Approach
- Top 5 Video & Photography Mobile Apps for iPhone/Android Users
- 2024 Approved Enhancing YouTube Popularity Editing & Optimizing Content Metadata
- Elevating Live Play with Professional Gear Lists
- Savory Showcase Inspiring Recipe Channels That Thrive
- [New] Create a Unique Identity Personalize Your YouTube URL Today
- [Updated] Crafting Unique Valorant Thumbnails with Style and Flair
- Authentic Audience Growth Tricks for Sustainable Views for 2024
- Elevate Your Channels' Image for Boosted YouTube Subscriptions for 2024
- [Updated] Download YouTube's Best Moments Without Full Streaming
- An Overview of YouTube Short Content Basics
- In 2024, Crafting a Commercial Channel YouTube's Premium Pathway Guide
- The Art of Profit-Driven Online Shopping Blogosynthesis
- Engaging Audiences Triad of Effective Storytelling
- [New] Audiovisual Improvement Voice Changing Apps Reviewed
- [Updated] Decoding the Algorithm Behind YouTube Shorts
- Offline Watching Made Simple YouTube Videos for iOS Users
- From Vlogs to Viral Jake Paul’s Online Empire Expansion
- Sparking Your Content Strategy Crafting a YouTube Channel From Scratch
- Boundless Creativity Celebrating Our Top 10 Female YouTubers for 2024
- [Updated] 20 Essentials Every New Creator Should Own
- Boosting Your YouTube Presence Key Tips for Popularity
- [Updated] Enhancing Video Experience on YouTube with Slower Playback (48 Chars)
- [Updated] Earnings Escalate 500-Subscriber Marker Achieved
- 2024 Approved Efface Thin Borders for a Seamless YouTube Experience
- [Updated] How to Embed A YouTube Playlist On a Website
- Breakthrough Ways to Amplify Your Video Content Reach for 2024
- In 2024, Dissecting Digital Dynamics Comparative Channel Analysis
- Youtubing Green Magic – Ideas That Come to Life
- Convenient Techniques for Customizing Your Own Short Videos
- Tailoring Your Viewing Experience with YouTube TV
- [Updated] Echoes of the Past The Top 10 YouTube Sources for History Lovers
- Now's the Time Top Ten Hourly Viewers' Picks
- Premium Video Starters The Best 16 to Skyrocket View Counts
- [Updated] Demystifying YouTube's Keyword Power Play
- Essential YouTube Movie Binge Guides for 2024
- Mastering YouTube Videos Without Spending A Dime - With the 8 Best Tools
- 2024 Approved Epic Moments in Gameplay with Casters
- In 2024, Digital Cash Kings Leading YouTube Creators
- YouTube Studio Editor Step-by-Step Video Tutorial Creation
- Profiting From Gaming Channels
- Can't open MOV files on Huawei
- Updated Everything About Final Cut Pro 90 Days FREE Trial Here for 2024
- [New] Navigating Skype's Ecosystem Essential Free and Paid Recording Methods (Windows/Mac)
- 2024 Approved Viral Video Voyage Unveiling the Trendiest Tweets of 2023
- 3 Solutions to Find Your Samsung Galaxy A34 5G Current Location of a Mobile Number | Dr.fone
- ZippyZoom PauseFrame Playback for 2024
- [New] How To Record Screen With Adobe Captive
- [Updated] 2024 Approved Mastering the Art of Captivating Vimeo Staff Picks
- Troubleshooting Stop Live Streaming Lags in OBS
- Seeking the Perfect Cut? Choose Between Filmora or Democreator
- In 2024, How to Unlock Vivo V27e Phone without Google Account?
- [Updated] Mastering Social Media Splitscreen A Facebook Guide for 2024
- Unlocking Made Easy The Best 10 Apps for Unlocking Your Samsung Galaxy XCover 7 Device
- New In 2024, VN Video Editor App Review Is It Worth Downloading?
- [New] Mastering TikTok'enas a Game Changer Top 30 Unique Username Suggestions for 2024
- In 2024, 5 Solutions For Nubia Z50S Pro Unlock Without Password
- [New] 2024 Approved Streamlined Mac Package Audio + Video Capture
- Updated 2024 Approved Why Mp3 Converter Windows Is a Total Game-Changer (And Why You Need to Know)
- Unlock TikTok Magic - Ditch the Watermark
- New 2024 Approved Linux Masterclass Comparing the Best Audio Workflow Tools Available This Year
- Updated Voice Mastery on Mac An Intuitive Tutorial for First-Time Users
- [New] 2024 Approved 5 Essential TikTok-to-GIF Conversion Apps
- [New] How to Make a Difference on TikTok The Best Practices & Exemplary Case Studies for 2024
- What to Do if Google Play Services Keeps Stopping on Oppo Find N3 Flip | Dr.fone
- Updated 15 Best Vloggers That You Should Follow for Travel for 2024
- [New] Viral Success Starts with These 49-Quotable TikTok Statements for 2024
- AddROM Bypass An Android Tool to Unlock FRP Lock Screen For your Asus ROG Phone 7
- Title: "2024 Approved Enhance Engagement Mastering Template-Based Video Description Writing"
- Author: Brian
- Created at : 2024-05-25 11:13:13
- Updated at : 2024-05-26 11:13:13
- Link: https://youtube-video-recordings.techidaily.com/2024-approved-enhance-engagement-mastering-template-based-video-description-writing/
- License: This work is licensed under CC BY-NC-SA 4.0.
