
:max_bytes(150000):strip_icc():format(webp)/GettyImages-136612668-5c640cc5c9e77c00010a4ff4.jpg)
"2024 Approved Engage and Inspire Viewers - Animated Subscribers in Filmora Explained"
Engage and Inspire Viewers - Animated Subscribers in Filmora Explained
How to Make Your YouTube Animated Subscribe Button Easily With Filmora

Richard Bennett
Mar 27, 2024• Proven solutions
The main goal of every content creator is to increase its audience to expand its reach and views. To do so, it’s essential to provide something unique and different to the viewer. Without providing them the content they are looking for, it is impossible to grow your channel and reach. Once your content is ready and you are getting many views, it is essential to make these potential viewers your permanent viewers. The animated subscribe button will help you achieve this goal. While your viewers are watching your videos, you must remind them about subscribing to your channel for receiving such incredible content in the future. Subscribe animation plays a vital role in converting your viewers into subscribers.
There are so many platforms on the internet from where you can get Youtube subscribe button animation free, and you can also purchase these subscribe png gifs. But creating your own animated subscribe button can make you stand out from the crowd and make your videos unique and exclusive. Because it enables you to design it the way you want according to your brand, so, let’s create your own subscribe animation using Wondershare Filmora .
Step-By-Step guide
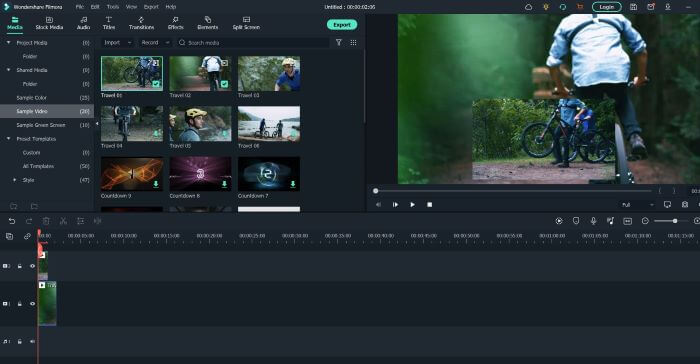
Step 1: To get started,open Filmora X. On your upper left corner, click on the “Sample Colors,” select the Green color and drag it to Video Track into the timeline. We are using a Green background to easily remove it using the green screen feature in Filmora to use it in our future projects after exporting it, without creating it again. Adjust the duration of this track according to your requirement. In my case, I am trying to make an animated subscribe button of 5 seconds.
Step 2: Lock this track by clicking on the lock icon to work on subscribe animation without disturbing the background easily.
Step 3: Now it’s time to design the subscribe png gif. Go to the Sample colors again and drag the red color into the time above the green background.
Step 4: Double click on the red color in the timeline and adjust its size. Make it look like a subscribe button that is a rectangle and place it at the bottom center of the background. You can put it anywhere you want it to appear in your future videos.
Step 5: Now, let’s add Subscribe text into the button. Go to the Title and select any style that you like. “Basic 6” will work perfectly fine for this purpose. Drag and drop it into the timeline above all tracks.
Step 6: Double click on the Title on the timeline and edit it with “Subscribe” and place it under the red rectangle and click OK.
Step 7: We have put a cursor that can click on the animated subscribe button. You can use Google Search to find a transparent cursor. Make sure to save it in png format. Download it and import it into Filmora.
Step 8: Drag and drop the cursor into the timeline and place it above all the other three tracks to make it prominent. Adjust the size of the cursor place it on the Subscribe button where you want it to appear.
Step 9: Now, it’s time to animate the design using keyframes. First of all, let’s animate the red rectangle. Double click on the red color on the timeline. Go to the ‘Animation’ tab and then click ‘Customize.’ Move to the 1 second in the timeline and click ‘Add.’
Step 10: Now go back to the beginning in the timeline and adjust the scale to 0%. It will make the rectangle pop up when you play the clip.
Step 11: Text needs to be animated as well to match it with the rectangle. Double click on the text in the timeline and click ‘ADVANCED.’
Step 12: In this Advance text editor, go to the ‘Animation’ tab and select any animation that you like. On the timeline under the preview screen, adjusts the dark areas according to the time you set on the rectangle, which was 1 second. We want the text to appear on the screen in 1 second, like the rectangle. Also, adjust the ending time when you want the text to disappear again. We have set it on 4 seconds. Which means it will start to fade after 4 seconds.
Step 13: Now, to animate the mouse cursor, we will use the same process we used for a rectangle that is key framing. Double click on the cursor track on the timeline and move the time on your timeline to a point when you want the cursor to appear. Now add a key frame by clicking ‘Add’.
Step 14: Now jump back to a point in your timeline, when the cursor will start appearing from outside the screen. Move the cursor outside the screen from where you want it to start moving toward the subscribe animation.
Step 15: To animate the click of the cursor, move ahead a little bit into your timeline and scale down the cursor to around 70%. Move it a little further and scale it up to 100%.
Step 16: You can add the sound of mouse click to make it more realistic. You can find this sound anywhere on the internet. Download it and import it into Filmora. Now place it into the timeline where it can match the movement of the cursor.
Step 17: Now it’s time to make this subscribe animation button disappear. Move forward into the time to the end, at around 4 seconds. Double click on the red button in the timeline and add a key frame at its actual scale.
Step 18: After that, move further in the timeline to the end and make its scale 0. It will make it disappear.
Step 19: Do the same with the cursor. Double click on the cursor in the time and add a key frame at its actual position.
Step 20: Move ahead when you want it to disappear. Move the cursor out of the screen and click ‘OK’.
Step 21: Your Subscribe png gif is ready to be exported and used in your videos. Click on export and choose from various formats and options to choose from while exporting it.
You may also like: How to Get People to Subscribe Channel
Conclusion:Your own Animated Subscribe Button is ready to be used in your future videos and projects. This is a ready-to-use subscribe button that can be easily used using the green screen effect in Filmora. Just import the clip, remove the green screen, and you are good to go. You can also customize this Subscribe Animation using your channel and more. Keep experimenting with new things using Filmora.


Richard Bennett
Richard Bennett is a writer and a lover of all things video.
Follow @Richard Bennett
Richard Bennett
Mar 27, 2024• Proven solutions
The main goal of every content creator is to increase its audience to expand its reach and views. To do so, it’s essential to provide something unique and different to the viewer. Without providing them the content they are looking for, it is impossible to grow your channel and reach. Once your content is ready and you are getting many views, it is essential to make these potential viewers your permanent viewers. The animated subscribe button will help you achieve this goal. While your viewers are watching your videos, you must remind them about subscribing to your channel for receiving such incredible content in the future. Subscribe animation plays a vital role in converting your viewers into subscribers.
There are so many platforms on the internet from where you can get Youtube subscribe button animation free, and you can also purchase these subscribe png gifs. But creating your own animated subscribe button can make you stand out from the crowd and make your videos unique and exclusive. Because it enables you to design it the way you want according to your brand, so, let’s create your own subscribe animation using Wondershare Filmora .
Step-By-Step guide
Step 1: To get started,open Filmora X. On your upper left corner, click on the “Sample Colors,” select the Green color and drag it to Video Track into the timeline. We are using a Green background to easily remove it using the green screen feature in Filmora to use it in our future projects after exporting it, without creating it again. Adjust the duration of this track according to your requirement. In my case, I am trying to make an animated subscribe button of 5 seconds.
Step 2: Lock this track by clicking on the lock icon to work on subscribe animation without disturbing the background easily.
Step 3: Now it’s time to design the subscribe png gif. Go to the Sample colors again and drag the red color into the time above the green background.
Step 4: Double click on the red color in the timeline and adjust its size. Make it look like a subscribe button that is a rectangle and place it at the bottom center of the background. You can put it anywhere you want it to appear in your future videos.
Step 5: Now, let’s add Subscribe text into the button. Go to the Title and select any style that you like. “Basic 6” will work perfectly fine for this purpose. Drag and drop it into the timeline above all tracks.
Step 6: Double click on the Title on the timeline and edit it with “Subscribe” and place it under the red rectangle and click OK.
Step 7: We have put a cursor that can click on the animated subscribe button. You can use Google Search to find a transparent cursor. Make sure to save it in png format. Download it and import it into Filmora.
Step 8: Drag and drop the cursor into the timeline and place it above all the other three tracks to make it prominent. Adjust the size of the cursor place it on the Subscribe button where you want it to appear.
Step 9: Now, it’s time to animate the design using keyframes. First of all, let’s animate the red rectangle. Double click on the red color on the timeline. Go to the ‘Animation’ tab and then click ‘Customize.’ Move to the 1 second in the timeline and click ‘Add.’
Step 10: Now go back to the beginning in the timeline and adjust the scale to 0%. It will make the rectangle pop up when you play the clip.
Step 11: Text needs to be animated as well to match it with the rectangle. Double click on the text in the timeline and click ‘ADVANCED.’
Step 12: In this Advance text editor, go to the ‘Animation’ tab and select any animation that you like. On the timeline under the preview screen, adjusts the dark areas according to the time you set on the rectangle, which was 1 second. We want the text to appear on the screen in 1 second, like the rectangle. Also, adjust the ending time when you want the text to disappear again. We have set it on 4 seconds. Which means it will start to fade after 4 seconds.
Step 13: Now, to animate the mouse cursor, we will use the same process we used for a rectangle that is key framing. Double click on the cursor track on the timeline and move the time on your timeline to a point when you want the cursor to appear. Now add a key frame by clicking ‘Add’.
Step 14: Now jump back to a point in your timeline, when the cursor will start appearing from outside the screen. Move the cursor outside the screen from where you want it to start moving toward the subscribe animation.
Step 15: To animate the click of the cursor, move ahead a little bit into your timeline and scale down the cursor to around 70%. Move it a little further and scale it up to 100%.
Step 16: You can add the sound of mouse click to make it more realistic. You can find this sound anywhere on the internet. Download it and import it into Filmora. Now place it into the timeline where it can match the movement of the cursor.
Step 17: Now it’s time to make this subscribe animation button disappear. Move forward into the time to the end, at around 4 seconds. Double click on the red button in the timeline and add a key frame at its actual scale.
Step 18: After that, move further in the timeline to the end and make its scale 0. It will make it disappear.
Step 19: Do the same with the cursor. Double click on the cursor in the time and add a key frame at its actual position.
Step 20: Move ahead when you want it to disappear. Move the cursor out of the screen and click ‘OK’.
Step 21: Your Subscribe png gif is ready to be exported and used in your videos. Click on export and choose from various formats and options to choose from while exporting it.
You may also like: How to Get People to Subscribe Channel
Conclusion:Your own Animated Subscribe Button is ready to be used in your future videos and projects. This is a ready-to-use subscribe button that can be easily used using the green screen effect in Filmora. Just import the clip, remove the green screen, and you are good to go. You can also customize this Subscribe Animation using your channel and more. Keep experimenting with new things using Filmora.
Richard Bennett
Richard Bennett is a writer and a lover of all things video.
Follow @Richard Bennett
The Ultimate List: Mastering YouTube’s Best Music Reaction Videos
Create High-Quality Video - Wondershare Filmora
An easy and powerful YouTube video editor
Numerous video and audio effects to choose from
Detailed tutorials are provided by the official channel
Reaction videos are slowly taking over YouTube as the most popular type of channel. Everyone loves when someone reacts to something, and it can be anything from music, games, trending topics, or even random things like orange juice. They are so popular that people tag their friends to react to the series.
Music reaction videos are becoming increasingly more popular. Instead of a standard lyric video, music reaction videos show a fan listening and singing to their favorite album or single from start to finish. There are tons of fan-made music reaction videos on YouTube, but some get hundreds of thousands or even millions of views!
In this article
01 What is a music reaction video?
02 10 Best YouTube Music Reaction Video
03 How to make a Youtube music reaction video with Filmora
What is a music reaction video?
When you are on YouTube, you will see many music reaction videos. The music reaction video is the video that is based on the song. According to the situation, the person who uploads the video reacts to the song and does something funny or crazy. Many people enjoy watching these kinds of videos because they are funny and entertaining in many ways.
The best thing about these videos is that you can learn from them. You can learn how to react in certain situations, but these situations might arise only once in your life. So, it is good to react to these funny videos and make yourself aware of what should be done in such a situation.
You can even make your music reaction video and share it with your friends on social media platforms like Facebook, Twitter, and Instagram. People will love it and appreciate it, and you can also learn how to make these kinds of videos by watching other people’s reactions.
10 Best YouTube Music Reaction Video
#1. [BANGTAN BOMB] ‘Dynamite’ MV Reaction
In this video, a famous Korean Band named BTS reacts to many different music videos from the past. People love to see their reactions, and the video has over 25M views on Youtube.
#2. Rappers React to Rich Brian ft. Ghostface Killah, Desiigner, Tory Lanez & More
In this video, many street rappers react to many famous rappers and give their views about them. The video became quite popular on Youtube and got 23M+ views.
#3. Dixie D’Amelio’s Family and Friends React to her Be Happy Music Video
In this video, many people who are relatives of Dixie D’Amelio react to her music video. She recorded the reach of each one of them and shared it with the youtube community. The video got over 20M views on youtube.
#4. Elders React To Lil Dicky - Earth
In this video, many elders react to the Lil Dick’s Music video. Their reactions are quite amusing to the audience, and the video got over 19M views on Youtube.
#5. Kids React To Eminem
In this video, some kids react to the Eminem rap music videos and give their views about rap. Some of them are amused by the rap, and some of them find it difficult to understand. Overall their reaction is worth watching. The video got over 13M views on Youtube.
#6. Do Teens Know 90s Hip Hop?
In this video, many teens listen to ‘90s hip-hop music videos, and their reactions are recorded. They are familiar with some of the songs, and some are totally new and amusing to them. The video got over 11M Views on Youtube.
#7. Big Shaq - Mans Not Hot (Music Video)- Reaction
In this video, a couple of friends react to the Mans Not Hot Music video and record their reactions. They have reacted to the video quite funny, and their reactions are very amusing. People enjoy watching their reactions. The video has over 11M views on Youtube.
#8 BTS React To Fans Watching “Boy With Luv” Music Video For The First Time
In this video, The famous Koran Band BTS reacts to their fan’s videos, watching Boy With Luv Music video for the first time. So, in this video, you will see the reaction of BTS to the reaction of their fans. The video was a hit on Youtube, and it got over 9M views.
#9 “Don’t Forget” Minecraft FNAF Animation Music Video
This is a reaction mashup video in which a lot of creators are reacting to the Don’t forget music video. You rarely get to see soo many reactions in a single video. The video is a hit and has over 9M views on Youtube.
#10 Youtubers React To Top 10 Most Disliked Music Videos Of All Time
In this video, many YouTubers react to the top 10 most disliked music videos in Youtube’s history. Their reactions are priceless, and this video is definitely worth watching. The video has over 6M views on Youtube.
How to make a Youtube music reaction video with Filmora
Reaction videos are the latest trend in the world of YouTube. So many people want to create their own reaction videos but either doesn’t have the skills to do so or don’t know how to get started. This guide should give you everything you need to get started on creating your very next reaction video.
Step 1: First of all, make sure that you have downloaded and installed the latest version of Filmora on your computer. If you haven’t already downloaded it, then you can install it from their official website.
Step 2: Run the Filmora software and when a window appears on your screen, click on the new project and select the 16:9 aspect ratio of your project.
Step 3: Now first, you need to record your reaction to a music video . You can use Filmora’s Built-In screen recorder to record your reaction along with your cam. You can also record your reactions separately and then merge them with the original music video using Filmora.
Step 4: Now import the music video on which you want to react to the Filmora library along with your reaction video. You can do this by clicking on the file, import, and import media.
Step 5: Now drag the music video from the Library and drop it into the Filmora timeline.
Step 6: Now drag your reaction video and drop it above the original music video in the track.
Step 7: Decrease the size of your reaction video by using the canvas controls in the preview window and adjusting it to any side of the window.
Step 8: If you want to keep your reaction video in a big frame and your music video in a small one, you can do the opposite.
Step 9: If you want to add any effects or call-outs to your video, you can use the rich elements library of Filmora, where you can find hundreds of interactive elements.
Step 10: Once you have finalized the video, click on the import button and save the video to your computer in your desired format. Once the video is imported, you can share it on Youtube with your audience.
For Win 7 or later (64-bit)
For macOS 10.12 or later
Conclusion
● By following the steps above and using Filmora, you will be able to produce a high-quality music reaction video that can be shared with family, friends, or even your favorite artists. All of the steps above may look complicated when separated into different actions, but they became much easier and quicker when completed together and practiced in order.
Also read:
- [New] Earn Online via YouTube How Reaching 500 Subscribers Pays Off
- Smartphone Skills Producing Engaging YouTube Thumbnails
- Discover Top 10 Flv-to-YouTube Conversion Tools
- In 2024, Cultivate Creativity Inspiration-Driven Video Titles
- YouTube's Legal Framework on Content Screencasting
- [New] Efficient Tricks to Scramble YouTube Playlists (PC/Phone/TV)
- Optimizing Your Online Video Strategy YouTube + TikTok
- YouTube's Revenue Per Million Views An Insight
- Your First Steps in Video Content Creation
- [New] Defeating Darkness in Youtube Videos
- In 2024, Enchanting Viewers The Art of Crafting Engaging YouTube Description Templates
- 2024 Approved Brief Snippet Analysis for Beginners
- Daily Vlogging Ideas What to Talk About While Vlogging?
- Growth Catalysts Increasing Audience Engagement on YouTube
- Sourav Joshi's Roadmap to Financial Freedom via YouTube
- Best Livestream Capturing Gear for Online Content Makers for 2024
- Stepwise Revelation of Concealed YouTube Archives
- [Updated] Conquering Cross-Platform Content Sharing YouTubes & FBs
- [New] Clearer Streams YouTube Video Borderless Adjustment
- [Updated] Banishing Unwanted Green in Mac-Recorded YouTube Content
- Cutting-Edge Editing Meets Online Video Sharing for 2024
- [New] Direct Hit The Techno-Friendly Way to Upload Your Short Clips
- Sky High Earnings Leveraging YouTube Analytics & Monetization
- Skyrocketing Your Content's View Count Title & Tag Mastery
- Who Are These Titans? Top 10 YouTube Channels with Gigantic Viewership & Subs
- Altering Who Can Access Your YouTube Videos
- 2024 Approved Amplify Your Video's Impact Increasing View Count on YouTube Shorts
- Step-by-Step for Sending 4K Films to the YouTube Platform
- [Updated] ASMR App Selection Guide for Phones
- [New] Clearing Process for YouTube's Pending Video List
- Ascending with ASMR Top Strategies for Video Creation for 2024
- [Updated] Aim for Affluence Securing YouTube's 2024 Partner Plan Access
- Beginner's Pathway Start Your Sports YouTube Chain on macOS for 2024
- Harmonize Your YouTube Presence With These Ideal Microphones for Various Channels
- Enhancing Video Visibility with Optimal Thumbnails for 2024
- [New] Crafting Your YouTube Legacy A Deep Dive Into Creator Studio Mastery
- In 2024, Directly Uploading YouTube Vids to Multiple Social Sites, Focusing on FB
- How to Make YouTube Banners and Thumbnails
- A Beginner's Path to Compiling a YouTube Playlist for 2024
- 2024 Approved Clear Shots for YouTube Filmmakers
- Latest way to get Shiny Meltan Box in Pokémon Go Mystery Box On Vivo V29 Pro | Dr.fone
- Looking For A Location Changer On Infinix Hot 30 5G? Look No Further | Dr.fone
- [Updated] In 2024, Leveraging Social Media Tactics More Insta Vids Watched
- Updated 2024 Approved Best Film Trailer Editing Tools for Mac and Windows Users
- In 2024, How to Change Apple iPhone XS Max Location on Skout | Dr.fone
- [Updated] In 2024, Starting Your Way Into Creating Room-Based WhatsApp Groups
- How to Record PowerPoint Presentation with Webcam for 2024
- 3 Effective Methods to Fake GPS location on Android For your Samsung Galaxy Z Flip 5 | Dr.fone
- [New] Cool Down with These Top-Rated Stress Erasers for 2024
- [New] Mastering Zoom's Quick Snapshot Feature for 2024
- New Best Video Speed Changers for Windows And Mac for 2024
- [Updated] 8 Exemplary Templates Dominate Social Media Creatives
- Gmail Not Working on OnePlus 11 5G 7 Common Problems & Fixes | Dr.fone
- In 2024, Want to Find a Good Camera for YouTube? This Article Brings You some of the Best Options of Different Varieties for Your Channel
- New In 2024, 10 Best Free DAW Online Browser-Based
- [Updated] Wild Wonders The Ultimate List of Strange and Exciting TikTok Games
- Updated 2024 Approved Exploring the Leading Edge of Audio Production Does MAGIX Samplitude Hold Sway?
- Why Is My Realme GT 5 Offline? Troubleshooting Guide | Dr.fone
- Boost Your TikTok's Speed A Step-by-Step Guide for 2024
- How to Send and Fake Live Location on Facebook Messenger Of your Realme Narzo 60 5G | Dr.fone
- 8 Best Apps for Screen Mirroring Asus ROG Phone 7 Ultimate PC | Dr.fone
- [New] Navigating Discord Server Deletion (Desktop/Mobile)
- Cut, Trim, and Edit MP4 Videos with These Free Editors for 2024
- Hard Reset Oppo Reno 11 5G in 3 Efficient Ways | Dr.fone
- Updated 2024 Approved Top 10 Calming Websites To Relax Your Mind
- Introduction | Wondershare Virbo
- In 2024, 5 Best Route Generator Apps You Should Try On Apple iPhone 11 Pro | Dr.fone
- iPhone 12 activation lock primer
- New The Best Aspect Ratio Calculators Available Online Now for 2024
- Title: "2024 Approved Engage and Inspire Viewers - Animated Subscribers in Filmora Explained"
- Author: Brian
- Created at : 2024-05-25 11:13:02
- Updated at : 2024-05-26 11:13:02
- Link: https://youtube-video-recordings.techidaily.com/2024-approved-engage-and-inspire-viewers-animated-subscribers-in-filmora-explained/
- License: This work is licensed under CC BY-NC-SA 4.0.
