
:max_bytes(150000):strip_icc()/pairquesttophone-5ea84b24d0684dab893fe33c5a25b5fa.png)
"2024 Approved Elevating Your YouTube Presence with Customized Subtitles"
Elevating Your YouTube Presence with Customized Subtitles
How to Add Text to YouTube Video Before or After Uploading

Richard Bennett
Mar 27, 2024• Proven solutions
A great way to emphasize something you say in your vlog is to have your words appear next to you as you say them . Adding text to YouTube videos can look really professional. You might put a title at the beginning of your video, use bullet points to help people keep track of your monologue, or to highlight an important point by writing it on your screen. When you use text in your videos there are a few things you need to keep in mind. In this article, I will share with you 2 ways to add text/subtitles/captions to YouTube videos, whether you need to add text to the video during editing and upload it to YouTube later, or you have uploaded the video to YouTube already and want to add some captions and subtitles to complement it.
- Part 1: Add text to video before uploading YouTube
- Part 2: Add Text to YouTube video after uploading
- Part 3: Top 3 YouTube Video Text Tips
How to Add Text to YouTube Video Before Uploading
Before uploading the video to YouTube, it is recommended to add text to the video first. You can add simple texts and captions to videos with the free video editing software. To add more text effects to the video, you can use Filmora, Sony Vegas Movie Studio and Adobe Premiere CC based on your video editing skills and needs. These software programs are great video editors, which can help you input text easily.
1. Use Filmora to Add text to Videos
There are plenty of Text effects built in Filmora, you can apply motions and animation to texts, titles, subtitles, end credits and openers as well. Each title preset will present different effects. You can add multiple text boxes and place the text to any position in need. Besides writing texts to video, you can select the target font, size and color and customize the text effect in detail as well. To add text to a video in Filmora is easy, just follow the steps below:

- Open up Filmora and drag a clip into your timeline. Then, go to Text/Credit.
- Find a style that you like and drag it into your timeline where you want your text to appear. Make sure your text is selected in your timeline and click the Advanced Text Editing icon, which looks like a pen and paper.
- Insert your own words and drag your text to where you want it on the screen. Adjust the size by dragging the blue squares which surround your text.
- To change the color of your text, go into the Customize menu. You will find it near the top left of your screen. While you are in Customize there will be a section called Fill. This is where you select the color of your text. You can even change the fill type to ‘gradient fill’ and have your text transition between two colors.
- All of Filmora’s text options are animated – they fade, move around the screen, or perform some other type of action as they appear and disappear. To change the animation of your text select Animation next to Customize. A selection of different animations will appear. Double click on the one you want to apply to your text.
 Download Mac Version ](https://tools.techidaily.com/wondershare/filmora/download/ )
Check the detailed steps of how to add text to video in Filmora.
2. Use Windows Movie Maker
As a simple video editing software, Windows Movie Maker also allows you to add text to videos. It provides 3 different options for you to add Title, Caption and Credits to the YouTube videos. You can follow the steps below to add text to the video in WMM.

- To start, launch the Windows Movie Maker.
- After, select import video to insert the video that you want to add text with.
- Select edit movie then click make credits or titles.
- Then add the text that you want to include.
For the step by step tutorial of adding text to YouTube video, check How to Add Text to Video with Windows Movie Maker . Besides adding text to video, you can use Windows Movie Maker to edit YouTube video further. Learn How to trim, cut, combine, split video and add transitions and upload video to YouTube in Windows Movie Maker?
3. Use Sony Vegas Movie Studio
Adding text to YouTube videos in Sony Vegas is not so complicated if you are new to this software. You can adjust the color, size, font and duration of the text effect and add fade in and fade out effects. Follow the steps below to add texts to video in Vegas:

- Launch Sony Vegas Movie Studio.
- Click the View Menu then select Media Generators.
- Choose the generator that you want to use.
- After, drag the generator you have chosen on the timeline.
- Then, the video event FX dialogue box will appear.
- Enter the text that you want and modify it by changing the font, size and style.
4. Use Adobe Premiere CC
For professionals who are looking for a professional way to adding text to video and also have a sufficient budget, Adobe Premiere CC is always recommended. You can check the video and the steps below to add text to video in Premiere:
- Click open or create a project.
- Click the file menu then choose new and title.
- After, the text window will appear then utilize the text tool to add text.
- You can also edit your text using the commands that are provided in the Title Menu.
- Save the text that you have made by clicking the file menu then choose Save As.
How to Add Text to video in YouTube after uploading
Sometimes, we have uploaded a video to YouTube and then want to add subtitles/cc to the video later. The good news is that YouTube is not only a site for videos but is also the place where you can edit your videos in an instant. As you have read, adding text and captions to the uploaded YouTube videos is just a breeze.
Of course, you can only add and edit texts and captions to the video under your YouTube account. Here are the steps on how you can add text to your videos with YouTube Video Editor after the video is uploaded.
- Go to youtube.com then sign in to your account. After sign in your YouTube account, click your avatar and select Creator Studio to enter the creator studio interface.
- Click the Video Manager tab and in Videos section you will see all your videos uploaded to YouTube. Select the video that you want to add captions to and then select Subtitles/CC after clicking Edit button.
- Add Captions/Subtitles

While YouTube may have already created the subtitles automatically for your video with its speech recognition technology. If it does, you will see something like Published: English (Automatic) to the right of your video. If the automatically generated subtitles is not correct, you can edit it to improve the accuracy. Select the line that needs modification to make the edits.
If there is no auto-subtitles, you can choose from 3 ways to add subtitles and closed captions to the video: Upload a file, Transcribe and auto-sync and create new subtitles or CC.

Upload a file: upload a text transcript or timed subtitles file.
Transcribe and auto-sync: Type or paste in a full transcript of the video and subtitle timings will be set automatically.
Create new subtitles or CC: Create subtitles and closed captions by typing them in as you watch the video.
If you already have a caption file which contains both text and time codes, just click Upload a file and upload the text to the video.
- Once everything is okay, you can change the name of the video and you can do it in the box beside Project.
Cons of Using YouTube Video Editor
When you make use of this editor, you cannot shorten the clips for music. Moreover, since it is an online editor, you need to refresh the page in order to do the changes. Aside from YouTube Video Editor, you can use Adobe Premier Pro, MAGIX Vegas Pro, OpenShot and Avidemux.
From 20th September 2017 users will no longer be able to use the complementary editing suite. Check the best YouTube video editor alternatives from this complete guide to find out more YouTube video editor alternatives if you want to add text to video with more features and customization.
Top 3 Tips for Adding Text to YouTube Videos
1. Leave Room
If you know you are going to add text to your video then make sure you leave room for it in your frame. Consider standing off to one side instead of directly in front of your camera. You do not want to have to choose between not using text, making your text really small, or placing it over your face.
While planning out your frame and leaving room for your text, consider what color you are going to make the words and whether it will stand out and look good against your background.
2. Bigger is Better
People should be able to read your text without putting in any extra effort, such as straining their eyes to make out small words. If it takes effort to read your text then a lot of people will just ignore it. Your text should be big enough that somebody watching your video on their smartphone screen – where everything is shrunk down – can read it easily.
It is easier to make your text larger when you stick to titles, keywords, and short sentences.
3. Do Not Overuse
Text is a great tool for making something stand out. However, if you try to use text to emphasize too much of what you say it will lose its effect. Text does not stand out anymore once viewers get too used to seeing it. Too much text can even get annoying and cause people to click away from your videos.
Try to use text to emphasize only the most important things you say.

Richard Bennett
Richard Bennett is a writer and a lover of all things video.
Follow @Richard Bennett
Richard Bennett
Mar 27, 2024• Proven solutions
A great way to emphasize something you say in your vlog is to have your words appear next to you as you say them . Adding text to YouTube videos can look really professional. You might put a title at the beginning of your video, use bullet points to help people keep track of your monologue, or to highlight an important point by writing it on your screen. When you use text in your videos there are a few things you need to keep in mind. In this article, I will share with you 2 ways to add text/subtitles/captions to YouTube videos, whether you need to add text to the video during editing and upload it to YouTube later, or you have uploaded the video to YouTube already and want to add some captions and subtitles to complement it.
- Part 1: Add text to video before uploading YouTube
- Part 2: Add Text to YouTube video after uploading
- Part 3: Top 3 YouTube Video Text Tips
How to Add Text to YouTube Video Before Uploading
Before uploading the video to YouTube, it is recommended to add text to the video first. You can add simple texts and captions to videos with the free video editing software. To add more text effects to the video, you can use Filmora, Sony Vegas Movie Studio and Adobe Premiere CC based on your video editing skills and needs. These software programs are great video editors, which can help you input text easily.
1. Use Filmora to Add text to Videos
There are plenty of Text effects built in Filmora, you can apply motions and animation to texts, titles, subtitles, end credits and openers as well. Each title preset will present different effects. You can add multiple text boxes and place the text to any position in need. Besides writing texts to video, you can select the target font, size and color and customize the text effect in detail as well. To add text to a video in Filmora is easy, just follow the steps below:
- Open up Filmora and drag a clip into your timeline. Then, go to Text/Credit.
- Find a style that you like and drag it into your timeline where you want your text to appear. Make sure your text is selected in your timeline and click the Advanced Text Editing icon, which looks like a pen and paper.
- Insert your own words and drag your text to where you want it on the screen. Adjust the size by dragging the blue squares which surround your text.
- To change the color of your text, go into the Customize menu. You will find it near the top left of your screen. While you are in Customize there will be a section called Fill. This is where you select the color of your text. You can even change the fill type to ‘gradient fill’ and have your text transition between two colors.
- All of Filmora’s text options are animated – they fade, move around the screen, or perform some other type of action as they appear and disappear. To change the animation of your text select Animation next to Customize. A selection of different animations will appear. Double click on the one you want to apply to your text.
Download Mac Version ](https://tools.techidaily.com/wondershare/filmora/download/ )
Check the detailed steps of how to add text to video in Filmora.
2. Use Windows Movie Maker
As a simple video editing software, Windows Movie Maker also allows you to add text to videos. It provides 3 different options for you to add Title, Caption and Credits to the YouTube videos. You can follow the steps below to add text to the video in WMM.
- To start, launch the Windows Movie Maker.
- After, select import video to insert the video that you want to add text with.
- Select edit movie then click make credits or titles.
- Then add the text that you want to include.
For the step by step tutorial of adding text to YouTube video, check How to Add Text to Video with Windows Movie Maker . Besides adding text to video, you can use Windows Movie Maker to edit YouTube video further. Learn How to trim, cut, combine, split video and add transitions and upload video to YouTube in Windows Movie Maker?
3. Use Sony Vegas Movie Studio
Adding text to YouTube videos in Sony Vegas is not so complicated if you are new to this software. You can adjust the color, size, font and duration of the text effect and add fade in and fade out effects. Follow the steps below to add texts to video in Vegas:
- Launch Sony Vegas Movie Studio.
- Click the View Menu then select Media Generators.
- Choose the generator that you want to use.
- After, drag the generator you have chosen on the timeline.
- Then, the video event FX dialogue box will appear.
- Enter the text that you want and modify it by changing the font, size and style.
4. Use Adobe Premiere CC
For professionals who are looking for a professional way to adding text to video and also have a sufficient budget, Adobe Premiere CC is always recommended. You can check the video and the steps below to add text to video in Premiere:
- Click open or create a project.
- Click the file menu then choose new and title.
- After, the text window will appear then utilize the text tool to add text.
- You can also edit your text using the commands that are provided in the Title Menu.
- Save the text that you have made by clicking the file menu then choose Save As.
How to Add Text to video in YouTube after uploading
Sometimes, we have uploaded a video to YouTube and then want to add subtitles/cc to the video later. The good news is that YouTube is not only a site for videos but is also the place where you can edit your videos in an instant. As you have read, adding text and captions to the uploaded YouTube videos is just a breeze.
Of course, you can only add and edit texts and captions to the video under your YouTube account. Here are the steps on how you can add text to your videos with YouTube Video Editor after the video is uploaded.
- Go to youtube.com then sign in to your account. After sign in your YouTube account, click your avatar and select Creator Studio to enter the creator studio interface.
- Click the Video Manager tab and in Videos section you will see all your videos uploaded to YouTube. Select the video that you want to add captions to and then select Subtitles/CC after clicking Edit button.
- Add Captions/Subtitles
While YouTube may have already created the subtitles automatically for your video with its speech recognition technology. If it does, you will see something like Published: English (Automatic) to the right of your video. If the automatically generated subtitles is not correct, you can edit it to improve the accuracy. Select the line that needs modification to make the edits.
If there is no auto-subtitles, you can choose from 3 ways to add subtitles and closed captions to the video: Upload a file, Transcribe and auto-sync and create new subtitles or CC.
Upload a file: upload a text transcript or timed subtitles file.
Transcribe and auto-sync: Type or paste in a full transcript of the video and subtitle timings will be set automatically.
Create new subtitles or CC: Create subtitles and closed captions by typing them in as you watch the video.
If you already have a caption file which contains both text and time codes, just click Upload a file and upload the text to the video.
- Once everything is okay, you can change the name of the video and you can do it in the box beside Project.
Cons of Using YouTube Video Editor
When you make use of this editor, you cannot shorten the clips for music. Moreover, since it is an online editor, you need to refresh the page in order to do the changes. Aside from YouTube Video Editor, you can use Adobe Premier Pro, MAGIX Vegas Pro, OpenShot and Avidemux.
From 20th September 2017 users will no longer be able to use the complementary editing suite. Check the best YouTube video editor alternatives from this complete guide to find out more YouTube video editor alternatives if you want to add text to video with more features and customization.
Top 3 Tips for Adding Text to YouTube Videos
1. Leave Room
If you know you are going to add text to your video then make sure you leave room for it in your frame. Consider standing off to one side instead of directly in front of your camera. You do not want to have to choose between not using text, making your text really small, or placing it over your face.
While planning out your frame and leaving room for your text, consider what color you are going to make the words and whether it will stand out and look good against your background.
2. Bigger is Better
People should be able to read your text without putting in any extra effort, such as straining their eyes to make out small words. If it takes effort to read your text then a lot of people will just ignore it. Your text should be big enough that somebody watching your video on their smartphone screen – where everything is shrunk down – can read it easily.
It is easier to make your text larger when you stick to titles, keywords, and short sentences.
3. Do Not Overuse
Text is a great tool for making something stand out. However, if you try to use text to emphasize too much of what you say it will lose its effect. Text does not stand out anymore once viewers get too used to seeing it. Too much text can even get annoying and cause people to click away from your videos.
Try to use text to emphasize only the most important things you say.
Richard Bennett
Richard Bennett is a writer and a lover of all things video.
Follow @Richard Bennett
How To Securely Extract and Convert YouTube Audios as MP3
How to Convert YouTube to MP3 in 3 Ways [Safe]

Benjamin Arango
Mar 27, 2024• Proven solutions
There is a wide range of prominent tools available in the digital market to convert YouTube to MP3 files. The basic idea behind these tools is that you can extract the audio content from your favorite youtube video and save it to an mp3 file. The RIP of the audio process differs from the program built-in within the application. Many sound professionals opt for an mp3 file format because of its smaller file size, high-frequency audio quality, etc.
After you convert youtube to mp3, you will be able to listen to the background music or audio offline and the MP3 file format guarantees flawless audio quality for you.
You may also like: Best Free Youtube to MP3 Converters You Should Know
Three Ways to Convert YouTube Videos to MP3
Now it is a perfect time to explore unique ways to convert youtube to mp3 files. I will share three different ways in this article. Let’s take a quick look at it below:
- **1. How to Convert YouTube to MP3 by an Online YouTube to MP3 Tool
- **2. How to Convert YouTube to MP3 by q Video Converter
- **3. How to Convert YouTube to MP3 by a Video Editing Software
1. How to Convert YouTube to MP3 by an Online YouTube to MP3 Tool
It is a free service and allows you to convert any videos within the one-hour time limit. The whole conversion process completes within a few minutes effectively. There is no need to register to avail of this online service. You can save the converted files at your desired location and play it during your comfort zone. This online application is compatible with PC, gadgets, tablets, etc.
- Get YtMp3 tool: Click Hereon your browser and step into the online YouTube converter platform
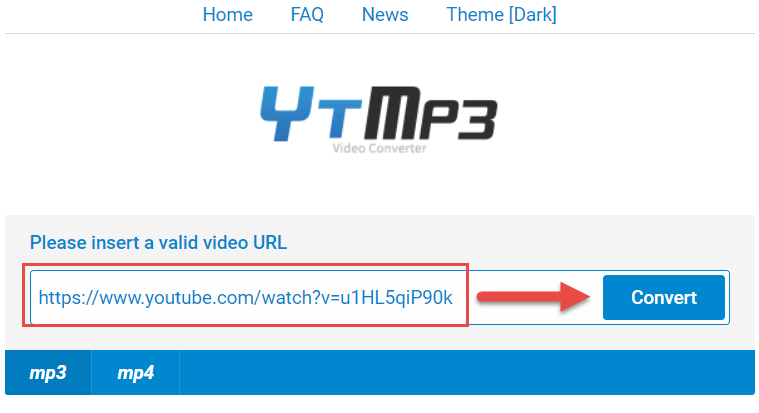
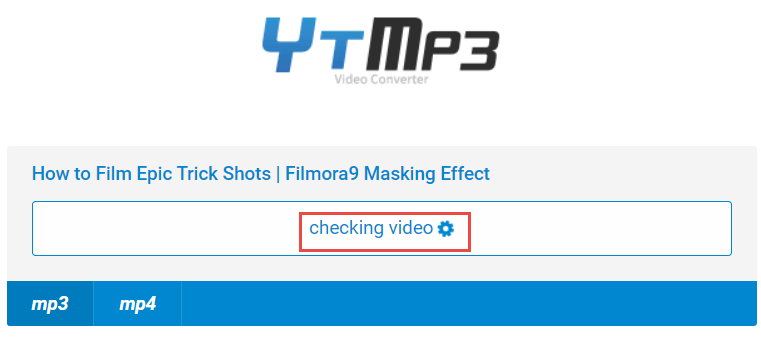
- **Paste the URL: Now copy your favorite track URL from YouTube and paste it on the box. Then hit the ‘Convert’ button beside the pasted URL. You have to wait for a few minutes until the conversion process completes.
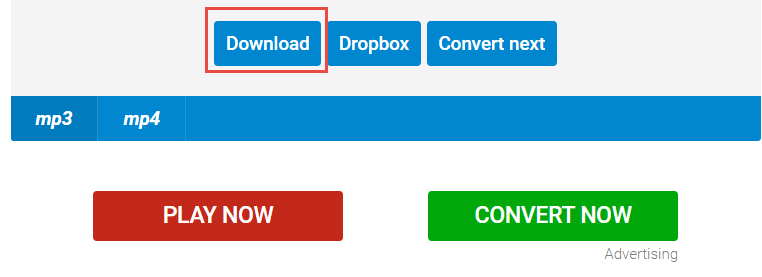
- **Download mp3: Immediately you must tap the ‘Download‘ button and choose the desired location by navigating between drives and folders to save the converted MP3 files. You can also choose the ‘Dropbox’ option to store it on the virtual location for easy retrieval.
Tips:
The converted YouTube video in the MP3 file format is available for further transfer to other external gadgets. Make use of the MP3 files according to your convenience without any limitations.
2. How to Convert YouTube to MP3 by a Video Converter
If you take a deeper look at the converter tools at the online platform you will end with piles of collection of software. The key factor which you must bear in your mind is the reliability of the conversion program. Wondershare Uniconverter is an ultimate tool and it meets the expectations of the users without any compromises. Let’s see how to convert youtube to mp3 with this video converter:
- Click Here to download and install Wondershare Uniconverter on your computer
- Visit your favorite YouTube channel and copy the link of your favorite tract at its address bar.
- Launch Wondershare Uniconverter, then click the ‘Paste UR L‘ option at the top left side of the screen and select ‘Download MP3‘ from the drop-down icon. The audio extraction process commences immediately.
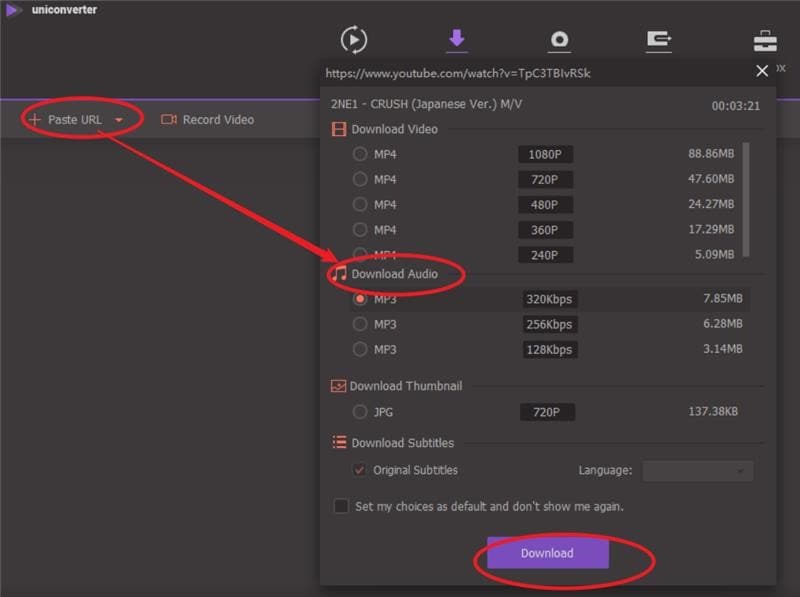
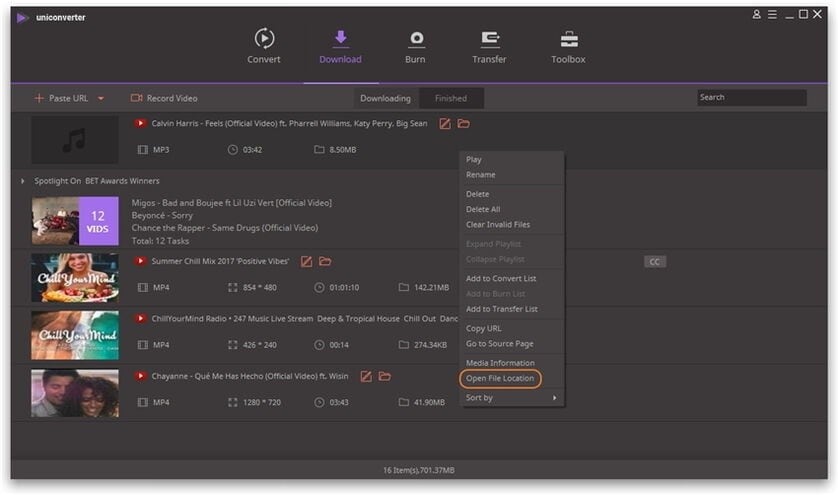
- After the download completes, you must hit the ‘Finished’ tab at the top of the screen to obtain the audio view. If you want to find out the folder details then you have to right-click and choose ‘Open File Location‘. This action takes you to the folder where the MP3 is available to carry out further tasks on it.
3. How to Convert YouTube to MP3 by a Video Editing Software
This method gives you access to convert Youtube to mp3 using a Video Editor. Wondershare Filmora not only offers many basic and professional editing tools and video effects but also can convert youtube to mp3. If you need further editing for mp3 after converting, Filmora will be the right one for you.
Here are the guidelines to convert YouTube to MP3 using Filmora:
Note:
This is a video editing software, and cannot convert a Youtube URL to an mp3 directly. You should convert the youtube URL to a local video in mp4 or other supported video formats first. You can read Convert Youtube to MP4 Guide and try some Youtube video downloaders to convert Youtube to mp4.
- Once you convert Youtube to mp4, please download Filmora below and install it on your computer
Download Mac Version ](https://tools.techidaily.com/wondershare/filmora/download/ )
- Open Filmora, then go to File-Import-Media to load the converted mp4 video to the Media Library

- Add or drag the video to the timeline(If you need to further edit or cut your video, you can double click the video on the track, and get more video and audio editing tools as you like, such as audio fade in/out and volume adjustment).
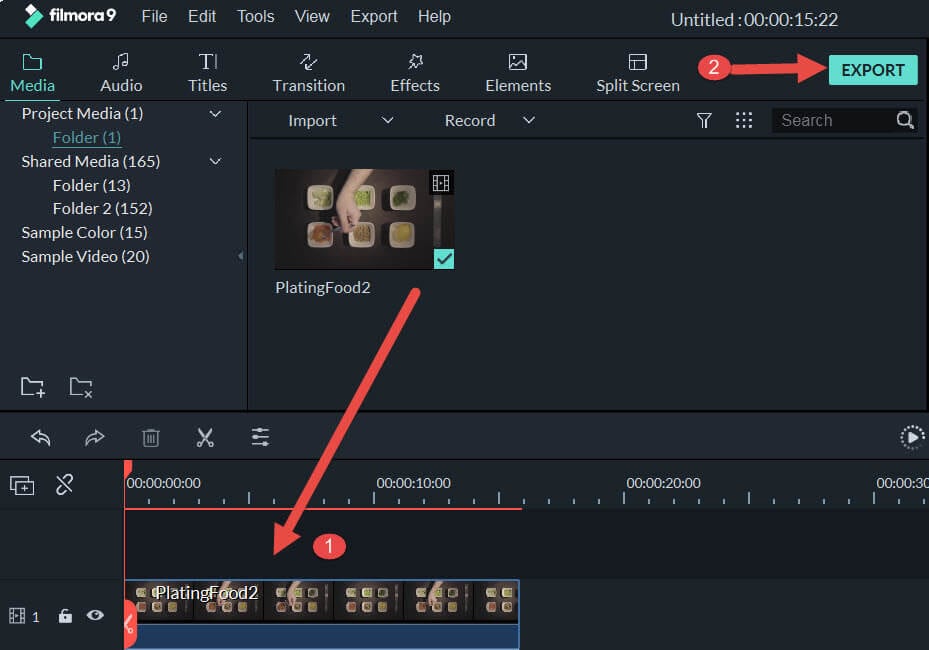
- Then hit the ‘Export‘ button and select ‘MP3’ format from the expanded list. You can click Settings in the export panel to customize the output audio settings, such as the audio bitrate for higher audio quality.

Warnings
Authorized Download—YouTube allows only legal download and conversion of videos on its platform. You can work on your videos on YouTube without any issues. You must own the copyrights if you want to download third person videos. As per the legal policy of YouTube, unauthorized download is strictly prohibited.
To sum up
There are multiple methods to convert youtube to mp3 effectively. The great challenge you may face while choosing the perfect app which fits your needs optimally. It is highly recommended to follow the YouTube copyrights guides and carryout legal downloads without any issues.
Stay tuned for more exciting facts on video converters. Leave your valuable comments and suggestions on this article.
Benjamin Arango
Benjamin Arango is a writer and a lover of all things video.
Follow @Benjamin Arango
Benjamin Arango
Mar 27, 2024• Proven solutions
There is a wide range of prominent tools available in the digital market to convert YouTube to MP3 files. The basic idea behind these tools is that you can extract the audio content from your favorite youtube video and save it to an mp3 file. The RIP of the audio process differs from the program built-in within the application. Many sound professionals opt for an mp3 file format because of its smaller file size, high-frequency audio quality, etc.
After you convert youtube to mp3, you will be able to listen to the background music or audio offline and the MP3 file format guarantees flawless audio quality for you.
You may also like: Best Free Youtube to MP3 Converters You Should Know
Three Ways to Convert YouTube Videos to MP3
Now it is a perfect time to explore unique ways to convert youtube to mp3 files. I will share three different ways in this article. Let’s take a quick look at it below:
- **1. How to Convert YouTube to MP3 by an Online YouTube to MP3 Tool
- **2. How to Convert YouTube to MP3 by q Video Converter
- **3. How to Convert YouTube to MP3 by a Video Editing Software
1. How to Convert YouTube to MP3 by an Online YouTube to MP3 Tool
It is a free service and allows you to convert any videos within the one-hour time limit. The whole conversion process completes within a few minutes effectively. There is no need to register to avail of this online service. You can save the converted files at your desired location and play it during your comfort zone. This online application is compatible with PC, gadgets, tablets, etc.
- Get YtMp3 tool: Click Hereon your browser and step into the online YouTube converter platform
- **Paste the URL: Now copy your favorite track URL from YouTube and paste it on the box. Then hit the ‘Convert’ button beside the pasted URL. You have to wait for a few minutes until the conversion process completes.
- **Download mp3: Immediately you must tap the ‘Download‘ button and choose the desired location by navigating between drives and folders to save the converted MP3 files. You can also choose the ‘Dropbox’ option to store it on the virtual location for easy retrieval.
Tips:
The converted YouTube video in the MP3 file format is available for further transfer to other external gadgets. Make use of the MP3 files according to your convenience without any limitations.
2. How to Convert YouTube to MP3 by a Video Converter
If you take a deeper look at the converter tools at the online platform you will end with piles of collection of software. The key factor which you must bear in your mind is the reliability of the conversion program. Wondershare Uniconverter is an ultimate tool and it meets the expectations of the users without any compromises. Let’s see how to convert youtube to mp3 with this video converter:
- Click Here to download and install Wondershare Uniconverter on your computer
- Visit your favorite YouTube channel and copy the link of your favorite tract at its address bar.
- Launch Wondershare Uniconverter, then click the ‘Paste UR L‘ option at the top left side of the screen and select ‘Download MP3‘ from the drop-down icon. The audio extraction process commences immediately.
- After the download completes, you must hit the ‘Finished’ tab at the top of the screen to obtain the audio view. If you want to find out the folder details then you have to right-click and choose ‘Open File Location‘. This action takes you to the folder where the MP3 is available to carry out further tasks on it.
3. How to Convert YouTube to MP3 by a Video Editing Software
This method gives you access to convert Youtube to mp3 using a Video Editor. Wondershare Filmora not only offers many basic and professional editing tools and video effects but also can convert youtube to mp3. If you need further editing for mp3 after converting, Filmora will be the right one for you.
Here are the guidelines to convert YouTube to MP3 using Filmora:
Note:
This is a video editing software, and cannot convert a Youtube URL to an mp3 directly. You should convert the youtube URL to a local video in mp4 or other supported video formats first. You can read Convert Youtube to MP4 Guide and try some Youtube video downloaders to convert Youtube to mp4.
- Once you convert Youtube to mp4, please download Filmora below and install it on your computer
Download Mac Version ](https://tools.techidaily.com/wondershare/filmora/download/ )
- Open Filmora, then go to File-Import-Media to load the converted mp4 video to the Media Library
- Add or drag the video to the timeline(If you need to further edit or cut your video, you can double click the video on the track, and get more video and audio editing tools as you like, such as audio fade in/out and volume adjustment).
- Then hit the ‘Export‘ button and select ‘MP3’ format from the expanded list. You can click Settings in the export panel to customize the output audio settings, such as the audio bitrate for higher audio quality.
Warnings
Authorized Download—YouTube allows only legal download and conversion of videos on its platform. You can work on your videos on YouTube without any issues. You must own the copyrights if you want to download third person videos. As per the legal policy of YouTube, unauthorized download is strictly prohibited.
To sum up
There are multiple methods to convert youtube to mp3 effectively. The great challenge you may face while choosing the perfect app which fits your needs optimally. It is highly recommended to follow the YouTube copyrights guides and carryout legal downloads without any issues.
Stay tuned for more exciting facts on video converters. Leave your valuable comments and suggestions on this article.
Benjamin Arango
Benjamin Arango is a writer and a lover of all things video.
Follow @Benjamin Arango
Also read:
- Comedic Choreography Producing Funny Mock Films
- Essential Tips and Tricks for Creating Killer Short Videos on YT for 2024
- Dissecting TSeries Profits From YouTube Platforms for 2024
- In 2024, Discovering Top 10 Must-Watch Business Video Hubs
- Explore Best ASMR Apps, Both Sides of the OS
- [New] Building a Broad-Spectrum Audience with Multichannel Strategy
- [Updated] Aspect Ratios for Stellar Youtube Thumbnails
- Liven Up Thumbnails Enchanted Settings
- Directing the Flow of Digital Storytelling Through Youtube Fusion
- Saturating the Market Precision in Sharing Through Shorts
- [Updated] Discovering Video Producers' Digital Command Center
- [Updated] Creating a Stellar Game Channels Look A Step-By-Step Approach
- Crafting YouTube Masterpieces with Powerful Hashtag Strategies for 2024
- Cutting-Edge Guide to YouTube Audio Editing for 2024
- Unlock the Full Potential of Your Video with Studio Editor
- [Updated] Channel Labeling 101 How to Make Yourself Hard to Ignore
- Increase Your Online Presence YouTube Methods
- Expressiveness Enhancing YouTube Comments via Emojis
- Worldwide Leaders in Short Video Download Hubs (FREE)
- 2024 Approved Daily Dollars and Cents Average Income From YouTube's AdSense Per Thousand Viewer Hours
- [Updated] Efficiently Engaging with Numerous YouTube Lectures
- Ubiquitous Display Dynamics Choosing a Media Company
- Dominance in Video Landscape Mirrorless vs DSLR Cameras for 2024
- 2024 Approved Achieving YouTube Live Prominence with Pro-Level Tips
- [New] Cultivating Your Persona in the World of Gamers
- Turn YouTube Videos Into Soundtracks
- Boosting Video Reach on YouTube An In-Depth Guide to SEO Techniques for 2024
- Trustworthy YouTube to MP4 File Extraction Processes
- Adept Guide to YouTube Shorts Transformation to MP4 for 2024
- In 2024, Action Capture Duel 2022 GoPro Hero5 Versus Garmin VIRB
- [New] Navigating the Social Maze Tweets + Tumble Videos
- 2024 Approved The Ultimate Guide to Slow Motion Video Editing Top 10 Software
- 2024 Approved Interrupting Real-Time Recording on QuickTime
- In 2024, Why Your WhatsApp Live Location is Not Updating and How to Fix on your Realme C51 | Dr.fone
- [New] 2024 Approved How to Upload Tweets - No Retweets on Mobile?
- [Updated] 2024 Approved Android/iOS TikTok Editing Winners
- New 2024 Approved Device/Network/Browser Requirements | Virbo AI Live Stream
- Full Guide to Catch 100 IV Pokémon Using a Map On Samsung Galaxy A25 5G | Dr.fone
- New In 2024, A Countdown Effect Is Widely Used in Gaming and Report Videos. So How to Create Your Own Countdown Video? This Article Will Tell You some Ideas About Contdown Video Editing
- 6 Fixes to Unfortunately WhatsApp has stopped Error Popups On ZTE Blade A73 5G | Dr.fone
- Title: "2024 Approved Elevating Your YouTube Presence with Customized Subtitles"
- Author: Brian
- Created at : 2024-05-25 11:12:33
- Updated at : 2024-05-26 11:12:33
- Link: https://youtube-video-recordings.techidaily.com/2024-approved-elevating-your-youtube-presence-with-customized-subtitles/
- License: This work is licensed under CC BY-NC-SA 4.0.
