
:max_bytes(150000):strip_icc()/pick-best-iphone-for-you-1999293-fe880837102c47d6ae1aba5964bd65e3.png)
"2024 Approved Elevate Your Videography with Top SEO Gadgets"
Elevate Your Videography with Top SEO Gadgets
Make Quality YouTube Video with Wondershare Filmora
An easy and powerful video editor for YouTube Video
Numerous video and audio effects to choose from
Detailed tutorials provided by the official channel
For the past several years, video has been the best-performing content across social media channels. In particular, YouTube has become the second most-visited website in the world. New and experienced business owners should consider utilizing YouTube as part of their search engine optimization strategy.
Whether you are an independent business owner or a boutique marketing agency, YouTube SEO tools can undoubtedly be helpful to grow your business.
How Will YouTube SEO Tools Help Boost Your Videos?
8 Handpicked YouTube SEO Tools For You
Bonus Tips: Factors to Consider for YouTube SEO
How Will YouTube SEO Tools Help Boost Your Videos?
The popularity of YT SEO tools is growing every day. They can help boost your videos in the following ways:
Help You Gain More Traffic
These tools can help you find the right keywords that your target audience is searching for on YouTube. Using these terms in your content will help you to boost the view count of your video.
Help You Analyze Your Channel
You can use the data provided by YouTube SEO tools to grow your channel. Because some tools allow you to view traffic sources and audience demographics, you can refine your content strategy and create videos that will boost the number of subscribers to your channel.
Show How Your Audiences is Responding to Your Content
These tools allow you to find out what your audience likes. Once you know what people want, you can create content on topics that will keep them engaged. That means it also helps you avoid the type of content that people don’t like.
8 Handpicked YouTube SEO Tools For You
YouTube SEO tools can streamline your path and ensure you have a growing and engaged following on YouTube. We have put together a list of the best YT SEO tools that you should try.
1. Google Trends

When it comes to producing well-performing YouTube content, it is all about timing. Utilizing Google Trends is a great way to figure out when to create and deploy content. Narrowing your search by category, time, and geographical region can also create a successful end product.
2. TubeBuddy

SEO experts and novices alike understand the importance of meta description. Metadata helps the search engine more quickly read and categorize the content. Unfortunately, YouTube can make writing metadata challenges. However, TubeBuddy can help you make the most of your videos. You can use this tool to write and publish descriptions, titles, annotations, cards, tags, and more.
3. Google Ads

If you know you’re creating a YouTube video with SEO best practices in mind, you’ll want to optimize both the video and the metadata for a specific keyword. Google Ads is the definitive tool for generating these terms. Plug in a topic to get a raw keyword spreadsheet full of possible terms to select.
4. Awario

YouTube engagement remains the most vital metric when it comes to video production. Awario is a social monitoring tool that can help you analyze how your channel is growing. You can also use the software to collect mentions and set up alerts.
5. YouTube Analytics
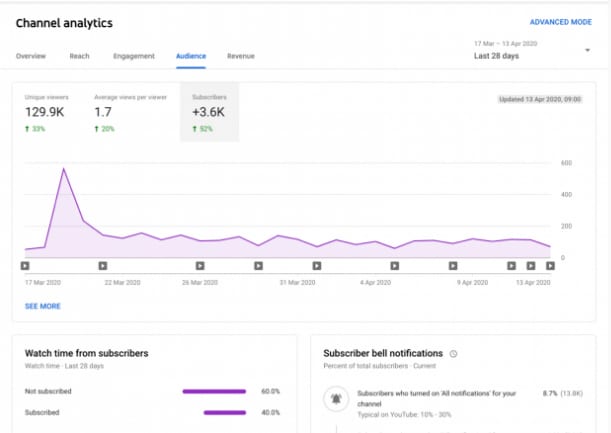
You can use YouTube’s analytics tool to get crucial details about your channel; you’ll know where it’s succeeding and where it is not. The tool allows you to find out more about your audience and what content they like. In turn, this will improve your views and keep your audience engaged.
What’s more? This tool allows you to view the watch time on your YouTube videos and the growth of your following.
6. YT SEO Tool Station
YT SEO Tool Station is the resource center for everything related to YouTube. You can find information on the most popular video tools that will help you grow your YouTube channel. These include tools for video descriptions, titles, tags, and keywords.
If you are looking for channel tools, YT SEO Tool Station also got you covered. Here, you’ll find details about tools for channel analytics, finding, counting live subscribers, and much more.
7. Rank Tracker

This freemium keyword research tool allows you to pick keywords from YouTube’s suggestions and check the search volume, expected visits, competition, and much more. Rank Tracker is ideal for finding keywords that can put your YouTube videos in the running for the coveted featured snippet position that will make you appear at the top of search results.
8. Tubics
As one of the popular YT SEO tools, Tubics provides analysis and recommendations to help your videos get more views and rank higher on search engines. This cloud-based tool offers analytics on video performance, channel analysis, keyword monitoring, tag generation, and more.
With this tool, you can find out how your videos and channel are performing. You also know how your audience is responding to the content.
Bonus Tips: Factors to Consider for YouTube SEO
Use descriptive Title Tags (Description)
Be sure to use descriptive title tags; this helps YouTube determine what your video is about, and it increases the likelihood of it appearing in search results for related searches.
Place Keywords in Your Video Tags, Description, and Titles
It is imperative to include keywords in your video titles, descriptions, and tags. Essentially, this allows YouTube to know what the content of your videos is about so it can recommend them to an audience interested in similar topics or related searches.
Share Your Videos on Social Media
Once you have created great content, you need to share the videos with family and friends to enjoy them! By sharing these videos on social media platforms, such as Facebook, Twitter, and LinkedIn, you can help to increase their visibility.
Optimize Your Channel
After setting up an account on YouTube, you must optimize the rest of your profile; this includes adding a custom avatar picture, bio description, relevant links to other social media sites like Instagram or Twitter, and links to relevant external sites.
Use Filmora to Make High-quality YouTube Videos
One of the most effective ways to keep people glued to your channel is by giving them high-quality videos. Filmora can help you edit YouTube videos before publishing them on your YouTube channel. The basic editing abilities like rotate, merge, split, trim, or crop are made easy with its simple user interface.
This software has created the ability to present a higher level of editing quality with features that can change or add an immersed effect to your video content. A Text and Titles library allows you to create illustrations for your content without having to find options.
There is also a music library giving you the ability to focus on the emotion or theme you’re attempting to create instead of spending time searching for royalty-free songs and different types of text to create the finished product you want.
You can give your videos an added effect with the inventory of handcrafted filters and overlays. To enhance these effects, you can also add transitions and motion elements.
Filmora is a one-stop shop with additional features like video stabilization and screen recording. Many other programs would require the use of separate software to make those types of adjustments. 3D Lut gives you access to different presets inspired by popular movies helping you reach your desired result.
YT SEO tools can help you optimize your videos to increase views and grow your following. Because people like to watch high-quality videos, you should use Filmora to make impressive videos to keep people coming to your channel.
For the past several years, video has been the best-performing content across social media channels. In particular, YouTube has become the second most-visited website in the world. New and experienced business owners should consider utilizing YouTube as part of their search engine optimization strategy.
Whether you are an independent business owner or a boutique marketing agency, YouTube SEO tools can undoubtedly be helpful to grow your business.
How Will YouTube SEO Tools Help Boost Your Videos?
8 Handpicked YouTube SEO Tools For You
Bonus Tips: Factors to Consider for YouTube SEO
How Will YouTube SEO Tools Help Boost Your Videos?
The popularity of YT SEO tools is growing every day. They can help boost your videos in the following ways:
Help You Gain More Traffic
These tools can help you find the right keywords that your target audience is searching for on YouTube. Using these terms in your content will help you to boost the view count of your video.
Help You Analyze Your Channel
You can use the data provided by YouTube SEO tools to grow your channel. Because some tools allow you to view traffic sources and audience demographics, you can refine your content strategy and create videos that will boost the number of subscribers to your channel.
Show How Your Audiences is Responding to Your Content
These tools allow you to find out what your audience likes. Once you know what people want, you can create content on topics that will keep them engaged. That means it also helps you avoid the type of content that people don’t like.
8 Handpicked YouTube SEO Tools For You
YouTube SEO tools can streamline your path and ensure you have a growing and engaged following on YouTube. We have put together a list of the best YT SEO tools that you should try.
1. Google Trends
When it comes to producing well-performing YouTube content, it is all about timing. Utilizing Google Trends is a great way to figure out when to create and deploy content. Narrowing your search by category, time, and geographical region can also create a successful end product.
2. TubeBuddy
SEO experts and novices alike understand the importance of meta description. Metadata helps the search engine more quickly read and categorize the content. Unfortunately, YouTube can make writing metadata challenges. However, TubeBuddy can help you make the most of your videos. You can use this tool to write and publish descriptions, titles, annotations, cards, tags, and more.
3. Google Ads
If you know you’re creating a YouTube video with SEO best practices in mind, you’ll want to optimize both the video and the metadata for a specific keyword. Google Ads is the definitive tool for generating these terms. Plug in a topic to get a raw keyword spreadsheet full of possible terms to select.
4. Awario
YouTube engagement remains the most vital metric when it comes to video production. Awario is a social monitoring tool that can help you analyze how your channel is growing. You can also use the software to collect mentions and set up alerts.
5. YouTube Analytics
You can use YouTube’s analytics tool to get crucial details about your channel; you’ll know where it’s succeeding and where it is not. The tool allows you to find out more about your audience and what content they like. In turn, this will improve your views and keep your audience engaged.
What’s more? This tool allows you to view the watch time on your YouTube videos and the growth of your following.
6. YT SEO Tool Station
YT SEO Tool Station is the resource center for everything related to YouTube. You can find information on the most popular video tools that will help you grow your YouTube channel. These include tools for video descriptions, titles, tags, and keywords.
If you are looking for channel tools, YT SEO Tool Station also got you covered. Here, you’ll find details about tools for channel analytics, finding, counting live subscribers, and much more.
7. Rank Tracker
This freemium keyword research tool allows you to pick keywords from YouTube’s suggestions and check the search volume, expected visits, competition, and much more. Rank Tracker is ideal for finding keywords that can put your YouTube videos in the running for the coveted featured snippet position that will make you appear at the top of search results.
8. Tubics
As one of the popular YT SEO tools, Tubics provides analysis and recommendations to help your videos get more views and rank higher on search engines. This cloud-based tool offers analytics on video performance, channel analysis, keyword monitoring, tag generation, and more.
With this tool, you can find out how your videos and channel are performing. You also know how your audience is responding to the content.
Bonus Tips: Factors to Consider for YouTube SEO
Use descriptive Title Tags (Description)
Be sure to use descriptive title tags; this helps YouTube determine what your video is about, and it increases the likelihood of it appearing in search results for related searches.
Place Keywords in Your Video Tags, Description, and Titles
It is imperative to include keywords in your video titles, descriptions, and tags. Essentially, this allows YouTube to know what the content of your videos is about so it can recommend them to an audience interested in similar topics or related searches.
Share Your Videos on Social Media
Once you have created great content, you need to share the videos with family and friends to enjoy them! By sharing these videos on social media platforms, such as Facebook, Twitter, and LinkedIn, you can help to increase their visibility.
Optimize Your Channel
After setting up an account on YouTube, you must optimize the rest of your profile; this includes adding a custom avatar picture, bio description, relevant links to other social media sites like Instagram or Twitter, and links to relevant external sites.
Use Filmora to Make High-quality YouTube Videos
One of the most effective ways to keep people glued to your channel is by giving them high-quality videos. Filmora can help you edit YouTube videos before publishing them on your YouTube channel. The basic editing abilities like rotate, merge, split, trim, or crop are made easy with its simple user interface.
This software has created the ability to present a higher level of editing quality with features that can change or add an immersed effect to your video content. A Text and Titles library allows you to create illustrations for your content without having to find options.
There is also a music library giving you the ability to focus on the emotion or theme you’re attempting to create instead of spending time searching for royalty-free songs and different types of text to create the finished product you want.
You can give your videos an added effect with the inventory of handcrafted filters and overlays. To enhance these effects, you can also add transitions and motion elements.
Filmora is a one-stop shop with additional features like video stabilization and screen recording. Many other programs would require the use of separate software to make those types of adjustments. 3D Lut gives you access to different presets inspired by popular movies helping you reach your desired result.
YT SEO tools can help you optimize your videos to increase views and grow your following. Because people like to watch high-quality videos, you should use Filmora to make impressive videos to keep people coming to your channel.
Boost YT Thumbnails: Flashy Neon Borders Applied
Your YouTube video, or any other clip published on any forum, gets a larger number of hits if it has an attractive thumbnail. And, the fact is, a thumbnail becomes 10x more attractive when the main character that the image has have a neon border around it.
With that said, in the following sections, you will learn a couple of methods on how to add a YouTube thumbnail border around the main characters and/or objects that are significant to the clip.
In this article
01 Add Glowing Neon Border to YouTube Thumbnail with Filmora
02 Add a Glowing Neon Border in YouTube Thumbnail with Canva
03 Outline a Person in a YouTube Thumbnail with Photoshop
Part 1: How to Add Neon Border to YouTube Thumbnail for Free with Filmora
Being one of the most versatile and intuitive post-production tools available in the market today, Wondershare Filmora X allows you to add a neon border to a YouTube thumbnail quite conveniently. You can learn how to get this done on Windows or Mac by following the steps given below.
For Win 7 or later (64-bit)
For macOS 10.12 or later
Step 1: Define Project Settings and Add Image to the Timeline
Launch Wondershare Filmora X on your PC (a MacBook Pro M1 is used here), ensure that the project aspect ratio is set to 16:9 (Widescreen) on the splash screen, and click New Project. On the main interface, click the Preview quality and display settings icon from the upper-right area of the Timeline, click Change Project Aspect Ratio, click to select 1280 x 720 (HD) from the Resolution menu of the Project Settings box, and click OK to save the custom project settings.

Then select My Media from the menu bar if not already selected, click Project Media from the navigation pane, and click Import from the Media box to select and import the image of the main character or object that you want to use in the thumbnail.

Now, drag the image from the Media box to the Timeline at the bottom.

Step 2: Clear Image Background, Add Border, and Add Custom Background
Go to Effects from the menu bar, click to select the Default tab and then AI Portrait from the navigation pane, and click and drag the Human Segmentation preset from the right box, and place it over the image track in the Timeline.

Double-click the image layer, scroll down the upper-left box to the Video Effects section, and use the Edge Thickness and Edge Feather sliders to adjust the character’s edges to make them as realistic as possible. Click OK when done.

Next, click and drag the Human Border preset over the image track in the Timeline, and follow the same procedure to customize the border. This will give the character a neon border effect.

Now, use the method explained earlier to import a custom image for the background, and drag and place it under the previous track in the Timeline.

If you are running the latest version of Filmora, you will find there are some neon light effects available under AI Portrait as well.

Step 3: Add Titles to Thumbnail
Go to Titles from the menu bar, click to select the Default tab and then Lower 3rds from the navigation pane, and click and drag your preferred lower-third preset from the right window to a separate layer in the Timeline. Double-click the lower-third layer, and use the available options in the upper-left window to change the text, its color, etc., and drag the textbox to place it to your preferred position on the image as well. Click OK to save the changes.
Next, click to select Titles from the navigation pane, and drag your preferred title from the right window to the upper-most track in the Timeline. Now use the method explained earlier to edit the text, its color, position, etc. to make it look professional.

For more tips and tricks for creating YouTube thumbnail, you can check this You Tube thumbnail creating guide.
Step 4: Get the Neon Border Thumbnail
Click the Snapshot (Camera) icon from the upper-right area of the Timeline, go to My Media from the menu bar, right-click the thumbnail of the screenshot you captured, and click Reveal in Finder (on Mac) or Reveal in Explorer (on Windows) to get to the folder the YouTube thumbnail border is saved in.

Part 2: How to Add a Glowing Neon Border in Your YouTube Thumbnail with Canva
Canva is another intuitive editing program that works on the web interface rather than having you download and install an app on your PC. You can add a neon border for YouTube thumbnails using Canva by following the instructions given below:
Step 1: Define Project Settings and Add a Background
After signing in to your Canva account, click Create a design from the top-right corner of the page, click Custom size from the bottom, define 1280 and 720 in the Width and Height fields on the box that appears respectively, and click Create new design.

Now, click to select Background from the navigation bar on the left (if the Background tool is not visible, click More and then choose Background from the expanded list), and click to select a background from the images available in the center pane.

Step 2: Upload an Image and Add Effects
Click Uploads from the navigation bar, click the More icon from the right of the Upload media button present at the top of the center pane, choose your preferred method to upload the image (with the transparent background) that you want to use, upload the image, and drag it from the center pane to the Canvas.
Note: You can use any of the tools available online to remove the background from your image for free.

To add a YouTube thumbnail border, make sure that the image that you added to the Canvas is selected, click the Duplicate icon from the upper-right area, and use the scaling handles of the copy of the image to increase its size a bit. Reposition the image back to its original location as well.
Then, click Edit image from the upper-left corner of the Canvas, click Duotone from the Edit image pane at the center, if need be, click See all, choose your preferred duotone effect to apply on the image, choose your preferred highlight and shadow colors from the box that appears next, and click Back from the top of the pane.

Next, click See all next to the Adjust section from the center pane, and drag the Blur slider to the right to increase the blur effect on the image.

Step 3: Position the Layers
While keeping the duplicate image selected, click the Position button from the upper-right area of the Canvas, and click Background to send the second image behind the first one to get the neon border effect for the photo.

Part 3: How to Outline a Person in a YouTube Thumbnail with Photoshop
Because YouTube thumbnails are nothing but static images, creating YouTube thumbnail border with Adobe Photoshop is comparatively easier. The process of doing this is given below:
Step 1: Define Document Preferences and Import an Image
Launch Adobe Photoshop on your PC, click Create new, and on the New Document customization box, define the width and height values to 1280 and 720 pixels respectively. Select Transparent from the Background Contents menu as well if not already selected. Click Create from the bottom to create a new Photoshop document with the specified document settings. Next, open the folder that contains the source image, drag the photo to Photoshop, and press Enter to place the photo.

Step 2: Remove Background from the Image
Make sure that the image layer is selected in the Layers panel on the right, go to Select from the menu bar at the top, and click Subject. From the bottom of the Layers panel, click the Add a mask icon to get rid of the background, leaving only the human on the Canvas.

Step 3: Add a Custom Background and an Outline Around the Subject
Use the method explained earlier to import a background image of your choice to Photoshop. Drag the background image layer to the bottom in the Layers panel. Double-click the masked layer, click to select Stroke from the left pane of the Layer Style box, and use the options available on the right to manage the size, color, position, etc. of the stroke that has been added around the human subject. Click OK when done, and then export the image normally to use it as a YouTube thumbnail border.

Summary
It is important to know that the default resolution of a YouTube thumbnail is 1280 x 720 pixels that is usually written and referred to as 720p. While adding a YouTube thumbnail border, it is also imperative to have a good sense of color combination and fonts. Furthermore, a decent tool like Wondershare Filmora X must be used to add an appealing neon border around the main subject in the thumbnail image easily and quickly.
02 Add a Glowing Neon Border in YouTube Thumbnail with Canva
03 Outline a Person in a YouTube Thumbnail with Photoshop
Part 1: How to Add Neon Border to YouTube Thumbnail for Free with Filmora
Being one of the most versatile and intuitive post-production tools available in the market today, Wondershare Filmora X allows you to add a neon border to a YouTube thumbnail quite conveniently. You can learn how to get this done on Windows or Mac by following the steps given below.
For Win 7 or later (64-bit)
For macOS 10.12 or later
Step 1: Define Project Settings and Add Image to the Timeline
Launch Wondershare Filmora X on your PC (a MacBook Pro M1 is used here), ensure that the project aspect ratio is set to 16:9 (Widescreen) on the splash screen, and click New Project. On the main interface, click the Preview quality and display settings icon from the upper-right area of the Timeline, click Change Project Aspect Ratio, click to select 1280 x 720 (HD) from the Resolution menu of the Project Settings box, and click OK to save the custom project settings.
Then select My Media from the menu bar if not already selected, click Project Media from the navigation pane, and click Import from the Media box to select and import the image of the main character or object that you want to use in the thumbnail.
Now, drag the image from the Media box to the Timeline at the bottom.
Step 2: Clear Image Background, Add Border, and Add Custom Background
Go to Effects from the menu bar, click to select the Default tab and then AI Portrait from the navigation pane, and click and drag the Human Segmentation preset from the right box, and place it over the image track in the Timeline.
Double-click the image layer, scroll down the upper-left box to the Video Effects section, and use the Edge Thickness and Edge Feather sliders to adjust the character’s edges to make them as realistic as possible. Click OK when done.
Next, click and drag the Human Border preset over the image track in the Timeline, and follow the same procedure to customize the border. This will give the character a neon border effect.
Now, use the method explained earlier to import a custom image for the background, and drag and place it under the previous track in the Timeline.
If you are running the latest version of Filmora, you will find there are some neon light effects available under AI Portrait as well.
Step 3: Add Titles to Thumbnail
Go to Titles from the menu bar, click to select the Default tab and then Lower 3rds from the navigation pane, and click and drag your preferred lower-third preset from the right window to a separate layer in the Timeline. Double-click the lower-third layer, and use the available options in the upper-left window to change the text, its color, etc., and drag the textbox to place it to your preferred position on the image as well. Click OK to save the changes.
Next, click to select Titles from the navigation pane, and drag your preferred title from the right window to the upper-most track in the Timeline. Now use the method explained earlier to edit the text, its color, position, etc. to make it look professional.
For more tips and tricks for creating YouTube thumbnail, you can check this You Tube thumbnail creating guide.
Step 4: Get the Neon Border Thumbnail
Click the Snapshot (Camera) icon from the upper-right area of the Timeline, go to My Media from the menu bar, right-click the thumbnail of the screenshot you captured, and click Reveal in Finder (on Mac) or Reveal in Explorer (on Windows) to get to the folder the YouTube thumbnail border is saved in.
Part 2: How to Add a Glowing Neon Border in Your YouTube Thumbnail with Canva
Canva is another intuitive editing program that works on the web interface rather than having you download and install an app on your PC. You can add a neon border for YouTube thumbnails using Canva by following the instructions given below:
Step 1: Define Project Settings and Add a Background
After signing in to your Canva account, click Create a design from the top-right corner of the page, click Custom size from the bottom, define 1280 and 720 in the Width and Height fields on the box that appears respectively, and click Create new design.
Now, click to select Background from the navigation bar on the left (if the Background tool is not visible, click More and then choose Background from the expanded list), and click to select a background from the images available in the center pane.
Step 2: Upload an Image and Add Effects
Click Uploads from the navigation bar, click the More icon from the right of the Upload media button present at the top of the center pane, choose your preferred method to upload the image (with the transparent background) that you want to use, upload the image, and drag it from the center pane to the Canvas.
Note: You can use any of the tools available online to remove the background from your image for free.
To add a YouTube thumbnail border, make sure that the image that you added to the Canvas is selected, click the Duplicate icon from the upper-right area, and use the scaling handles of the copy of the image to increase its size a bit. Reposition the image back to its original location as well.
Then, click Edit image from the upper-left corner of the Canvas, click Duotone from the Edit image pane at the center, if need be, click See all, choose your preferred duotone effect to apply on the image, choose your preferred highlight and shadow colors from the box that appears next, and click Back from the top of the pane.
Next, click See all next to the Adjust section from the center pane, and drag the Blur slider to the right to increase the blur effect on the image.
Step 3: Position the Layers
While keeping the duplicate image selected, click the Position button from the upper-right area of the Canvas, and click Background to send the second image behind the first one to get the neon border effect for the photo.
Part 3: How to Outline a Person in a YouTube Thumbnail with Photoshop
Because YouTube thumbnails are nothing but static images, creating YouTube thumbnail border with Adobe Photoshop is comparatively easier. The process of doing this is given below:
Step 1: Define Document Preferences and Import an Image
Launch Adobe Photoshop on your PC, click Create new, and on the New Document customization box, define the width and height values to 1280 and 720 pixels respectively. Select Transparent from the Background Contents menu as well if not already selected. Click Create from the bottom to create a new Photoshop document with the specified document settings. Next, open the folder that contains the source image, drag the photo to Photoshop, and press Enter to place the photo.
Step 2: Remove Background from the Image
Make sure that the image layer is selected in the Layers panel on the right, go to Select from the menu bar at the top, and click Subject. From the bottom of the Layers panel, click the Add a mask icon to get rid of the background, leaving only the human on the Canvas.
Step 3: Add a Custom Background and an Outline Around the Subject
Use the method explained earlier to import a background image of your choice to Photoshop. Drag the background image layer to the bottom in the Layers panel. Double-click the masked layer, click to select Stroke from the left pane of the Layer Style box, and use the options available on the right to manage the size, color, position, etc. of the stroke that has been added around the human subject. Click OK when done, and then export the image normally to use it as a YouTube thumbnail border.
Summary
It is important to know that the default resolution of a YouTube thumbnail is 1280 x 720 pixels that is usually written and referred to as 720p. While adding a YouTube thumbnail border, it is also imperative to have a good sense of color combination and fonts. Furthermore, a decent tool like Wondershare Filmora X must be used to add an appealing neon border around the main subject in the thumbnail image easily and quickly.
Also read:
- Supercharge Videos - Download Premium Effs!
- Pinpointing Your Place in YouTube's Varied Landscapes
- Viral Hits 8 The Speedy Expanders on YT
- [New] Essential GIF Making Software The Ultimate Guide
- [Updated] Crafting Quality Videos A Guide to Apple Device Screen Recording
- [New] Animated Text That Jumps Master Class with Easy Steps
- [Updated] Cutting-Edge Openings at No Cost The Best YouTube Intro Makers
- In 2024, Boost Creativity with Free Audio Effects Online
- Broadcast Perfection Recommended Tech and Apps for YouTubers for 2024
- [Updated] A Creator’s Guide to Understanding YouTube Policies
- MediaMasher Suite
- In 2024, Ensuring Visibility Fixing Missing Shorts Thumbnails
- [New] Defeating Darkness in Youtube Videos
- Essential Tips and Tricks for Creating Killer Short Videos on YT
- Easing Into Your YouTube Watches 3 Methods (50 Chars) for 2024
- [Updated] Elevate View Count Prime Hashtags Strategy
- [Updated] Best Practices in YT Thumbnail Sizing
- Becoming a Trendsetter YouTube Video Tactics
- Must-Know Facts for ASMR Content Lovers
- Visionary Video Download Engine - Capture & Save Anywhere
- Leading Resource Hubs for YouTube Intro Files
- High-Quality YouTube Images Download Without Any Cost!
- 2024 Approved Crafting Engaging Content with Google Trends Analytics
- Youtube to Animated GIFs Conversion Guide Online Tutorial for Success
- [Updated] Elevating Your Artistry in Lyric Videos Through Lyric Video Maker Mastery
- Unleash Your YouTube Potential Steps to Finding & Managing Video Collab Partners
- In 2024, Adding Richness YouTube Videos in Slideshows
- Enhance Your Online Skills A Guide to YouTube Editing via Sony Vegas
- 2024 Approved Blitzing Sharing Easy YouTube Playlist Methods
- Crafting Powerful Thumbnails with Top 20 Font Options for 2024
- Top 8 Techniques for Grabbing Attention in YT Thumbnails
- The Ultimate Guide to Cost-Effective Media Providers Online
- Transformative Thumbnails with Immersive Scenes
- [Updated] Creating Compelling Content with Personalized Video Setups
- [Updated] Easy Steps How to Master the Best of 9 Free YouTube Logomakers
- Discovering 8 Honestly-Endorsed Promotional Strategies for 2024
- Getting Your Foot in the Channel's Door Must-Haves
- [Updated] Unveiling the Secrets to Captioning Stories and Reels for 2024
- [New] Unlocking the Secrets of Flawless Video Calls (Screen Sharing)
- [Updated] Breaking Barriers on Frozen Grounds - Olympic Snowboard Speed Showdown
- 2024 Approved Transform Your Footage Into a Blockbuster Mac Video Editing Essentials
- In 2024, How to Make Animated Explainer Videos
- 5 Techniques to Transfer Data from Lenovo ThinkPhone to iPhone 15/14/13/12 | Dr.fone
- Updated | How to Change Quicktime Player Speed on Mac, In 2024
- Updated 2024 Approved Free Download Adobe Premiere Pro CS6 for Mac OS
- In 2024, Top 5 Oppo A1x 5G Bypass FRP Tools for PC That Actually Work
- In 2024, For People Wanting to Mock GPS on Vivo Y27 4G Devices | Dr.fone
- [Updated] Navigating the Technicalities Recording & Saving Your Role-Play Experieninas on Apple Devices for 2024
- New 2024 Approved If You Want to Know What to Prepare and How to Make the Wedding Video Perfect for Videographers, Check Out This Menu Here
- Hard Resetting an Itel P55 5G Device Made Easy | Dr.fone
- [New] Streamline Media Management with Top 10+ Free Instagram-to-MP4 Converters for 2024
- In 2024, Full Guide to Catch 100 IV Pokémon Using a Map On Vivo Y200 | Dr.fone
- [New] 2024 Approved Dive Into Free Emoji Worlds with These Innovative Online Locations
- 2024 Approved Streamline Your Teamwork Zooming Through Screenshares
- [Updated] 2024 Approved Clearing up TikTok Problems on Android & iPhone Quickly
- The way to get back lost call history from Motorola Moto G84 5G
- New In 2024, Pinpointing Areas with Fervent Canine Outcry
- Comprehensive FB Messenger Recordings Explained
- Updated How Have Game Recording Software Improved Their Stature in the Market? An Overview for 2024
- Updated Navigating Through This Years Top Ten Budget-Friendly Browser-Based DAW Solutions
- In 2024, The Essential List 8 Leading Sound Recording Applications
- Best Realme Narzo N55 Pattern Lock Removal Tools Remove Android Pattern Lock Without Losing Data
- The Engineers Selection Identifying the Best 5 Dynamic Ducking Software Updates (2 Market Trends) for 2024
- 2024 Approved Seeking Out Dynamic Percussive Audio Layers
- Updated 2024 Approved SopranoSculptor & TenorTamer - Revolutionary Audio Modification Software
- All Must-Knows to Use Fake GPS GO Location Spoofer On Apple iPhone 6 Plus | Dr.fone
- In 2024, Recommended Best Applications for Mirroring Your Itel P55+ Screen | Dr.fone
- Title: "2024 Approved Elevate Your Videography with Top SEO Gadgets"
- Author: Brian
- Created at : 2024-05-25 11:12:05
- Updated at : 2024-05-26 11:12:05
- Link: https://youtube-video-recordings.techidaily.com/2024-approved-elevate-your-videography-with-top-seo-gadgets/
- License: This work is licensed under CC BY-NC-SA 4.0.
