
:max_bytes(150000):strip_icc()/samsung-unveils-new-products-at-its-annual-unpacked-event-1200186175-0a17180ae84e47f488f43d3afbb7daa6.jpg)
"2024 Approved Elevate Your Content Top-Rated Cameras for YouTubers"
Elevate Your Content: Top-Rated Cameras for YouTubers
The Best Cameras for YouTube from Beginners to Professionals

Max Wales
Mar 27, 2024• Proven solutions
Whether you’re a beginner or a pro as a YouTuber, your YouTube equipment shouldn’t be the thing that holds you back from becoming a YouTube star. But, how do you find the best camera for making YouTube videos? What options do you have?
In this article, we’re going to explore some of the best cameras for YouTube. We’ll label each one based on what we believe is best for particular uses, so that you can better parse what it is that you want to purchase. All of this is in hopes that you can find the video camera for YouTube that is right for you and what you need.
Part 1: 7 Best Best Camera for Youtube to Make Videos
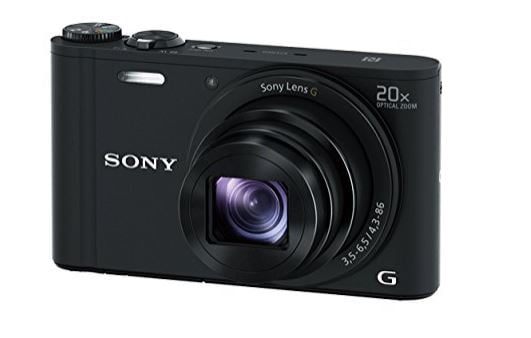
1. Sony DSC WX350 Digital Camera – Best Point and Shoot Video Camera
Specifications:
- 40x clear image zoom; 20x optical zoom
- Lock-on Auto Focus
- Wi-Fi with NFC3 connectivity for mobile devices
- 4 megapixels
- CMOS sensor that provides top quality images, even in low lighting
- Motion shot video with up to 4k quality output
Description: Have you been looking for a 20x zoom camera that fits in your pocket ? Get the best pictures with the Sony DSC WX350. This camera offers both still photos and video recording, using technology that minimizes how much the camera shakes, even if you’re filming on the go.
Pros: The image stabilizer makes this one of the best cameras for making YouTube videos out there, alongside of the 20x optical zoom. The battery life is quite long as well, which means you can get a lot of content done without any problems. Lastly, you can film in HD, which makes any YouTube influencer happy.
Cons: The LED screen can be quite dim, so it’s hard to see it when you’re out in bright sunlight; be sure you make adjustments before you go outside. There is also not your typical viewfinder installed, so experienced videographers may not like using it.
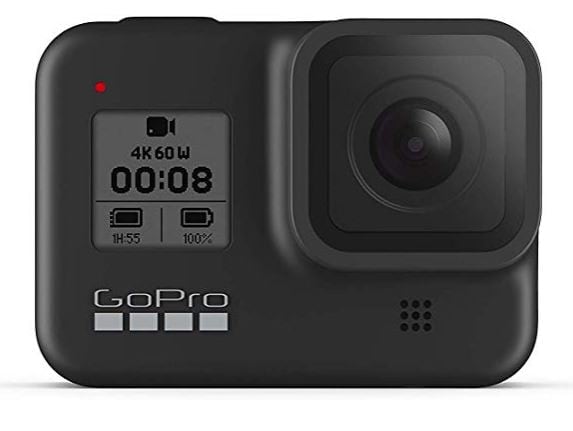
2. GoPro HERO8 Action Camera - Best Wearable Sports Camera
Specifications:
- Up to 60 FPS
- 4k and HD capabilities
- HyperSmooth 2.0 stabilization options.
- Optional Battery Mod available.
- Integrated Mount
- Crisp, easy to use and navigate LCD.
Description: If you need an on-the-go video camera for YouTube, there’s nothing better than a GoPro. With their HERO series of GoPros, they have all sorts of great features that allow you to capture the smoothest video, even when you’re out and on the go. Their top end stabilization makes their cameras the best for the active YouTuber.
Pros: The rugged, waterproof design of the HERO7 is a great option for anyone who is looking to be on the go with their YouTube. The integrated mount makes it simple for anyone who wants to put it on a selfie stick or something else, and it even has a companion app for easy, on the go editing!
Cons: The Wi-Fi capabilities are great, but the video transfer can take a bit of time due to how large the files may be. So, if you’re uploading the transfer, you may want to consider using the USB port instead. Also, the memory card slot is in an awkward place near the mount, so those with larger fingers may have trouble putting a card in there.
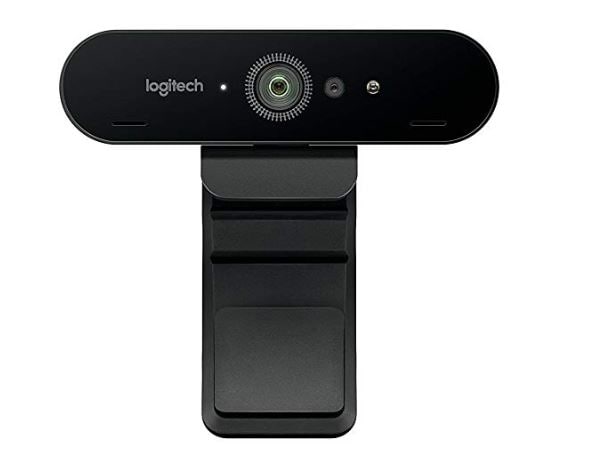
3. Logitech BRIO HD Webcam for Video – Best Video Recording and Streaming Camera
Specifications:
- 5x zoom
- Premium glass lens
- 4k image sensor for videoing and HDR with autofocus
- Light exposure automatically adjusts for whatever lighting that you’re filming in.
- Streaming and recording available.
- Enterprise ready for any use.
- Plug and play software automatically installs upon first use.
- Cover clip so you can cover the camera quickly, when needed.
Description: If you need an easy to use, simple to install option for filming and streaming from your computer, then this Logitech is the best camera for YouTube videos of this type. With multiple features and a design that has been made for streamers like you, you’ll always be able to just turn it on, make adjustments with ease, and get streaming in no time.
Pros: The camera is incredibly easy to use and install; it connects to your PC with a USB type C to USB type 3.0 cord (backwards compatible to 2.0). You can easily tinker with all of the settings and such in the included software.
Cons: The arm is designed for thick edges; those with flat monitors or borderless monitors may find that it’s difficult to attach it to your monitor. The software is easy to use, but it’s missing a handful of settings that more experienced streamers would want to have available. There is a crop out background feature, but it can be hard to find and use.
4. PANASONIC Lumix G7 4K Digital Camera - Best Mirrorless Camera for Professionals

Specifications:
- 16 megapixels
- No pass filter with four thirds sensor
- Wi-Fi capability
- 4k and HD video capture available at 30 frames per second.
- Aperture and shutter settings are adjusted via knobs, not menus.
- 3 inch tilt and swivel display
- High resolution viewfinder
Description: If you want to have professional looking photos and videos, the PANASONIC Lumix G7 4K is a solid choice for a mirrorless camera. All of the controls make it easy to get things the way that you want it, and it comes with multiple ports so that you can plug it into any device and get it ready to go.
Pros: This one of the best 4k video options out there, and you don’t need to spend an arm and a leg on it. The dual control dials and the variable touch LCD allow for maximum control, making it simple to film what you want with minimal editing after you’ve filmed.
Cons: There is a tracking focus, which can be good, but it makes the burst rate (which helps with motion blur) a lot slower. It does have a plastic build, rather than metal, so it’s not as heavy duty as other options. And, you need to purchase it with everything included, instead of just purchasing the body.
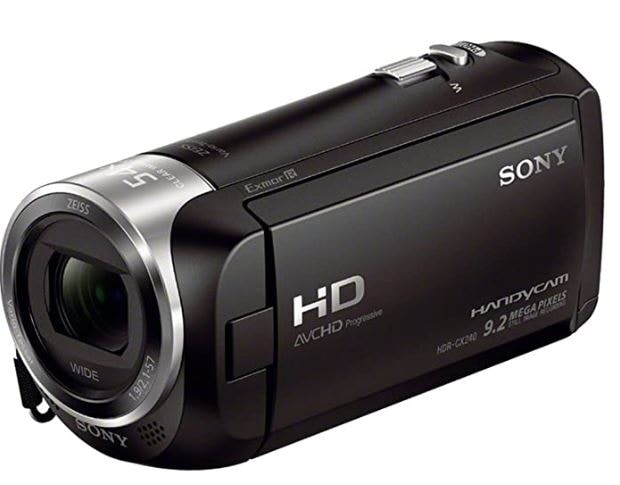
5. Sony CX405 Full HD - Best Camcorder (Only) for Video
Specifications:
- 60x clear image zoom with Zeiss Lens
- 50 Mbps XAVC
- MP4 and AVCHD codecs
- SteadyShot image stabilization
- Built-in USB cable
- Face detection and noise reduction
- 7 picture effects for video
Description: If you’re looking for the best cheap camera for YouTube, this is a pretty solid option. It has a Carl Zeiss lens (low light capable) and SteadyShot technology for stabilization. It’s the starter camera that beginners dream of due to its ease of use and affordability.
Pros: The image stabilization is some of the best out there, and it’s got a user friendly interface. Dual recording options make for great YouTube and other social media use. Lightweight makes it easy to take anywhere.
Cons: Connectivity ports are in strange spots, and can be hard to get to. You cannot add an external mic, so you have to use the on-board ones. After extensive use of the ports, the on-board USB cable may have some issues with connectivity over time.
6. DJI OSMO Handheld Gimbal – Best Easy to Use Holder for Camera Phone for Beginners
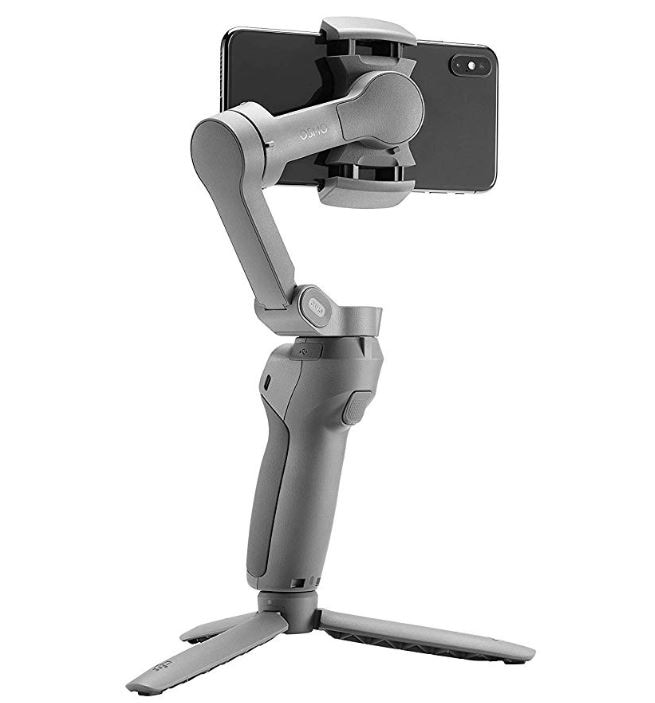
Specifications:
- 3 axis Gimbal that reduces shaky footage
- Ultra-responsive design reacts in real time.
- Easily folds up for maximum portability
- Battery operated ensures that you don’t always need a connection
- Comfortable grip allows you to use the gimbal without discomfort or pain.
Description: If your phone is currently the best camera for YouTube videos, then the DJI OSMO Handheld Gimbal makes it really easy for you to use it on the go. This has been designed to keep your camera flat, no matter where you’re moving, and it helps you take some pretty great shots. This is an option if you need freedom in your movement.
Pros: The DJI OSMO Handheld Gimbal is really easy to use and compatible with most mobile phones that are out there. With multiple settings and options, you can easily turn your phone into the very best option for getting footage, even if your regular video camera isn’t nearby.
Cons: Some people note that it doesn’t work with wide-screen mobile devices or “phablets” as they are called. Another complaint is that it can be difficult to get used the construction of the Gimbal, but that’s something that you can sort out with practice.
7. Canon Digital SLR Camera Kit – Best Cheap SLR Choice
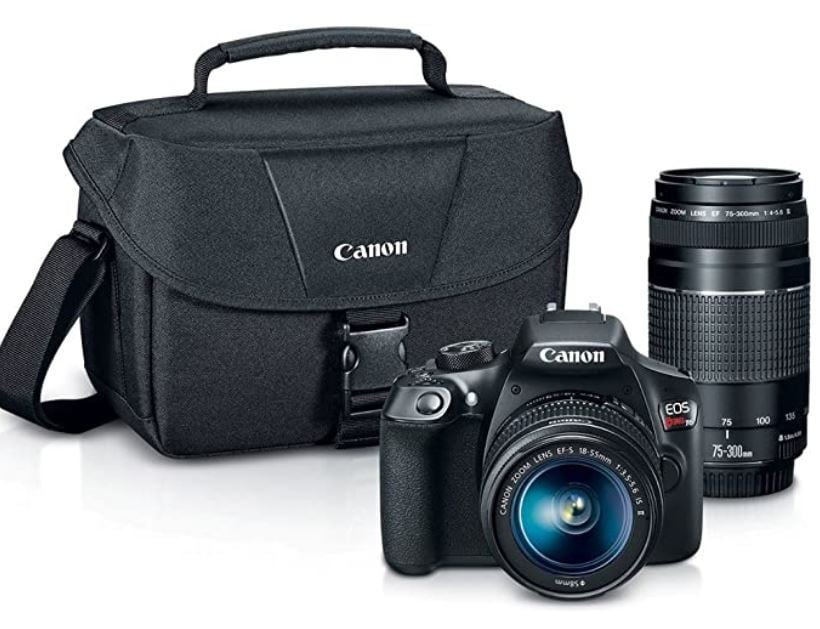
Specifications:
- Wi-Fi and NFC built in for ease of video and photo transfer
- 18 Megapixel
- Image sensor with an IS of 100 to 6400 (and the option to expand to 12800)
- Full HD videos with manual controls for focus and exposure
- 3 inch LCD monitor turns and adjusts as needed.
- Interchangeable lens, Bayonet mount for tripods and selfie sticks.
Description: The Canon Digital SLR Camera Kit is an all-in-one kit that makes it simple for you to start making videos right out of the bag. Complete with everything that you need in order to use an SLR well, you’ll find it’s quite simple to get the hang of, and that you have a lot of flexibility in how you use it.
Pros: The Canon Digital SLR Camera Kit has Wi-Fi capability, offers a great auto focus and is made from heavy duty materials. Plus, it can shoot stills, video, and rolls, which makes it really versatile for anyone.
Cons: This particular set doesn’t have Bluetooth with it, so you can’t connect a remote. Its lens is interchangeable, but you can only use Canon lenses and flashes with it, so that decreases the number of options you have here.
Want to know more about camera? Watch this!
What Gear Do Creators Actually Use | Vidcon 2023 | Sony vs Canon
Part 2: Frequently Asked Questions
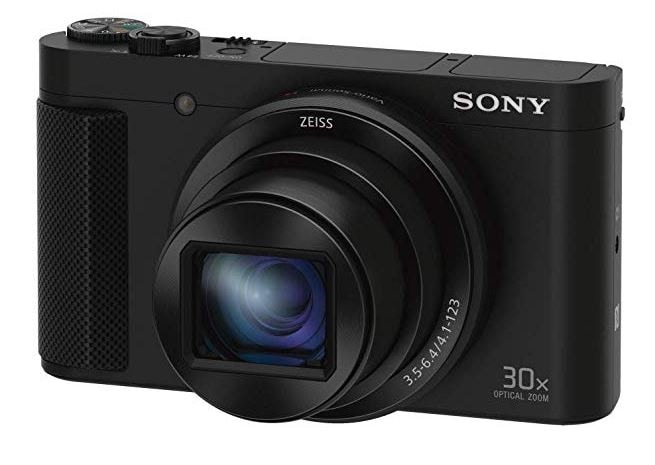
1. What is a good camera for YouTube beginners?
Sony DSCHX80/B Point & Shoot Camera is the best cheap camera for YouTube that you can find if you’re on any sort of budget. It has a 60x clear image zoom and incredibly versatile video with multiple viewfinder and autofocus options. It’s selfie ready with a multi-angle LCD display and you can customize your setting sin whatever way that you wish to do so. It also comes with pretty much anything that you need in the box, so you’re ready to start filming as soon as you charge it.
2. What equipment do you need to start a YouTube channel?
- A camera that meets all of your needs and purposes.
- A microphone that is easy to use and produces high quality audio options.
- A sturdy, reliable tripod that is compatible with your camera
- Lighting equipment for the space that you’re filming in.
- An idea as to what you’re going to do and how you’d like to proceed.
3. What software do YouTubers use to edit videos?
There are a number of different options that you can consider if you’re looking to edit your videos well. Here is a quick list of some of the top options that you’ll see them using alongside of the best cameras for YouTube
Beginners
- Filmora : A simple to download and use option which can create high-quality videos in just a few clicks.
- iMovie: Only for Macs, this is a simple to use, intuitively designed video editor has a lot of features, and comes pre-installed on most Macs.
- Adobe Rush: Adobe Rush is a simple to use, browser based, video editing program that is also available as a phone app.
Professional
- Adobe Premiere: One of the top programs out there for editing video, this is part of the Adobe series and has endless options and features.
- Final Cut Pro: A Mac-Only, high end video editing software, many people who use the best YouTube camera also use this.
Max Wales
Max Wales is a writer and a lover of all things video.
Follow @Max Wales
Max Wales
Mar 27, 2024• Proven solutions
Whether you’re a beginner or a pro as a YouTuber, your YouTube equipment shouldn’t be the thing that holds you back from becoming a YouTube star. But, how do you find the best camera for making YouTube videos? What options do you have?
In this article, we’re going to explore some of the best cameras for YouTube. We’ll label each one based on what we believe is best for particular uses, so that you can better parse what it is that you want to purchase. All of this is in hopes that you can find the video camera for YouTube that is right for you and what you need.
Part 1: 7 Best Best Camera for Youtube to Make Videos
1. Sony DSC WX350 Digital Camera – Best Point and Shoot Video Camera
Specifications:
- 40x clear image zoom; 20x optical zoom
- Lock-on Auto Focus
- Wi-Fi with NFC3 connectivity for mobile devices
- 4 megapixels
- CMOS sensor that provides top quality images, even in low lighting
- Motion shot video with up to 4k quality output
Description: Have you been looking for a 20x zoom camera that fits in your pocket ? Get the best pictures with the Sony DSC WX350. This camera offers both still photos and video recording, using technology that minimizes how much the camera shakes, even if you’re filming on the go.
Pros: The image stabilizer makes this one of the best cameras for making YouTube videos out there, alongside of the 20x optical zoom. The battery life is quite long as well, which means you can get a lot of content done without any problems. Lastly, you can film in HD, which makes any YouTube influencer happy.
Cons: The LED screen can be quite dim, so it’s hard to see it when you’re out in bright sunlight; be sure you make adjustments before you go outside. There is also not your typical viewfinder installed, so experienced videographers may not like using it.
2. GoPro HERO8 Action Camera - Best Wearable Sports Camera
Specifications:
- Up to 60 FPS
- 4k and HD capabilities
- HyperSmooth 2.0 stabilization options.
- Optional Battery Mod available.
- Integrated Mount
- Crisp, easy to use and navigate LCD.
Description: If you need an on-the-go video camera for YouTube, there’s nothing better than a GoPro. With their HERO series of GoPros, they have all sorts of great features that allow you to capture the smoothest video, even when you’re out and on the go. Their top end stabilization makes their cameras the best for the active YouTuber.
Pros: The rugged, waterproof design of the HERO7 is a great option for anyone who is looking to be on the go with their YouTube. The integrated mount makes it simple for anyone who wants to put it on a selfie stick or something else, and it even has a companion app for easy, on the go editing!
Cons: The Wi-Fi capabilities are great, but the video transfer can take a bit of time due to how large the files may be. So, if you’re uploading the transfer, you may want to consider using the USB port instead. Also, the memory card slot is in an awkward place near the mount, so those with larger fingers may have trouble putting a card in there.
3. Logitech BRIO HD Webcam for Video – Best Video Recording and Streaming Camera
Specifications:
- 5x zoom
- Premium glass lens
- 4k image sensor for videoing and HDR with autofocus
- Light exposure automatically adjusts for whatever lighting that you’re filming in.
- Streaming and recording available.
- Enterprise ready for any use.
- Plug and play software automatically installs upon first use.
- Cover clip so you can cover the camera quickly, when needed.
Description: If you need an easy to use, simple to install option for filming and streaming from your computer, then this Logitech is the best camera for YouTube videos of this type. With multiple features and a design that has been made for streamers like you, you’ll always be able to just turn it on, make adjustments with ease, and get streaming in no time.
Pros: The camera is incredibly easy to use and install; it connects to your PC with a USB type C to USB type 3.0 cord (backwards compatible to 2.0). You can easily tinker with all of the settings and such in the included software.
Cons: The arm is designed for thick edges; those with flat monitors or borderless monitors may find that it’s difficult to attach it to your monitor. The software is easy to use, but it’s missing a handful of settings that more experienced streamers would want to have available. There is a crop out background feature, but it can be hard to find and use.
4. PANASONIC Lumix G7 4K Digital Camera - Best Mirrorless Camera for Professionals
Specifications:
- 16 megapixels
- No pass filter with four thirds sensor
- Wi-Fi capability
- 4k and HD video capture available at 30 frames per second.
- Aperture and shutter settings are adjusted via knobs, not menus.
- 3 inch tilt and swivel display
- High resolution viewfinder
Description: If you want to have professional looking photos and videos, the PANASONIC Lumix G7 4K is a solid choice for a mirrorless camera. All of the controls make it easy to get things the way that you want it, and it comes with multiple ports so that you can plug it into any device and get it ready to go.
Pros: This one of the best 4k video options out there, and you don’t need to spend an arm and a leg on it. The dual control dials and the variable touch LCD allow for maximum control, making it simple to film what you want with minimal editing after you’ve filmed.
Cons: There is a tracking focus, which can be good, but it makes the burst rate (which helps with motion blur) a lot slower. It does have a plastic build, rather than metal, so it’s not as heavy duty as other options. And, you need to purchase it with everything included, instead of just purchasing the body.
5. Sony CX405 Full HD - Best Camcorder (Only) for Video
Specifications:
- 60x clear image zoom with Zeiss Lens
- 50 Mbps XAVC
- MP4 and AVCHD codecs
- SteadyShot image stabilization
- Built-in USB cable
- Face detection and noise reduction
- 7 picture effects for video
Description: If you’re looking for the best cheap camera for YouTube, this is a pretty solid option. It has a Carl Zeiss lens (low light capable) and SteadyShot technology for stabilization. It’s the starter camera that beginners dream of due to its ease of use and affordability.
Pros: The image stabilization is some of the best out there, and it’s got a user friendly interface. Dual recording options make for great YouTube and other social media use. Lightweight makes it easy to take anywhere.
Cons: Connectivity ports are in strange spots, and can be hard to get to. You cannot add an external mic, so you have to use the on-board ones. After extensive use of the ports, the on-board USB cable may have some issues with connectivity over time.
6. DJI OSMO Handheld Gimbal – Best Easy to Use Holder for Camera Phone for Beginners
Specifications:
- 3 axis Gimbal that reduces shaky footage
- Ultra-responsive design reacts in real time.
- Easily folds up for maximum portability
- Battery operated ensures that you don’t always need a connection
- Comfortable grip allows you to use the gimbal without discomfort or pain.
Description: If your phone is currently the best camera for YouTube videos, then the DJI OSMO Handheld Gimbal makes it really easy for you to use it on the go. This has been designed to keep your camera flat, no matter where you’re moving, and it helps you take some pretty great shots. This is an option if you need freedom in your movement.
Pros: The DJI OSMO Handheld Gimbal is really easy to use and compatible with most mobile phones that are out there. With multiple settings and options, you can easily turn your phone into the very best option for getting footage, even if your regular video camera isn’t nearby.
Cons: Some people note that it doesn’t work with wide-screen mobile devices or “phablets” as they are called. Another complaint is that it can be difficult to get used the construction of the Gimbal, but that’s something that you can sort out with practice.
7. Canon Digital SLR Camera Kit – Best Cheap SLR Choice
Specifications:
- Wi-Fi and NFC built in for ease of video and photo transfer
- 18 Megapixel
- Image sensor with an IS of 100 to 6400 (and the option to expand to 12800)
- Full HD videos with manual controls for focus and exposure
- 3 inch LCD monitor turns and adjusts as needed.
- Interchangeable lens, Bayonet mount for tripods and selfie sticks.
Description: The Canon Digital SLR Camera Kit is an all-in-one kit that makes it simple for you to start making videos right out of the bag. Complete with everything that you need in order to use an SLR well, you’ll find it’s quite simple to get the hang of, and that you have a lot of flexibility in how you use it.
Pros: The Canon Digital SLR Camera Kit has Wi-Fi capability, offers a great auto focus and is made from heavy duty materials. Plus, it can shoot stills, video, and rolls, which makes it really versatile for anyone.
Cons: This particular set doesn’t have Bluetooth with it, so you can’t connect a remote. Its lens is interchangeable, but you can only use Canon lenses and flashes with it, so that decreases the number of options you have here.
Want to know more about camera? Watch this!
What Gear Do Creators Actually Use | Vidcon 2023 | Sony vs Canon
Part 2: Frequently Asked Questions
1. What is a good camera for YouTube beginners?
Sony DSCHX80/B Point & Shoot Camera is the best cheap camera for YouTube that you can find if you’re on any sort of budget. It has a 60x clear image zoom and incredibly versatile video with multiple viewfinder and autofocus options. It’s selfie ready with a multi-angle LCD display and you can customize your setting sin whatever way that you wish to do so. It also comes with pretty much anything that you need in the box, so you’re ready to start filming as soon as you charge it.
2. What equipment do you need to start a YouTube channel?
- A camera that meets all of your needs and purposes.
- A microphone that is easy to use and produces high quality audio options.
- A sturdy, reliable tripod that is compatible with your camera
- Lighting equipment for the space that you’re filming in.
- An idea as to what you’re going to do and how you’d like to proceed.
3. What software do YouTubers use to edit videos?
There are a number of different options that you can consider if you’re looking to edit your videos well. Here is a quick list of some of the top options that you’ll see them using alongside of the best cameras for YouTube
Beginners
- Filmora : A simple to download and use option which can create high-quality videos in just a few clicks.
- iMovie: Only for Macs, this is a simple to use, intuitively designed video editor has a lot of features, and comes pre-installed on most Macs.
- Adobe Rush: Adobe Rush is a simple to use, browser based, video editing program that is also available as a phone app.
Professional
- Adobe Premiere: One of the top programs out there for editing video, this is part of the Adobe series and has endless options and features.
- Final Cut Pro: A Mac-Only, high end video editing software, many people who use the best YouTube camera also use this.
Max Wales
Max Wales is a writer and a lover of all things video.
Follow @Max Wales
Guide to Incorited Visuals in Text Without Cost
How to Add Video to Text

Liza Brown
Mar 27, 2024• Proven solutions
It may be challenging to capture the attention of your audience if the video openings or PowerPoint presentations contain too much text. Striking a perfect balance between the visual and textual elements isn’t always easy, especially if the text is the only way to convey essential information to the audience.
Luckily, video editing and presentation software products offer the tools you will need to combine video and text. In this article, we are going to show you how to add a video to text in PowerPoint and Filmora.
Part 1: How to Add Video to Text for Free with PowerPoint?
An effective PowerPoint presentation should contain proportionate amounts of textual and visual elements. Using too many images, videos or animations can make following a presentation difficult, just as too much text can render a presentation too static.
Adding videos to titles or subtitles you include in a slideshow you’re creating in PowerPoint can help you create a presentation that is both informative and visually entertaining. The process of combining videos with text in PowerPoint isn’t overly complicated, but you will still need to go through it several times in order to become familiar with it.
You should start by creating a new slide and adding a textbox to it. Proceed to type the word or phrase into the textbox and go on to format the text. Pick the font that matches the style of your presentation and make sure that the text size is large enough for the video to be visible.
Head over to the Insert tab, select Rectangle from the Shapes menu, and create a rectangular shape over the entire slide. Right-click on the slide and choose the Send to Back option from the menu. In this manner, you will position the rectangle you created behind the textbox.

The next step you will have to take is to create the cut-out of the text within the rectangle. Select both the text and shape you placed in the background before clicking on the Format tab that is located near the end of PowerPoint’s ribbon.
Find the Insert Shape option and choose Subtract from the Merge Shapes drop-down menu. The shape of the text in the textbox will be applied to the object in the background, which enables you to add a video to that text.

Click on the Insert tab, and then choose the Video option from the Media menu. You can insert a video that is stored on a local hard drive or the Internet to PowerPoint. The video will cover the entire slide, so you must right-click on it and select the Send to Back option.
You can then fine-tune the video playback settings from the Playback tab. Preview the results before you move on to the next slide in your presentation, and make necessary adjustments if you don’t like how the video merged with the text.
Part 2: Adding Video to Text in Filmora
Besides presentation software, you can also use video editing software products to add a video to text. Filmora lets you add a video to text in just a few simple steps. You can first make a text video with animation first, and then use the picture in picture feature to add the video to text. Here are the detailed information about how to add a video to text in Filmora.


You should start by creating a new project in Filmora and importing the video you want to add to the text into the project. Click on the Titles tab, and choose the title that matches the visual style of your project.

Set the preferred duration of the title by dragging one of its ends to the left or right after you place it on the timeline, and then double-click on it to customize it. Click on the Advanced button once the Text tab opens and insert the text into the Input Text box.

Proceed to select a font and adjust the text size before deciding if you want to animate the text . When done, you should export the title as a video file, and then import it back into your project.
Now it’s time to add the text video and the background video to the project media library, and then place the two videos one above the other. Since we’re adding video to text, the text video should be placed above the background video.

Click on the video that contains text to gain access to the Video tab of the Editor panel and then expand the Compositing menu. Change the Blending Mode to Multiply, and the text in the overlaying video should be filled with the parts of the footage from the video below it.
Optionally you can enhance the colors in the background video or adjust the size of the text before exporting your project from Filmora.
Conclusion
There are so many different ways to create visually striking content, and adding videos to text is just one among numerous techniques that enable you to make a PowerPoint presentation or an opening of a video more interesting to watch.
Merging text with video is equally easy in PowerPoint and Filmora, so you just have to choose which software better suits your needs and select the materials that fit the style of your project. Learning how to add a video to text won’t take too much of your time, as this process can be completed in just a few quick steps. Which software are you using to add a video to text? Leave a comment below and let us know.
Liza Brown
Liza Brown is a writer and a lover of all things video.
Follow @Liza Brown
Liza Brown
Mar 27, 2024• Proven solutions
It may be challenging to capture the attention of your audience if the video openings or PowerPoint presentations contain too much text. Striking a perfect balance between the visual and textual elements isn’t always easy, especially if the text is the only way to convey essential information to the audience.
Luckily, video editing and presentation software products offer the tools you will need to combine video and text. In this article, we are going to show you how to add a video to text in PowerPoint and Filmora.
Part 1: How to Add Video to Text for Free with PowerPoint?
An effective PowerPoint presentation should contain proportionate amounts of textual and visual elements. Using too many images, videos or animations can make following a presentation difficult, just as too much text can render a presentation too static.
Adding videos to titles or subtitles you include in a slideshow you’re creating in PowerPoint can help you create a presentation that is both informative and visually entertaining. The process of combining videos with text in PowerPoint isn’t overly complicated, but you will still need to go through it several times in order to become familiar with it.
You should start by creating a new slide and adding a textbox to it. Proceed to type the word or phrase into the textbox and go on to format the text. Pick the font that matches the style of your presentation and make sure that the text size is large enough for the video to be visible.
Head over to the Insert tab, select Rectangle from the Shapes menu, and create a rectangular shape over the entire slide. Right-click on the slide and choose the Send to Back option from the menu. In this manner, you will position the rectangle you created behind the textbox.
The next step you will have to take is to create the cut-out of the text within the rectangle. Select both the text and shape you placed in the background before clicking on the Format tab that is located near the end of PowerPoint’s ribbon.
Find the Insert Shape option and choose Subtract from the Merge Shapes drop-down menu. The shape of the text in the textbox will be applied to the object in the background, which enables you to add a video to that text.
Click on the Insert tab, and then choose the Video option from the Media menu. You can insert a video that is stored on a local hard drive or the Internet to PowerPoint. The video will cover the entire slide, so you must right-click on it and select the Send to Back option.
You can then fine-tune the video playback settings from the Playback tab. Preview the results before you move on to the next slide in your presentation, and make necessary adjustments if you don’t like how the video merged with the text.
Part 2: Adding Video to Text in Filmora
Besides presentation software, you can also use video editing software products to add a video to text. Filmora lets you add a video to text in just a few simple steps. You can first make a text video with animation first, and then use the picture in picture feature to add the video to text. Here are the detailed information about how to add a video to text in Filmora.
You should start by creating a new project in Filmora and importing the video you want to add to the text into the project. Click on the Titles tab, and choose the title that matches the visual style of your project.
Set the preferred duration of the title by dragging one of its ends to the left or right after you place it on the timeline, and then double-click on it to customize it. Click on the Advanced button once the Text tab opens and insert the text into the Input Text box.
Proceed to select a font and adjust the text size before deciding if you want to animate the text . When done, you should export the title as a video file, and then import it back into your project.
Now it’s time to add the text video and the background video to the project media library, and then place the two videos one above the other. Since we’re adding video to text, the text video should be placed above the background video.
Click on the video that contains text to gain access to the Video tab of the Editor panel and then expand the Compositing menu. Change the Blending Mode to Multiply, and the text in the overlaying video should be filled with the parts of the footage from the video below it.
Optionally you can enhance the colors in the background video or adjust the size of the text before exporting your project from Filmora.
Conclusion
There are so many different ways to create visually striking content, and adding videos to text is just one among numerous techniques that enable you to make a PowerPoint presentation or an opening of a video more interesting to watch.
Merging text with video is equally easy in PowerPoint and Filmora, so you just have to choose which software better suits your needs and select the materials that fit the style of your project. Learning how to add a video to text won’t take too much of your time, as this process can be completed in just a few quick steps. Which software are you using to add a video to text? Leave a comment below and let us know.
Liza Brown
Liza Brown is a writer and a lover of all things video.
Follow @Liza Brown
Also read:
- DIY GIF Making Transforming YouTube Videos Into Animated Forms
- Establishing an Individual Identity on YouTube Platform
- Streamline Your Shoots Top Lenses Recommended by Professionals
- [Updated] Brush Up Your Youtube Videos with Color Correction
- [New] City Planning for Climate Action A Comprehensive Guide
- [Updated] Breaking Personal Barriers in YT Content Creation
- [New] Directing Content Flow Uploading IMovie Films to YouTube
- Top 10 iOS & Android Beginner Video-Makers
- Efficiently Edit Your YouTube Videos Using Sony Vegas for 2024
- [Updated] Backwards Play Mastering YouTube Video Reversals
- Enhancing Watchability Adding Time Stamps to YouTube Videos
- Essential Elements for Implementing Channel Banners in Games for 2024
- Leapfrog Content Management From YouTube to Dailymotion Effortlessly
- Maximizing Your Creations Uploading IMovie Videos to YouTube
- How To Add Custom Thumbnails to Your YouTube Videos
- Channel Control Center Creator Studio Essentials for 2024
- The Essential Tutorial for Home-Grown Animation Magic
- [Updated] Do Paid Followers Impact Channel Popularity?
- Dial Back Your Playlist Quick Steps to Reverse Order
- 10 YouTube Havens for Entrepreneurs & Business Gurus for 2024
- ASMR Recommendations for Android Users
- Can Affordable View Count Gains Be Achieved Naturally for 2024
- Essential Steps to Apply a Creative Commons Copyright for 2024
- [New] Elevate Your Channels A Guide to YouTube Metrics
- Easy Ways to Make a Great Educational Video for YouTube
- [New] Content Creation Evolution Studio Vs. Innovative Beta
- [New] Boost Your Content Access Free Vocal SFX
- [New] Elevate Your Channel Techniques for Logo Insertion in Videos
- Keep It Real, Keep It Right Tips for Authentic Daily Videos
- Satire Skills Video Comedy Mastery Tips
- Rapid Rise to Stardom YouTube's Fastest to Reach 100+ Million Views
- In 2024, 15 Online Audio Haven Sites for Video Content Makers
- 2024 Approved Crafting Captivating Haul Vlogs for Online Fame
- The Ultimate Plan for Streaming Google Meet on YouTube
- [Updated] Best YouTube Names Generators [+ How to Brainstorm]
- Eluding YouTube Ban Protective Measures for 2024
- 2024 Approved Mastering Audio Mute on TikTok Quick and Easy Techniques
- [New] In 2024, Analyzing Instagram De-Followings
- [New] In 2024, The Great Livestream Showdown Streamlabs Vs. OBS Head-to-Head
- [Updated] In 2024, Master the Art of Sharing Funny GIFs Instagram's Latest Trend Explained in 4 Steps
- New Top-Rated HD Video Editing Tools for Professionals and Beginners for 2024
- [Updated] In 2024, Streamlined Screencasting with Top 10 Apps Reviewed
- Free Up Space Fast The Ultimate FCPX Storage Cleanup Guide for 2024
- 2024 Approved Top Converter Tools Download 4K Videos in MP4 Format with Ease
- [New] In 2024, Diverse IPTV Content Distribution
- In 2024, How To Activate and Use Life360 Ghost Mode On Motorola Moto G34 5G | Dr.fone
- 2024 Approved 5 Excellent Video Conference Devices for Professionals
- In 2024, 6 Proven Ways to Unlock Infinix Hot 40i Phone When You Forget the Password
- 2024 Approved Top Considerations for Picking a Reliable Video to Audio Conversion Tool
- Digital Discussion Documentary
- How to Change Your Xiaomi Redmi Note 12 Pro 4G Location on life360 Without Anyone Knowing? | Dr.fone
- [New] 2024 Approved How to Efficiently Capture Skype Meetings Across Windows and MacOS
- In 2024, The Essentials of Gameplay Saving A Complete Guide to Recording Minecraft on Mac
- Cutting-Edge Techniques for Captivate Content for 2024
- How To Transfer Data From iPhone SE (2022) To Other iPhone 15 devices? | Dr.fone
- Title: "2024 Approved Elevate Your Content Top-Rated Cameras for YouTubers"
- Author: Brian
- Created at : 2024-05-25 11:11:48
- Updated at : 2024-05-26 11:11:48
- Link: https://youtube-video-recordings.techidaily.com/2024-approved-elevate-your-content-top-rated-cameras-for-youtubers/
- License: This work is licensed under CC BY-NC-SA 4.0.
