
:max_bytes(150000):strip_icc()/amazon-prime-day-is-just-16-days-away---here-s-what-you-need-to-know-76d8205ed9e54da1ae0c0d0ec5d883e7)
"2024 Approved Effortless Strategy Deleting Dislikes From YouTube Discussions"
Effortless Strategy: Deleting Dislikes From YouTube Discussions
Deleting YouTube Comments

Richard Bennett
Mar 27, 2024• Proven solutions
YouTube is a video platform where people share informative and entertaining content. It works in the form of channels belonging to individuals or companies. People can subscribe to these channels to show support, and YouTubers create a strong sense of community with these subscribers.
But some people comment inappropriate comments that can cause the community harm and spread hatred. Many YouTubers may want to delete such remarks. There are also times when you accidentally comment on a channel’s comment section and may wish to delete it.
So how do you delete all YouTube comments? In this how-to blog, we will show you.
- Part 1: Deleting YouTube Comments from Desktop
- Part 2: Deleting All YouTube Comments from Mobile
- Part 3: How to Delete Your Comments from YouTube?
- part 4: Delete Other People’s Comments on Others’ Channels
- Part 5: Delete All Your Posted YouTube Comments
How to Delete YouTube Comments from Desktop?
In this section, we will tell you how you can do it from your desktop.
- Go tohttps://www.youtube.com/ from your desktop browser and log in.
- Once you log in, you need to go to your channel. For this, you can select the My Channel option from the upper-left side of your YouTube home page.
- From the list of your videos, select the one you need and scroll down to reach the comment you want to delete.
- When you locate the comment, click on the three vertical dots on the right-hand side of the comment. From the drop-down list, click on Remove. The process is complete, and YouTube will remove your comment.
You also have the option to report the comment or hide the user from your channel .
How to Delete All YouTube Comments from Mobile?
The steps to deleting someone else’s YouTube comments from your mobile are similar to those from your desktop.
- Log in to your account from the YouTube app on your phone.
- On the right-hand side of your YouTube homepage, there will be a profile icon. Tap on that, and from the list, select My Channel. This will direct you to all videos on your channel.
- Select the video from where you want to delete a comment. Scroll down to reach the desired comment.
- Once you reach the target comment, click on the three vertical dots at the bottom corner. There should be an option called Remove. Tap on it.
- This will create another dialog box on the mobile app where you have to click on Remove again to delete the comment.
How Do You Delete Your Comments from YouTube?
Have you accidentally posted something on a YouTuber’s channel? Are you anxious because you cannot find the comment and delete it?
Fear not. Read on to know how to delete all comments you posted on someone else’s YouTube channel from your desktop.
- Visithttps://www.youtube.com/ from your desktop and then sign in YouTube channel.
- If your YouTube account is not open, tap on Sign in and enter your email and password to log in to your account.
- Once there, you need to access your Comment History page. To do this, you can click on the three horizontal lines at the top left corner of your YouTube homepage. Click on History. On the page that opens, click Comments from the panel on the right. It will direct you to your Comment History page. You can also access the YouTube comment history fromhere .
- When you reach the Comment History page, you will be able to find all comments you have ever posted. Scroll down to the comment you want to delete.
- Click on the three vertical dots that you see beside the target comment. You will find a Delete option. Tap on it, and confirm that you want to delete the comment. That completes the process. No more embarrassing comments!
How Do You Delete Your Comments from Your Phone?
Don’t have a desktop handy? This section will tell you how you can delete your comments you posted on your or someone else’s YouTube video from your mobile.
- Go to the YouTube app on your phone. You will need to log in to your account to delete any comment you posted.
- When the login process is complete, you need to find the video where your target comment is.
If it is someone else’s video, you can search for it by clicking on the magnifying glass at the top of the homepage or check your YouTube History to find it. To access your History, you need to click on an option called Library at the bottom of the homepage. From there, you can find the History option.
If it is your video where the comment to be removed is, you can go to My Channel from the profile icon on the right-hand side of the YouTube app’s homepage.
- Once you locate the video, you need to find the comment you want to delete. On the YouTube app, you may need to scroll down for a while to do this.
- When you reach it, click on the three vertical dots at the bottom corner of your comment. You should see an option called Delete. Click on that. You need to confirm once more that you want to delete it, and the process will be complete.
Delete Other People’s Comments on Others’ Channels
Did you see a hate comment on your favorite creator’s video? Sadly, you cannot delete the comment. But, you can report it, and YouTube will hide or take it down.
You can do this both from your desktop or your phone with some easy steps.
How to report people’s comments on YouTube?
Go to https://www.youtube.com/ from your desktop or open the YouTube app from your phone. Log in to your account if it is not open.
- The next step is to find the video where the comment is. You can search for it by tapping on the search button at the top of the YouTube homepage. Or you can locate it from your YouTube History.
To find your History from your desktop, you need to click on the three horizontal lines at the top left corner of the homepage. You will find the History option from the list. To access it from your phone, click on the Library option at the bottom of your homepage, and it will open a list where you will find the History option.
- Open the video, and scroll down to locate the comment you want to report.
- Once you find your target comment, click on the three vertical dots that appear on its right side. You will find the Report option from the pop-up menu. Click on that.
- When you tap Report, another dialogue box will appear. From the list of options, choose the most appropriate option, tap on Report at the lower right corner of the pop-up, and complete the process. YouTube will do the rest.

How to Delete All Your Posted YouTube Comments?
You can also delete all comments you ever posted on any YouTube video by hiding your channel. When you do this, you can hide your video content temporarily. But it will irreversibly erase all your comments throughout YouTube. If you are curious, read on to know how you can do it.
- You need to go to YouTube from your desktop and sign in to your account.
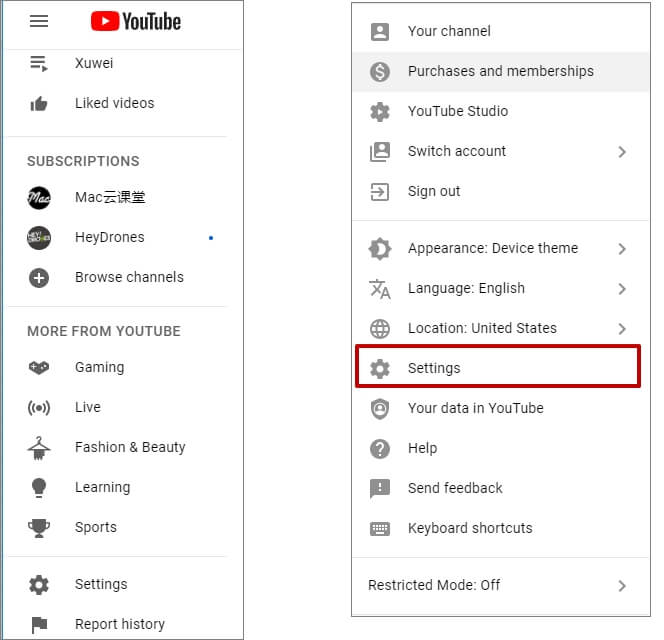
- Next, you can either click on the profile icon at the top right corner or the three horizontal lines beside the YouTube logo on your homepage. From the list of options, click Settings.
- YouTube will direct you to the Settings page of your account. Choose Advanced Settings from the list on your left. You can also access it fromhere .

- Scroll down and select Delete Channel. Clicking it will not delete your account. When you click on Delete Channel, you will get two choices – ‘I want to hide my channel’ and ‘I want to permanently delete my content’. Select the first.

- YouTube will now show you what will happen when you hide your channel. Check all the boxes to confirm that you understand, and then tap on Hide My Channel. YouTube will now delete all comments made by your account.
Final Thoughts
YouTube can be an unsafe place with unwanted comments everywhere. In this blog, we tried to show how you can get rid of comments on your and on others’ YouTube accounts. The next time you see an offensive comment or post something mistakenly, don’t forget to try our tips and make YouTube a safe platform again.
Richard Bennett
Richard Bennett is a writer and a lover of all things video.
Follow @Richard Bennett
Richard Bennett
Mar 27, 2024• Proven solutions
YouTube is a video platform where people share informative and entertaining content. It works in the form of channels belonging to individuals or companies. People can subscribe to these channels to show support, and YouTubers create a strong sense of community with these subscribers.
But some people comment inappropriate comments that can cause the community harm and spread hatred. Many YouTubers may want to delete such remarks. There are also times when you accidentally comment on a channel’s comment section and may wish to delete it.
So how do you delete all YouTube comments? In this how-to blog, we will show you.
- Part 1: Deleting YouTube Comments from Desktop
- Part 2: Deleting All YouTube Comments from Mobile
- Part 3: How to Delete Your Comments from YouTube?
- part 4: Delete Other People’s Comments on Others’ Channels
- Part 5: Delete All Your Posted YouTube Comments
How to Delete YouTube Comments from Desktop?
In this section, we will tell you how you can do it from your desktop.
- Go tohttps://www.youtube.com/ from your desktop browser and log in.
- Once you log in, you need to go to your channel. For this, you can select the My Channel option from the upper-left side of your YouTube home page.
- From the list of your videos, select the one you need and scroll down to reach the comment you want to delete.
- When you locate the comment, click on the three vertical dots on the right-hand side of the comment. From the drop-down list, click on Remove. The process is complete, and YouTube will remove your comment.
You also have the option to report the comment or hide the user from your channel .
How to Delete All YouTube Comments from Mobile?
The steps to deleting someone else’s YouTube comments from your mobile are similar to those from your desktop.
- Log in to your account from the YouTube app on your phone.
- On the right-hand side of your YouTube homepage, there will be a profile icon. Tap on that, and from the list, select My Channel. This will direct you to all videos on your channel.
- Select the video from where you want to delete a comment. Scroll down to reach the desired comment.
- Once you reach the target comment, click on the three vertical dots at the bottom corner. There should be an option called Remove. Tap on it.
- This will create another dialog box on the mobile app where you have to click on Remove again to delete the comment.
How Do You Delete Your Comments from YouTube?
Have you accidentally posted something on a YouTuber’s channel? Are you anxious because you cannot find the comment and delete it?
Fear not. Read on to know how to delete all comments you posted on someone else’s YouTube channel from your desktop.
- Visithttps://www.youtube.com/ from your desktop and then sign in YouTube channel.
- If your YouTube account is not open, tap on Sign in and enter your email and password to log in to your account.
- Once there, you need to access your Comment History page. To do this, you can click on the three horizontal lines at the top left corner of your YouTube homepage. Click on History. On the page that opens, click Comments from the panel on the right. It will direct you to your Comment History page. You can also access the YouTube comment history fromhere .
- When you reach the Comment History page, you will be able to find all comments you have ever posted. Scroll down to the comment you want to delete.
- Click on the three vertical dots that you see beside the target comment. You will find a Delete option. Tap on it, and confirm that you want to delete the comment. That completes the process. No more embarrassing comments!
How Do You Delete Your Comments from Your Phone?
Don’t have a desktop handy? This section will tell you how you can delete your comments you posted on your or someone else’s YouTube video from your mobile.
- Go to the YouTube app on your phone. You will need to log in to your account to delete any comment you posted.
- When the login process is complete, you need to find the video where your target comment is.
If it is someone else’s video, you can search for it by clicking on the magnifying glass at the top of the homepage or check your YouTube History to find it. To access your History, you need to click on an option called Library at the bottom of the homepage. From there, you can find the History option.
If it is your video where the comment to be removed is, you can go to My Channel from the profile icon on the right-hand side of the YouTube app’s homepage.
- Once you locate the video, you need to find the comment you want to delete. On the YouTube app, you may need to scroll down for a while to do this.
- When you reach it, click on the three vertical dots at the bottom corner of your comment. You should see an option called Delete. Click on that. You need to confirm once more that you want to delete it, and the process will be complete.
Delete Other People’s Comments on Others’ Channels
Did you see a hate comment on your favorite creator’s video? Sadly, you cannot delete the comment. But, you can report it, and YouTube will hide or take it down.
You can do this both from your desktop or your phone with some easy steps.
How to report people’s comments on YouTube?
Go to https://www.youtube.com/ from your desktop or open the YouTube app from your phone. Log in to your account if it is not open.
- The next step is to find the video where the comment is. You can search for it by tapping on the search button at the top of the YouTube homepage. Or you can locate it from your YouTube History.
To find your History from your desktop, you need to click on the three horizontal lines at the top left corner of the homepage. You will find the History option from the list. To access it from your phone, click on the Library option at the bottom of your homepage, and it will open a list where you will find the History option.
- Open the video, and scroll down to locate the comment you want to report.
- Once you find your target comment, click on the three vertical dots that appear on its right side. You will find the Report option from the pop-up menu. Click on that.
- When you tap Report, another dialogue box will appear. From the list of options, choose the most appropriate option, tap on Report at the lower right corner of the pop-up, and complete the process. YouTube will do the rest.
How to Delete All Your Posted YouTube Comments?
You can also delete all comments you ever posted on any YouTube video by hiding your channel. When you do this, you can hide your video content temporarily. But it will irreversibly erase all your comments throughout YouTube. If you are curious, read on to know how you can do it.
- You need to go to YouTube from your desktop and sign in to your account.
- Next, you can either click on the profile icon at the top right corner or the three horizontal lines beside the YouTube logo on your homepage. From the list of options, click Settings.
- YouTube will direct you to the Settings page of your account. Choose Advanced Settings from the list on your left. You can also access it fromhere .
- Scroll down and select Delete Channel. Clicking it will not delete your account. When you click on Delete Channel, you will get two choices – ‘I want to hide my channel’ and ‘I want to permanently delete my content’. Select the first.
- YouTube will now show you what will happen when you hide your channel. Check all the boxes to confirm that you understand, and then tap on Hide My Channel. YouTube will now delete all comments made by your account.
Final Thoughts
YouTube can be an unsafe place with unwanted comments everywhere. In this blog, we tried to show how you can get rid of comments on your and on others’ YouTube accounts. The next time you see an offensive comment or post something mistakenly, don’t forget to try our tips and make YouTube a safe platform again.
Richard Bennett
Richard Bennett is a writer and a lover of all things video.
Follow @Richard Bennett
Streamline Your Content on YouTube: A Detailed Tutorial
How To Upload Videos to YouTube [a Step-by-Step Guide]
Richard Bennett
Mar 27, 2024• Proven solutions
Want to learn how to upload videos to YouTube? Millions of people watch YouTube every day. Creating and posting YouTube videos can be a lot of fun, and if you get a lot of views and become popular you can also make money. YouTube videos are a creative way to connect with people all around the world.
These simple steps can assist you in learning how to upload YouTube videos from a desktop computer. You are going to Learn:
Edit YouTube with Powerful Video Editor
As a YouTuber, it is necessary to have an easy-to-use video editor, especially for beginners. Download Filmora for free and start your editing journey happily.


Part 1: Basic Rules You Need to Know Before Uploading
Clicking the ‘upload’ button is easy, but during the upload process, there are things you can do to help your video get views and maintain its quality. You should also keep an eye on the length and file size limits. The more basic things you need to consider carefully when you upload are the title, description, and tags of your video. These are part of what determines if and where your video comes up in people’s search results. There are also slightly more advanced video specs, like your video’s resolution, which will be helpful for you to understand as somebody who will be producing video content frequently. These sorts of specs will affect how long it takes your videos to upload and how much of the quality they maintain.
1. How Long Can my Video Be?
By default, your YouTube videos can only be 15 minutes long. You can post longer videos by going to the upload page and clicking on ‘Increase your Limit’ at the bottom. After you have followed the steps to verify your account you will be able to post videos that are a maximum of 11 hours long.
2. How Big a File Can I Upload?
Your file size was capped at 20GB, initially. If you follow the same steps for posting videos longer than 15 minutes then you can also increase your maximum file size to 128GB.
3. Other Basics
After you click the ‘upload’ button on YouTube you are taken to a page where you choose a category for your video and add a title, description, and tags. These are all important for getting hits so you should put some thought into them.
Title: Keep your title under 70 characters so none of it disappears into a ‘…’. The best titles make people curious or elicit an emotional response. Terms like ‘video’, ‘how-to’, and ‘tutorial’ are often typed into people’s searches so if they apply to your video it can help to put them in the title.
Description: A short synopsis of your video which includes your most important keyword. You have about three lines before your text is hidden by a ‘show more’ tab. If you are including the URL of your channel or other videos then you should make sure they are above the ‘show more’.
Tags: Use a lot of them. These are the keywords and terms people will be searching for when they find your video. YouTube will suggest some after you start adding. A quick way to find good keywords to use is to search for videos similar to yours and check out their tags. A while ago YouTube started hiding video tags by default but you can download a free, YouTube-certified, extension for Google Chrome which will allow you to see them from vidIQ.com.
4. Digging Deeper
To get your viewers to subscribe to your channel you will need to make sure your videos are not losing quality when you upload them. Here are some things to be aware of if you want your videos to look great on YouTube.
Resolution: the number of pixels in your image. For example when a video has a resolution of 1080p that means it has a grid of pixels that is 1920 x 1080. The more pixels you have the sharper your image.
Bitrate: Bitrate is a measurement of how compressed your file is, and the less compressed it is the more information there is per frame. Higher bitrates mean larger file sizes.
Your resolution and bitrate should complement each other. If you have a higher bitrate than is needed for your video’s resolution your file will be unnecessarily large. If your bitrate is too low for your resolution then you will not see the quality you expect.
YouTube has a list of recommended resolutions and bitrates at support.google.com/youtube/answer/1722171.
Aspect Ratio: the dimensions of your video, in terms of width and height. YouTube’s aspect ratio is 16:9, so your videos should also be 16:9. If they are not then you will get black bars on either side of your video after you upload it. The most common way that people end up with the wrong aspect ratio is by creating videos on their smartphones and holding them up and down instead of sideways.
Part 2: Steps to Upload Videos to YouTube
Uploading YouTube Video on Desktop:
1. Sign in to your YouTube account
2. Hit the upload button
3. Select your video type (Public, Private, Unlisted)
4. Manage the upload
5. Choose your thumbnail
Step 1: Sign in to your YouTube account
In order to upload videos to YouTube, the very first thing you need to do is sign in. The sign-in button is located at the top right corner of the YouTube homepage. If you have multiple accounts registered to one device, you will be asked to choose one to log in to.

Step 2: Hit the upload button
It is a simple step that you will have to follow right after you log in to YouTube. As soon as you enter YouTube, after using your Google account and password for login, you will find the upload button in the top right corner of the screen. Click on this button and it will take you to the dedicated upload page.
Step 3: Select your video type (Public, Private, Unlisted)
Choose your audience. If you wish to make your video available to everyone on YouTube, simply go to the privacy settings and choose the “Public” option from the drop-down menu.
If you do not want your video to be searchable, but still want to be able to easily share a link to it with your friends and family, choose the “Unlisted” option.
Those who wish to keep their video personal can choose the “Private” option from the drop-down menu. You can still share a private video with a limited number of people (as long as they have Google accounts).
The “Scheduled” option is available for choosing a future date and time to make the video available to viewers. Once you have selected your privacy level, simply upload your video from your device storage.

Step 4: Manage the upload
As soon as you have confirmed your video upload, you will find a progress bar on the screen. It will take some time depending on factors such as the resolution of the video and how long it is. In the meanwhile, you can write a title, description and add relevant tags for your video so that YouTube knows what search results to include it in and viewers can find it. Remember that YouTube is the second biggest search engine on the Internet, so take some time to optimize your keywords .
Step 5: Choose your thumbnail
Once your video uploading is complete, it is time to choose a creative thumbnail for your video. The system provides you with three options to choose from automatically, all of which will be screenshots from your video. It is usually better toupload your own custom thumbnail , as thumbnails are a very important factor in attracting viewers. Hit the “Done” button or use the “Publish” button to finalize your upload.
That’s how to upload a video on YouTube! Any questions?
Richard Bennett
Richard Bennett is a writer and a lover of all things video.
Follow @Richard Bennett
Richard Bennett
Mar 27, 2024• Proven solutions
Want to learn how to upload videos to YouTube? Millions of people watch YouTube every day. Creating and posting YouTube videos can be a lot of fun, and if you get a lot of views and become popular you can also make money. YouTube videos are a creative way to connect with people all around the world.
These simple steps can assist you in learning how to upload YouTube videos from a desktop computer. You are going to Learn:
Edit YouTube with Powerful Video Editor
As a YouTuber, it is necessary to have an easy-to-use video editor, especially for beginners. Download Filmora for free and start your editing journey happily.
Part 1: Basic Rules You Need to Know Before Uploading
Clicking the ‘upload’ button is easy, but during the upload process, there are things you can do to help your video get views and maintain its quality. You should also keep an eye on the length and file size limits. The more basic things you need to consider carefully when you upload are the title, description, and tags of your video. These are part of what determines if and where your video comes up in people’s search results. There are also slightly more advanced video specs, like your video’s resolution, which will be helpful for you to understand as somebody who will be producing video content frequently. These sorts of specs will affect how long it takes your videos to upload and how much of the quality they maintain.
1. How Long Can my Video Be?
By default, your YouTube videos can only be 15 minutes long. You can post longer videos by going to the upload page and clicking on ‘Increase your Limit’ at the bottom. After you have followed the steps to verify your account you will be able to post videos that are a maximum of 11 hours long.
2. How Big a File Can I Upload?
Your file size was capped at 20GB, initially. If you follow the same steps for posting videos longer than 15 minutes then you can also increase your maximum file size to 128GB.
3. Other Basics
After you click the ‘upload’ button on YouTube you are taken to a page where you choose a category for your video and add a title, description, and tags. These are all important for getting hits so you should put some thought into them.
Title: Keep your title under 70 characters so none of it disappears into a ‘…’. The best titles make people curious or elicit an emotional response. Terms like ‘video’, ‘how-to’, and ‘tutorial’ are often typed into people’s searches so if they apply to your video it can help to put them in the title.
Description: A short synopsis of your video which includes your most important keyword. You have about three lines before your text is hidden by a ‘show more’ tab. If you are including the URL of your channel or other videos then you should make sure they are above the ‘show more’.
Tags: Use a lot of them. These are the keywords and terms people will be searching for when they find your video. YouTube will suggest some after you start adding. A quick way to find good keywords to use is to search for videos similar to yours and check out their tags. A while ago YouTube started hiding video tags by default but you can download a free, YouTube-certified, extension for Google Chrome which will allow you to see them from vidIQ.com.
4. Digging Deeper
To get your viewers to subscribe to your channel you will need to make sure your videos are not losing quality when you upload them. Here are some things to be aware of if you want your videos to look great on YouTube.
Resolution: the number of pixels in your image. For example when a video has a resolution of 1080p that means it has a grid of pixels that is 1920 x 1080. The more pixels you have the sharper your image.
Bitrate: Bitrate is a measurement of how compressed your file is, and the less compressed it is the more information there is per frame. Higher bitrates mean larger file sizes.
Your resolution and bitrate should complement each other. If you have a higher bitrate than is needed for your video’s resolution your file will be unnecessarily large. If your bitrate is too low for your resolution then you will not see the quality you expect.
YouTube has a list of recommended resolutions and bitrates at support.google.com/youtube/answer/1722171.
Aspect Ratio: the dimensions of your video, in terms of width and height. YouTube’s aspect ratio is 16:9, so your videos should also be 16:9. If they are not then you will get black bars on either side of your video after you upload it. The most common way that people end up with the wrong aspect ratio is by creating videos on their smartphones and holding them up and down instead of sideways.
Part 2: Steps to Upload Videos to YouTube
Uploading YouTube Video on Desktop:
1. Sign in to your YouTube account
2. Hit the upload button
3. Select your video type (Public, Private, Unlisted)
4. Manage the upload
5. Choose your thumbnail
Step 1: Sign in to your YouTube account
In order to upload videos to YouTube, the very first thing you need to do is sign in. The sign-in button is located at the top right corner of the YouTube homepage. If you have multiple accounts registered to one device, you will be asked to choose one to log in to.
Step 2: Hit the upload button
It is a simple step that you will have to follow right after you log in to YouTube. As soon as you enter YouTube, after using your Google account and password for login, you will find the upload button in the top right corner of the screen. Click on this button and it will take you to the dedicated upload page.
Step 3: Select your video type (Public, Private, Unlisted)
Choose your audience. If you wish to make your video available to everyone on YouTube, simply go to the privacy settings and choose the “Public” option from the drop-down menu.
If you do not want your video to be searchable, but still want to be able to easily share a link to it with your friends and family, choose the “Unlisted” option.
Those who wish to keep their video personal can choose the “Private” option from the drop-down menu. You can still share a private video with a limited number of people (as long as they have Google accounts).
The “Scheduled” option is available for choosing a future date and time to make the video available to viewers. Once you have selected your privacy level, simply upload your video from your device storage.
Step 4: Manage the upload
As soon as you have confirmed your video upload, you will find a progress bar on the screen. It will take some time depending on factors such as the resolution of the video and how long it is. In the meanwhile, you can write a title, description and add relevant tags for your video so that YouTube knows what search results to include it in and viewers can find it. Remember that YouTube is the second biggest search engine on the Internet, so take some time to optimize your keywords .
Step 5: Choose your thumbnail
Once your video uploading is complete, it is time to choose a creative thumbnail for your video. The system provides you with three options to choose from automatically, all of which will be screenshots from your video. It is usually better toupload your own custom thumbnail , as thumbnails are a very important factor in attracting viewers. Hit the “Done” button or use the “Publish” button to finalize your upload.
That’s how to upload a video on YouTube! Any questions?
Richard Bennett
Richard Bennett is a writer and a lover of all things video.
Follow @Richard Bennett
Also read:
- 2024 Approved DIY Delights in Motion Personalized Animation Artistry
- The Ultimate Channel Growth Guide Top 5 Video Marketing Tactics Revealed
- Make Sense of iPhone Video Repetition Tech
- In 2024, Direct YouTube Tunes to MP3s Online & Offline Options
- Prime Video Editors for YouTube Enthusiasts
- Deciding on the Best Videography Camera Type DSLR or Mirrorless, In 2024
- Banter Bonanza The Funniest Content on the Internet for 2024
- [New] Blurring Identity Erasing Faces From Video Content
- 2024 Approved Charting a Successful Course in YouTube Keywords
- Multitask Mastery in Media Co-Watching Channels with Ease
- In 2024, Conquering the Digital Landscape Leveraging Multi-Platform Streaming
- The Fast Track to Fandom – YouTube's Viral Hits Jumping Past 100M in '24
- Alternative Classics New Filmmaking Titles to Love for 2024
- Essential List 10 Leading Online Video Length Reducers
- Top 10 Free YouTube Video Trimming Apps Reviewed
- Endless Creativity FREE YouTube Art Resources for 2024
- [Updated] Decoding YouTube's Algorithm The Role of Keyword Optimization
- 10 Key Tactics to Amplify Your YouTube Presence and Engagement
- [New] Countdown in Forward The Counterintuitive Playlist Method
- Annual Roundup Top No-Money Video Editing Software Reviewed
- 2024 Approved 10 Best Intro Maker Apps for iPhone and Android
- 2024 Approved Apple Media Access and Download YouTube Videos on iPhone/iPad
- YouTube Recommended Videos - Block the Videos I Don't Like
- Mastering the Download of Your YouTube Playlist Today
- [Updated] A Comprehensible Breakdown for YouTube Annotation and Card Implementation
- Channel Ownership & Revenue with 2024 YTP Plan
- In 2024, Convenient Techniques for Customizing Your Own Short Videos
- 2024 Approved Audio Amplified Today's Hits Backdropping YT Shorts
- 2024 Approved Detailed Guide YouTube's End Screens Explained
- Fluid Fusion Combining Videos for a Unified Youtube Presence
- Youngest Entrepreneur in Media Lands Fortune Peak
- [New] Delicious Ideas Top 30 Creative Recipe Show Titles
- Your Go-To List ASMR on Phone Platforms
- Rapid-Fire Success Strategies The Essential List of 20 Video Tips
- Your First Steps in Video Content Creation
- [Updated] Accessing Your Subscriber Details Directly
- Coordinating a Course Through Combined YouTube Watches for 2024
- Maximizing Streaming Is Sub4Sub Effective?
- How to Create a YouTube Auto-Subscribe Link
- Preventing Complete Loss of Visuals in YouTube Streaming
- The Frequency of Monetization on YouTube
- 2024 Approved Edu-Top Ten Inspiring Educational Content YT
- [Updated] Converting YouTube Videos Into Engaging GIFs on Devices
- 3 Ways to Export Contacts from Apple iPhone 7 Plus to Excel CSV & vCard Easily | Dr.fone
- In 2024, Secrets to Compelling Presentations PPT on Mobile & Desktop GMeet
- In 2024, The 10 Best Tools to Bypass iCloud Activation Lock On Apple iPhone X You Should Try Out
- Easy Fixes How To Recover Forgotten iCloud Password From your Apple iPhone 12 Pro Max
- In 2024, Top 5 Tracking Apps to Track Realme C51 without Them Knowing | Dr.fone
- [New] 2024 Approved The Ultimate How-To for Navigating Old Features on FB, Mobile/PC
- How to Change Location On Facebook Dating for your ZTE Blade A73 5G | Dr.fone
- Proven Cinematic Strategies for Video Editors
- How to Transfer Data After Switching From Gionee F3 Pro to Latest Samsung | Dr.fone
- [New] 2024 Approved The Insider's Guide Adding Borders in Instagram Footage
- How to Save TikTok Video in Gallery-3 Proven Ways [Android&iPhone] for 2024
- Simple Solutions to Fix Android SystemUI Has Stopped Error For Poco M6 Pro 4G | Dr.fone
- Updated The Art of Vertical Smartphone Techniques for Better Video for 2024
- [New] 2024 Approved Steps for Crafting Visually Stimulating FB Ad Content
- The Ultimate Guide to Your First Adobe Presenter Video
- PassFab iPhone 14 Pro Backup Unlocker Top 4 Alternatives
- Forecasting Facebook's Video Trajectory with a Focus on Brevity for 2024
- Simple and Effective Ways to Change Your Country on YouTube App Of your Realme GT Neo 5 | Dr.fone
- Can't open MOV files on HTC
- [New] In 2024, VideoCapture Analysis Hub
- Unbiased Reviews Finding the Most Suitable YouTube MP3 Downloader for 2024
- [Updated] Crafting Personalized Instagram Story Sections
- [New] Top Picks for the Ultimate Offline Game Experience on Android for 2024
- In 2024, Unlock Your Oppo Reno 11 5G Phone with Ease The 3 Best Lock Screen Removal Tools
- All Must-Knows to Use Fake GPS GO Location Spoofer On Realme V30 | Dr.fone
- In 2024, Top 10 Online Resources for Creating Eye-Catching Gaming Intros
- New 2024 Approved How to Discern and Assess the Best in the Business for Audio Post-Production Excellence
- [Updated] Mastering Quieter Recordings - Basic or Advanced Techniques
- Demystifying Pexels.com The Ultimate Resource for Photographers and Designers
- Title: "2024 Approved Effortless Strategy Deleting Dislikes From YouTube Discussions"
- Author: Brian
- Created at : 2024-05-25 11:11:14
- Updated at : 2024-05-26 11:11:14
- Link: https://youtube-video-recordings.techidaily.com/2024-approved-effortless-strategy-deleting-dislikes-from-youtube-discussions/
- License: This work is licensed under CC BY-NC-SA 4.0.
