:max_bytes(150000):strip_icc()/a-man-runs-in-the-hudson-river-park-at-sunset-in-new-york-city-624813952-583659073df78c6f6a5efd57.jpg)
"2024 Approved Detailed Guide Crafting Powerful Video Thumbnails for Content Marketing"
Detailed Guide: Crafting Powerful Video Thumbnails for Content Marketing
How to Make Video Thumbnails for YouTube

Richard Bennett
Oct 26, 2023• Proven solutions
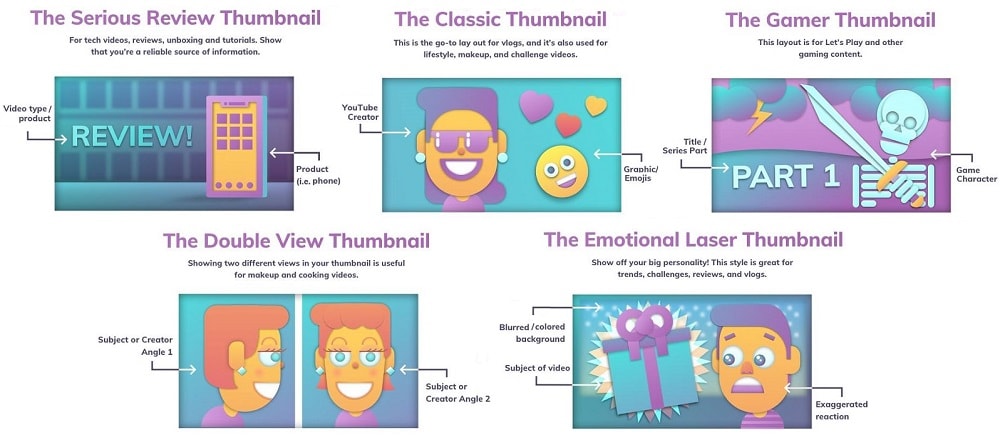
The video thumbnails you use for YouTube are vital to getting views and subscribers. There are a lot of things that go into making people watch your videos, but your video thumbnail might be the most important factor.
Here are 5 easy tips for creating thumbnails that get views.
- Have a Consistent Layout
- Use Your Face
- Use Graphics/Emojis That is On Topic
- Make Your Text Huge
- Keep It Clutter-Free!
Contest now closed.
Edit Your Videos Before Creating Video Thumbnails


1. Have a Consistent Layout
Your thumbnails all must look like part of the same set. You want viewers to recognize your videos like yours, and they are more likely to do that if you build up a standard layout that they can start associating with you.
An example of a standard layout could be you in the middle of the screen wearing an expression that matches the theme of your video, with your title written underneath your face. Every individual thumbnail would still be different, but you and the text would always be in the same spot.
2. Use Your Face
People feel automatically connected and drawn into images that make eye contact. This makes thumbnails which feature faces more click-able than thumbnails which don’t, in most genres (i.e. if you make food videos then this may not apply – featuring the food might be more important than featuring your face). Check out more tips like this here .
Also, if somebody recognizes you in your thumbnail from a previous video of yours, that will go a long way towards making them click.
3. Use Graphics/Emojis that are On Topic
Anybody can take a screenshot of themselves in their video and use it as a thumbnail. To make your thumbnails look polished, consider using small images (like emojis or hearts) to stand out. This will add color and personality to your thumbnail.
Make sure the images you choose are relevant to the topic of your video.
4. Make Your Text Huge
If you use text in your thumbnail (you don’t have to) then it should be to add context. For example, if the main image is just you smiling then you might need some text to let viewers know the video is a makeup tutorial.
Thumbnails might look large while you’re putting them together in your image editor, but when they’re displayed on YouTube they’re a lot smaller. That goes double if a viewer is watching on their phone. So, make sure that any text you use is large enough that it can be read easily on small screens.
5. Keep it Clutter-Free
It’s great to add text and emojis to your thumbnails, but you do need to be careful not to add too much. You never want your thumbnails to look cluttered. Viewers should be able to glance at your thumbnails and know exactly what kind of video to expect – that’s difficult to do if there’s too much to process.
A good rule for text is to use only 1-3 words. That way they won’t clutter your screen, and you can make them large enough to read on small-screened devices.
For even more tips on making great YouTube thumbnails, click here .
Use these tips to make video thumbnails for YouTube, and tell us what kind of results you get!
Richard Bennett
Richard Bennett is a writer and a lover of all things video.
Follow @Richard Bennett
Richard Bennett
Oct 26, 2023• Proven solutions
The video thumbnails you use for YouTube are vital to getting views and subscribers. There are a lot of things that go into making people watch your videos, but your video thumbnail might be the most important factor.
Here are 5 easy tips for creating thumbnails that get views.
- Have a Consistent Layout
- Use Your Face
- Use Graphics/Emojis That is On Topic
- Make Your Text Huge
- Keep It Clutter-Free!
Contest now closed.
Edit Your Videos Before Creating Video Thumbnails
1. Have a Consistent Layout
Your thumbnails all must look like part of the same set. You want viewers to recognize your videos like yours, and they are more likely to do that if you build up a standard layout that they can start associating with you.
An example of a standard layout could be you in the middle of the screen wearing an expression that matches the theme of your video, with your title written underneath your face. Every individual thumbnail would still be different, but you and the text would always be in the same spot.
2. Use Your Face
People feel automatically connected and drawn into images that make eye contact. This makes thumbnails which feature faces more click-able than thumbnails which don’t, in most genres (i.e. if you make food videos then this may not apply – featuring the food might be more important than featuring your face). Check out more tips like this here .
Also, if somebody recognizes you in your thumbnail from a previous video of yours, that will go a long way towards making them click.
3. Use Graphics/Emojis that are On Topic
Anybody can take a screenshot of themselves in their video and use it as a thumbnail. To make your thumbnails look polished, consider using small images (like emojis or hearts) to stand out. This will add color and personality to your thumbnail.
Make sure the images you choose are relevant to the topic of your video.
4. Make Your Text Huge
If you use text in your thumbnail (you don’t have to) then it should be to add context. For example, if the main image is just you smiling then you might need some text to let viewers know the video is a makeup tutorial.
Thumbnails might look large while you’re putting them together in your image editor, but when they’re displayed on YouTube they’re a lot smaller. That goes double if a viewer is watching on their phone. So, make sure that any text you use is large enough that it can be read easily on small screens.
5. Keep it Clutter-Free
It’s great to add text and emojis to your thumbnails, but you do need to be careful not to add too much. You never want your thumbnails to look cluttered. Viewers should be able to glance at your thumbnails and know exactly what kind of video to expect – that’s difficult to do if there’s too much to process.
A good rule for text is to use only 1-3 words. That way they won’t clutter your screen, and you can make them large enough to read on small-screened devices.
For even more tips on making great YouTube thumbnails, click here .
Use these tips to make video thumbnails for YouTube, and tell us what kind of results you get!
Richard Bennett
Richard Bennett is a writer and a lover of all things video.
Follow @Richard Bennett
YouTube Editing Tutorial: Mastering Video Cuts
YouTube Video Editor Guide and Review
Richard Bennett
Mar 27, 2024• Proven solutions
YouTube has had a video editor for a long time, but over time it has changed for the better. 2010 was when the first major overhaul happened, and since then more and more features have been added. There is still the question if the YouTube Video Editor is good, and if it replaces desktop editors. Hopefully, our YouTube Video Editor Review helps you figure out if you want to use the editor.
Want to make your YouTube video more attractive and beautiful? here I recommend an easy-to-use video editing software - Wondershare Filmora which not only allows you cut, crop, rotate, and split your videos in minutes, but also simplify the advanced video editing like green screen effect and PIP. You can also find over 300 video effects like Fashion, Beauty, Gaming, Education, etc.
YouTube Video Editor Review
Note: From 20th September 2017 users will no longer be able to use the complimentary editing suite. Check the best YouTube video editor alternatives from this complete guide.
In the early days of the YouTube Video Editor , all you could do was trim video clips, arrange the clips on a timeline, add in basic transitions, and add music. Now the YouTube video editor is able to add video effects to the video and create multiple projects at the same time. While the editor can do more, it has stayed a simple tool.
This simplicity makes it very easy and quick to use. Unlike desktop editors, the YouTube Editor processes much faster. Since the tool is designed to be easy to use, you can learn to use the YouTube Editor in very little time. However, due to its simplicity, it does not offer all the same features. Some of the features that are missing means that it is not suited for every project.
The Basic Features
1.The editor

The YouTube Video Editor does come with some standard video editing functions like video splicing, Audioswap, and cropping videos. The video editor needs to have the videos already uploaded to YouTube. Along with using your own videos, you have the option to use videos that are part of the Creative Commons library. There transitions, and other features that other standard video editors have. Audioswap is easy to use, and there is access to the Creative Commons library in the editor.
2. The Enhancements

The Enhancements that are included in the YouTube Video Editor are not the best tools, but they are still pretty good overall. Enhancements can be found by clicking on a video picture after it has been added to the project. Enhancements are broken into four categories: Quick Fixes, Filters, Text, and Audio. Quick fixes are basic adjustments for small issues like the contrast and saturation of the video. YouTube added an auto-fix button and stabilize video button to make it quick to fix these issues. The filters, text, and audio, are about the same that you would find with any other video editing software.
Related: Want to know how to use the Enhancements feature in YouTube? Check this tutorial to know more: How to use YouTube Enhancements.
Pros and Cons of the YouTube Video Editor
The Pros of the YouTube Editor are that is it is free and has a huge library of free video clips and music. It is also super easy to learn. If you have a Google+ account, you can photos to your video straight from your cloud storage. You also have access to all the videos that you have uploaded to YouTube. All the features are easy to use, and many can be dragged and dropped making editing easy. Google is still improving the YouTube Video Editor to have more features and run smoother.
Related: Want to know YouTube alternatives? Check this article to know more: YouTube Video Editor Alternatives
The major con for YouTube Video Editor is that it only has the basic video editing features at the moment. Another major con is that the video editor is fully online. This means that a refresh is needed to see the changes that you have made. After the refresh of the video, the video jumps back to the beginning of the video making it frustrating to edit the end of a video. There is also no real way of shortening music in the editor at the moment. Unlike many desk top video editors, you cannot overlap music or video clips. This means that some of the transitions are choppy.
The Bottom Line
Since Google is still working on the YouTube Video Editor, hopefully, most of kinks will be worked out soon. While the YouTube Video Editor is getting better, it is still have the most basic features. The easy to use nature of the editor may mean that it stays more of a simple to use video tool. This does make it easy to edit, and it’s good for most projects. Millions of people use this editor because it is so easy to use. However, more advanced projects are still going to need a desktop video editor. We are hoping to see more advanced features in the future.
Many YouTubers and everyday people like the YouTube Video Editor, for its ease of use and the quick video editing that it provides. However, if it is right for you, depends greatly on what you are trying to do. If you plan on doing any editing past cropping videos, adding type and transitions, and switching music, you are better off using a desktop video editor. Hopefully, this YouTube Video Editor Review helps you figure out if YouTube’s editor is the right one of your projects.
Richard Bennett
Richard Bennett is a writer and a lover of all things video.
Follow @Richard Bennett
Richard Bennett
Mar 27, 2024• Proven solutions
YouTube has had a video editor for a long time, but over time it has changed for the better. 2010 was when the first major overhaul happened, and since then more and more features have been added. There is still the question if the YouTube Video Editor is good, and if it replaces desktop editors. Hopefully, our YouTube Video Editor Review helps you figure out if you want to use the editor.
Want to make your YouTube video more attractive and beautiful? here I recommend an easy-to-use video editing software - Wondershare Filmora which not only allows you cut, crop, rotate, and split your videos in minutes, but also simplify the advanced video editing like green screen effect and PIP. You can also find over 300 video effects like Fashion, Beauty, Gaming, Education, etc.
YouTube Video Editor Review
Note: From 20th September 2017 users will no longer be able to use the complimentary editing suite. Check the best YouTube video editor alternatives from this complete guide.
In the early days of the YouTube Video Editor , all you could do was trim video clips, arrange the clips on a timeline, add in basic transitions, and add music. Now the YouTube video editor is able to add video effects to the video and create multiple projects at the same time. While the editor can do more, it has stayed a simple tool.
This simplicity makes it very easy and quick to use. Unlike desktop editors, the YouTube Editor processes much faster. Since the tool is designed to be easy to use, you can learn to use the YouTube Editor in very little time. However, due to its simplicity, it does not offer all the same features. Some of the features that are missing means that it is not suited for every project.
The Basic Features
1.The editor
The YouTube Video Editor does come with some standard video editing functions like video splicing, Audioswap, and cropping videos. The video editor needs to have the videos already uploaded to YouTube. Along with using your own videos, you have the option to use videos that are part of the Creative Commons library. There transitions, and other features that other standard video editors have. Audioswap is easy to use, and there is access to the Creative Commons library in the editor.
2. The Enhancements
The Enhancements that are included in the YouTube Video Editor are not the best tools, but they are still pretty good overall. Enhancements can be found by clicking on a video picture after it has been added to the project. Enhancements are broken into four categories: Quick Fixes, Filters, Text, and Audio. Quick fixes are basic adjustments for small issues like the contrast and saturation of the video. YouTube added an auto-fix button and stabilize video button to make it quick to fix these issues. The filters, text, and audio, are about the same that you would find with any other video editing software.
Related: Want to know how to use the Enhancements feature in YouTube? Check this tutorial to know more: How to use YouTube Enhancements.
Pros and Cons of the YouTube Video Editor
The Pros of the YouTube Editor are that is it is free and has a huge library of free video clips and music. It is also super easy to learn. If you have a Google+ account, you can photos to your video straight from your cloud storage. You also have access to all the videos that you have uploaded to YouTube. All the features are easy to use, and many can be dragged and dropped making editing easy. Google is still improving the YouTube Video Editor to have more features and run smoother.
Related: Want to know YouTube alternatives? Check this article to know more: YouTube Video Editor Alternatives
The major con for YouTube Video Editor is that it only has the basic video editing features at the moment. Another major con is that the video editor is fully online. This means that a refresh is needed to see the changes that you have made. After the refresh of the video, the video jumps back to the beginning of the video making it frustrating to edit the end of a video. There is also no real way of shortening music in the editor at the moment. Unlike many desk top video editors, you cannot overlap music or video clips. This means that some of the transitions are choppy.
The Bottom Line
Since Google is still working on the YouTube Video Editor, hopefully, most of kinks will be worked out soon. While the YouTube Video Editor is getting better, it is still have the most basic features. The easy to use nature of the editor may mean that it stays more of a simple to use video tool. This does make it easy to edit, and it’s good for most projects. Millions of people use this editor because it is so easy to use. However, more advanced projects are still going to need a desktop video editor. We are hoping to see more advanced features in the future.
Many YouTubers and everyday people like the YouTube Video Editor, for its ease of use and the quick video editing that it provides. However, if it is right for you, depends greatly on what you are trying to do. If you plan on doing any editing past cropping videos, adding type and transitions, and switching music, you are better off using a desktop video editor. Hopefully, this YouTube Video Editor Review helps you figure out if YouTube’s editor is the right one of your projects.
Richard Bennett
Richard Bennett is a writer and a lover of all things video.
Follow @Richard Bennett
Also read:
- [New] Pazera Unleashed A Deep Dive Into Audio Extractor Reviews of 2024
- [New] Seeking Optimal Video Player VLC Meets MX
- 2024 Approved Overcoming the Crashes in Windows 11'S Photos Application
- Easy Tutorial: Configuring Kodi for External Plug-Ins Installation on Matrix & Leia - User Privacy Secure
- Guide to Deactivating 'Sticky Keys' Functionality on Windows Systems
- How to Downgrade Apple iPhone 12 mini to an Older iOS System Version? | Dr.fone
- Instant Thumbnail Transformation Personalized YouTube Shorts in a Flash
- Intel's Ax201 Wi-Fi 6 Nonfunctional Resolved
- Mac Standard Mobile Eraser: Efficient Star-Quality File Deletion Solution
- Professional Video Fixing Tools by Grau GmbH: Complete Your Editing Workflow
- Smart Shoppers What to Evaluate for a 4K Lens for 2024
- Transforming Campfire Games: ChatGPT for Unforgettable RPG Experiences
- Title: 2024 Approved Detailed Guide Crafting Powerful Video Thumbnails for Content Marketing
- Author: Brian
- Created at : 2025-01-01 17:33:41
- Updated at : 2025-01-03 17:16:44
- Link: https://youtube-video-recordings.techidaily.com/2024-approved-detailed-guide-crafting-powerful-video-thumbnails-for-content-marketing/
- License: This work is licensed under CC BY-NC-SA 4.0.