
:max_bytes(150000):strip_icc()/how-to-fix-it-when-theres-no-sound-on-fire-stick-f248a020eb424349acc82c507c4e958e.jpg)
"2024 Approved Cutting Edge Advanced Techniques in YouTube Video Editing"
Cutting Edge: Advanced Techniques in YouTube Video Editing
How To Edit YouTube Videos

Richard Bennett
Oct 26, 2023• Proven solutions
YouTube videos have a certain look and feel that many viewers have come to expect and enjoy. Much of the aesthetics of YouTube videos developed as a result of the biggest YouTubers having to quickly and efficiently edit videos together on a daily basis. Below is our list of some of the most common video editing techniques used by famous YouTubers.
Part 1: Introduction
1. Start Big
“I’m doing something really exciting… within the first ten seconds of this video. That way you stay here.” – Liza Koshy (How To Be A YouTuber 101!! | Lizzza)
In the same way that a teaser or trailer builds anticipation for a full film, many YouTubers start with a preview of the most high-energy part of their video.
In Jake Paul’s prank vlog (above), Jake shows his brother, Logan, chasing and beating him up as Jake screams for help at the top of his lungs. The already high-energy scene is even more intensified by the epic music playing in the background. This seven-second clip, which resurfaces halfway through the video, is enough to entice many viewers to continue watching. It very effectively leaves enough room for viewers to wonder, “How did Logan’s room actually look in the end?” “What was Logan’s initial reaction before he started chasing Jake?” By creating curiosity gaps like these, you can incentivize your viewers to close these gaps by watching longer.
2. Opening Title Introduction
Just as TV episodes begin with opening credits and theme music, quite similarly, some YouTubers start their YouTube videos with an intro.
Greg from “How To Drink” has an effective twenty-second intro (above). In this video, he shows you who he is and what his videos are generally about. Since these two things don’t change so much for him from video to video, he can start many of his videos off with this same intro.
Below is a video tutorial about how to add text and titles to video in Filmora, hope that helps you in creating your own YouTube video texts and titles.


For more information on intros, check out our post on How to Make a YouTube Intro?
Part 2: Cuts
1. Jump Cut
A jump cut is a simple and straightforward type of video editing cutting technique that “jumps” from one section of a clip to a later section of a clip, cutting out whatever happened in the middle. Some of the middle parts you might want to remove may include mistakes, long silent pauses, and filler words (umm, like, etc.).
Although the use of jump cuts to remove these parts had been discouraged for a long time in the film world, its extensive use by so many YouTubers has established it as its own style that many viewers have come to expect and enjoy. The jumpiness that comes from jump cuts can be effective in keeping your audience’s attention in a shock-inducing manner.
Jump cuts can also be used to show a passage of time in a creative way or make objects magically appear on-screen.
Zack King (above) makes a toy taxi magically appear in his hands using this video editing technique. Filmora allows you to do jump cut easily, you can watch the tutorial below and learn more jump cut tips and tricks .
2. Associative Cut
Not everyone in your audience may recognize the cultural or historical references you make in your videos. It can, therefore, be helpful (and also quite enjoyable) to show the original clip of the reference you are making.
In the same vlog that Jake Paul gets chased down by his brother (above), twenty-eight seconds into the video, Jake expresses his desire to go fast in his car. Right after he says “I want to go fast,” Jake cuts into a scene from the movie Talladega Nights. In that scene, Ricky Bobby, Will Ferrell’s character, also says that he wants to go fast.

Part 3: Transform
1. Zoom
Many YouTubers digitally adjust the zoom of their talking head shots in order to create additional emphasis or suspense. When zoom is used very slowly and smoothly, this technique can be effective in building up suspense and drawing a viewer deeper into the speaker’s message. When a drastic zoom is used suddenly, it can be effective in emphasizing a particular spoken line.
RiceGum is one YouTuber who uses zoom video editing effects extensively in his talking head videos. Want to pan and zoom your video footage too? Check our guide to getting Ken Burns Effect on Videos .
2. Camera Shake
Camera shake is a video effect that makes the original clip appear like it was filmed during a violent earthquake. Many YouTubers use this effect to emphasize their voice when they are talking about something erratic or out of control.
3. Color/Level Adjustment
A lot of comedy YouTubers change the color and levels of their videos in order to emphasize different moods. One common thing YouTubers do when they talk about anything slightly sad is to gradually fade out the colors in their talking head shots. In a cheesy way, the black and white look can emphasize a feeling of emptiness. For his “sad” reactions, PewDiePie often jump cuts into a black and white, slowed down clip of his sad face while playing some sad music in the background. To emphasize a darker message, some YouTubers increase the amount of shadows in their video. In the video below, while his daughter is delivering a darker message from 0:32 to 0:50, La Guardia Cross gradually adds more shadows around his daughter’s face through what appears to be a vignette effect.
Part 4: Transitions
1. Wipe
Many YouTubers transition from one scene into the next using a wipe transition. In a wipe transition, the next clip that you want to transition into slides into the frame horizontally or vertically until it completely covers the first clip. For additional wiping effect, many YouTubers also use a fast, high pitched “woosh” sound effect with this transition.
2. Zoom
The zoom transition is quite similar to the wipe transition, except it uses a zoom effect. Many of the top YouTubers combine this transition with a lower-pitched “woosh” sound effect.
Part 5: Visual Elements
In other genres of film, the only appropriate visual elements filmmakers can tastefully add to their footage seem to be clean looking, seamlessly integrated text and motion graphics. YouTube, on the other hand, is another world with much more room to get outrageous. Many of the top YouTubers add a lot of visual elements (emojis , images, filters, explosions) to their videos to emphasize their jokes, play-on-words, historical or cultural references, and mood.
1. Call-To-Action Visuals
Whether they’re prompting you to subscribe, like, comment, or check out their purchasable merchandise, many YouTubers include visuals to strengthen their calls-to-action.
Part 6: Time Manipulation
1. Timelapse
“The staple of any Casey Neistat vlog is the timelapse, which he uses both to further the narrative or set the time of day.” -@omgurheadsgone
A lot of cameras now come with a timelapse/hyperlapse function, requiring no further video editing. To achieve the kind of timelapses that Casey Neistat makes, though, you’ll have to film real-time footage and then manipulate the speed of it in post. Since sped up ambient sound is hardly ever pleasing to the ear, a lot of YouTubers replace the audio with music that enhances the mood of the timelapse.
2. Slow Motion
Slowing down footage is another way YouTubers like to manipulate the passage of time. This technique can draw the audience’s attention into the intricacies of a movement captured on film. But if you stretch your video clip digitally in order to achieve this look, your video may not look so smooth – your software will need to create extra frames of footage based on your existing footage. The solution around this problem is to make sure to record your video at a very high frame rate.

Part 7: Audio
1. Censor
The traditional practice for censoring out explicit language in television has been to replace profanity with a high pitched “bleep” sound effect . YouTubers, however, have popularized the use of animal sound effects to censor out explicit language. Epic Meal Time frequently uses the “caw” of a crow for this purpose.
2. Sound Effects
Whether it is pouring water into a cup or drinking a glass of water, adding louder sound effects can enhance your viewer’s experience of the action that is taking place on camera.
3. Background Music
Music is very effective in helping people feel all kinds of emotions. It is no wonder so many of the top YouTubers make gratuitous use of music in their videos. Some even add background music to every single clip of their entire YouTube video and only drop the music when the following technique (below) is used.
4. Muting Background Music
A lot of YouTubers who talk over background music abruptly mute the music when they want their audience to focus their attention on whatever it is that they have to say at that very moment. Isolating one’s speech in this way can be a very effective way to emphasize something serious or emphasize a punchline to a joke.
5. Voice-Over
Adding additional recorded verbal commentary is another technique used by many of the top YouTubers. This technique can be helpful when the visuals of your footage do not sufficiently communicate the full message you want to get across to your audience.
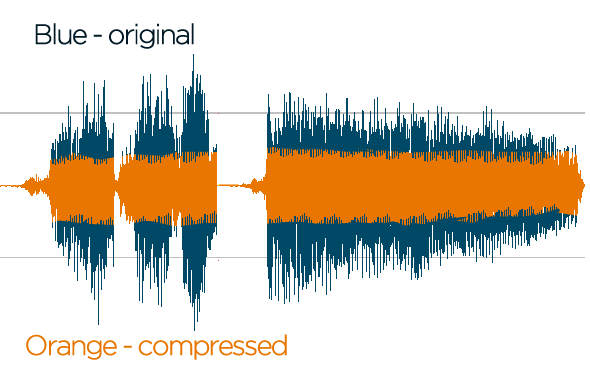
6. Compressor
A lot of video editing software programs give you the option to add compression to your video’s audio. Compression lessens the dynamic range between the softest and loudest parts of your audio. This technique can help your speech sound more uniform in volume.
For those who want to make their YouTube videos better, I recommend Wondershare Filmora for editing YouTube videos . Filmora video editor allows you to create and edit a YouTube video easily with plentiful templates and effects pre-programmed.
Richard Bennett
Richard Bennett is a writer and a lover of all things video.
Follow @Richard Bennett
Richard Bennett
Oct 26, 2023• Proven solutions
YouTube videos have a certain look and feel that many viewers have come to expect and enjoy. Much of the aesthetics of YouTube videos developed as a result of the biggest YouTubers having to quickly and efficiently edit videos together on a daily basis. Below is our list of some of the most common video editing techniques used by famous YouTubers.
Part 1: Introduction
1. Start Big
“I’m doing something really exciting… within the first ten seconds of this video. That way you stay here.” – Liza Koshy (How To Be A YouTuber 101!! | Lizzza)
In the same way that a teaser or trailer builds anticipation for a full film, many YouTubers start with a preview of the most high-energy part of their video.
In Jake Paul’s prank vlog (above), Jake shows his brother, Logan, chasing and beating him up as Jake screams for help at the top of his lungs. The already high-energy scene is even more intensified by the epic music playing in the background. This seven-second clip, which resurfaces halfway through the video, is enough to entice many viewers to continue watching. It very effectively leaves enough room for viewers to wonder, “How did Logan’s room actually look in the end?” “What was Logan’s initial reaction before he started chasing Jake?” By creating curiosity gaps like these, you can incentivize your viewers to close these gaps by watching longer.
2. Opening Title Introduction
Just as TV episodes begin with opening credits and theme music, quite similarly, some YouTubers start their YouTube videos with an intro.
Greg from “How To Drink” has an effective twenty-second intro (above). In this video, he shows you who he is and what his videos are generally about. Since these two things don’t change so much for him from video to video, he can start many of his videos off with this same intro.
Below is a video tutorial about how to add text and titles to video in Filmora, hope that helps you in creating your own YouTube video texts and titles.
For more information on intros, check out our post on How to Make a YouTube Intro?
Part 2: Cuts
1. Jump Cut
A jump cut is a simple and straightforward type of video editing cutting technique that “jumps” from one section of a clip to a later section of a clip, cutting out whatever happened in the middle. Some of the middle parts you might want to remove may include mistakes, long silent pauses, and filler words (umm, like, etc.).
Although the use of jump cuts to remove these parts had been discouraged for a long time in the film world, its extensive use by so many YouTubers has established it as its own style that many viewers have come to expect and enjoy. The jumpiness that comes from jump cuts can be effective in keeping your audience’s attention in a shock-inducing manner.
Jump cuts can also be used to show a passage of time in a creative way or make objects magically appear on-screen.
Zack King (above) makes a toy taxi magically appear in his hands using this video editing technique. Filmora allows you to do jump cut easily, you can watch the tutorial below and learn more jump cut tips and tricks .
2. Associative Cut
Not everyone in your audience may recognize the cultural or historical references you make in your videos. It can, therefore, be helpful (and also quite enjoyable) to show the original clip of the reference you are making.
In the same vlog that Jake Paul gets chased down by his brother (above), twenty-eight seconds into the video, Jake expresses his desire to go fast in his car. Right after he says “I want to go fast,” Jake cuts into a scene from the movie Talladega Nights. In that scene, Ricky Bobby, Will Ferrell’s character, also says that he wants to go fast.
Part 3: Transform
1. Zoom
Many YouTubers digitally adjust the zoom of their talking head shots in order to create additional emphasis or suspense. When zoom is used very slowly and smoothly, this technique can be effective in building up suspense and drawing a viewer deeper into the speaker’s message. When a drastic zoom is used suddenly, it can be effective in emphasizing a particular spoken line.
RiceGum is one YouTuber who uses zoom video editing effects extensively in his talking head videos. Want to pan and zoom your video footage too? Check our guide to getting Ken Burns Effect on Videos .
2. Camera Shake
Camera shake is a video effect that makes the original clip appear like it was filmed during a violent earthquake. Many YouTubers use this effect to emphasize their voice when they are talking about something erratic or out of control.
3. Color/Level Adjustment
A lot of comedy YouTubers change the color and levels of their videos in order to emphasize different moods. One common thing YouTubers do when they talk about anything slightly sad is to gradually fade out the colors in their talking head shots. In a cheesy way, the black and white look can emphasize a feeling of emptiness. For his “sad” reactions, PewDiePie often jump cuts into a black and white, slowed down clip of his sad face while playing some sad music in the background. To emphasize a darker message, some YouTubers increase the amount of shadows in their video. In the video below, while his daughter is delivering a darker message from 0:32 to 0:50, La Guardia Cross gradually adds more shadows around his daughter’s face through what appears to be a vignette effect.
Part 4: Transitions
1. Wipe
Many YouTubers transition from one scene into the next using a wipe transition. In a wipe transition, the next clip that you want to transition into slides into the frame horizontally or vertically until it completely covers the first clip. For additional wiping effect, many YouTubers also use a fast, high pitched “woosh” sound effect with this transition.
2. Zoom
The zoom transition is quite similar to the wipe transition, except it uses a zoom effect. Many of the top YouTubers combine this transition with a lower-pitched “woosh” sound effect.
Part 5: Visual Elements
In other genres of film, the only appropriate visual elements filmmakers can tastefully add to their footage seem to be clean looking, seamlessly integrated text and motion graphics. YouTube, on the other hand, is another world with much more room to get outrageous. Many of the top YouTubers add a lot of visual elements (emojis , images, filters, explosions) to their videos to emphasize their jokes, play-on-words, historical or cultural references, and mood.
1. Call-To-Action Visuals
Whether they’re prompting you to subscribe, like, comment, or check out their purchasable merchandise, many YouTubers include visuals to strengthen their calls-to-action.
Part 6: Time Manipulation
1. Timelapse
“The staple of any Casey Neistat vlog is the timelapse, which he uses both to further the narrative or set the time of day.” -@omgurheadsgone
A lot of cameras now come with a timelapse/hyperlapse function, requiring no further video editing. To achieve the kind of timelapses that Casey Neistat makes, though, you’ll have to film real-time footage and then manipulate the speed of it in post. Since sped up ambient sound is hardly ever pleasing to the ear, a lot of YouTubers replace the audio with music that enhances the mood of the timelapse.
2. Slow Motion
Slowing down footage is another way YouTubers like to manipulate the passage of time. This technique can draw the audience’s attention into the intricacies of a movement captured on film. But if you stretch your video clip digitally in order to achieve this look, your video may not look so smooth – your software will need to create extra frames of footage based on your existing footage. The solution around this problem is to make sure to record your video at a very high frame rate.
Part 7: Audio
1. Censor
The traditional practice for censoring out explicit language in television has been to replace profanity with a high pitched “bleep” sound effect . YouTubers, however, have popularized the use of animal sound effects to censor out explicit language. Epic Meal Time frequently uses the “caw” of a crow for this purpose.
2. Sound Effects
Whether it is pouring water into a cup or drinking a glass of water, adding louder sound effects can enhance your viewer’s experience of the action that is taking place on camera.
3. Background Music
Music is very effective in helping people feel all kinds of emotions. It is no wonder so many of the top YouTubers make gratuitous use of music in their videos. Some even add background music to every single clip of their entire YouTube video and only drop the music when the following technique (below) is used.
4. Muting Background Music
A lot of YouTubers who talk over background music abruptly mute the music when they want their audience to focus their attention on whatever it is that they have to say at that very moment. Isolating one’s speech in this way can be a very effective way to emphasize something serious or emphasize a punchline to a joke.
5. Voice-Over
Adding additional recorded verbal commentary is another technique used by many of the top YouTubers. This technique can be helpful when the visuals of your footage do not sufficiently communicate the full message you want to get across to your audience.
6. Compressor
A lot of video editing software programs give you the option to add compression to your video’s audio. Compression lessens the dynamic range between the softest and loudest parts of your audio. This technique can help your speech sound more uniform in volume.
For those who want to make their YouTube videos better, I recommend Wondershare Filmora for editing YouTube videos . Filmora video editor allows you to create and edit a YouTube video easily with plentiful templates and effects pre-programmed.
Richard Bennett
Richard Bennett is a writer and a lover of all things video.
Follow @Richard Bennett
Achieving Profit Through YouTube: Sourav Joshi’s Guide
YouTubers don’t only create fun vlogs, but they generate serious income from it, too. One such YouTuber is Sourav Joshi - quite popular in his niche.
If you’re curious about Sourav Joshi vlog income, this blog is the right place to get this secret information. From biography to monthly income to popular videos, you’re going to learn almost everything about Sourav and his YouTube channel.
And if you’re into producing content for YouTube, read on to find bonus tips.
Part 1: Who is Sourav Joshi?

An Indian YouTuber, Sourav started his first channel “Sourav Joshi Arts” on the Platform in September, 2015. You can find drawings of famous people, including Abraham Lincoln on his arts channel.
Later in February, 2019, Sourav started his vlogging channel “Sourav Joshi Vlogs.” And no doubt, he has been successful in his journey and has established himself as a popular YouTuber.
Sourav Joshi Biography
| Name | Sourav Joshi |
|---|---|
| Real Name | Sourav Joshi |
| Net Worth (2022) | $1 Million |
| Monthly Income & Salary | $30,000 - 45,000 |
| Yearly Income | Rs. 2.5 - 3 Crore |
| Age | 22 years |
| Gender | Male |
| Nationality | Indian |
| Height | 5 feet 7 inche |
| Profession | YouTuber, Content Creator |
| YouTube Channel | Sourav Joshi ArtsSourav Joshi Vlogs |
| Awards & Recognition | Silver & Gold Play Button |
Being creative and unique can help you go big on YouTube. With his art videos and fun vlogs, Saurav has proved it, too. Let’s explore how much Saurav Joshi earn from YouTube.
Part 2: Sourav Joshi YouTube Earnings and Stats
Now that you know who Sourav Joshi is and what he does to earn dollars from YouTube, see how YouTube calculates income.
Sourav Joshi YouTube Income
As an established YouTuber, Sourav makes money from affiliate marketing, sponsorships, paid partnerships, and Google AdSense.
Want to know Sourav Joshi’s income from YouTube? He’s known to earn $30,000 to $45,000 monthly, and has a current net worth, $1 million.
Sourav receives 320-350 million views monthly on his two YouTube videos that helped him elevate his net worth.
Sourav Joshi YouTube Stats
| Monthly Earnings | Rs. 35-50 lakh, $30,000 to $45,000 |
|---|---|
| Yearly Earnings | Rs. 2.5 - 3 Crore |
| Total Video Uploads | Sourav Joshi Vlogs - 1K VideosSourav Joshi Arts - 676 Videos |
| Subscribers | Sourav Joshi Vlogs - 17.2MSourav Joshi Arts - 3.75M |
| Video Views | Sourav Joshi Vlogs - 6,378,282,781Sourav Joshi Arts - 177,342,864 |
| Last 30-Day Views | Sourav Joshi Vlogs - 316.365M |
How Famous Sourav Joshi is?
The views on his videos show him as a popular Indian YouTuber. Not only this, he has made a record of 100 days 100 trending videos on the platform.
Sourav’s channel was the fastest growing one during the Covid-19 lockdown. Even his Instagram bio says “Most subscribed vlogger of India.”
The vlogger enjoys 3.7M followers on Instagram.
Part 3: Why is Sourav Joshi Trending on YouTube?
With two successful channels, net worth in million, luxury cars, and collaboration with music albums, Sourav is a well-known YouTuber among kids and adults.
The reasons for his success and popularity are:
Exclusive Personality

It’s no secret that with dedication and hard work Sourav has managed to create himself a successful YouTuber.
He also gives off humble vibes. Looking at his content, you’ll see and feel adoration he has for his brother and cousin brother. He seems like a genuine and fun guy, too.
Engaging and Interactive Content

Since he’s got two channels, both are great in terms of content. On his art channel, he’s drawn images of known people, such as Bollywood actor Tiger Shroff, Indian Cricketer MS Dhoni, and many more.
More so, on his vlog channel, he created daily-life vlogs which most people can relate to. From travel videos to surprises for family, you can see enjoyable content on Sourav’s vlog channel.
Most Viewed Vlogs/Videos
As an artist, Sourav has created some stunning portraits of popular people. But one video where he drew hair got the most views.

His “How I Draw Hairs | Step by Step” got around 13,353, 361 views.
How I Draw Hairs | Step by step
In this 8-minute video clip, you can see him draw hair with absolute perfection, making the final product look 100% realistic.

During the lockdown, Sourav vlogs got massive popularity. One such vlog was “Golgappa CHALLENGE WITH PIYUSH.”
Golgappa CHALLENGE WITH PIYUSH 馃槏馃構
This 13-minute vlog was fun, and viewers can see Sourav enjoying with his younger brother, too.

People love watching vlogs, especially when they’re relatable to their personal lives. Many viewers can relate to “Highway Pe Faas Gye” vlog while enjoying it.
Highway Pe Faas Gye 馃槄 Popat Hi Popat
This is one of the most-viewed vlogs by Sourav with 23,431,594 views.
Pro Tips: How to be a YouTuber and Make Videos Like Sourav Joshi
A fun 11-minute video requires a lot of efforts, including top-tier video editing. If you’re impressed with the work of Sourav, try Filmora to edit your next video.
Wondershare Filmora is an intuitive software that offers a series of features and templates, so you can edit and make your videos impressive, following only a few simple steps which can help you do the right job.
Step1 Import your Footage

The first step is to click on “import” to access the folder where you can browse the video clips you need to edit.
Step2 Drag your Footage to Timeline

Drag and drop your files from the media library to be used as the background in the first round. Then, drag and drop another video to be used on the top of that background in the second round.
Step3 Work on Speed and Duration Settings

In the duration settings, you can adjust the video duration. If there’s need for adding more video clips together, repeat the same process on several tracks, sharing the same frame.
Step4 Fix Size and Positioning of your Video

For this step, you can use editing interface, so you can work on your video’s position. Drag the sliders to the interface and change the size, position, and direction of your footage.
Step5 See Advance Editing Option
When it comes to making a video 10x impressive, use Filmora’s advance editing sounds like a great move.
Simply access the editing panel by double-clicking the video. After this, you can perform the following:
Motion effects

Adjustment of video tone

Color correction of the video

Options for audio

Apply masks to your video, they feature different shape and positions, so adjust them accordingly.

Step6 Use More Features from Library
The software comes with a vast library packed with stunning effects, elements, transitions, and stock video. Don’t hesitate to use them and make your video more visually interesting.
Effects

Find “effects” on the top menu, click, and choose from the list.
Stock Video

“Stock video” button is also located on the top menu. Click on it to find more eye-pleasing content for your footage.
Elements

Go to the top menu and find “elements.” You can add these elements to ensure your video appear interesting and engaging.
Transitions

Using various video clips in a single video? Use transitions, located on the top menu, to smooth out everything.
Step7 Save and Export your Footage

Once you’re satisfied with the end result, it’s time to save and export the video for actual usage.
Wrap Up
Becoming a content creator and earning in dollars seems like a dream job. But not everyone understands that it needs a lot of effort and patience to reach this level of success on YouTube.
Although the journey is unpredictable, it doesn’t hurt to try. See Sourav Joshi for an example. His art or creativity paved a way for him and made him a successful YouTuber in such a young age.
You can try creating a video for YouTube. And use Filmora to make your videos impressive and aesthetically pleasing.
Free Download For Win 7 or later(64-bit)
Free Download For macOS 10.14 or later
Part 1: Who is Sourav Joshi?
An Indian YouTuber, Sourav started his first channel “Sourav Joshi Arts” on the Platform in September, 2015. You can find drawings of famous people, including Abraham Lincoln on his arts channel.
Later in February, 2019, Sourav started his vlogging channel “Sourav Joshi Vlogs.” And no doubt, he has been successful in his journey and has established himself as a popular YouTuber.
Sourav Joshi Biography
| Name | Sourav Joshi |
|---|---|
| Real Name | Sourav Joshi |
| Net Worth (2022) | $1 Million |
| Monthly Income & Salary | $30,000 - 45,000 |
| Yearly Income | Rs. 2.5 - 3 Crore |
| Age | 22 years |
| Gender | Male |
| Nationality | Indian |
| Height | 5 feet 7 inche |
| Profession | YouTuber, Content Creator |
| YouTube Channel | Sourav Joshi ArtsSourav Joshi Vlogs |
| Awards & Recognition | Silver & Gold Play Button |
Being creative and unique can help you go big on YouTube. With his art videos and fun vlogs, Saurav has proved it, too. Let’s explore how much Saurav Joshi earn from YouTube.
Part 2: Sourav Joshi YouTube Earnings and Stats
Now that you know who Sourav Joshi is and what he does to earn dollars from YouTube, see how YouTube calculates income.
Sourav Joshi YouTube Income
As an established YouTuber, Sourav makes money from affiliate marketing, sponsorships, paid partnerships, and Google AdSense.
Want to know Sourav Joshi’s income from YouTube? He’s known to earn $30,000 to $45,000 monthly, and has a current net worth, $1 million.
Sourav receives 320-350 million views monthly on his two YouTube videos that helped him elevate his net worth.
Sourav Joshi YouTube Stats
| Monthly Earnings | Rs. 35-50 lakh, $30,000 to $45,000 |
|---|---|
| Yearly Earnings | Rs. 2.5 - 3 Crore |
| Total Video Uploads | Sourav Joshi Vlogs - 1K VideosSourav Joshi Arts - 676 Videos |
| Subscribers | Sourav Joshi Vlogs - 17.2MSourav Joshi Arts - 3.75M |
| Video Views | Sourav Joshi Vlogs - 6,378,282,781Sourav Joshi Arts - 177,342,864 |
| Last 30-Day Views | Sourav Joshi Vlogs - 316.365M |
How Famous Sourav Joshi is?
The views on his videos show him as a popular Indian YouTuber. Not only this, he has made a record of 100 days 100 trending videos on the platform.
Sourav’s channel was the fastest growing one during the Covid-19 lockdown. Even his Instagram bio says “Most subscribed vlogger of India.”
The vlogger enjoys 3.7M followers on Instagram.
Part 3: Why is Sourav Joshi Trending on YouTube?
With two successful channels, net worth in million, luxury cars, and collaboration with music albums, Sourav is a well-known YouTuber among kids and adults.
The reasons for his success and popularity are:
Exclusive Personality
It’s no secret that with dedication and hard work Sourav has managed to create himself a successful YouTuber.
He also gives off humble vibes. Looking at his content, you’ll see and feel adoration he has for his brother and cousin brother. He seems like a genuine and fun guy, too.
Engaging and Interactive Content
Since he’s got two channels, both are great in terms of content. On his art channel, he’s drawn images of known people, such as Bollywood actor Tiger Shroff, Indian Cricketer MS Dhoni, and many more.
More so, on his vlog channel, he created daily-life vlogs which most people can relate to. From travel videos to surprises for family, you can see enjoyable content on Sourav’s vlog channel.
Most Viewed Vlogs/Videos
As an artist, Sourav has created some stunning portraits of popular people. But one video where he drew hair got the most views.
His “How I Draw Hairs | Step by Step” got around 13,353, 361 views.
How I Draw Hairs | Step by step
In this 8-minute video clip, you can see him draw hair with absolute perfection, making the final product look 100% realistic.
During the lockdown, Sourav vlogs got massive popularity. One such vlog was “Golgappa CHALLENGE WITH PIYUSH.”
Golgappa CHALLENGE WITH PIYUSH 馃槏馃構
This 13-minute vlog was fun, and viewers can see Sourav enjoying with his younger brother, too.
People love watching vlogs, especially when they’re relatable to their personal lives. Many viewers can relate to “Highway Pe Faas Gye” vlog while enjoying it.
Highway Pe Faas Gye 馃槄 Popat Hi Popat
This is one of the most-viewed vlogs by Sourav with 23,431,594 views.
Pro Tips: How to be a YouTuber and Make Videos Like Sourav Joshi
A fun 11-minute video requires a lot of efforts, including top-tier video editing. If you’re impressed with the work of Sourav, try Filmora to edit your next video.
Wondershare Filmora is an intuitive software that offers a series of features and templates, so you can edit and make your videos impressive, following only a few simple steps which can help you do the right job.
Step1 Import your Footage
The first step is to click on “import” to access the folder where you can browse the video clips you need to edit.
Step2 Drag your Footage to Timeline
Drag and drop your files from the media library to be used as the background in the first round. Then, drag and drop another video to be used on the top of that background in the second round.
Step3 Work on Speed and Duration Settings
In the duration settings, you can adjust the video duration. If there’s need for adding more video clips together, repeat the same process on several tracks, sharing the same frame.
Step4 Fix Size and Positioning of your Video
For this step, you can use editing interface, so you can work on your video’s position. Drag the sliders to the interface and change the size, position, and direction of your footage.
Step5 See Advance Editing Option
When it comes to making a video 10x impressive, use Filmora’s advance editing sounds like a great move.
Simply access the editing panel by double-clicking the video. After this, you can perform the following:
Motion effects
Adjustment of video tone
Color correction of the video
Options for audio
Apply masks to your video, they feature different shape and positions, so adjust them accordingly.
Step6 Use More Features from Library
The software comes with a vast library packed with stunning effects, elements, transitions, and stock video. Don’t hesitate to use them and make your video more visually interesting.
Effects
Find “effects” on the top menu, click, and choose from the list.
Stock Video
“Stock video” button is also located on the top menu. Click on it to find more eye-pleasing content for your footage.
Elements
Go to the top menu and find “elements.” You can add these elements to ensure your video appear interesting and engaging.
Transitions
Using various video clips in a single video? Use transitions, located on the top menu, to smooth out everything.
Step7 Save and Export your Footage
Once you’re satisfied with the end result, it’s time to save and export the video for actual usage.
Wrap Up
Becoming a content creator and earning in dollars seems like a dream job. But not everyone understands that it needs a lot of effort and patience to reach this level of success on YouTube.
Although the journey is unpredictable, it doesn’t hurt to try. See Sourav Joshi for an example. His art or creativity paved a way for him and made him a successful YouTuber in such a young age.
You can try creating a video for YouTube. And use Filmora to make your videos impressive and aesthetically pleasing.
Free Download For Win 7 or later(64-bit)
Free Download For macOS 10.14 or later
Also read:
- In 2024, Boosting Engagement Customizing Your Shorts' First Impressions
- [Updated] AdSense Profits on YouTube Earnings per Thousand Video Watchers
- [Updated] 2023'S Top Social Moment Infographics
- Strategies to Secure Best YouTube Collaborative Pairs
- Beginner's Guide to Video Making Mastering 10 Straightforward YouTube Concepts for 2024
- In 2024, Convert Your Streaming Top Free Video to Audio Tools
- 2024 Approved Designing the Ideal YouTube Playlist for You
- Easy Techniques for Snagging YouTube Songs and Commentary
- Conquer Profits On-the-Go YouTube Studio Monetization Explained
- [Updated] Easy Steps to Extract and Save Your YouTube Watch Lists
- How to Create GIFs From YouTube Videos
- [Updated] Creating Captivating YouTube Openers - Two Ways
- Enhancing Video Visibility on YouTube with Imaginative Thumbnails
- [Updated] Earning Potential in Gaming Videos
- DIY Filmmaking for YouTube Personalities for 2024
- [Updated] Capture Your Audience The Smartphone Guide to YouTube Thumbnails
- 2024 Approved Commanding the Screen Top 10 Women Gamers YT
- [New] Essential Screen Recording Software List for Vloggers
- [Updated] Best Free YouTube Video Editing Apps for iPhone & iPad & How-Tos
- [New] Crafting Captivating Intros on Mobile Platforms
- Maximizing Income Sourav Joshi's YouTube Journey
- New Should You Buy Videopad Video Editor? Our Honest Review and Verdict
- [Updated] In 2024, Instagram Dimensions for Impressive Videography
- The Art of Anonymity in Video Hiding Private Data
- [New] Ultimate Battle of Video Capturing Apps
- [Updated] Video Capture Crusade OBS Vs ShadowCast
- Mastering Media Making Filmora's Edge Over Democreator for 2024
- Top 10 Fixes for Phone Keep Disconnecting from Wi-Fi On Samsung Galaxy A54 5G | Dr.fone
- [New] PC's Prime Screen Capture Software Ranked #1-#5 for 2024
- [Updated] Premium Editing Platform Tailored to Vimeo
- [New] Crafting Effective In-Stream Ad Campaigns on Facebook A Comprehensive Guide for 2024
- In 2024, The Top 5 Android Apps That Use Fingerprint Sensor to Lock Your Apps On Poco X6
- In 2024, Best Humor Image Processor
- In 2024, Find Cricket Sound Effect
- [Updated] 2024 Approved From Vision to Viewers Step-by-Step Guide to Live TV Screens on Windows PCs
- [New] 2024 Approved Streaming Success Capturing Dota 2'S Epic Battles (2Enas)
- New From Conversion to Quality How to Find the Best YouTube to MP3 Converter
- Updated In 2024, Use Auto-Sync of Final Cut Pro to Deal with Out of Sync Problem in You Video. This Article Shows You How and More
- Title: "2024 Approved Cutting Edge Advanced Techniques in YouTube Video Editing"
- Author: Brian
- Created at : 2024-05-25 11:06:52
- Updated at : 2024-05-26 11:06:52
- Link: https://youtube-video-recordings.techidaily.com/2024-approved-cutting-edge-advanced-techniques-in-youtube-video-editing/
- License: This work is licensed under CC BY-NC-SA 4.0.
