
"2024 Approved Customizing Your Channel Icon, Banner & Thumbnail Ideas"
Customizing Your Channel: Icon, Banner & Thumbnail Ideas
YouTube Channel Art: How to Make Banners, Icons, and Thumbnails?

Shanoon Cox
Oct 26, 2023• Proven solutions
YouTube channel art refers to your banner, icon, and watermark along with the thumbnails of your videos. Creating custom channel art is a great way to express yourself and communicate the tone of your videos.
YouTube supports JPG, GIF, BMP, and PNG files for channel art, although they do not allow animated GIFs.
Part 1: Top Sites for YouTube Channel Art
You can make your channel art in Photoshop, or another photo editing program, but there are also some excellent tools online which you can access for free. Here are two of the best:
Canva.com
Canva has templates for YouTube banners as well as a variety of stock images. You can also upload and edit your own images on Canva. It is a free service, but they do have some premium features which cost $1 each. Canva has a desktop version and an iPad app.
PicMonkey.com
PicMonkey lets you import images from your computer or social media accounts, edit them, and use them in templates for YouTube banners or other kinds of social media graphics. It’s free to use, but you can only access their more advanced editing tools if you buy a paid subscription for either $4.99 a month, or $2.75 a month for a year.
Part 2: Banners
Your banner is the header for your channel page. Its dimensions are 2560 x 1440 px.
Not all of your banner will be visible on all devices. The full 2560 x 1440 px image will only be seen by viewers watching on tv screens.
Only 1546 x 423 px of your banner will be visible on computers, and this ‘safe area’ can vary for different tablets and smartphones depending on the width of their screens. Make sure any important text or logos are placed in a central location so everybody can see them.
Also, keep in mind that your icon will hover over the top left corner of your banner and that your social media icons will be located in the bottom right corner.
The file size of your banner cannot be over 4MB.
Part 3: Icons
Your icon is the avatar you use when leaving and replying to comments on YouTube. It also hovers over your banner on your channel page.
By default, your icon will be the picture associated with your Google account.
If you upload a new icon, it will render down to 98 x 98 px. So, any square image larger than 98 x 98 px will work. However, YouTube recommends you use one as large as 800 x 800 px. This will give you a sharper, higher quality, image.
Part 4: Thumbnails
Thumbnails are the images that represent your videos on your channel page and in search results.
You can browse through your video and choose a still frame you want to use as your video’s thumbnail. Or, you can upload a custom image.
Custom thumbnails should have an aspect ratio of 16:9, the same as YouTube’s video player. The files should be under 2MB and have a resolution of 1280 x 720.
To upload a custom thumbnail, select the custom thumbnail option under Video Thumbnails at the end of the video uploading process. You can also change the thumbnails of your existing videos to custom ones through Video Manager.
Remember that your thumbnail will be rendered down to a much smaller size. If you use text, like the title of your video, then you should make it really big so that it is easy to read when it gets shrunk down.
Part 5: Watermarks
A watermark is a small, usually 50 x 50 px image displayed in the bottom right corner of your video.
Watermarks protect your videos by making them harder for others to steal and take credit for.
Ideally, your watermark will be a transparent version of your logo. Try not to use more than three colors – you do not want your watermark to distract your viewers.
If you add a branding watermark through YouTube then that watermark will also double as a subscribe link.
Here is how you can add a branding watermark through YouTube:
- On YouTube, go to your Creator Studio and select Branding under the Channel menu.
- Click the blue add a watermark button on the Branding page.
- An upload of a watermark window will pop up. Select your image file and click Save.
- Choose between having a start time for your watermark, making it appear only at the end of your videos, or having it there for the entire length of your videos. The popular choice is to have it visible through the entire video.
- Click Update. Your watermark will be applied to all of your videos.
If you want to find a video editing solution that empowers your imagination and creativity yet takes less effort, please try this robust and user-friendly video editing software Filmora, which is equipped with its own footage stock Wondershare Filmstock and will definitely enhance your productivity and helps you to make money by making videos much easier.


Shanoon Cox
Shanoon Cox is a writer and a lover of all things video.
Follow @Shanoon Cox
Shanoon Cox
Oct 26, 2023• Proven solutions
YouTube channel art refers to your banner, icon, and watermark along with the thumbnails of your videos. Creating custom channel art is a great way to express yourself and communicate the tone of your videos.
YouTube supports JPG, GIF, BMP, and PNG files for channel art, although they do not allow animated GIFs.
Part 1: Top Sites for YouTube Channel Art
You can make your channel art in Photoshop, or another photo editing program, but there are also some excellent tools online which you can access for free. Here are two of the best:
Canva.com
Canva has templates for YouTube banners as well as a variety of stock images. You can also upload and edit your own images on Canva. It is a free service, but they do have some premium features which cost $1 each. Canva has a desktop version and an iPad app.
PicMonkey.com
PicMonkey lets you import images from your computer or social media accounts, edit them, and use them in templates for YouTube banners or other kinds of social media graphics. It’s free to use, but you can only access their more advanced editing tools if you buy a paid subscription for either $4.99 a month, or $2.75 a month for a year.
Part 2: Banners
Your banner is the header for your channel page. Its dimensions are 2560 x 1440 px.
Not all of your banner will be visible on all devices. The full 2560 x 1440 px image will only be seen by viewers watching on tv screens.
Only 1546 x 423 px of your banner will be visible on computers, and this ‘safe area’ can vary for different tablets and smartphones depending on the width of their screens. Make sure any important text or logos are placed in a central location so everybody can see them.
Also, keep in mind that your icon will hover over the top left corner of your banner and that your social media icons will be located in the bottom right corner.
The file size of your banner cannot be over 4MB.
Part 3: Icons
Your icon is the avatar you use when leaving and replying to comments on YouTube. It also hovers over your banner on your channel page.
By default, your icon will be the picture associated with your Google account.
If you upload a new icon, it will render down to 98 x 98 px. So, any square image larger than 98 x 98 px will work. However, YouTube recommends you use one as large as 800 x 800 px. This will give you a sharper, higher quality, image.
Part 4: Thumbnails
Thumbnails are the images that represent your videos on your channel page and in search results.
You can browse through your video and choose a still frame you want to use as your video’s thumbnail. Or, you can upload a custom image.
Custom thumbnails should have an aspect ratio of 16:9, the same as YouTube’s video player. The files should be under 2MB and have a resolution of 1280 x 720.
To upload a custom thumbnail, select the custom thumbnail option under Video Thumbnails at the end of the video uploading process. You can also change the thumbnails of your existing videos to custom ones through Video Manager.
Remember that your thumbnail will be rendered down to a much smaller size. If you use text, like the title of your video, then you should make it really big so that it is easy to read when it gets shrunk down.
Part 5: Watermarks
A watermark is a small, usually 50 x 50 px image displayed in the bottom right corner of your video.
Watermarks protect your videos by making them harder for others to steal and take credit for.
Ideally, your watermark will be a transparent version of your logo. Try not to use more than three colors – you do not want your watermark to distract your viewers.
If you add a branding watermark through YouTube then that watermark will also double as a subscribe link.
Here is how you can add a branding watermark through YouTube:
- On YouTube, go to your Creator Studio and select Branding under the Channel menu.
- Click the blue add a watermark button on the Branding page.
- An upload of a watermark window will pop up. Select your image file and click Save.
- Choose between having a start time for your watermark, making it appear only at the end of your videos, or having it there for the entire length of your videos. The popular choice is to have it visible through the entire video.
- Click Update. Your watermark will be applied to all of your videos.
If you want to find a video editing solution that empowers your imagination and creativity yet takes less effort, please try this robust and user-friendly video editing software Filmora, which is equipped with its own footage stock Wondershare Filmstock and will definitely enhance your productivity and helps you to make money by making videos much easier.
Shanoon Cox
Shanoon Cox is a writer and a lover of all things video.
Follow @Shanoon Cox
Streamlining Process: Clean Up YouTube’s Buffered List
The YouTube Watch Later playlist is a great way to save videos and view them later. But if you don’t keep on top of it, your Watch Later list can quickly become unmanageable and cluttered with content that you no longer want to watch afterward.
If you are wondering how, you can declutter the playlist, we’ve got you covered. To help you with the task, we’ve compiled a comprehensive step-by-step guide. In this article, we will show you how to clear Watch Later on YouTube with just a few clicks.
So, without beating around the bush, let’s get started with our tutorial!
How To Delete YouTube Watch Later Playlist
If your YouTube Watch Later playlist is filled with videos you’ll never watch again, or you are not interested in that specific content type, you can quickly delete these videos at any time.
Here’s the step-by-step process on how to clear Watch Later on YouTube Web and App:
How To Delete YouTube Watch Later Playlist On Web?
You can delete the YouTube Watch Later Playlist on your desktop in the following ways:
From YouTube Homepage
To clear the YouTube Watch Later Playlist from the YouTube Homepage, do the following steps:
Step1 First, open a browser on your PC and visit the YouTube homepage. Sign into your account if needed and click the “Library” option located at the left-hand side menu panel.

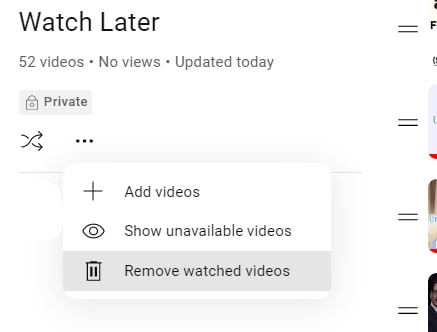
Step2 Croll down and click the “See All” option under the Watch Later header. Click the Three Dots below the Watch Later playlist details on the next page.
Step3 From the drop-down menu, click “Remove Watch Videos.” This will instantly remove all the videos you’ve watched but are still in the playlist.
Step4 Finally, to remove the unwatched videos, hover over a video and click the Three Dots. Select the “Remove from Watch Later” option to delete the video. You can repeat this process to remove all the content from the playlist until it is decluttered at the point of your satisfaction.

Using A Script
Since the above process can be tiring, you can use a script to remove all the videos at once from the Watch Later playlist in the following way:
Step1 In the first step, launch the Google Chrome browser on your system and head to the YouTube website**.** Next, select the “Library” option in the left pane and click “Watch Later” from the menu.
Step2 Now, hit the “Ctrl + Shift + J” keys on Windows or the “Command + Option+ J” buttons on Mac to launch the developer mode and open the console window.

Step3 Copy and paste the following lines of the script at the end of the line under the Console tab where the cursor is blinking.
setInterval(function () { document.querySelector(‘#primary button[aria-label=”Action menu”]‘).click(); var things = document.evaluate( ‘//span[contains(text(),”Remove from”)]‘, document, null, XPathResult.ORDERED_NODE_SNAPSHOT_TYPE, null ); for (var i = 0; i < things.snapshotLength; i++) { things.snapshotItem(i).click(); } }, 1000);
Step4 In the last step, hit the “Enter” key to clear the Watch Later Playlist on YouTube. However, the process may take some time, depending on the number of videos in your playlist.
Although a bit tech-savvy, the script execution method is the most effective way to delete all Watch Later videos at once.
You can also replace the number at the end of the script with a lower entry to delete videos according to your preference. Also, choosing a lesser number can speed up the video deletion process from YouTube Watch Later list by a great deal.
![]()
Note: It is important to note that experimenting with scripts is only for some. The script above has been confirmed to work, but others still need to be thoroughly checked and could potentially damage your computer. To prevent this from happening, only look for scripts from reliable sources instead of those posted by random people in various forums.
How To Delete YouTube Watch Later Playlist On YouTube App?
If you are using YouTube on an Android or iOS device, it is possible to clear the Watch Later Playlist by doing the steps below:
Step1 In the first step, swipe up on the Homescreen of your Android device or swipe right on your iOS device to launch App Drawer, and tap “YouTube” to launch the app.
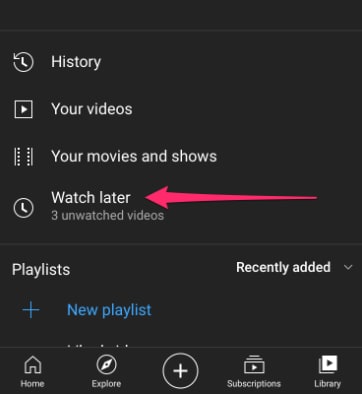
Step2 Now, tap the “Library” option in the bottom-right corner of the screen and tap “Watch Later.”
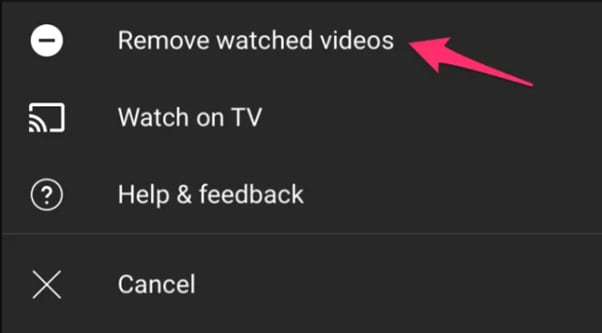
Step3 Next, tap the three dots (vertical ellipses) icon on the top-right side of the screen and choose the “Remove Watched Videos” option to delete them from the playlist.
Step4 If there are still unwatched videos in the playlist, select a video and tap the three dots next to it. Now, tap the “Remove from Watch Later” option. Repeat the process to remove all the unwatched videos to clear the playlist.
Is there an Alternative Way to Download YouTube Videos without Using Software?
Now that you’ve learned how you can clear the Watch Later playlist on YouTube, you might be looking for a way to download your favorite videos on your PC for later watch without using any software. If so,click here to find out 13 proven ways to get this done.
Free Download For Win 7 or later(64-bit)
Free Download For macOS 10.14 or later
Bonus Video Tutorial: From a User to a Creator, How To Edit YouTube Videos Like a Pro
Hopefully, you have found the most appropriate solution to clear your YouTube Watcher Later playlist. However, while you are a YouTube user, how can you transfer your character from a user to a creator? In this video era, why not participate in the creation party and be one of them?
If you have any interests, you can watch the video we specially prepared for you. This video will show you how to use a user-friendly video editor, Filmora , to create your own YouTube videos!
Conclusion
In this article, we’ve discussed how to clear your YouTube watch later playlist from both the YouTube web from the homepage and using the script in the browser’s developer mode. We’ve also provided a step-by-step process for deleting the Watch Later playlist on the YouTube mobile app.
This guide was informative enough to answer most of your queries, and after reading it, you can now unclutter your YouTube Watch Later without any issues.
How To Delete YouTube Watch Later Playlist On YouTube App?
If you are using YouTube on an Android or iOS device, it is possible to clear the Watch Later Playlist by doing the steps below:
Step1 In the first step, swipe up on the Homescreen of your Android device or swipe right on your iOS device to launch App Drawer, and tap “YouTube” to launch the app.
Step2 Now, tap the “Library” option in the bottom-right corner of the screen and tap “Watch Later.”
Step3 Next, tap the three dots (vertical ellipses) icon on the top-right side of the screen and choose the “Remove Watched Videos” option to delete them from the playlist.
Step4 If there are still unwatched videos in the playlist, select a video and tap the three dots next to it. Now, tap the “Remove from Watch Later” option. Repeat the process to remove all the unwatched videos to clear the playlist.
Is there an Alternative Way to Download YouTube Videos without Using Software?
Now that you’ve learned how you can clear the Watch Later playlist on YouTube, you might be looking for a way to download your favorite videos on your PC for later watch without using any software. If so,click here to find out 13 proven ways to get this done.
Free Download For Win 7 or later(64-bit)
Free Download For macOS 10.14 or later
Bonus Video Tutorial: From a User to a Creator, How To Edit YouTube Videos Like a Pro
Hopefully, you have found the most appropriate solution to clear your YouTube Watcher Later playlist. However, while you are a YouTube user, how can you transfer your character from a user to a creator? In this video era, why not participate in the creation party and be one of them?
If you have any interests, you can watch the video we specially prepared for you. This video will show you how to use a user-friendly video editor, Filmora , to create your own YouTube videos!
Conclusion
In this article, we’ve discussed how to clear your YouTube watch later playlist from both the YouTube web from the homepage and using the script in the browser’s developer mode. We’ve also provided a step-by-step process for deleting the Watch Later playlist on the YouTube mobile app.
This guide was informative enough to answer most of your queries, and after reading it, you can now unclutter your YouTube Watch Later without any issues.
Also read:
- [Updated] 2024 Approved Generate Brand Identity Accessible Logo Templates & Editing
- [Updated] Ace Your Online Presence YouTube's Studio Command Center
- [Updated] Capture Flawless Underwater Images Easily in 7 Steps for 2024
- [Updated] Elevate Your FreeFire Presence with Top Tips and Tricks
- [Updated] In 2024, Exploring the Top 8 Facebook Extractors for Films
- 2024 Approved Essentials Checklist - What You Must Know Before Sharing 4K Videos on Youtube
- Boost Your Mac with a macOS Sierra Installation for 2024
- How to identify some outdated drivers with Windows Device Manager in Windows 10 & 7
- How to Spot and Stop an AirTag From Trailing Behind You: A Comprehensive Guide for Privacy Seekers
- In 2024, Artistic Additions Free Designs for YouTube Crafting
- In 2024, Audience Enchantment Setting Tips for Streams
- In 2024, Top 10 YouTube Video Trimmers Online
- In-Depth Evaluation of the Newest SloMo Video Software for 2024
- Maximizing YouTube Shorts Income Strategies
- Title: 2024 Approved Customizing Your Channel Icon, Banner & Thumbnail Ideas
- Author: Brian
- Created at : 2024-12-27 17:51:20
- Updated at : 2025-01-03 16:38:13
- Link: https://youtube-video-recordings.techidaily.com/2024-approved-customizing-your-channel-icon-banner-and-thumbnail-ideas/
- License: This work is licensed under CC BY-NC-SA 4.0.