"2024 Approved Cultivating Commitment Gentle Subscription Strategies"
Cultivating Commitment: Gentle Subscription Strategies
How to Get People to Subscribe to Your YouTube Channel

Richard Bennett
Oct 26, 2023• Proven solutions
The following is a step-by-step tutorial on how to get more subscribers by asking the right way. People are more likely to do something if you give them a bit of a nudge, and that includes subscribing to your YouTube channel.
There are people who think that if people like their videos they’ll subscribe, so they shouldn’t bother people by asking. This is, simply put, wrong. When people are browsing YouTube their minds are on what video they want to watch next, not whether or not they want to subscribe – unless you remind them.
What is a ‘Call To Action’?
It has become the norm for YouTubers to ask viewers to subscribe in their sign-offs. A typical CTA (‘call to action’) goes something like this:
“Thanks for watching. If you liked this video, make sure to subscribe for more!”
That’s great. At the end of a video is a good place to ask people to subscribe, but is it the best and only place you should be reminding them? If you take a peek at your analytics and you might find that most of your viewers aren’t watching to the ends of your videos (people have short attention spans).
A More Effective Way of Asking For Subscribers
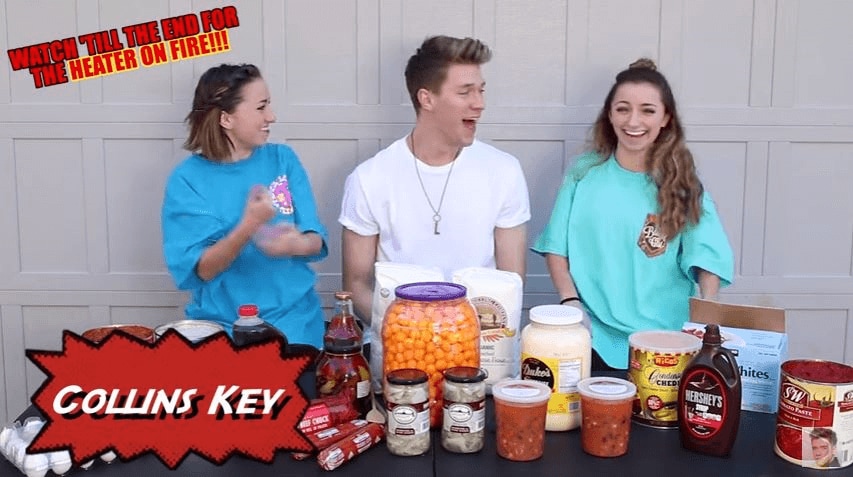
Collins Key is one YouTuber who has mastered asking for subscribers early on, and given that he has over 7 million subscribers himself I’d say it’s working out. Check out the technique in this video collab with Brooklyn and Bailey:
Step 1: How to Hook The Viewer
As you can see, the video starts with a ‘flash forward’ to one of the twins saying the heater is on fire and then a reminder of what’s going to happen later – the heater catching fire – is written in the top left of the screen so it stays on the viewers’ mind. This is one way in which the viewer is immediately hooked.
Step 2: Get to The Point Quickly
Shortly after, while still in the first 30 seconds of the video, Collins gets right to the point and introduces the Twin Telepathy Challenge promised in the title of the video. The hook with the heater catching fire is effective, but it’s not essential. It happens to suit Collins’ style, and it happens to have happened. Getting to the main point of the video quickly – usually in the first 15 seconds, not the first 30 (it’s in the first 15 seconds that most viewers click away) – is vital. People click on videos for a reason, and if they don’t see a sign of that payoff quickly they’ll leave.
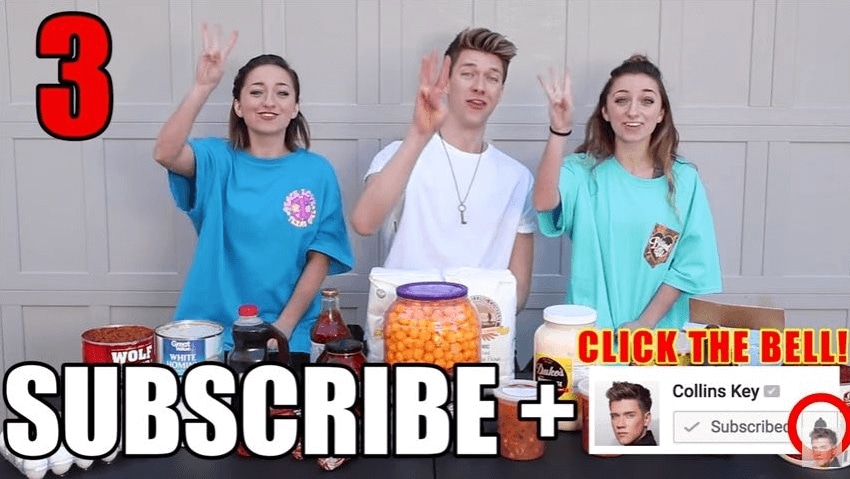
Step 3: Create A Moment - Make Subscribing Part of the Experience
It’s only after hooking the viewer in and reiterating the promise of the title that Collins asks viewers to subscribe. The really clever thing about how he asks is that he carves out time in the video for the viewer to comply with his request. He gives 5 seconds and does a countdown.
Collins Key has been one of the fastest-growing channels on YouTube. He does not implement this strategy in every video, but it’s not a stretch to think it’s had something to do with his success. Instead of simply asking you to subscribe at the end of the video, he creates a part of the video early on – before people who don’t watch until the end will have clicked away – where you feel as if you’re ‘supposed to’ subscribe.
Polish Your YouTube Videos with Filmora
Even with the above tricks, you may not get the subscribers as you wish unless you can make sure your videos and contents are of high quality. As YouTube is getting more and more popular and more YouTubers are competing for subscribers, you will need to polish your YouTube videos.
As one of the most widely used video editing software in YouTube video editing, Filmora video editor provides lots of templates and effects with an intuitive interface, which saves much time. Its features like motion tracking, audio ducking, keyframing, color matching and effects will help make your video impressive enough to get pepople to subscribe to your channel.
Here is a tutorial video about how to use Filmora to edit your YouTube video. Check it out and try Filmora if you are interested.


That’s how you can get more YouTube subscribers by asking the right way. You may follow the instructions and try it yourself. Do not forget to track your YouTube subscribers in real time to make necessary adjustments.
Richard Bennett
Richard Bennett is a writer and a lover of all things video.
Follow @Richard Bennett
Richard Bennett
Oct 26, 2023• Proven solutions
The following is a step-by-step tutorial on how to get more subscribers by asking the right way. People are more likely to do something if you give them a bit of a nudge, and that includes subscribing to your YouTube channel.
There are people who think that if people like their videos they’ll subscribe, so they shouldn’t bother people by asking. This is, simply put, wrong. When people are browsing YouTube their minds are on what video they want to watch next, not whether or not they want to subscribe – unless you remind them.
What is a ‘Call To Action’?
It has become the norm for YouTubers to ask viewers to subscribe in their sign-offs. A typical CTA (‘call to action’) goes something like this:
“Thanks for watching. If you liked this video, make sure to subscribe for more!”
That’s great. At the end of a video is a good place to ask people to subscribe, but is it the best and only place you should be reminding them? If you take a peek at your analytics and you might find that most of your viewers aren’t watching to the ends of your videos (people have short attention spans).
A More Effective Way of Asking For Subscribers
Collins Key is one YouTuber who has mastered asking for subscribers early on, and given that he has over 7 million subscribers himself I’d say it’s working out. Check out the technique in this video collab with Brooklyn and Bailey:
Step 1: How to Hook The Viewer
As you can see, the video starts with a ‘flash forward’ to one of the twins saying the heater is on fire and then a reminder of what’s going to happen later – the heater catching fire – is written in the top left of the screen so it stays on the viewers’ mind. This is one way in which the viewer is immediately hooked.
Step 2: Get to The Point Quickly
Shortly after, while still in the first 30 seconds of the video, Collins gets right to the point and introduces the Twin Telepathy Challenge promised in the title of the video. The hook with the heater catching fire is effective, but it’s not essential. It happens to suit Collins’ style, and it happens to have happened. Getting to the main point of the video quickly – usually in the first 15 seconds, not the first 30 (it’s in the first 15 seconds that most viewers click away) – is vital. People click on videos for a reason, and if they don’t see a sign of that payoff quickly they’ll leave.
Step 3: Create A Moment - Make Subscribing Part of the Experience
It’s only after hooking the viewer in and reiterating the promise of the title that Collins asks viewers to subscribe. The really clever thing about how he asks is that he carves out time in the video for the viewer to comply with his request. He gives 5 seconds and does a countdown.
Collins Key has been one of the fastest-growing channels on YouTube. He does not implement this strategy in every video, but it’s not a stretch to think it’s had something to do with his success. Instead of simply asking you to subscribe at the end of the video, he creates a part of the video early on – before people who don’t watch until the end will have clicked away – where you feel as if you’re ‘supposed to’ subscribe.
Polish Your YouTube Videos with Filmora
Even with the above tricks, you may not get the subscribers as you wish unless you can make sure your videos and contents are of high quality. As YouTube is getting more and more popular and more YouTubers are competing for subscribers, you will need to polish your YouTube videos.
As one of the most widely used video editing software in YouTube video editing, Filmora video editor provides lots of templates and effects with an intuitive interface, which saves much time. Its features like motion tracking, audio ducking, keyframing, color matching and effects will help make your video impressive enough to get pepople to subscribe to your channel.
Here is a tutorial video about how to use Filmora to edit your YouTube video. Check it out and try Filmora if you are interested.
That’s how you can get more YouTube subscribers by asking the right way. You may follow the instructions and try it yourself. Do not forget to track your YouTube subscribers in real time to make necessary adjustments.
Richard Bennett
Richard Bennett is a writer and a lover of all things video.
Follow @Richard Bennett
Unleashing Auditory Brilliance without a Mic in Sight
How to Record Good Audio Without a Microphone?
Richard Bennett
Oct 26, 2023• Proven solutions
Audio quality is more important than video quality on YouTube. You’ve probably heard that before – viewers might forgive sub-par video quality if they’re interested in what you’re saying, but if it’s hard to understand what you’re saying they’ll click away.
Getting an external mic (even a $10 one-off Amazon ) is one of the best ways to improve your videos. That said, maybe your budget is $0. Or, maybe you just don’t happen to have a mic now and don’t want to wait to make videos. It could even be that you just don’t want to bother with an external mic.
Luckily, there are a lot of easy, free, things you can do to protect the quality of your audio recording even if you’re not using an external mic. Here are a few tips:
- 1. Keep Your Camera Close
- 2. Shoot Somewhere Quiet
- 3. Pick a Good Room
- 4. Protect your Built-In Mic from Wind
- 5. Use a Free Audio App
- 6. Do a Sound Check
1. Keep Your Camera Close (like, really close)
The biggest problem with the mic built into any camera or phone is just that, since it’s with the camera, it’s usually too far away from you. Built-in mics can record decent audio up close, but usually, your camera will be set up farther away from you than an external mic would be.
For example, your camera’s mic might be just as good as a clip-on LAV, but that LAV is right by your mouth and the camera is a couple of big steps away.
Moving your camera/smartphone physically closer to you will make it hard to include anything besides your head and shoulders in your shot, but it will get you significantly better audio.
2.Shoot Somewhere Quiet
The best way to limit the amount of background noise you pick up in your sound recording is to shoot somewhere where there’s no background noise. That probably seems really basic, but it’s something a lot of people just don’t do. It’s easy to default to recording in your home office, even though it’s right next to the kitchen where your family is bustling around, or in your bedroom even though there’s a busy street right outside your window.
Sometimes the best thing you can do for your audio is simply to scout out a quiet room in your house where the sound recording conditions are better. Speaking of recording conditions…
3. Pick a Good Room
There’s more that goes into picking a good room than how quiet it is. If you try to record in a room that’s too big your voice might sound to distant, and if you try to record in a room that’s too small your audio will be too echo-y. You need a room that’s just right.
You should also pay attention to what’s in the room you’re recording in. Avoid hard, reflective, surfaces like appliances and mirrors which your voice will bounce off of. The same conditions that make you sound great when you sing in the shower will – like recording in a small space -make your voiceover unpleasantly echo-y.
Look for a room that has a lot of soft things in it, like beds and sofas.
4. Protect your Built-In Mic from Wind
If you shoot outside, then the wind passing over your built-in mic will do terrible things to your audio. You can do a lot to counter-act this problem by physically blocking the wind.
There are a few ways to do this. If you’re doing hand-held shots you can partially cover your camera or phone’s mic with your finger. You don’t want to completely cover it/press down or your audio will be muffled. What you’re trying to do is create a barrier blocking out the wind.
On movie sets, they block out wind by covering the microphones with big fuzzy things called ‘dead cats’. You can also block out wind noise by attaching something fuzzy to your microphone. If your camera’s built-in mic is on front of it then you just need something big and fluffy you can loop around the lens. You can use a piece of a boa, a fuzzy novelty scrunchie – you can even murder a fuzzy stuffed animal! Do you have an old coat with a fuzz around the hood? That fuzz would do nicely.
The pompom used in this video cost $2, but you might already have something that would work!
If your built-in mic is on top of your camera you can get something called a ‘micromuff’. A micromuff is essentially a circular or rectangular piece of velcro with long strands of fluff on top. It’s open in the middle so it doesn’t actually cover your mic, but the surrounding fuzz blocks out the wind.

You use the adhesive backing to attach the base velcro to your camera. The other side of the velcro has your fluff attached to the back.
The only thing about a micromuff is that it costs about $30, and if you’re going to spend $30 on audio equipment then you could just buy yourself an inexpensive LAV mic. I only bring up the micromuff because it’s a very simple design you can probably DIY – you just need velcro with adhesive backing and any of the fluff-sources we just discussed.
5. Use a Free Audio App
If you’re recording on a smartphone, you can download a free app that will let you make adjustments to your audio as you record it. With the right app, you can adjust your gain (volume is how you control ‘output’ audio, and gain is for ‘input’ audio. By turning up your gain, you can make your mic more sensitive), tempo, and more. A lot of the time, your audio recording app will also let you edit your audio afterward.
Even if you’re not recording video from your smartphone, it might be a good idea to use your phone as your mic and record a separate audio file. You’ll be able to use an app to fine-tune your recording, and you can set your phone up closer to you the way you would an external mic while keeping your camera back a bit farther.
Free audio apps: Hi-Q MP3 Voice Recorder (Android), RecForge II (Android), Smart Voice Recorder (Android), Audio Memos (iOS), and Recorder Plus (iOS).
6. Do a Sound Check
Once you think you’ve got good audio set up – test it! You don’t want to do a whole video and find out when you play it back that your audio doesn’t sound good.
Do you have any of your own audio tips to pass on? Leave them in the comments!
This topic was suggested by RS Beauty over in the forums. Thanks for the idea!
Polish Your YouTube Videos with Filmora
As one of the most widely used video editing software in YouTube video editing, Filmora allows you to record voiceover and edit the recorded audio with mixer, equalizer and provides lots of templates and effects with an intuitive interface, which saves much time. Download the free trial version and get started now.
Richard Bennett
Richard Bennett is a writer and a lover of all things video.
Follow @Richard Bennett
Richard Bennett
Oct 26, 2023• Proven solutions
Audio quality is more important than video quality on YouTube. You’ve probably heard that before – viewers might forgive sub-par video quality if they’re interested in what you’re saying, but if it’s hard to understand what you’re saying they’ll click away.
Getting an external mic (even a $10 one-off Amazon ) is one of the best ways to improve your videos. That said, maybe your budget is $0. Or, maybe you just don’t happen to have a mic now and don’t want to wait to make videos. It could even be that you just don’t want to bother with an external mic.
Luckily, there are a lot of easy, free, things you can do to protect the quality of your audio recording even if you’re not using an external mic. Here are a few tips:
- 1. Keep Your Camera Close
- 2. Shoot Somewhere Quiet
- 3. Pick a Good Room
- 4. Protect your Built-In Mic from Wind
- 5. Use a Free Audio App
- 6. Do a Sound Check
1. Keep Your Camera Close (like, really close)
The biggest problem with the mic built into any camera or phone is just that, since it’s with the camera, it’s usually too far away from you. Built-in mics can record decent audio up close, but usually, your camera will be set up farther away from you than an external mic would be.
For example, your camera’s mic might be just as good as a clip-on LAV, but that LAV is right by your mouth and the camera is a couple of big steps away.
Moving your camera/smartphone physically closer to you will make it hard to include anything besides your head and shoulders in your shot, but it will get you significantly better audio.
2.Shoot Somewhere Quiet
The best way to limit the amount of background noise you pick up in your sound recording is to shoot somewhere where there’s no background noise. That probably seems really basic, but it’s something a lot of people just don’t do. It’s easy to default to recording in your home office, even though it’s right next to the kitchen where your family is bustling around, or in your bedroom even though there’s a busy street right outside your window.
Sometimes the best thing you can do for your audio is simply to scout out a quiet room in your house where the sound recording conditions are better. Speaking of recording conditions…
3. Pick a Good Room
There’s more that goes into picking a good room than how quiet it is. If you try to record in a room that’s too big your voice might sound to distant, and if you try to record in a room that’s too small your audio will be too echo-y. You need a room that’s just right.
You should also pay attention to what’s in the room you’re recording in. Avoid hard, reflective, surfaces like appliances and mirrors which your voice will bounce off of. The same conditions that make you sound great when you sing in the shower will – like recording in a small space -make your voiceover unpleasantly echo-y.
Look for a room that has a lot of soft things in it, like beds and sofas.
4. Protect your Built-In Mic from Wind
If you shoot outside, then the wind passing over your built-in mic will do terrible things to your audio. You can do a lot to counter-act this problem by physically blocking the wind.
There are a few ways to do this. If you’re doing hand-held shots you can partially cover your camera or phone’s mic with your finger. You don’t want to completely cover it/press down or your audio will be muffled. What you’re trying to do is create a barrier blocking out the wind.
On movie sets, they block out wind by covering the microphones with big fuzzy things called ‘dead cats’. You can also block out wind noise by attaching something fuzzy to your microphone. If your camera’s built-in mic is on front of it then you just need something big and fluffy you can loop around the lens. You can use a piece of a boa, a fuzzy novelty scrunchie – you can even murder a fuzzy stuffed animal! Do you have an old coat with a fuzz around the hood? That fuzz would do nicely.
The pompom used in this video cost $2, but you might already have something that would work!
If your built-in mic is on top of your camera you can get something called a ‘micromuff’. A micromuff is essentially a circular or rectangular piece of velcro with long strands of fluff on top. It’s open in the middle so it doesn’t actually cover your mic, but the surrounding fuzz blocks out the wind.
You use the adhesive backing to attach the base velcro to your camera. The other side of the velcro has your fluff attached to the back.
The only thing about a micromuff is that it costs about $30, and if you’re going to spend $30 on audio equipment then you could just buy yourself an inexpensive LAV mic. I only bring up the micromuff because it’s a very simple design you can probably DIY – you just need velcro with adhesive backing and any of the fluff-sources we just discussed.
5. Use a Free Audio App
If you’re recording on a smartphone, you can download a free app that will let you make adjustments to your audio as you record it. With the right app, you can adjust your gain (volume is how you control ‘output’ audio, and gain is for ‘input’ audio. By turning up your gain, you can make your mic more sensitive), tempo, and more. A lot of the time, your audio recording app will also let you edit your audio afterward.
Even if you’re not recording video from your smartphone, it might be a good idea to use your phone as your mic and record a separate audio file. You’ll be able to use an app to fine-tune your recording, and you can set your phone up closer to you the way you would an external mic while keeping your camera back a bit farther.
Free audio apps: Hi-Q MP3 Voice Recorder (Android), RecForge II (Android), Smart Voice Recorder (Android), Audio Memos (iOS), and Recorder Plus (iOS).
6. Do a Sound Check
Once you think you’ve got good audio set up – test it! You don’t want to do a whole video and find out when you play it back that your audio doesn’t sound good.
Do you have any of your own audio tips to pass on? Leave them in the comments!
This topic was suggested by RS Beauty over in the forums. Thanks for the idea!
Polish Your YouTube Videos with Filmora
As one of the most widely used video editing software in YouTube video editing, Filmora allows you to record voiceover and edit the recorded audio with mixer, equalizer and provides lots of templates and effects with an intuitive interface, which saves much time. Download the free trial version and get started now.
Richard Bennett
Richard Bennett is a writer and a lover of all things video.
Follow @Richard Bennett
Also read:
- [New] Accessing Your Own Custom-Designed Youtube Melodies
- 2024 Approved Leading 10 Models Premier 4K DSLR Shoulder Rigs
- Acquiring Free Music YouTube Video Edition for 2024
- Essential Considerations in Selecting Video Coders on Windows
- Forecast Vs. Reality: How Accurate Were Pre-2017 Predictions About the Modern eSports Landscape?
- How to Use Chromecast for Seamless PC Screen Mirroring on Your Home Television Setup
- In 2024, Earnings From a Million YouTube Globals
- In 2024, How to Use Life360 on Windows PC For Oppo A78 5G? | Dr.fone
- Top 5 Winter Frameworks for Comfortable Cinematography
- Top Places for Free Text Visual Enhancements
- Youtube Clip Maker
- Title: 2024 Approved Cultivating Commitment Gentle Subscription Strategies
- Author: Brian
- Created at : 2025-01-01 17:46:31
- Updated at : 2025-01-03 16:37:33
- Link: https://youtube-video-recordings.techidaily.com/2024-approved-cultivating-commitment-gentle-subscription-strategies/
- License: This work is licensed under CC BY-NC-SA 4.0.