
:max_bytes(150000):strip_icc()/new-apple-tv-4k-console-device-against-yellow-background-1140205622-2a35a59f75d34f95b8395268d53950b0.jpg)
"2024 Approved Consistent Title Creation Framework for Tech Sectors"
Consistent Title Creation Framework for Tech Sectors
Versatile Video Editor - Wondershare Filmora
An easy yet powerful editor
Numerous effects to choose from
Detailed tutorials provided by the official channel
The vertical video went to a mainstream media style. Nowadays, it’s common for online video, especially on social apps. Mobile video has become the most common way to watch online videos. It makes sense then that vertical is the preferred familiarization for videos. Users don’t want to twist their phones to watch a 30-second ad. Knowing YouTube shorts vertical size is important as well as Facebook vertical video specs.
Social juggernauts like Facebook and YouTube have adopted vertical video size or formats in current years. The newer social apps, like Snapchat and TikTok, use vertical video completely. While most platforms now prefer vertical video, they each have different patterns. Even Instagram vertical video dimensions premiere is different.
Users tinkering in video marketing know it’s essential to stay updated on social media video sizes across all platforms. But, we also know that it is time-consuming to dig through each technical specification of each social app. For that purpose, we have covered all network video sizes for each platform. So, browse the table of contents below and find the video dimensions, aspect ratios, and file sizes you need.
In this article
01 [What Vertical Video Size Do We Usually Use?](#Part 1)
02 [Vertical Video Dimension for Different Social Apps](#Part 2)
03 [Tips: How to Adjust Vertical Videos Size](#Part 3)
Part 1 What Vertical Video Size Do We Usually Use?
Videos come in different sizes. However, one principle is standard in creating them, the vertical video aspect ratio (width to height). This refers to how you compare and create the video height to video ratio (how you intend to record and produce your video).
Ideally, it is what you and viewers will see while watching your video. To create a perfect video, any video creator should decide on the relationship between the video height and width.
When creating YouTube vertical video dimensions, the width is usually longer than the height. Most television videos have a standard ratio of 4:3 and 16:9. However, social media videos are created using a 1:1 and 9:16 ratio.

A smartphone can shoot vertical videos perfectly, but some media players like cameras require editing and adjusting the sizes to get the correct aspect ratio. Experts won’t have difficulties adjusting horizontally shot videos, but an amateur will. Fortunately, you can avoid taking unprofessional shoots by focusing on the frame’s center to capture your subject wholly without clipping important aspects. While editing Facebook vertical video dimensions and other social apps, the results could vary depending on the editing software. But you can rotate the video within the software to get the correct dimensions lest you get ugly videos full of black backgrounds filling the frame.
Most cameras and video recorders have inbuilt settings that switch to aspect ratio when you start recording. And the good thing is that you can adjust the settings to your desired dimensions in the settings section. If you are shooting a vertical video without a preset aspect ratio, then:
- Shoot gently without switching your camera horizontally, especially if you are capturing a narrow view.
- Avoid fast spans as it appears intense on the camera that could result in blurry animations.
- Focus on what you are capturing, and if need be, zoom in to capture every essential detail.
The importance of applying aspect ratio in videos is to ensure your images and videos have excellent resolution. This way, you have a chance to present (market) your idea professionally.
Part 2 Vertical Video Dimension for Different Social Apps
Here is a guide on how to shoot vertical dimensions for various social apps –
1. YouTube Vertical Video Dimension Guide
It is common for viewers to switch to YouTube and watch videos, and this is why you need the work on the perfect YouTube vertical video size. Initially, you could display YouTube videos in different dimensions, but this is no longer the case since the app’s dynamic innovation to view animations in preferred sizes.

Usually, YouTube videos are recorded at a standard aspect ratio of 16: 9. It means that you cannot customize the dimensions as this is this ratio is the default.
Though the 16:9 dimensions are standard, you can also shoot your videos using different ratios like 1:1 (square), 4:3, or 9:16 (vertically). In this case, your video will fit different YouTube videos on each device but will display white or grey padding on the frames by default.
Manually adding padding to your videos reduces the ability to adjust them to different ratios on various devices. If you are yet to switch to YouTube vertical video dimensions, you are missing to increase brand awareness.
2. Facebook Vertical Video Dimension Guide
Facebook vertical video specs have mainly been using the 16:9 ratio. And since the app attracts billions of global users, it’s high time to optimize your snapshots and try posting in different formats.

For your next FB vertical video size for feed videos, think of square snapshots (1:1), 2:3, 4:5, or 16:9. If you love creating Facebook stories, you can stick to the 9:16 ratio. And for Facebook live videos, stick with the Facebook video vertical size, 16:9 dimensions. Note that most Facebook video posts will automatically have a standard measurement of 16:9.
3. Instagram Vertical Video Dimensions Guide
Since the inception of Instagram vertical video dimensions premiere, the ratio has always been 1:1. This dimension makes it optimal for phones and small-sized screens. Here is the ultimate guide for your new Instagram animations:
- 1:1 for square videos.
- 4:5 for portrait shots.
- 9:16 when shooting vertical animations.
If you are going live on Instagram, we recommend 9:16, while you can shoot in 1:1, 4:5, and 16:9 ratios for feed videos. For Instagram stories, we suggest 9:16, but you can always work around 1:1, 4:9, and 16:9.

4. Twitter Vertical Video Dimension Guide
Twitter is quite different when considering feed video dimensions; portrait and square. The former (portrait) is a favorite for ads and marketing videos display (increase brand visibility), whereas the latter is perfect for displaying videos on multiple devices.
Twitter videos can be perfect in the below dimensions:
- Promotional video ads 1:2 39 to 2.39:1
- Six-second short ads 1:2.39 – 2.39:1
- First video ads 1:2.39 – 2.39:1
- Personal portrait (vertical) videos 9:16
- Personal horizontal animations 1:2.39 – 2.39:1

5. WhatsApp Vertical Video Dimension Guide
Most people don’t know the importance of resizing WhatsApp videos. Sharing videos on your WhatsApp status is a marketing strategy, but you must resize your videos well. Most video WhatsApp vertical videos have 4:3 dimensions and a 1080 × 1920 pixels size.
Part 3 Tips: How to Adjust Vertical Videos Size
The smartphone has become the primary tool for taking photos or recording videos, but we hold our mobile phone in a different direction while shooting videos, which causes the wrong adjustment while uploading it. Fortunately, there are ways, and your video can fit any screen without any compromises. Bellow, we are going to tell you two methods to adjust vertical video size
Method 1: Filmora
Filmora allows users to rotate your video to any point they want. What’s more, you can zoom in or crop the undesired parts in the video with a snap. It also offers you preset aspect ratios like 16:9, 9:16; 4:5, 1:1, etc., to help you quickly find the perfect aspect ratio for YouTube, Instagram, and other social apps. Let’s see how to change video adjustment in Filmora.
How to crop aspect ratio at the starting interface:
In this method, you must upload the animation first. Follow these steps:
Step 1: Upload your video into the editing panel.
Step2: Scroll to the drop-down menu to see various dimensions (1:1. 4:3, 9:16, 16:9, and 21:9).
Step3: Select the desired ratio and apply.

Modifying aspect ratio in project settings:
This method allows you to preset the ratios before uploading your media. Most files are preset to a 4:3 ratio, but you can adjust as you wish. Note that uploading a video with other aspect ratios will automatically switch to the default one. However, you can change the ratio by clicking on the project settings tab.

Changing aspect ratio when editing:
You can crop your video after importing it to the Filmora panel using the crop and zoom tools.
Step 1: Right-click on the file in the panel.
Step 2: Select crop and zoom.
Step 3: Click on the desired ratio from the suggestions (16:9, 4:3, 1:1, and 9:16) and confirm the action by clicking OK.

You can also modify the aspect ratio manually, add filters, and blur the background to enhance resolution when editing.
Auto reframing:
Latest Filmora running versions like V10.5 have the auto-reframe feature that can help crop aspect ratio seamlessly. The good thing about this feature is that it detects any object and can remove it if need be. Plus, this video editor also comes with preset aspect ratios that conveniently suit different social apps.
You can auto reframe by:
Step 1: Import the video to the panel. Right-click on the file and select the auto-reframe icon.

Step 2: Choose the desired aspect ratio.

Step 3: Click the analyze icon and wait for the results in a preview window.
Step 4: Adjust the frame by dragging the box to balance the object or leave it if you love the results.

Step 5: When done, rename it and click the export feature to save your new file.

Step 6: Edit (add effects) as desired.
Modifying aspect ratio when exporting:
After saving your file, you can export it to your desired media display device and change the aspect ratio based on your platform settings, as discussed above.

Method 2: Final Cut Pro
Apple’s Final Cut Pro is a compelling software for video editing and compositing. The interface is designed similar with many other video editing programs such as Adobe Premiere and Combustion etc.
To prepare:
- Take vertical videos.
- Connect iPhone to an editing system.
- Enter a password on the iPhone.
- Started Final Cut Pro.
- Create a new library, named it “Vertical Video”.
Steps to adjust vertical video size with Final cut pro:
Step 1: To import the video clip, you want to edit, click on the File > Import Media. The connected iPhone screen appears in the top left corner. The circle icon shows that FCP is still collecting data from the phone and the pointing arrow allows to disconnect.
Step 2: When the iPhone is chosen in the sidebar, thumbnails appear at the bottom of the Media Import window. For example, you can see the four vertical video clips, choose one to edit.
Step 3: The iPhone compresses MP4 video. While editing a simple project, you don’t need to generate optimized media. However, optimizing media will save you time in the long run if you plan to add lots of effects.
Step 4: Now, generate a new project and apply the Automatic settings.
Step 5: Next, edit a vertical clip into the empty new project. Even if this isn’t the first clip you want the audience to see, it is essential because FCP uses this clip to configure the project settings.
Step 6: When that first video clip is edited into the timeline, this dialog arrives. Note that the frame size is already fixed by the size of the video you shot on the iPhone. Don’t change any settings. It allows FCP to automatically configure the project to match the specs of this clip. If you’ve done this correctly, your clip appears vertically in the Viewer.
Wondershare Filmora
Get started easily with Filmora’s powerful performance, intuitive interface, and countless effects!
Try It Free Try It Free Try It Free Learn More >

AI Portrait – The best feature of Wondershare Filmora for gameplay editing
The AI Portrait is a new add-on in Wondershare Filmora. It can easily remove video backgrounds without using a green screen or chroma key, allowing you to add borders, glitch effects, pixelated, noise, or segmentation video effects.

Conclusion
As you can tell, video dimensions significantly influence your media resolution and impact. Aspect ratio is the standard way to modify your media to fit YouTube, Instagram, Facebook, and other social apps. Changing dimensions is a DIY process; you can edit YouTube vertical video dimensions and other social apps like Facebook and Instagram through Filmora or Final Cut Pro.
The vertical video went to a mainstream media style. Nowadays, it’s common for online video, especially on social apps. Mobile video has become the most common way to watch online videos. It makes sense then that vertical is the preferred familiarization for videos. Users don’t want to twist their phones to watch a 30-second ad. Knowing YouTube shorts vertical size is important as well as Facebook vertical video specs.
Social juggernauts like Facebook and YouTube have adopted vertical video size or formats in current years. The newer social apps, like Snapchat and TikTok, use vertical video completely. While most platforms now prefer vertical video, they each have different patterns. Even Instagram vertical video dimensions premiere is different.
Users tinkering in video marketing know it’s essential to stay updated on social media video sizes across all platforms. But, we also know that it is time-consuming to dig through each technical specification of each social app. For that purpose, we have covered all network video sizes for each platform. So, browse the table of contents below and find the video dimensions, aspect ratios, and file sizes you need.
In this article
01 [What Vertical Video Size Do We Usually Use?](#Part 1)
02 [Vertical Video Dimension for Different Social Apps](#Part 2)
03 [Tips: How to Adjust Vertical Videos Size](#Part 3)
Part 1 What Vertical Video Size Do We Usually Use?
Videos come in different sizes. However, one principle is standard in creating them, the vertical video aspect ratio (width to height). This refers to how you compare and create the video height to video ratio (how you intend to record and produce your video).
Ideally, it is what you and viewers will see while watching your video. To create a perfect video, any video creator should decide on the relationship between the video height and width.
When creating YouTube vertical video dimensions, the width is usually longer than the height. Most television videos have a standard ratio of 4:3 and 16:9. However, social media videos are created using a 1:1 and 9:16 ratio.
A smartphone can shoot vertical videos perfectly, but some media players like cameras require editing and adjusting the sizes to get the correct aspect ratio. Experts won’t have difficulties adjusting horizontally shot videos, but an amateur will. Fortunately, you can avoid taking unprofessional shoots by focusing on the frame’s center to capture your subject wholly without clipping important aspects. While editing Facebook vertical video dimensions and other social apps, the results could vary depending on the editing software. But you can rotate the video within the software to get the correct dimensions lest you get ugly videos full of black backgrounds filling the frame.
Most cameras and video recorders have inbuilt settings that switch to aspect ratio when you start recording. And the good thing is that you can adjust the settings to your desired dimensions in the settings section. If you are shooting a vertical video without a preset aspect ratio, then:
- Shoot gently without switching your camera horizontally, especially if you are capturing a narrow view.
- Avoid fast spans as it appears intense on the camera that could result in blurry animations.
- Focus on what you are capturing, and if need be, zoom in to capture every essential detail.
The importance of applying aspect ratio in videos is to ensure your images and videos have excellent resolution. This way, you have a chance to present (market) your idea professionally.
Part 2 Vertical Video Dimension for Different Social Apps
Here is a guide on how to shoot vertical dimensions for various social apps –
1. YouTube Vertical Video Dimension Guide
It is common for viewers to switch to YouTube and watch videos, and this is why you need the work on the perfect YouTube vertical video size. Initially, you could display YouTube videos in different dimensions, but this is no longer the case since the app’s dynamic innovation to view animations in preferred sizes.
Usually, YouTube videos are recorded at a standard aspect ratio of 16: 9. It means that you cannot customize the dimensions as this is this ratio is the default.
Though the 16:9 dimensions are standard, you can also shoot your videos using different ratios like 1:1 (square), 4:3, or 9:16 (vertically). In this case, your video will fit different YouTube videos on each device but will display white or grey padding on the frames by default.
Manually adding padding to your videos reduces the ability to adjust them to different ratios on various devices. If you are yet to switch to YouTube vertical video dimensions, you are missing to increase brand awareness.
2. Facebook Vertical Video Dimension Guide
Facebook vertical video specs have mainly been using the 16:9 ratio. And since the app attracts billions of global users, it’s high time to optimize your snapshots and try posting in different formats.
For your next FB vertical video size for feed videos, think of square snapshots (1:1), 2:3, 4:5, or 16:9. If you love creating Facebook stories, you can stick to the 9:16 ratio. And for Facebook live videos, stick with the Facebook video vertical size, 16:9 dimensions. Note that most Facebook video posts will automatically have a standard measurement of 16:9.
3. Instagram Vertical Video Dimensions Guide
Since the inception of Instagram vertical video dimensions premiere, the ratio has always been 1:1. This dimension makes it optimal for phones and small-sized screens. Here is the ultimate guide for your new Instagram animations:
- 1:1 for square videos.
- 4:5 for portrait shots.
- 9:16 when shooting vertical animations.
If you are going live on Instagram, we recommend 9:16, while you can shoot in 1:1, 4:5, and 16:9 ratios for feed videos. For Instagram stories, we suggest 9:16, but you can always work around 1:1, 4:9, and 16:9.
4. Twitter Vertical Video Dimension Guide
Twitter is quite different when considering feed video dimensions; portrait and square. The former (portrait) is a favorite for ads and marketing videos display (increase brand visibility), whereas the latter is perfect for displaying videos on multiple devices.
Twitter videos can be perfect in the below dimensions:
- Promotional video ads 1:2 39 to 2.39:1
- Six-second short ads 1:2.39 – 2.39:1
- First video ads 1:2.39 – 2.39:1
- Personal portrait (vertical) videos 9:16
- Personal horizontal animations 1:2.39 – 2.39:1
5. WhatsApp Vertical Video Dimension Guide
Most people don’t know the importance of resizing WhatsApp videos. Sharing videos on your WhatsApp status is a marketing strategy, but you must resize your videos well. Most video WhatsApp vertical videos have 4:3 dimensions and a 1080 × 1920 pixels size.
Part 3 Tips: How to Adjust Vertical Videos Size
The smartphone has become the primary tool for taking photos or recording videos, but we hold our mobile phone in a different direction while shooting videos, which causes the wrong adjustment while uploading it. Fortunately, there are ways, and your video can fit any screen without any compromises. Bellow, we are going to tell you two methods to adjust vertical video size
Method 1: Filmora
Filmora allows users to rotate your video to any point they want. What’s more, you can zoom in or crop the undesired parts in the video with a snap. It also offers you preset aspect ratios like 16:9, 9:16; 4:5, 1:1, etc., to help you quickly find the perfect aspect ratio for YouTube, Instagram, and other social apps. Let’s see how to change video adjustment in Filmora.
How to crop aspect ratio at the starting interface:
In this method, you must upload the animation first. Follow these steps:
Step 1: Upload your video into the editing panel.
Step2: Scroll to the drop-down menu to see various dimensions (1:1. 4:3, 9:16, 16:9, and 21:9).
Step3: Select the desired ratio and apply.
Modifying aspect ratio in project settings:
This method allows you to preset the ratios before uploading your media. Most files are preset to a 4:3 ratio, but you can adjust as you wish. Note that uploading a video with other aspect ratios will automatically switch to the default one. However, you can change the ratio by clicking on the project settings tab.
Changing aspect ratio when editing:
You can crop your video after importing it to the Filmora panel using the crop and zoom tools.
Step 1: Right-click on the file in the panel.
Step 2: Select crop and zoom.
Step 3: Click on the desired ratio from the suggestions (16:9, 4:3, 1:1, and 9:16) and confirm the action by clicking OK.
You can also modify the aspect ratio manually, add filters, and blur the background to enhance resolution when editing.
Auto reframing:
Latest Filmora running versions like V10.5 have the auto-reframe feature that can help crop aspect ratio seamlessly. The good thing about this feature is that it detects any object and can remove it if need be. Plus, this video editor also comes with preset aspect ratios that conveniently suit different social apps.
You can auto reframe by:
Step 1: Import the video to the panel. Right-click on the file and select the auto-reframe icon.
Step 2: Choose the desired aspect ratio.
Step 3: Click the analyze icon and wait for the results in a preview window.
Step 4: Adjust the frame by dragging the box to balance the object or leave it if you love the results.
Step 5: When done, rename it and click the export feature to save your new file.
Step 6: Edit (add effects) as desired.
Modifying aspect ratio when exporting:
After saving your file, you can export it to your desired media display device and change the aspect ratio based on your platform settings, as discussed above.
Method 2: Final Cut Pro
Apple’s Final Cut Pro is a compelling software for video editing and compositing. The interface is designed similar with many other video editing programs such as Adobe Premiere and Combustion etc.
To prepare:
- Take vertical videos.
- Connect iPhone to an editing system.
- Enter a password on the iPhone.
- Started Final Cut Pro.
- Create a new library, named it “Vertical Video”.
Steps to adjust vertical video size with Final cut pro:
Step 1: To import the video clip, you want to edit, click on the File > Import Media. The connected iPhone screen appears in the top left corner. The circle icon shows that FCP is still collecting data from the phone and the pointing arrow allows to disconnect.
Step 2: When the iPhone is chosen in the sidebar, thumbnails appear at the bottom of the Media Import window. For example, you can see the four vertical video clips, choose one to edit.
Step 3: The iPhone compresses MP4 video. While editing a simple project, you don’t need to generate optimized media. However, optimizing media will save you time in the long run if you plan to add lots of effects.
Step 4: Now, generate a new project and apply the Automatic settings.
Step 5: Next, edit a vertical clip into the empty new project. Even if this isn’t the first clip you want the audience to see, it is essential because FCP uses this clip to configure the project settings.
Step 6: When that first video clip is edited into the timeline, this dialog arrives. Note that the frame size is already fixed by the size of the video you shot on the iPhone. Don’t change any settings. It allows FCP to automatically configure the project to match the specs of this clip. If you’ve done this correctly, your clip appears vertically in the Viewer.
Wondershare Filmora
Get started easily with Filmora’s powerful performance, intuitive interface, and countless effects!
Try It Free Try It Free Try It Free Learn More >
AI Portrait – The best feature of Wondershare Filmora for gameplay editing
The AI Portrait is a new add-on in Wondershare Filmora. It can easily remove video backgrounds without using a green screen or chroma key, allowing you to add borders, glitch effects, pixelated, noise, or segmentation video effects.
Conclusion
As you can tell, video dimensions significantly influence your media resolution and impact. Aspect ratio is the standard way to modify your media to fit YouTube, Instagram, Facebook, and other social apps. Changing dimensions is a DIY process; you can edit YouTube vertical video dimensions and other social apps like Facebook and Instagram through Filmora or Final Cut Pro.
Expert Picks: Laptops That Transform Raw Footage
The Best Laptops for Video Editing

Richard Bennett
Oct 26, 2023• Proven solutions
This article lists the 3 best laptops for video editing in 2018.
Whether you’re an industry professional or an avid YouTuber, you know how important it is to produce quality videos consistently.
The quality of the videos you create will depend on your creativity, the editing software you use, and the hardware that software is installed on. And as you probably know, it can be tough to work fast and get good results when your hardware or laptop isn’t strong enough to power your software properly and allow you to work at the pace you want.
The best laptops for video editing in 2018 have three things in common. First, they have top-of-the-line display technology for color accuracy, color depth, and clarity. Next, they have discrete (dedicated) Graphic Processing Units (GPUs) with accompanying RAM to enable them to handle video processing fast without compromising other system functions. And finally, they have Intel core i7 CPU processors and Solid-State Drives (SSD) for faster overall performance.
THE TOP 3 LAPTOPS FOR EDITING VIDEO IN 2018
The top 3 laptops below are quite impressive. They have the right mix of power and function that video editing requires.
1.MACBOOK PRO WITH TOUCH BAR
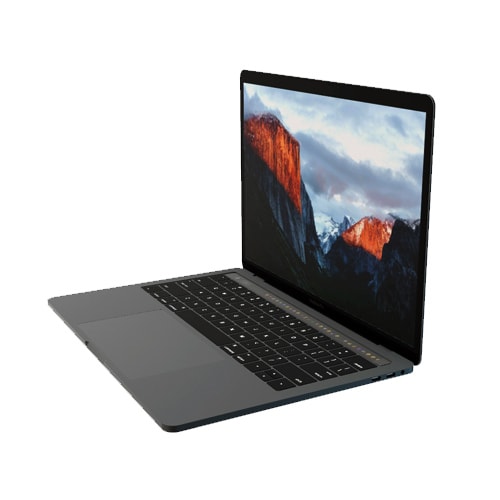
PRICE: $1500 - $1800
SYSTEM SPECS:
CPU: Intel Core i7 Processor
GRAPHICS: Radeon Pro 555 with 2GB memory – 560 with 4GB memory
RAM: 16GB
SCREEN: 15.4” Retina Display
RES: 2880 x 1800px
STORAGE: 128 – 256GB SSD
PROS
- OLED Touch Bar
- Thunderbolt 3 ports
- Large Trackpad
CONS:
- No other input ports available besides Thunderbolt 3
- Expensive
The MacBook Pro with Touch Bar is the best video editing laptop produced by Apple. It has a wide 15.4” screen with thin bezels, and its proprietary OLED Touch bar amps up its flexibility and functionality considerably. The Touch Bar is set-up to show different shortcuts for different apps. It works quite well with Photoshop and will show thumbnails, filter options, a color picker, and more while you’re editing videos or stills.
Working with large 4K video files is much easier with the MacBook Pro. It’s fitted with Thunderbolt 3 Ports which have the highest data and video bandwidth available for USB-C connections. With these Thunderbolt ports, you can also use high-speed and high-power peripherals without a hitch. This laptop also has an extra-wide touchpad or Trackpad (as Apple calls it) which expands your physical working surface while also making it easier to do detailed video editing.
Unfortunately, if you need a variety of ports like most videographers, working with the MacBook Pro could be a challenge as it only has Thunderbolt 3 ports. If this is the laptop you prefer, you’ll need to buy additional connection hardware to work with different input devices. And while this laptop impresses in many ways, it’s also quite expensive. There are certainly other laptops on the market which can give you similar performance at a lower cost.
2. DELL XPS 15
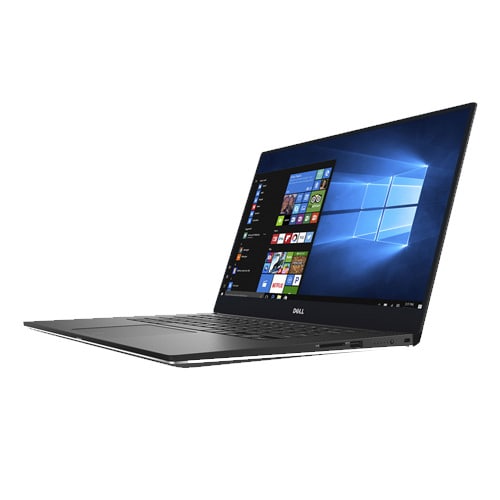
PRICE: $999 - $1300
SYSTEM SPECS:
CPU: Intel Core i7 Processor
GRAPHICS: NVIDIA GeForce GTX 1050
RAM: 8 - 16GB
SCREEN: 15.6”
RES: FHD - 4k UHD 3840 x 2160px
STORAGE: 256GB – 1TB SSD
PROS
- 4k InfinityEdge display
- Good battery life
- Has multiple input ports
CONS:
- Webcam is oddly positioned
The Dell XPS 15 is one laptop that hits the sweet spot for many videographers. It’s considered the closest competitor to the MacBook Pro reviewed above. In fact, many would argue that it tops the MacBook Pro when it comes to speed, color accuracy, and color depth. Its 15.6” screen has very thin bezels for minimal distraction and immersive work experience. At 4K resolution and displaying a wide range of the sRGB gamut, video editing with the Dell XPS 15 promises to be both smooth and enjoyable.
The Dell XPS 15 is certainly more affordable, while still delivering excellent graphics performance. It features an Intel i7 processor and the NVIDIA GeForce GTX 1050 graphics processor. This makes it remarkably fast for video editing, as well as energy-efficient. People who work with different input devices will also like that this laptop has legacy adapters (USB, HDMI, ethernet) alongside a USB type C port.
The biggest downside to the Dell XPS 15 laptop is its oddly positioned webcam. It feels awkward and can be an inconvenience to use since you’ll have to adjust your position significantly while making video calls or recording for your YouTube channel.
3. MICROSOFT SURFACE BOOK 2
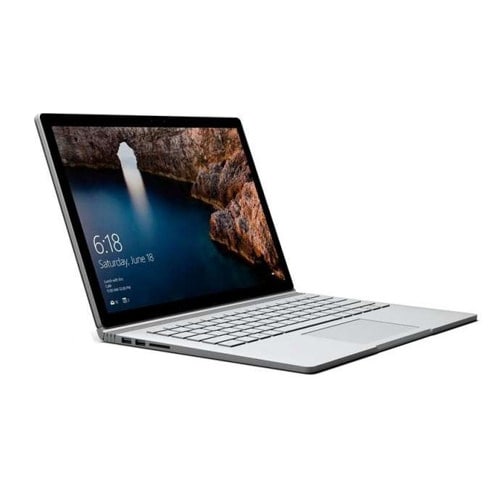
PRICE: $1499 - $2499
SYSTEM SPECS:
CPU: Intel Core i7 Processor
GRAPHICS: Intel HD 620 or Nvidia GTX 1050 / GTX 1060
RAM: 16GB
SCREEN: 15.0”
RES: 3240 x 2160px
STORAGE: 256GB, 512GB – 1TB SSD
PROS
- Detachable screen
- Has multiple input ports (USB Type-A, USB Type-C, SD card reader)
- Works with a Stylus
CONS:
- Expensive
- Fulcrum hinge
The Microsoft Surface Book 2 is a laptop and a tablet thanks to its detachable screen. At a resolution of 3240 x 2160px, its screen is nearly 4k and can handle Full HD and HD footage with ease. Add to this its capacity to show a considerable portion of the sRGB gamut and its easy-to-use stylus and you can see why this 2-in-1 combo from Microsoft is one of the top 3 laptops for video editing in 2018.
Surface Book 2 also has the right combination of power and storage capacity that video editing requires. It boasts a state-of-the-art NVIDIA graphics processor and an Intel i7 processor for a smooth workflow no matter the size or level of detail involved in your video editing project.
On the downside, this laptop is undoubtedly very expensive. Compared to the function and power you can get from the DELL XPS 15, it’s hard to justify paying nearly $2500 for the Surface Book 2. Its detachable screen, supported by a fulcrum hinge, also comes at a price. It makes the laptop a bit bulky at one end when it’s folded. This in turn can make day-to-day handling a bit more tricky than it has to be.
CONCLUSION
If you’re searching for a good laptop to help you improve the quality of your videos in 2018, look no further than these 3. They have all the power, function, and storage capacity you need to handle any project with ease. Just be mindful of your budget and consider which extras are worth the expense. Go for the MacBook Pro with Touch Bar if customizing your workflow is a priority. Opt for the Dell XPS 15 if you want the best combination of display quality and graphics processing. Finally, consider the Surface Book 2 if you need the flexibility of a 2-in-1 device.
What do you think is the best laptop for video editing?
Equip Your Laptop with the Best Video Editing Software


Richard Bennett
Richard Bennett is a writer and a lover of all things video.
Follow @Richard Bennett
Richard Bennett
Oct 26, 2023• Proven solutions
This article lists the 3 best laptops for video editing in 2018.
Whether you’re an industry professional or an avid YouTuber, you know how important it is to produce quality videos consistently.
The quality of the videos you create will depend on your creativity, the editing software you use, and the hardware that software is installed on. And as you probably know, it can be tough to work fast and get good results when your hardware or laptop isn’t strong enough to power your software properly and allow you to work at the pace you want.
The best laptops for video editing in 2018 have three things in common. First, they have top-of-the-line display technology for color accuracy, color depth, and clarity. Next, they have discrete (dedicated) Graphic Processing Units (GPUs) with accompanying RAM to enable them to handle video processing fast without compromising other system functions. And finally, they have Intel core i7 CPU processors and Solid-State Drives (SSD) for faster overall performance.
THE TOP 3 LAPTOPS FOR EDITING VIDEO IN 2018
The top 3 laptops below are quite impressive. They have the right mix of power and function that video editing requires.
1.MACBOOK PRO WITH TOUCH BAR
PRICE: $1500 - $1800
SYSTEM SPECS:
CPU: Intel Core i7 Processor
GRAPHICS: Radeon Pro 555 with 2GB memory – 560 with 4GB memory
RAM: 16GB
SCREEN: 15.4” Retina Display
RES: 2880 x 1800px
STORAGE: 128 – 256GB SSD
PROS
- OLED Touch Bar
- Thunderbolt 3 ports
- Large Trackpad
CONS:
- No other input ports available besides Thunderbolt 3
- Expensive
The MacBook Pro with Touch Bar is the best video editing laptop produced by Apple. It has a wide 15.4” screen with thin bezels, and its proprietary OLED Touch bar amps up its flexibility and functionality considerably. The Touch Bar is set-up to show different shortcuts for different apps. It works quite well with Photoshop and will show thumbnails, filter options, a color picker, and more while you’re editing videos or stills.
Working with large 4K video files is much easier with the MacBook Pro. It’s fitted with Thunderbolt 3 Ports which have the highest data and video bandwidth available for USB-C connections. With these Thunderbolt ports, you can also use high-speed and high-power peripherals without a hitch. This laptop also has an extra-wide touchpad or Trackpad (as Apple calls it) which expands your physical working surface while also making it easier to do detailed video editing.
Unfortunately, if you need a variety of ports like most videographers, working with the MacBook Pro could be a challenge as it only has Thunderbolt 3 ports. If this is the laptop you prefer, you’ll need to buy additional connection hardware to work with different input devices. And while this laptop impresses in many ways, it’s also quite expensive. There are certainly other laptops on the market which can give you similar performance at a lower cost.
2. DELL XPS 15
PRICE: $999 - $1300
SYSTEM SPECS:
CPU: Intel Core i7 Processor
GRAPHICS: NVIDIA GeForce GTX 1050
RAM: 8 - 16GB
SCREEN: 15.6”
RES: FHD - 4k UHD 3840 x 2160px
STORAGE: 256GB – 1TB SSD
PROS
- 4k InfinityEdge display
- Good battery life
- Has multiple input ports
CONS:
- Webcam is oddly positioned
The Dell XPS 15 is one laptop that hits the sweet spot for many videographers. It’s considered the closest competitor to the MacBook Pro reviewed above. In fact, many would argue that it tops the MacBook Pro when it comes to speed, color accuracy, and color depth. Its 15.6” screen has very thin bezels for minimal distraction and immersive work experience. At 4K resolution and displaying a wide range of the sRGB gamut, video editing with the Dell XPS 15 promises to be both smooth and enjoyable.
The Dell XPS 15 is certainly more affordable, while still delivering excellent graphics performance. It features an Intel i7 processor and the NVIDIA GeForce GTX 1050 graphics processor. This makes it remarkably fast for video editing, as well as energy-efficient. People who work with different input devices will also like that this laptop has legacy adapters (USB, HDMI, ethernet) alongside a USB type C port.
The biggest downside to the Dell XPS 15 laptop is its oddly positioned webcam. It feels awkward and can be an inconvenience to use since you’ll have to adjust your position significantly while making video calls or recording for your YouTube channel.
3. MICROSOFT SURFACE BOOK 2
PRICE: $1499 - $2499
SYSTEM SPECS:
CPU: Intel Core i7 Processor
GRAPHICS: Intel HD 620 or Nvidia GTX 1050 / GTX 1060
RAM: 16GB
SCREEN: 15.0”
RES: 3240 x 2160px
STORAGE: 256GB, 512GB – 1TB SSD
PROS
- Detachable screen
- Has multiple input ports (USB Type-A, USB Type-C, SD card reader)
- Works with a Stylus
CONS:
- Expensive
- Fulcrum hinge
The Microsoft Surface Book 2 is a laptop and a tablet thanks to its detachable screen. At a resolution of 3240 x 2160px, its screen is nearly 4k and can handle Full HD and HD footage with ease. Add to this its capacity to show a considerable portion of the sRGB gamut and its easy-to-use stylus and you can see why this 2-in-1 combo from Microsoft is one of the top 3 laptops for video editing in 2018.
Surface Book 2 also has the right combination of power and storage capacity that video editing requires. It boasts a state-of-the-art NVIDIA graphics processor and an Intel i7 processor for a smooth workflow no matter the size or level of detail involved in your video editing project.
On the downside, this laptop is undoubtedly very expensive. Compared to the function and power you can get from the DELL XPS 15, it’s hard to justify paying nearly $2500 for the Surface Book 2. Its detachable screen, supported by a fulcrum hinge, also comes at a price. It makes the laptop a bit bulky at one end when it’s folded. This in turn can make day-to-day handling a bit more tricky than it has to be.
CONCLUSION
If you’re searching for a good laptop to help you improve the quality of your videos in 2018, look no further than these 3. They have all the power, function, and storage capacity you need to handle any project with ease. Just be mindful of your budget and consider which extras are worth the expense. Go for the MacBook Pro with Touch Bar if customizing your workflow is a priority. Opt for the Dell XPS 15 if you want the best combination of display quality and graphics processing. Finally, consider the Surface Book 2 if you need the flexibility of a 2-in-1 device.
What do you think is the best laptop for video editing?
Equip Your Laptop with the Best Video Editing Software
Richard Bennett
Richard Bennett is a writer and a lover of all things video.
Follow @Richard Bennett
Also read:
- Constructing Inquiry Curtain Closers for 2024
- Dodging Account Penaltinas on Youtube
- 2024 Approved Does YouTube Offer Frequent Payments to You?
- 2024 Approved Crafting Powerful Thumbnails with Top 20 Font Options
- Can Genuine Growth Outpace Faux Followers' Effects, In 2024
- Reversing the Fortunes of ZERO Views on Your YouTube Videos
- Streamline Shorter Optimizing YouTube Videos for Less Time
- 2024 Approved Daytime Delights The Most Inspiring Anime Streaming Channels
- Navigate Away From Bot-Influenced Metrics
- In 2024, Ajey's YouTube Earnings Insight - 2023
- [Updated] Captivating Crafting Writing Intriguing Youtube Descriptions with Templates
- The Complete Step-by-Step for YouTube FB Sharing
- 2024 Approved Beat Procrastination with Instant Access to Your Youtube Favorites
- [Updated] Enhance Video Popularity with Strategic Timestamps
- Dive Into Gaming How to Build and Prosper on YouTube
- In 2024, Cutting Through the Noise Optimal Thumbnail Sizes
- Epicurean Escapades Crafting Kitchen Films for 2024
- The Ultimate Handbook for Optimal YouTube Banners & Art Sizes
- 2024 Approved Captivating Your Audience YouTube Intro Excellence with iMovie
- [Updated] Capture and Relive Your Favorite Moments Anywhere, Anytime The Best in Free Video Downloaders for YouTubes
- 2024 Approved Earning Potential for Creators in YouTube Ads?
- [Updated] Decoding Digital Dollars An Effective Triple Step Process to Determine Your Subscriber Profits
- Crafting Stories Essential Tips for YouTube Video Editors
- Unlock the Power of Emojis for YT Feedback
- [Updated] Epicurean Elites Top Food Vloggers You Can't Miss
- [New] Content Strategy Boost Top 8 YouTube Rank Watcher Revealed
- The Art of Profit-Driven Online Shopping Blogosynthesis
- Best Free Downloader Turn YouTube Audio Into Premium MP3s
- YouTube's Iconic Counter-Based Awards System
- In 2024, Beat Bazaar Curation of Superior DJ Video Samples for Download
- Top 5 Gaming Headsets for YouTube
- Core ASMR Platforms Explored for 2024
- Elevate Streams Using YouTube's AV1 Settings
- How to Recover Hidden Shorts' Thumbnails in Videos
- [Updated] Breakthrough Techniques in YouTube Content Creation
- Mastering YouTube Earnings A Monetization Checklist
- 2024 Approved Profit From YouTube Monetize YouTube Shorts and Boost Your Income
- Best YouTube Beginnings 15 Editing Samples for 2024
- [Updated] Crafting Captivating Edu-Vids on YouTube A Step-by-Step Guide
- 2024 Approved A Comprehensive Walkthrough Creating Channel Banners
- Mouthwatering Marvels Leading TikTok Eaters
- Gmail Not Working on Honor X9a 7 Common Problems & Fixes | Dr.fone
- [Updated] AZ Capture Insights Apps Explored for 2024
- Maximize Impact Mastering IGTV Content Submission
- New Add Some Shake to Videos with Alight Motion for 2024
- New Unleash Your Creativity Best Time-Lapse Video Apps for Mobile
- In 2024, How to Mirror PC Screen to Infinix Smart 8 HD Phones? | Dr.fone
- In 2024, How to Change/Add Location Filters on Snapchat For your Samsung Galaxy S23 Ultra | Dr.fone
- 2024 Approved Efficient Server Management Cutting Down Clutter with Discord's Mass Delete
- Which is the Best Fake GPS Joystick App On Oppo K11 5G? | Dr.fone
- [New] Fine-Tuning Your FB Videos Aspect Ratios Decoded
- The New Social Networking Battlefield A Comparative Analysis Between TikTok and Snap
- Top 4 Ways to Trace Nokia C110 Location | Dr.fone
- 2024 Approved Navigating with Precision to Uncover Ideal Discord Spaces
- [Updated] Mastering Clear Webcam Footage Recording & Editing Tips for 2024
- Updated Snapshot of Sound Forge A Thorough Look at Its Audio Production Capabilities
- In 2024, How to Transfer from Apple iPhone 13 to iPhone 8/X/11 | Dr.fone
- [New] In 2024, Pixel Perfection Cutest/Scariest Filter Guide for TikToks
- [New] Reviewing and Analyzing Previous Tweets for 2024
- Top 15 Augmented Reality Games Like Pokémon GO To Play On Lenovo ThinkPhone | Dr.fone
- 2 Ways to Monitor Nokia C12 Pro Activity | Dr.fone
- Lightweight Travel Bags with Camera Integration
- Updated Macs Best Video Production Tools Unleash Your Creativity for 2024
- In 2024, The Best TikTok Inspired Amazon Picks – Your List Goes Here
- Easy Fixes How To Recover Forgotten iCloud Password From your iPhone 6 Plus
- iSpoofer is not working On Itel P55T? Fixed | Dr.fone
- Updated Video Blur Made Easy Free Online Method for 2024
- Snapchat Integration for the Tech-Savvy Mac User
- [New] In 2024, Game to Glass OBS Edition
- Updated 2024 Approved Turn Your Photos Into a Movie A Beginners Tutorial
- How to Mirror Honor X50 to Mac? | Dr.fone
- Title: "2024 Approved Consistent Title Creation Framework for Tech Sectors"
- Author: Brian
- Created at : 2024-05-25 11:04:44
- Updated at : 2024-05-26 11:04:44
- Link: https://youtube-video-recordings.techidaily.com/2024-approved-consistent-title-creation-framework-for-tech-sectors/
- License: This work is licensed under CC BY-NC-SA 4.0.
