
"2024 Approved Channel Upgrade Made Simple - Embrace TubeBuddy Techniques"
Channel Upgrade Made Simple - Embrace TubeBuddy Techniques
The Benefits of TubeBuddy | Manage Your YouTube Channel More Easily

Richard Bennett
Nov 01, 2022• Proven solutions
TubeBuddy is a YouTube certified extension for your Google Chrome browser. When you visit YouTube after installing TubeBuddy a whole new set of useful tools becomes available.
TubeBuddy’s tools were designed to save you time and effort when performing some of the more mundane tasks involved in running a YouTube channel, like adding cards. Many of TubeBuddy’s tools are completely free to use, but others might require a paid license. There are three levels of licensing: $9, $19, or $39 per month.
The Benefits of Using TubeBuddy for YouTube
- Increased Productivity
- Bulk Tools for Annotations, Cards, Thumbnails and More
- Quick Optimization for Your Video’s Tags
- Useful Data
Benefits of TubeBuddy
YouTubers who use TubeBuddy are able to spend less time on busy-work and more time on coming up with creative video ideas. Here are some of the ways TubeBuddy can help you, especially if you have a large or mid-sized channel:
1. Increased Productivity
Most of TubeBuddy’s Productivity Tools are available for free, but some require a $9 per month Pro license.
You can use these tools to get your videos ready for posting faster, embed them off-YouTube more easily, and save time by creating canned responses or templates for cards and annotations.
For example, you might find yourself creating the same YouTube Card over and over again to include it in every video you make. Creating a template through TubeBuddy will save you this effort.
Another great productivity tool is the Video Topic Planner. You can save video ideas you come up with, or ideas viewers have suggested to you, and arrange them in a queue so you never forget what you are planning to make next.
2. Bulk Tools for Annotations, Cards, Thumbnails and More
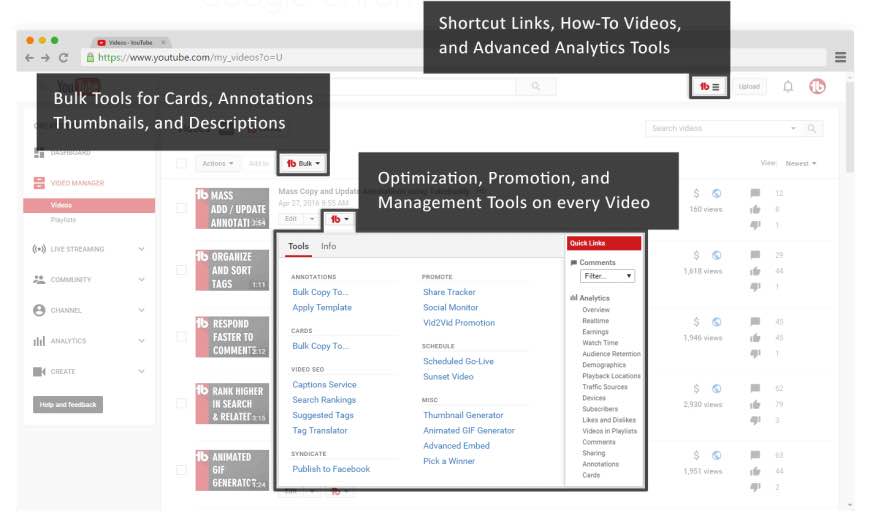
Most of TubeBuddy’s bulk processing tools require a $19 per month Star license.
Two of the most time-saving tools in this section are the Bulk Copy tools for cards and annotations. They will save you from having to recreate the same ones over and over. Then, using the Bulk Update tools, you will be able to make changes to all of your cards or annotations at once.
For example: if you use a YouTube Card to link to your personal website and include it in every video, and then you change your website, you change the link in all of your existing cards at once.
Another useful Bulk tool is Bulk Thumbnail Overlays, which will allow you to add a logo to all of your existing video thumbnails at once.
3. Quick Optimization for Your Video’s Tags
The SEO Tools in TubeBuddy will help you find the best tags for your videos and suggest tags you might want to target. Many of these tools are free, but others require a $19 Star license.
One of the best free tools in this category is View and Copy Video Tags. It allows you to see and copy the tags of other people’s videos. You will be able to see which keywords your competitors are targeting (and look for opportunities to target them more effectively). This can also save you a lot of time writing out tags that should really be the same as the ones on an existing video.
4. Useful Data
The most useful piece of data under Data and Research Tools is the Best Time to Publish. How many views you get on a video could vary greatly depending on when you post, and the best times to post vary depending on the demographics of your audience. This free tool from TubeBuddy will show you when you should be uploading.
Another interesting tool, which is unfortunately only available with $39 licenses, is the Competitor Scoreboard. It allows creators to compare their channels stats to those of their rival channels.
Have you ever tried TubeBuddy for YouTube?
Richard Bennett
Richard Bennett is a writer and a lover of all things video.
Follow @Richard Bennett
Richard Bennett
Nov 01, 2022• Proven solutions
TubeBuddy is a YouTube certified extension for your Google Chrome browser. When you visit YouTube after installing TubeBuddy a whole new set of useful tools becomes available.
TubeBuddy’s tools were designed to save you time and effort when performing some of the more mundane tasks involved in running a YouTube channel, like adding cards. Many of TubeBuddy’s tools are completely free to use, but others might require a paid license. There are three levels of licensing: $9, $19, or $39 per month.
The Benefits of Using TubeBuddy for YouTube
- Increased Productivity
- Bulk Tools for Annotations, Cards, Thumbnails and More
- Quick Optimization for Your Video’s Tags
- Useful Data
Benefits of TubeBuddy
YouTubers who use TubeBuddy are able to spend less time on busy-work and more time on coming up with creative video ideas. Here are some of the ways TubeBuddy can help you, especially if you have a large or mid-sized channel:
1. Increased Productivity
Most of TubeBuddy’s Productivity Tools are available for free, but some require a $9 per month Pro license.
You can use these tools to get your videos ready for posting faster, embed them off-YouTube more easily, and save time by creating canned responses or templates for cards and annotations.
For example, you might find yourself creating the same YouTube Card over and over again to include it in every video you make. Creating a template through TubeBuddy will save you this effort.
Another great productivity tool is the Video Topic Planner. You can save video ideas you come up with, or ideas viewers have suggested to you, and arrange them in a queue so you never forget what you are planning to make next.
2. Bulk Tools for Annotations, Cards, Thumbnails and More
Most of TubeBuddy’s bulk processing tools require a $19 per month Star license.
Two of the most time-saving tools in this section are the Bulk Copy tools for cards and annotations. They will save you from having to recreate the same ones over and over. Then, using the Bulk Update tools, you will be able to make changes to all of your cards or annotations at once.
For example: if you use a YouTube Card to link to your personal website and include it in every video, and then you change your website, you change the link in all of your existing cards at once.
Another useful Bulk tool is Bulk Thumbnail Overlays, which will allow you to add a logo to all of your existing video thumbnails at once.
3. Quick Optimization for Your Video’s Tags
The SEO Tools in TubeBuddy will help you find the best tags for your videos and suggest tags you might want to target. Many of these tools are free, but others require a $19 Star license.
One of the best free tools in this category is View and Copy Video Tags. It allows you to see and copy the tags of other people’s videos. You will be able to see which keywords your competitors are targeting (and look for opportunities to target them more effectively). This can also save you a lot of time writing out tags that should really be the same as the ones on an existing video.
4. Useful Data
The most useful piece of data under Data and Research Tools is the Best Time to Publish. How many views you get on a video could vary greatly depending on when you post, and the best times to post vary depending on the demographics of your audience. This free tool from TubeBuddy will show you when you should be uploading.
Another interesting tool, which is unfortunately only available with $39 licenses, is the Competitor Scoreboard. It allows creators to compare their channels stats to those of their rival channels.
Have you ever tried TubeBuddy for YouTube?
Richard Bennett
Richard Bennett is a writer and a lover of all things video.
Follow @Richard Bennett
Crafting Quality Videos: A Guide to Apple Device Screen Recording
How to Record your iPhone or iPad Screen for YouTube
Richard Bennett
Mar 27, 2024• Proven solutions
There are a lot of reasons why you might want to use footage recorded from the screen of your apple device in your YouTube videos. Some people like to make YouTube tutorials about iPhone or iPad apps, others like to share their gaming experiences, and some need to use footage taken from their devices for presentations. Even if you do not think these kinds of videos suit your vlog, screen recording is a useful tool to have on your belt. You never know when one of your subscribers is going to ask you about your favorite mobile games.
Basically, there are three ways to record YouTube video on iPhone/iPad, including the built-in screen recorder (if you have updated to iOS 11 ), connecting iPhone to Mac and the last, some third party screen recorder. In this article, you will learn the three powerful methods one by one.
- Part1: Recording your iPhone screen in iOS 11
- Part2: Wired Using QuickTime on your Mac
- Part3: Wirelessly Using AirPlay and Reflector
Note: We resolutely oppose all forms of copyright-infringing downloads. This tutorial is only for downloading YouTube videos/audio materials from your own channel.
1. Recording your iPhone screen in iOS 11
You can find more information in this article: How to Record iPhone/iPad’s Screen in iOS 11 >>


2. Wired Using QuickTime on your Mac
If you have a Mac then you already have all the software you need.
Step 1: Connect your tablet or smartphone to your computer using a USB port, and then open QuickTime on your Mac. In QuickTime select ‘File’ and ‘New Movie Recording’. A recording window will pop up.
Step 2: In the recording window there will be a red ‘record’ button. Next to that button there will be an arrow. Click the arrow and a menu of recording options will appear. In the section where it says ‘Camera’ select your iPhone or iPad. In this menu you can also choose whether or not to record audio from your device, such sound effects from games.
Step 3: Once you are finished in this menu click record to begin recording the screen of your device. Click ‘stop’ when you are finished recording.
Although you can download a version of QuickTime for PC, the PC version does not have a screen recording option. If you have a PC you will need to use the second method.
3. Wirelessly Using AirPlay and Reflector(For Mac or PC!)
If you either prefer to do things wirelessly or own a PC then you will need to use a slightly more round-about method. Rather than recording directly from your iPhone you will be mirroring your device’s interface onto your computer screen and then recording it there.
Step 1: First, you will need to download a third party mirroring app. Reflector is the popular choice. You can download Reflector at Airsquirrels.com .Next, you need to have Apple’s Airplay on your device. Make sure Reflector that your computer and device are connected to the same wifi network.
Step 2: Open Reflector on your PC. Initially it will tell you there is no device connected.
Step 3: Open AirPlay on your device and make sure mirroring is turned on. Your computer’s name will show up as a receiver option. Select it.
Step 4: This will cause the display of your smartphone or tablet to pop up on your computer screen. Once your device is being mirrored on your computer, record your computer screen.
You can record your Mac or PC screen using Filmora Video Editor. Using Filmora you can crop out and record only your iPhone display instead of your entire computer screen. You can download the latest version of Filmora Video Editor at Filmora.wondershare.com.
If you have a Mac you can also record your computer screen in QuickTime following the same steps listed above, until it comes time to choose your camera. Then you record your desktop instead of your device. There are a few different screen recording programs you can download for PC.
Conclusion
After reading the three ways to record YouTube on iPhone/iPad, I am sure you want to give it a try. If you have any questions, please let us know!
Richard Bennett
Richard Bennett is a writer and a lover of all things video.
Follow @Richard Bennett
Richard Bennett
Mar 27, 2024• Proven solutions
There are a lot of reasons why you might want to use footage recorded from the screen of your apple device in your YouTube videos. Some people like to make YouTube tutorials about iPhone or iPad apps, others like to share their gaming experiences, and some need to use footage taken from their devices for presentations. Even if you do not think these kinds of videos suit your vlog, screen recording is a useful tool to have on your belt. You never know when one of your subscribers is going to ask you about your favorite mobile games.
Basically, there are three ways to record YouTube video on iPhone/iPad, including the built-in screen recorder (if you have updated to iOS 11 ), connecting iPhone to Mac and the last, some third party screen recorder. In this article, you will learn the three powerful methods one by one.
- Part1: Recording your iPhone screen in iOS 11
- Part2: Wired Using QuickTime on your Mac
- Part3: Wirelessly Using AirPlay and Reflector
Note: We resolutely oppose all forms of copyright-infringing downloads. This tutorial is only for downloading YouTube videos/audio materials from your own channel.
1. Recording your iPhone screen in iOS 11
You can find more information in this article: How to Record iPhone/iPad’s Screen in iOS 11 >>
2. Wired Using QuickTime on your Mac
If you have a Mac then you already have all the software you need.
Step 1: Connect your tablet or smartphone to your computer using a USB port, and then open QuickTime on your Mac. In QuickTime select ‘File’ and ‘New Movie Recording’. A recording window will pop up.
Step 2: In the recording window there will be a red ‘record’ button. Next to that button there will be an arrow. Click the arrow and a menu of recording options will appear. In the section where it says ‘Camera’ select your iPhone or iPad. In this menu you can also choose whether or not to record audio from your device, such sound effects from games.
Step 3: Once you are finished in this menu click record to begin recording the screen of your device. Click ‘stop’ when you are finished recording.
Although you can download a version of QuickTime for PC, the PC version does not have a screen recording option. If you have a PC you will need to use the second method.
3. Wirelessly Using AirPlay and Reflector(For Mac or PC!)
If you either prefer to do things wirelessly or own a PC then you will need to use a slightly more round-about method. Rather than recording directly from your iPhone you will be mirroring your device’s interface onto your computer screen and then recording it there.
Step 1: First, you will need to download a third party mirroring app. Reflector is the popular choice. You can download Reflector at Airsquirrels.com .Next, you need to have Apple’s Airplay on your device. Make sure Reflector that your computer and device are connected to the same wifi network.
Step 2: Open Reflector on your PC. Initially it will tell you there is no device connected.
Step 3: Open AirPlay on your device and make sure mirroring is turned on. Your computer’s name will show up as a receiver option. Select it.
Step 4: This will cause the display of your smartphone or tablet to pop up on your computer screen. Once your device is being mirrored on your computer, record your computer screen.
You can record your Mac or PC screen using Filmora Video Editor. Using Filmora you can crop out and record only your iPhone display instead of your entire computer screen. You can download the latest version of Filmora Video Editor at Filmora.wondershare.com.
If you have a Mac you can also record your computer screen in QuickTime following the same steps listed above, until it comes time to choose your camera. Then you record your desktop instead of your device. There are a few different screen recording programs you can download for PC.
Conclusion
After reading the three ways to record YouTube on iPhone/iPad, I am sure you want to give it a try. If you have any questions, please let us know!
Richard Bennett
Richard Bennett is a writer and a lover of all things video.
Follow @Richard Bennett
Also read:
- [New] 2024 Approved Sound Sculpting on Android The 7 Ultimate Audio Editing Apps
- [New] In 2024, In-Depth Review of SplitCam Leading Camera Tech?
- [New] Racing Hearts '22 Short-Track Triumph for 2024
- [New] Tailoring Your Videography with Personalized Instagram Captions for 2024
- [Updated] 2024 Approved Enhancing Collaboration with Snap Camera Techniques
- [Updated] Enhancing Your YouTube Projects A Compreayer of Visual Improvement
- 2024 Approved Enrolling in the Apple Podcast Network
- 2024 Approved Essential Steps for Chromakey Magic
- Channel Charm with Cost-Free Visual Aids for 2024
- Download the Epson WF-2650 Printer Software for Windows Computers
- In 2024, Supreme Artistry Studios Feedback Studio Review 2023
- In 2024, WebCamPro RecordingStepsSimplified
- Jumpstart Your YouTube Channel Growth with Key Editing Skills From Sony Vegas
- Mastering YouTube Profits Studio Tips for All Gadgets
- Optimal Size Strategy for Click-Driven Titles
- Premiere Leaderboard Identifier for YouTuber's Insight
- Prime 8 Edits Suites on Linux OS
- Secrets Attracting YouTube Affiliates with Minimal Channel Size
- Want to Uninstall Google Play Service from Vivo Y100A? Here is How | Dr.fone
- Title: 2024 Approved Channel Upgrade Made Simple - Embrace TubeBuddy Techniques
- Author: Brian
- Created at : 2024-12-27 16:55:24
- Updated at : 2025-01-03 17:24:44
- Link: https://youtube-video-recordings.techidaily.com/2024-approved-channel-upgrade-made-simple-embrace-tubebuddy-techniques/
- License: This work is licensed under CC BY-NC-SA 4.0.