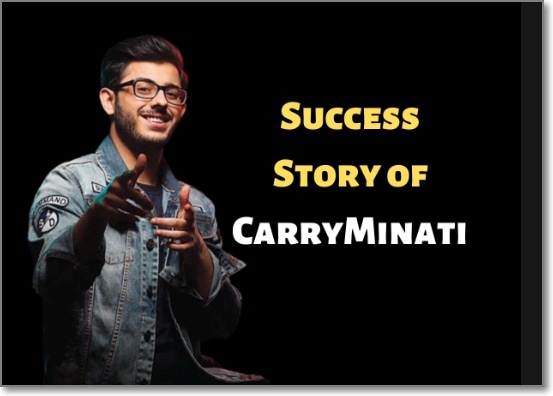
"2024 Approved CarryMinati's Income Evolution with Ajey Nagar"
CarryMinati’s Income Evolution with Ajey Nagar
If you have been following the who’s who of YouTube, then Ajey Nagar, also popularly known as CarryMinati is definitely not a new name for you and you must also be well aware of CarryMinati YouTube income. And, if you have not heard of this name before, then it is high time to know about this YouTube influencer who is an Asian and Indian sensation.
Getting excited, we too!!! So, in this article, we will learn all about who is Ajey Nagar, what is CarryMinati, what makes this man so popular, what is his CarryMinati monthly income, his personal life, and much more.
Part 1: Who is CarryMinati?
You may wonder who this simple-looking, young boy is, right?
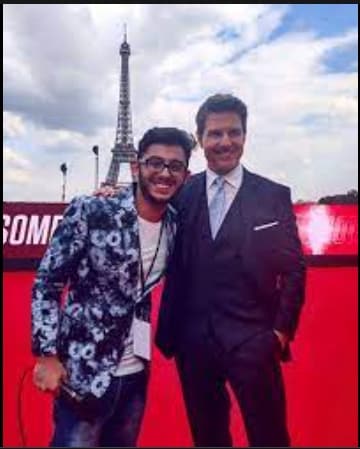
Yes, he is one of the India’s biggest YouTuber- Ajey Nagar. He shared a shoulder with Tom Cruise while promoting Mission Impossible 6 in Paris.
In this part of the topic, we are going to get deep knowledge about the personal, professional and financial information related to Carryminati.
| Nickname | CarryMinati |
|---|---|
| Real Name | Ajey Nagar |
| Net Worth (2022) | 31 Crores ($4 Million) |
| Monthly Income | Rs. 16+ Lakh |
| Yearly Income | Rs. 3+ Crore |
| Biography | |
| Date of Birth | 12th June 1999 |
| Gender | Male |
| Nationality | Indian |
| Height | 165 cm |
| Profession | YouTube |
| YouTube Channel | CarryMinati and CarryisLive |
| Awards and Recognition | Listed in TIME’s 10 next-generation leaders in the year 2019Listed in Forbes 30 Under 30 Asia in 2020 |
So, by now we know that CarryMinati aka Ajay Nagar is quite popular on YouTube. But, what does this popularity gets him in terms of money? Yes, this is an interesting question and the answer for this, you can check out in the next part of the topic.
Part 2: CarryMinati YouTube earning and stats
Let’s now deep digger into the financial aspects and other related stats related to CarryMinati. So, if you are eager to know how much CarryMinati earn from YouTube, we will give you to the nearest exact figures. Who does not like numbers, they are interesting facts, isn’tead.
A major part of Ajay Nagar’s income comes from YouTube videos and in addition to this, his popularity makes him earn from YouTube sponsors, collaborations, tie-up videos, brand endorsements, and advertising.
| Estimated Monthly Earnings in USD/Indian Rupees | Rs. 16+ Lakhs |
|---|---|
| Estimated yearly Earnings in USD/Indian Rupees | $ 4 Million/ Rs. 3+ Crores |
| Videos About | Roasting, Comedy, Sketches, Satire, and Gaming |
| Total Video Uploads | Over 176 |
| Subscribers | CarryMinati- 36.6millionCarryisLive- 11.3 million |
| Video Views | CarryMinati- 2.9 billion+CarryisLive- 1.3 billion+ |
| Last 30 Days Views | 35 M+ |
The statistics related to the views and income about CarryMinati are quite interesting and this makes everyone curious about what makes the channel and this person so popular on YouTube. If you too have been curious about the same, head to our next section.
Part 3: Why is Carry Minati trending on YouTube?
Just like the statistics, the facts related to CarryMinati’s popularity are equally interesting. Every YouTube channel or an influencer who is popular and trending have their own uniqueness and when it comes to CarrayMinati aka Ajay Nagar, there are several factors that makes him a sensation. Shortlisted some of them are as below.
Exclusive personality of Ajay Naga
Ajay Nagar has an exclusive personality that acts like a magnet that attracts viewers. His way of speaking and interacting with the audience has earned him a fan base across the globe.
Engaging and interactive video
The videos of CarryMinati are engaging and interactive which keeps the audience interested throughout.
Rib-tickling humour
The way the humour is added to the videos is simply amazing and definitely makes the viewers laugh a lot.
Relatable and authentic video content
Viewers of different ages and genres can easily relate to the videos created by CarryMinati and also found them to be authentic and different from the other channels.
Checkout his video on Social Media Culture that how interestingly he engages people with the relatable topics, and you will know what makes this man different from the others.
Most popular videos of CarryMinati
Though almost all videos by CarryMinati gain popularity, listed below are the top ones to date.
The End (The video was uploaded on 8th May 2020 and had over 65 million views with 8 lacs comments and over 10 million likes.) This was a roasting video by CarryMinati that gained immense popularity, but was later pulled down by YouTube stating it to be against the harassment policy of YouTube and for violating the guidelines of the community.

This video is about the Indian Film Industry and the awards given to the stars. Carryinati has interesting roasted the stars and receiving awards.
PUBG India: Life Battle Royale
https://www.youtube.com/embed/10y9yefd%5FxY
It is an interesting video of around 17 minutes where Ajay Nagar has acted along with other people to create a fun plot based of PUBG game.
Bonus Tip: How to be a YouTuber and Make Videos like Carryminati
We have learned that CarryMinati has become the name it is, all because of the excellent videos it creates. Though it may sound simple, video creation requires a lot of skills, patience, and the help of expert tools.
A lot of people have some excellent themes and ideas in their minds, but they do not know how to weave them all into an interesting video and here the need for an expert tool like Wondershare Filmora arises. So, if you also have some video creation plans in mind but have been holding them back, it’s time to bring them to reality using Filmora.
Wondershare Filmora is an excellent Windows and Mac-based software that helps in creating eye-catchy videos using multiple features supported by the program. From basic to advanced, no matter what type of video creation requirements you are looking for, Wondershare Filmora will take due care of the same.
Key features of the software
- Support to all types of video files and formats including 4K and also comes with a huge collection of stock footage.
- Support advanced features like PIP, green screen, split-screen, AI portrait, auto reframe, screen recorder, speed ramping, masking, and more.
- Allows adding visual effects and transitions and also allows uploading the created videos to YouTube and Facebook.
Wondershare Filmora supports a wide range of video editing features including basic editing, advanced editing, AI-based tools, and much more. The complete features can be checked in the Wondershare Filmora Video Editing Guide.
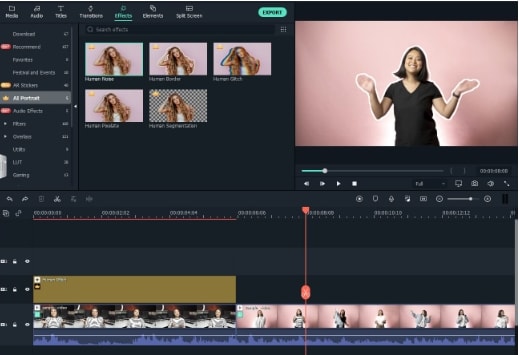
AI-based features are the highlight of this software and for your reference, listed below are the steps for the AI Portrait function. Using this feature, the background of a video can be removed easily without using the green screen or the chroma key.
Steps to use AI Portrait in Wondershare Filmora
Free Download For Win 7 or later(64-bit)
Free Download For macOS 10.14 or later
Step1 Launch the installed software on your system and add the media file to the software timeline.

Step2 Next, go to Effects > Ai Portrait, and the options of the features can be checked here. Click on the thumbnail and the feature can be viewed in the preview window.
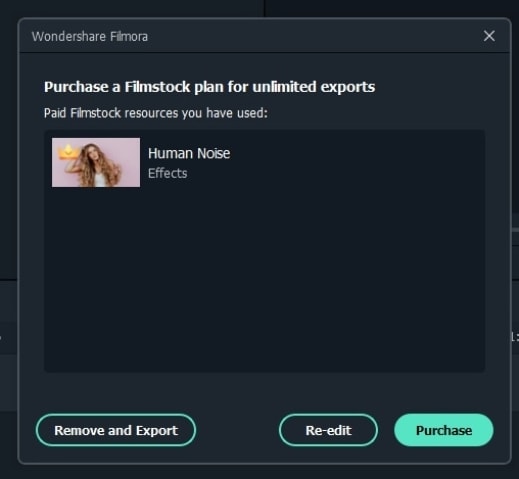
Step3 Drag the selected Portrait to the timeline and from the pop-up window choose to Purchase the additional module. You can check the result by playing the video. If needed multiple AI Portraits can be added to the video.
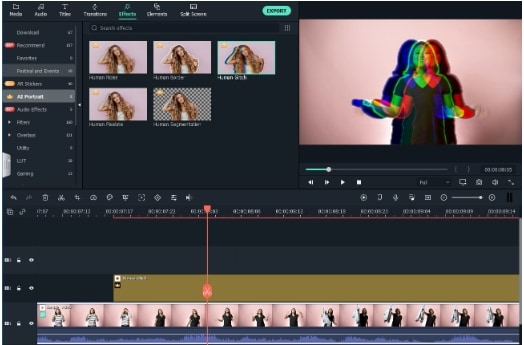
Step4 If further customization is needed, you can even adjust the AI Portrait settings.
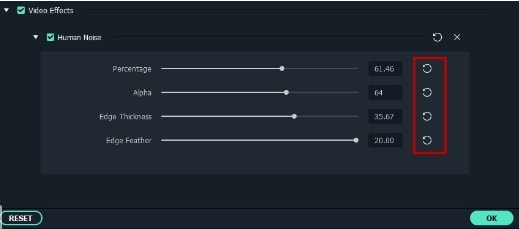
Step5 When finally, all the settings are done, click on the Export button to save the file.
Hot FAQs on CarryMinati
Below we have answered some hot frequently asked questions about CarryMinati.
1. Is Carry Minati married?
No, till date, CarryMinati aka Ajay Nagar is not married.
2. How much CarryMinati earn from 1 video?
Calculating the income from a YouTube video can be a complicated task that depends on several factors like views, likes, ads in the video, and more.
3. Which actors has Carry Minati interviewed?
Carry Minati has interviewed popular actors like Tom Cruise, Tessa Thompson, Henry Cavil, and others celebrities.
Final Words
Gone are the days when only high posts at big-shot companies can bring in money and proving this right is CarryMinati who is not only earning big but has also earned worldwide fans and has created a name for himself. With his comic skits and engaging videos, this popular YouTube influencer is growing and stretching his wings.
If you too have got inspired and looking forward to starting with some interesting videos, we suggest downloading Wondershare Filmora which will let you create a professional video with ease.
Free Download For Win 7 or later(64-bit)
Free Download For macOS 10.14 or later
So, by now we know that CarryMinati aka Ajay Nagar is quite popular on YouTube. But, what does this popularity gets him in terms of money? Yes, this is an interesting question and the answer for this, you can check out in the next part of the topic.
Part 2: CarryMinati YouTube earning and stats
Let’s now deep digger into the financial aspects and other related stats related to CarryMinati. So, if you are eager to know how much CarryMinati earn from YouTube, we will give you to the nearest exact figures. Who does not like numbers, they are interesting facts, isn’tead.
A major part of Ajay Nagar’s income comes from YouTube videos and in addition to this, his popularity makes him earn from YouTube sponsors, collaborations, tie-up videos, brand endorsements, and advertising.
| Estimated Monthly Earnings in USD/Indian Rupees | Rs. 16+ Lakhs |
|---|---|
| Estimated yearly Earnings in USD/Indian Rupees | $ 4 Million/ Rs. 3+ Crores |
| Videos About | Roasting, Comedy, Sketches, Satire, and Gaming |
| Total Video Uploads | Over 176 |
| Subscribers | CarryMinati- 36.6millionCarryisLive- 11.3 million |
| Video Views | CarryMinati- 2.9 billion+CarryisLive- 1.3 billion+ |
| Last 30 Days Views | 35 M+ |
The statistics related to the views and income about CarryMinati are quite interesting and this makes everyone curious about what makes the channel and this person so popular on YouTube. If you too have been curious about the same, head to our next section.
Part 3: Why is Carry Minati trending on YouTube?
Just like the statistics, the facts related to CarryMinati’s popularity are equally interesting. Every YouTube channel or an influencer who is popular and trending have their own uniqueness and when it comes to CarrayMinati aka Ajay Nagar, there are several factors that makes him a sensation. Shortlisted some of them are as below.
Exclusive personality of Ajay Naga
Ajay Nagar has an exclusive personality that acts like a magnet that attracts viewers. His way of speaking and interacting with the audience has earned him a fan base across the globe.
Engaging and interactive video
The videos of CarryMinati are engaging and interactive which keeps the audience interested throughout.
Rib-tickling humour
The way the humour is added to the videos is simply amazing and definitely makes the viewers laugh a lot.
Relatable and authentic video content
Viewers of different ages and genres can easily relate to the videos created by CarryMinati and also found them to be authentic and different from the other channels.
Checkout his video on Social Media Culture that how interestingly he engages people with the relatable topics, and you will know what makes this man different from the others.
Most popular videos of CarryMinati
Though almost all videos by CarryMinati gain popularity, listed below are the top ones to date.
The End (The video was uploaded on 8th May 2020 and had over 65 million views with 8 lacs comments and over 10 million likes.) This was a roasting video by CarryMinati that gained immense popularity, but was later pulled down by YouTube stating it to be against the harassment policy of YouTube and for violating the guidelines of the community.
This video is about the Indian Film Industry and the awards given to the stars. Carryinati has interesting roasted the stars and receiving awards.
PUBG India: Life Battle Royale
https://www.youtube.com/embed/10y9yefd%5FxY
It is an interesting video of around 17 minutes where Ajay Nagar has acted along with other people to create a fun plot based of PUBG game.
Bonus Tip: How to be a YouTuber and Make Videos like Carryminati
We have learned that CarryMinati has become the name it is, all because of the excellent videos it creates. Though it may sound simple, video creation requires a lot of skills, patience, and the help of expert tools.
A lot of people have some excellent themes and ideas in their minds, but they do not know how to weave them all into an interesting video and here the need for an expert tool like Wondershare Filmora arises. So, if you also have some video creation plans in mind but have been holding them back, it’s time to bring them to reality using Filmora.
Wondershare Filmora is an excellent Windows and Mac-based software that helps in creating eye-catchy videos using multiple features supported by the program. From basic to advanced, no matter what type of video creation requirements you are looking for, Wondershare Filmora will take due care of the same.
Key features of the software
- Support to all types of video files and formats including 4K and also comes with a huge collection of stock footage.
- Support advanced features like PIP, green screen, split-screen, AI portrait, auto reframe, screen recorder, speed ramping, masking, and more.
- Allows adding visual effects and transitions and also allows uploading the created videos to YouTube and Facebook.
Wondershare Filmora supports a wide range of video editing features including basic editing, advanced editing, AI-based tools, and much more. The complete features can be checked in the Wondershare Filmora Video Editing Guide.
AI-based features are the highlight of this software and for your reference, listed below are the steps for the AI Portrait function. Using this feature, the background of a video can be removed easily without using the green screen or the chroma key.
Steps to use AI Portrait in Wondershare Filmora
Free Download For Win 7 or later(64-bit)
Free Download For macOS 10.14 or later
Step1 Launch the installed software on your system and add the media file to the software timeline.
Step2 Next, go to Effects > Ai Portrait, and the options of the features can be checked here. Click on the thumbnail and the feature can be viewed in the preview window.
Step3 Drag the selected Portrait to the timeline and from the pop-up window choose to Purchase the additional module. You can check the result by playing the video. If needed multiple AI Portraits can be added to the video.
Step4 If further customization is needed, you can even adjust the AI Portrait settings.
Step5 When finally, all the settings are done, click on the Export button to save the file.
Hot FAQs on CarryMinati
Below we have answered some hot frequently asked questions about CarryMinati.
1. Is Carry Minati married?
No, till date, CarryMinati aka Ajay Nagar is not married.
2. How much CarryMinati earn from 1 video?
Calculating the income from a YouTube video can be a complicated task that depends on several factors like views, likes, ads in the video, and more.
3. Which actors has Carry Minati interviewed?
Carry Minati has interviewed popular actors like Tom Cruise, Tessa Thompson, Henry Cavil, and others celebrities.
Final Words
Gone are the days when only high posts at big-shot companies can bring in money and proving this right is CarryMinati who is not only earning big but has also earned worldwide fans and has created a name for himself. With his comic skits and engaging videos, this popular YouTube influencer is growing and stretching his wings.
If you too have got inspired and looking forward to starting with some interesting videos, we suggest downloading Wondershare Filmora which will let you create a professional video with ease.
Free Download For Win 7 or later(64-bit)
Free Download For macOS 10.14 or later
Capturing the Best Visuals in Vlogs
Lighting Tips for Vlogging: How to Light

Richard Bennett
Mar 27, 2024• Proven solutions
One of the best things you can do for your video quality is to ensure you have great lighting. Viewers find poor lighting distracting and it’s hard for them to see how great your content is if they are busy thinking about why your video is so dark. By creating a great lighting set up you can ensure that the people watching your videos are only thinking about how much they’re enjoying them.
Going outside and using natural light is the cheapest way to get a lot of light for your videos. If your vlog is not suited to the great outdoors then you need to get more strategic. You can turn on all the lights in your living room and still end up with a dark, grainy, video.
Video Lighting Basics: Three Point Lighting

The most common technique of lighting a scene is called three-point lighting. It involves three different sources of light in the shot and is used by portrait photographers, which is also a great method for lighting your vlog.
The brightest source of light is also known as the key light which need to be high quality. A window will work, but if you do not have access to one where you are filming then consider an LED panel light or a softbox light like the ones used in portrait photography.
This first light will create a dramatic shadow across half of your face. You want to reduce this shadow, but not get rid of it completely.
Rather than setting up another light source on the opposite side of the camera, put up a reflector to bounce some light back onto your face. This reflector is called your ‘Fill Light’.
The fill light is less bright than the primary source of light and it is placed on the side opposite to the key light. Its purpose is to reduce shadows produced by the key light and the reflector will need to be mounted on a stand.
The final step to creating three point lighting is to set up another light behind you. This is your ‘Backlight’, and it will help you stand out from your background. Backlight or Hair light is always placed behind and above the subject to create separation between the subject in the shot and the background. This basic lighting technique can be applied in almost every scene you shoot, which is why it is important to keep an open mind and to continue experimenting with possible light setups.
Watch Video! Top Lighting Tips for Vlogging
Lightning Tips for Aspiring YouTube Videographers
Becoming the master of light will take some time and practice, so it is crucial to remain curious and anxious to learn new tricks throughout that process if you want to continually become better. These tips will help you make the first steps on that journey.
1. Focus Your Key Light
Try to focus your Key Light so that it lights only you and not your background. Do this by mounting anything that can cast a shadow onto your Key Light to control the area where the light hits. If you are using a window for your Key Light then you can use a curtain. If you use a softbox light then your light will already be somewhat focused.
2. Use Natural Lighting
The light provided by the Sun is still the best light source, you can have in your video. The trouble is that natural light changes quickly, which makes it highly unpredictable. The best way to deal with this challenge is to come prepared to the set and to get the shot you want as quickly as you can.
3. Try DIY Lightning
Literally, anything from candles to LED light bulbs can serve as a source of light in a shot. You just need to pay attention to the light temperature, because warmer light sources may highlight reds and yellows that can make your footage look less realistic.
4. Use Lightning Kits
This is by far the best option if you want to be in complete control of the light on your set. You can adjust the intensity of the lights, use filters, diffusers and all sorts of other accessories to create the light that flatters the subjects of your videos. The only downside is that you’ll have to spend a considerable amount of money if you want to have a professional lighting kit.
5. Set up reflectors
Sets of reflectors are often under $50, so they are fairly affordable. However, some vloggers choose to forgo purchasing reflectors and make their own out of tinfoil.

If your strong main light is too hard on your eyes then you can use a translucent ‘reflector’ to soften it. Set your translucent reflector, or other screen, up in front of your main light to diffuse it.
If you are hosting a beauty vlog then you might consider a slightly different set up. Instead of having your main light off to one side set it up directly in front of you so your entire face is lit evenly. It is still a good idea to use fill lights in this set up to give you some dimension, and a backlight is even more essential for helping you stand out from the background. The even light hitting your face will also make you look flat if you do not use a backlight.

If you are using all of the lighting options available to you and your video still looks too dark then you can try brightening it by opening up the aperture of your camera lens/setting a lower f-stop. Letting more light into your camera can help your footage look brighter, although you also run the risk of making things look overexposed/ washed out if you are not careful.
If you are stuck shooting in low light conditions it is best to use a lens with a wider aperture/lower f-stop. This will make the best of the light you do have.
Richard Bennett
Richard Bennett is a writer and a lover of all things video.
Follow @Richard Bennett
Richard Bennett
Mar 27, 2024• Proven solutions
One of the best things you can do for your video quality is to ensure you have great lighting. Viewers find poor lighting distracting and it’s hard for them to see how great your content is if they are busy thinking about why your video is so dark. By creating a great lighting set up you can ensure that the people watching your videos are only thinking about how much they’re enjoying them.
Going outside and using natural light is the cheapest way to get a lot of light for your videos. If your vlog is not suited to the great outdoors then you need to get more strategic. You can turn on all the lights in your living room and still end up with a dark, grainy, video.
Video Lighting Basics: Three Point Lighting
The most common technique of lighting a scene is called three-point lighting. It involves three different sources of light in the shot and is used by portrait photographers, which is also a great method for lighting your vlog.
The brightest source of light is also known as the key light which need to be high quality. A window will work, but if you do not have access to one where you are filming then consider an LED panel light or a softbox light like the ones used in portrait photography.
This first light will create a dramatic shadow across half of your face. You want to reduce this shadow, but not get rid of it completely.
Rather than setting up another light source on the opposite side of the camera, put up a reflector to bounce some light back onto your face. This reflector is called your ‘Fill Light’.
The fill light is less bright than the primary source of light and it is placed on the side opposite to the key light. Its purpose is to reduce shadows produced by the key light and the reflector will need to be mounted on a stand.
The final step to creating three point lighting is to set up another light behind you. This is your ‘Backlight’, and it will help you stand out from your background. Backlight or Hair light is always placed behind and above the subject to create separation between the subject in the shot and the background. This basic lighting technique can be applied in almost every scene you shoot, which is why it is important to keep an open mind and to continue experimenting with possible light setups.
Watch Video! Top Lighting Tips for Vlogging
Lightning Tips for Aspiring YouTube Videographers
Becoming the master of light will take some time and practice, so it is crucial to remain curious and anxious to learn new tricks throughout that process if you want to continually become better. These tips will help you make the first steps on that journey.
1. Focus Your Key Light
Try to focus your Key Light so that it lights only you and not your background. Do this by mounting anything that can cast a shadow onto your Key Light to control the area where the light hits. If you are using a window for your Key Light then you can use a curtain. If you use a softbox light then your light will already be somewhat focused.
2. Use Natural Lighting
The light provided by the Sun is still the best light source, you can have in your video. The trouble is that natural light changes quickly, which makes it highly unpredictable. The best way to deal with this challenge is to come prepared to the set and to get the shot you want as quickly as you can.
3. Try DIY Lightning
Literally, anything from candles to LED light bulbs can serve as a source of light in a shot. You just need to pay attention to the light temperature, because warmer light sources may highlight reds and yellows that can make your footage look less realistic.
4. Use Lightning Kits
This is by far the best option if you want to be in complete control of the light on your set. You can adjust the intensity of the lights, use filters, diffusers and all sorts of other accessories to create the light that flatters the subjects of your videos. The only downside is that you’ll have to spend a considerable amount of money if you want to have a professional lighting kit.
5. Set up reflectors
Sets of reflectors are often under $50, so they are fairly affordable. However, some vloggers choose to forgo purchasing reflectors and make their own out of tinfoil.
If your strong main light is too hard on your eyes then you can use a translucent ‘reflector’ to soften it. Set your translucent reflector, or other screen, up in front of your main light to diffuse it.
If you are hosting a beauty vlog then you might consider a slightly different set up. Instead of having your main light off to one side set it up directly in front of you so your entire face is lit evenly. It is still a good idea to use fill lights in this set up to give you some dimension, and a backlight is even more essential for helping you stand out from the background. The even light hitting your face will also make you look flat if you do not use a backlight.
If you are using all of the lighting options available to you and your video still looks too dark then you can try brightening it by opening up the aperture of your camera lens/setting a lower f-stop. Letting more light into your camera can help your footage look brighter, although you also run the risk of making things look overexposed/ washed out if you are not careful.
If you are stuck shooting in low light conditions it is best to use a lens with a wider aperture/lower f-stop. This will make the best of the light you do have.
Richard Bennett
Richard Bennett is a writer and a lover of all things video.
Follow @Richard Bennett
Also read:
- [New] Elevate Your Channel'enas Expensive? Check Out Our 11 Free Name Generators Guide
- [New] Enhance Your Digital Diaries for Free – Extensions & Mobile Edition for 2024
- [New] In 2024, Sierra's Ultimate Guide to the Best Mac Video Editing Tools
- [Updated] Discovering Your Customized YouTube Playlist
- [Updated] Maximize Impact Strategic Viewing Hours Schedule
- Cyberpunk 2077 PC Malfunctions? Here's How to Resolve Them
- How To Unlock Any Infinix Note 30i Phone Password Using Emergency Call
- How YouTube Really Measures Your Content's Popularity
- Influencers' Utopia Summit
- Restoring Original Aspect Ratios in Windows 11
- The Role of Green Infrastructure in Revitalizing Cities
- Top 10 Premium Android & PC-Compatible Video Editors for 2024
- Top 6 Ways to Transfer Text Messages from Asus ROG Phone 7 Ultimate to Other Android Devices | Dr.fone
- Title: 2024 Approved CarryMinati's Income Evolution with Ajey Nagar
- Author: Brian
- Created at : 2024-12-28 17:28:06
- Updated at : 2025-01-03 16:20:53
- Link: https://youtube-video-recordings.techidaily.com/2024-approved-carryminatis-income-evolution-with-ajey-nagar/
- License: This work is licensed under CC BY-NC-SA 4.0.