
:max_bytes(150000):strip_icc()/GettyImages-673781390-59f0b3b8685fbe0011e5991e.jpg)
"2024 Approved Building Your First Channel Essential Video Gear List"
Building Your First Channel: Essential Video Gear List
Essential YouTube Equipment For Starting Your Channel - What Do You Really Need?

Richard Bennett
Oct 26, 2023• Proven solutions
Check out our most updated guide on this topic: YouTube Equipment Starter Guide For Beginners .
The first thing to make sure of before starting a YouTube channel is having all that you need to record and upload high-quality videos regularly. That doesn’t mean you have to take out a loan and spend thousands to purchase a brand new camera and all other gadgets that professional filmmakers use.
The smartest way to get started is to go through a list of necessary equipment for YouTube and check whether or not you already own some of it. Once your channel starts growing, you can then start thinking about whether you want to invest in upgraded equipment. Here is a quick overview of all items that you need to start entertaining your online audience and gaining subscribers to your YouTube channel:
- Your YouTube Camera
- Microphones and Audio
- Lighting Gear for YouTube
- Tripods and Camera Stands
- Smartphone Camera Gear
YouTube Cameras
The short version: Use whatever you already have, even if it’s your phone or webcam. It’s nice to have sharp, fine-tuned, 4K footage, but viewers will forgive lower visual quality if your content is good.
The long version: You will need a camera, but there are a lot of different devices you can use including DSLRs, point and shoots, webcams, and your smartphone.
Your choice of camera will have a tremendous impact on the visual quality of your content and might drive your decisions regarding other pieces of equipment. However, you shouldn’t feel obliged to work with a top-notch camera from day one, especially since cheaper options can produce great results if used the right way.
On one end of the spectrum, you have basic smartphone cameras and web cameras, which are easy to come by and simple to operate. These days, high-end phones come equipped with quite powerful cameras that are more than sufficient for the needs of the average YouTuber. Better webcams can also do the job, although high-performance webcam models can get pretty expensive too. It is probably wise to resist the urge to start broadcasting with the built-in camera in your laptop and at least get a webcam or use your phone, but your computer’s camera is still always an option. Not having a better camera should never stop you from making YouTube videos.
If you already have a DSLR camera then it’s a good idea to familiarize yourself with it. You have far more freedom to adjust the settings and achieve a professional look for your videos with a DSLR, but that does mean it’ll take some time to become an expert at using it. Ultra-high resolution is not required for YouTube, but it certainly won’t hurt to have additional sharpness and more detail in the scene. If you’re shopping for a DSLR, look for one with a flip screen that allows you to quickly check what your viewers see.
YouTube Microphone and Audio
The short version: Audio quality is extremely important. If you can buy either a new camera or an external microphone, but not both, it might be better to go for the microphone. Click here for advice on upping your audio quality without an external microphone.
The long version: Sound capturing is every bit as important for your success as your video feed. In fact, poor audio can be even more damaging to your subscriber count than grainy video, since people won’t spend their time listening to something they have to put effort into understanding.
Again, most YouTube video makers have a limited budget at their disposal, so professional microphones are mostly off the table. However, investing in a directional microphone (‘shotgun mic’) that can pick up your voice clearly and without background noise is certainly a smart move. Such microphones can be pointed towards you while you speak, and since most YouTubers sit still while doing their shows there won’t be too much need for in-session adjustments.
If you’re not ready to invest in a shotgun mic, you can also find very inexpensive (often under $20) LAV mics. These small microphones can be pinned to your shirt, which allows them to record very clear dialogue because they’re so close to your mouth.
Lights for YouTube
The short version: You need as much light as you can get. Lighting kits can be affordable on Amazon, but you can also achieve a great look using daylight/windows and ‘daylight’ lightbulbs.
The long version: If you’ve ever tried to make a video indoors, you already know that it’s necessary to have additional light. Often just filming with the normal lights in a room will cause your footage to look dark and grainy, and possibly be tinted orange. To overcome these problems you need to increase the amount of light you have available.
Sometimes, it is enough to film near windows and/or bring more household lamps into your filming area. For any household lamps or lighting fixtures you use, make sure to put in white or ‘daylight’ lightbulbs instead of using the orange/tungsten bulbs that you might have for everyday use (this is how you avoid tinting things orange).
If you have the budget available to get some lighting equipment, you can find softbox lights or LED panel lights available fairly inexpensively online. Softbox lights are great because they provide even, diffused, light.
Another useful piece of lighting equipment to have is a reflector. A reflector is usually a piece of white, silver, or gold fabric stretched over a frame. You can use it to bounce light from one light source back towards yourself (this is a great way to fill shadows cast by your main light). Reflectors tend to be inexpensive, but you can also use white cardboard or tinfoil in place of purchasing a reflector.
Tripods and Camera Stands
The short version: You need something to hold your camera. If you mostly film in your own home that can be a desk or a stack of books, but if you make a lot of videos while you’re on the go you probably need a tripod or gimbal. Heavier cameras need heavier tripods.
The long version: While handheld cameras can deliver solid results for vloggers and casual streamers, viewers do expect reasonably stable footage. For many types of videos, the camera needs to be completely still and flatly positioned on a horizontal plane. Tripods and camera stands can cost very little, so it’s a good idea to look into getting some kind of stabilizer.
When you are choosing a tripod, pay attention to how much it weighs. If the camera that needs to be mounted on it is very heavy (like some DSLR models), you want to ensure that the structure itself weighs enough not to be easily tipped over. Too thin tripods can put your camera at risk, and that’s the last thing you want. Smaller cameras such as GoPros are more flexible in this regard and can be placed on a wider range of tripods.
Even if you are using a phone or a webcam to record YouTube videos, you should consider mounting the device on a stable stand. It is possible to find mini tripods ideal for smartphones for as little as $10. These tripods are small enough to carry in your pocket, so you will be prepared to start making a video no matter where your adventures take you. If you are using a web camera, you should attach it to the stand so that it won’t move accidentally after you touch the surface it is placed on.
Smartphone Camera Gear
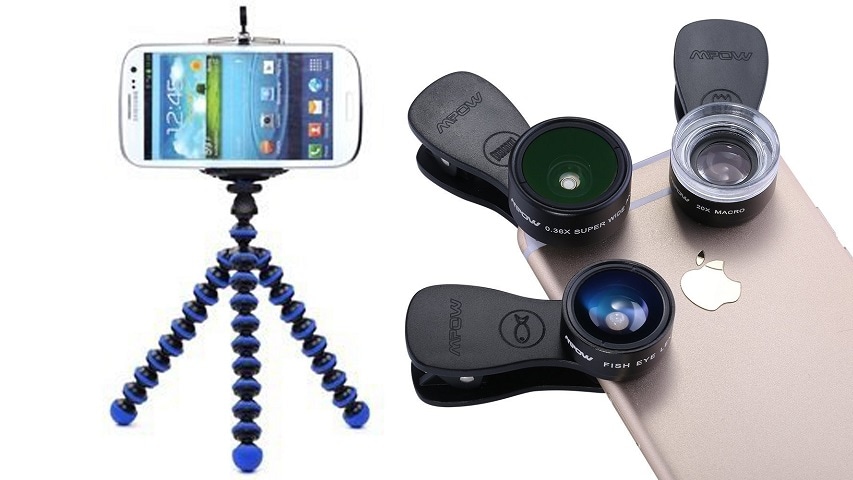
The short version: There’s a lot of gear out there designed with smartphone photos and videos in mind, including clip-on lenses, tripod mounts, phone-mounted LED lights, and inexpensive microphones that plug into the audio jack.
The long version: Recording your videos with a mobile phone can be a good decision. It all depends on the phone you have and the range of add-ons and apps that you complement it with. Almost every high-end model released in the past five years can shoot videos in 1080p or higher. Some can even produce 4K footage. If you perfect your smartphone filming technique, your YouTube videos could look as if they were made with pro equipment.
On the flip side, smartphone cameras typically perform poorly in low light. It is possible to download an app that lets you play around with settings to overcome this, but a phone-mounted LED light is probably a better solution. An external microphone might also be a necessity, but there are some good (inexpensive) options that can simply be plugged in through the headphone jack.
Another common downside of smartphone cameras is that most of them use digital zoom, which is vastly inferior to optical zoom. If you intend to shoot anything that’s further away than a few feet, you need a clip-on lens that goes on top of the built-in camera. This inexpensive device will give you a lot of freedom to work in space, and allow you to make spectacular shots even without high-end YouTube equipment.
Equipment with Easy-to-Use Video Editor


Richard Bennett
Richard Bennett is a writer and a lover of all things video.
Follow @Richard Bennett
Richard Bennett
Oct 26, 2023• Proven solutions
Check out our most updated guide on this topic: YouTube Equipment Starter Guide For Beginners .
The first thing to make sure of before starting a YouTube channel is having all that you need to record and upload high-quality videos regularly. That doesn’t mean you have to take out a loan and spend thousands to purchase a brand new camera and all other gadgets that professional filmmakers use.
The smartest way to get started is to go through a list of necessary equipment for YouTube and check whether or not you already own some of it. Once your channel starts growing, you can then start thinking about whether you want to invest in upgraded equipment. Here is a quick overview of all items that you need to start entertaining your online audience and gaining subscribers to your YouTube channel:
- Your YouTube Camera
- Microphones and Audio
- Lighting Gear for YouTube
- Tripods and Camera Stands
- Smartphone Camera Gear
YouTube Cameras
The short version: Use whatever you already have, even if it’s your phone or webcam. It’s nice to have sharp, fine-tuned, 4K footage, but viewers will forgive lower visual quality if your content is good.
The long version: You will need a camera, but there are a lot of different devices you can use including DSLRs, point and shoots, webcams, and your smartphone.
Your choice of camera will have a tremendous impact on the visual quality of your content and might drive your decisions regarding other pieces of equipment. However, you shouldn’t feel obliged to work with a top-notch camera from day one, especially since cheaper options can produce great results if used the right way.
On one end of the spectrum, you have basic smartphone cameras and web cameras, which are easy to come by and simple to operate. These days, high-end phones come equipped with quite powerful cameras that are more than sufficient for the needs of the average YouTuber. Better webcams can also do the job, although high-performance webcam models can get pretty expensive too. It is probably wise to resist the urge to start broadcasting with the built-in camera in your laptop and at least get a webcam or use your phone, but your computer’s camera is still always an option. Not having a better camera should never stop you from making YouTube videos.
If you already have a DSLR camera then it’s a good idea to familiarize yourself with it. You have far more freedom to adjust the settings and achieve a professional look for your videos with a DSLR, but that does mean it’ll take some time to become an expert at using it. Ultra-high resolution is not required for YouTube, but it certainly won’t hurt to have additional sharpness and more detail in the scene. If you’re shopping for a DSLR, look for one with a flip screen that allows you to quickly check what your viewers see.
YouTube Microphone and Audio
The short version: Audio quality is extremely important. If you can buy either a new camera or an external microphone, but not both, it might be better to go for the microphone. Click here for advice on upping your audio quality without an external microphone.
The long version: Sound capturing is every bit as important for your success as your video feed. In fact, poor audio can be even more damaging to your subscriber count than grainy video, since people won’t spend their time listening to something they have to put effort into understanding.
Again, most YouTube video makers have a limited budget at their disposal, so professional microphones are mostly off the table. However, investing in a directional microphone (‘shotgun mic’) that can pick up your voice clearly and without background noise is certainly a smart move. Such microphones can be pointed towards you while you speak, and since most YouTubers sit still while doing their shows there won’t be too much need for in-session adjustments.
If you’re not ready to invest in a shotgun mic, you can also find very inexpensive (often under $20) LAV mics. These small microphones can be pinned to your shirt, which allows them to record very clear dialogue because they’re so close to your mouth.
Lights for YouTube
The short version: You need as much light as you can get. Lighting kits can be affordable on Amazon, but you can also achieve a great look using daylight/windows and ‘daylight’ lightbulbs.
The long version: If you’ve ever tried to make a video indoors, you already know that it’s necessary to have additional light. Often just filming with the normal lights in a room will cause your footage to look dark and grainy, and possibly be tinted orange. To overcome these problems you need to increase the amount of light you have available.
Sometimes, it is enough to film near windows and/or bring more household lamps into your filming area. For any household lamps or lighting fixtures you use, make sure to put in white or ‘daylight’ lightbulbs instead of using the orange/tungsten bulbs that you might have for everyday use (this is how you avoid tinting things orange).
If you have the budget available to get some lighting equipment, you can find softbox lights or LED panel lights available fairly inexpensively online. Softbox lights are great because they provide even, diffused, light.
Another useful piece of lighting equipment to have is a reflector. A reflector is usually a piece of white, silver, or gold fabric stretched over a frame. You can use it to bounce light from one light source back towards yourself (this is a great way to fill shadows cast by your main light). Reflectors tend to be inexpensive, but you can also use white cardboard or tinfoil in place of purchasing a reflector.
Tripods and Camera Stands
The short version: You need something to hold your camera. If you mostly film in your own home that can be a desk or a stack of books, but if you make a lot of videos while you’re on the go you probably need a tripod or gimbal. Heavier cameras need heavier tripods.
The long version: While handheld cameras can deliver solid results for vloggers and casual streamers, viewers do expect reasonably stable footage. For many types of videos, the camera needs to be completely still and flatly positioned on a horizontal plane. Tripods and camera stands can cost very little, so it’s a good idea to look into getting some kind of stabilizer.
When you are choosing a tripod, pay attention to how much it weighs. If the camera that needs to be mounted on it is very heavy (like some DSLR models), you want to ensure that the structure itself weighs enough not to be easily tipped over. Too thin tripods can put your camera at risk, and that’s the last thing you want. Smaller cameras such as GoPros are more flexible in this regard and can be placed on a wider range of tripods.
Even if you are using a phone or a webcam to record YouTube videos, you should consider mounting the device on a stable stand. It is possible to find mini tripods ideal for smartphones for as little as $10. These tripods are small enough to carry in your pocket, so you will be prepared to start making a video no matter where your adventures take you. If you are using a web camera, you should attach it to the stand so that it won’t move accidentally after you touch the surface it is placed on.
Smartphone Camera Gear
The short version: There’s a lot of gear out there designed with smartphone photos and videos in mind, including clip-on lenses, tripod mounts, phone-mounted LED lights, and inexpensive microphones that plug into the audio jack.
The long version: Recording your videos with a mobile phone can be a good decision. It all depends on the phone you have and the range of add-ons and apps that you complement it with. Almost every high-end model released in the past five years can shoot videos in 1080p or higher. Some can even produce 4K footage. If you perfect your smartphone filming technique, your YouTube videos could look as if they were made with pro equipment.
On the flip side, smartphone cameras typically perform poorly in low light. It is possible to download an app that lets you play around with settings to overcome this, but a phone-mounted LED light is probably a better solution. An external microphone might also be a necessity, but there are some good (inexpensive) options that can simply be plugged in through the headphone jack.
Another common downside of smartphone cameras is that most of them use digital zoom, which is vastly inferior to optical zoom. If you intend to shoot anything that’s further away than a few feet, you need a clip-on lens that goes on top of the built-in camera. This inexpensive device will give you a lot of freedom to work in space, and allow you to make spectacular shots even without high-end YouTube equipment.
Equipment with Easy-to-Use Video Editor
Richard Bennett
Richard Bennett is a writer and a lover of all things video.
Follow @Richard Bennett
Best Free YouTube Video Editing Apps for iPhone & iPad
Best Free YouTube Video Editing Apps for iPhone & iPad [2024]
Richard Bennett
Mar 27, 2024• Proven solutions
iPhones and iPads can capture footage in high resolution, however, video clips you record with an iPhone or an iPad may contain imperfections sometimes. Removing parts of a video clip you don’t want to share publicly, or stabilizing the shaky footage are just a few ways in which you can improve the quality of the videos you’re creating.
The good news is that the iPhone and iPad support a broad range of video editing apps, which enables you to edit all videos you record on these devices before you post them on YouTube or other social media platforms.
There are hundreds of video editing apps to choose from at the App Store , but such a wide range of options can make the process of choosing a video editing app you are going to use to edit your videos, more complicated.
So, in this article, we are going to take you through the some of the best video editing apps for YouTube videos on iPhones and iPads and help you determine which of these apps is the right choice for you.
- Part 1: Best Video Editing Apps for YouTube Video [Free & Paid]
- Part 2: Edit YouTube Videos on iPhone with YouTube Studio
Before we get started, I want to recommend thebest video editing software for YouTubers - Wondershare Filmora video editor , an easy to use while powerful video editor that allows you not only cut, split, crop, resize, reverse your videos, but also offers you multiple video effects specially designed for Fashion, Beauty, Gaming, Travel, Education, etc. Check the video to know more fantastic features:
For Win 7 or later (64-bit)
 Secure Download
For macOS 10.14 or later
Secure Download
Click here to get Filmora for PC by email
or Try Filmora App for mobile >>>
download filmora app for ios ](https://app.adjust.com/b0k9hf2%5F4bsu85t ) download filmora app for android ](https://app.adjust.com/b0k9hf2%5F4bsu85t )
- Windows & Mac Cross-Platform compatible
- Various Templates, Effects, Elements, Transitions, Filters for making Hollywood like movie easily
- Practical Audio Editing Tools and Color Grading Feature
Part 1: Best Free Video Editing Apps for iPhone to Edit YouTube Videos You Should Know
Before you opt for one of the apps we’ve featured in our top list, you must first make sure that the app you’re interested in offers all the video editing tools you need to process the footage you recorded for your YouTube channel. Considering the number of audio and video tracks an app supports, the number of visual effects it offers or its file-sharing capabilities can make it easier for you to decide which app you are going to install on your device. However, your choice ultimately depends on how frequently and how professionally you want to edit your YouTube videos. Here are the top 5 video editing apps for iPhones and iPads.
1. Filmora
Price: Free, but offers in-app purchases
Compatibility: Requires iOS 9.0 or later. Compatible with iPhone, iPad, and iPod touch.


This is an easy and convenient video editing app that is going to allow you to turn regular videos into artistic renditions that are going to look as if they were production-valued. All you need to do is choose the video and select the overall theme for it as well as the design and music. Furthermore, the app delivers some fantastic visual effects such as overlays, filters, elements and transitions, basic function. It also allows you to trim and split video clips, rotate and crop the footage, change the video speed, play the video backwards or add your own voiceover. Another special feature is that you can automate the video by selecting the best parts and letting the application handle everything else.
Pros
- Lots of titles, overlays, filters, elements, transitions, themes for making artistic video
- Enough editing tools to trim, split, rotate, crop videos on iPhone and iPad
Cons
- NO advanced features such as Green Screen video compositing
- Not connected to Filmora desktop video editor
2. iMovie
Price: Free
Compatibility: Requires iOS 11.4 or later.
This is a very comprehensive video editing app and a benchmark release for Apple. It is very similar to the desktop iMovie version, and it should definitely be featured on your device if you’re looking for a free YouTube video editing app for iOS. You can use it to add voiceovers, music, titles as well as photos to your work. There are a lot of templates, themes as well as filters for movie trailers that you can take advantage of if you want to make the video even better. You can enhance the video with slow motion and fast forward by changing video speed and add your own narration as well.
Pros
- Totally Free for iPhone and iPad Users
- Trailer Templates, Themes, Filters Available
- Projects can edit on Mac with iMovie or Final Cut Pro X
Cons
- No elements
- Speed up limited to 2X
Learn more details about How to Edit YouTube videos with iMovie >>
3. Adobe Premiere Rush
Price: Free, but offers in-app purchases
Compatibility: Requires iOS 11.0 or later
Adobe’s software products have been at the center of the video editing world for several decades, but most of the company’s video and audio editing products are aimed athigh-end professional users .
Adobe Premiere Rush has a built-in camera feature, which allows you to capture high-resolution footage from the app and edit it as soon as you stop recording. Creating a soundtrack for a video, arranging video clips in any way you want or customizing a title template are just a few among countless video editing options Adobe Premiere Rush offers.
Its file-sharing capabilities are also impressive since you can share your videos to all major social media platforms directly from the app or edit the file on desktop with Premiere Pro CC. This makes Adobe Premiere Rush an excellent choice for YouTubers, vloggers and all other video content creators who often shoot their videos on different locations.
Pros:
- Let users change a video’s aspect ratio effortlessly
- Records high-definition footage
- Rich title template library
- Multitrack timeline
Cons:
- A limited selection of video effects
- The rendering process can be slow
- Offers only a basic set of transitions
4. LumaFusion
Price: $29,00 – offers in-app purchases
Compatibility: Requires iOS 11 or later
The LumaFusion app is equipped with a wide spectrum of professional video editing tools, that enable video content creators to edit their footage with ease. You can choose a project’s frame rate or its aspect ratio in order to meet the content specifications of the social network on which you want to share your videos.
There are six separate video tracks as well as six audio tracks on the app’s timeline, which means that you can use media files like photos, videos and motion graphics in your projects or create stunning soundtracks.
LumaFusion’s selection of visual effects includes effects like Chroma Key or LUTs and you can also utilize the app’s color correction tools to make your own effects. This iOS-based video editor supports fast and slow-motion effects so that you can create smooth slow-motion videos at 120fps or 240fps.
Pros
- Rich media library that contains free videos, sounds, and backgrounds
- Lets users animate effects with keyframes
- The app’s titler grants users full creative control over the process of creating titles for a video
- Excellent file-sharing capabilities
Cons:
- No video recording features
- Requires previous video editing experience
Check the detailed comparison between LumaFusion and Premiere Rush
5. KineMaster
Price: Free, but offers in-app purchases
Compatibility: Requires iOS 10.3 or later
This video editor for iPhones and iPads grants you access to all the tools you are going to need to create videos that attract a lot of attention on YouTube. In fact, a lot of content creators who share their videos on TikTok, Instagram and YouTube are already using KineMaster to edit their footage.
Adding text layers, stickers or overlaying several videos or photos is easy with KineMaster, while you can also choose from a variety of blending modes that let you decide how the images are going to be combined.
The app features rich filters, music, visual and audio effect libraries and it supports 4K video editing. However, each video you create with the free version of KineMaster is going to be watermarked, and you must purchase the monthly or the annual subscription in order to remove the watermark and gain access to all of the app’s features.
Pros:
- Excellent time-lapse and slow-motion video editing tools
- Offers a broad range of image and text overlays
- Allows users to animate layers with keyframes
- The app’s Asset Store contains hundreds of free stickers, transitions, and music
Cons
- You must make an in-app purchase to remove the watermark
- No video recording capability
- Limited color correction options
6. Magisto
Price: Free, but offers in-app purchases
Compatibility: Requires iOS 11.0 or later
Creating a new video with Magisto won’t take much more than a few moments of your time. You just have to select one of the available templates such as Birthday or Wedding, import the footage from your phone’s camera roll and add music to your project. Magisto’s AI-powered super-smart editor will do the rest for you.
Such a quick and simple video editing process makes this video editor for iPhones and iPads an excellent choice for digital marketers who want to create tutorials or promotional videos they can share on social media.
Purchasing the Magisto’s Business Plan will grant you access to dozens of business-based templates that can help you grow your online audience and improve your brand’s visibility. Keep in mind that purchasing one of the available subscription models is necessary if you want to use Magisto for professional purposes.
Pros:
- A simple 3-step video creation process
- Huge library of royalty-free songs
- Offers a wide range of themes and templates
- Lets users create video collages and videos from photos
Cons:
- No 4K video editing support
- The free version of the app has limited capabilities
- More expensive than the competition
7. Filmmaker Pro Video Editor
Price: Free, but offers in-app purchases
Compatibility: Requires iOS 11.0 or later
Filmmaker Pro Video Editor is equipped with a versatile set of video editing tools that allow users to create attention-grabbing video content from their iPhones and iPads. The app lets you create as many audio and video tracks as your project demands, while it also supports 4K editing, although only on iPad Pro, iPhone SE and later iPhone models.
The Filmmaker Pro Video Editor provides more than thirty filters, as well as color grading tools that enable you to adjust a video’s contrast, exposure or brightness. Moreover, the app grants you access to Green Screen and Ken Burns effects that can be used to make your videos more visually dynamic.
In case you’re editing videos with the Filmmaker Pro Video Editor from an iPad you can use Apple Pen to draw over the footage you’re editing. The only downside is that you must make an in-app purchase to remove the watermark from the videos you export from this app.
Pros
- Excellent font selection
- Built-in fade-in and fade-out audio effects
- Offers support for 4K video editing
- The app doesn’t limit the number of projects you can create
Cons
- Pricy
- Limited file-sharing capabilities
- Requires previous video editing experience
8. QUIK
This is an app which was initially designed for Instagram users, but it quickly transitioned to being one of the best apps for video editing on iPhone. You can make a variety of tweaks to your videos such as fonts, titles, filters, styles and pace of the video and trims. It is easy and convenient for usage.
9. SPLICE
This is another convenient option that you can take advantage of. You would be provided with the chance to add transitions, filters, and text. You can adjust the speed as well as trim the video as you see fit. There is a lot of flexibility delivered by the video which is quite convenient.
Part 2: How to Edit YouTube Videos on iPhone with the YouTube Studio Application
Being able to edit the videos you’ve uploaded to YouTube on your iPhone is without a doubt something very beneficial. The YouTube iOS application - YouTube Studio is a powerful mini video-editing tool. You can easily trim your video, add different effects and filters in order to prominently enhance the way that your video looks as well as to add music as a background and many more.
To edit videos with YouTube Studio, you need to upload the video footge first. To upload the video, navigate to the upper corner of your home screen, and click on the icon like a camera. Now that you can allow access to camera and go through and select your videos, you can easily take advantage of the three convenient tools.
You can trim the beginning as well as the ending of the video quickly, and you can select new start as well as end points. However, you wouldn’t be able to separate the clip in two different ones. Once you are through with that, you can easily add different filter effects through the filter option – there are six of them that you can take advantage of. Furthermore, you can easily add background music by tapping on the music icon which is located in the lower-right part of your screen.
The YouTube Studio app might be a good idea, but it doesn’t provide you with all the necessary capabilities as it is rather limited.
As you can see, there are quite a lot of different ways to edit YouTube videos on iPhone and all you need to do is download a specific application or use the one which YouTube has built-in. There is no need for any previous specific knowledge or skills in video editing as they provide quite comprehensive features.
For Win 7 or later (64-bit)
Secure Download
For macOS 10.14 or later
Secure Download
Click here to get Filmora for PC by email
or Try Filmora App for mobile >>>
download filmora app for ios ](https://app.adjust.com/b0k9hf2%5F4bsu85t ) download filmora app for android ](https://app.adjust.com/b0k9hf2%5F4bsu85t )
Check our guide for beginners about How to Edit YouTube videos with Filmora.
Richard Bennett
Richard Bennett is a writer and a lover of all things video.
Follow @Richard Bennett
Richard Bennett
Mar 27, 2024• Proven solutions
iPhones and iPads can capture footage in high resolution, however, video clips you record with an iPhone or an iPad may contain imperfections sometimes. Removing parts of a video clip you don’t want to share publicly, or stabilizing the shaky footage are just a few ways in which you can improve the quality of the videos you’re creating.
The good news is that the iPhone and iPad support a broad range of video editing apps, which enables you to edit all videos you record on these devices before you post them on YouTube or other social media platforms.
There are hundreds of video editing apps to choose from at the App Store , but such a wide range of options can make the process of choosing a video editing app you are going to use to edit your videos, more complicated.
So, in this article, we are going to take you through the some of the best video editing apps for YouTube videos on iPhones and iPads and help you determine which of these apps is the right choice for you.
- Part 1: Best Video Editing Apps for YouTube Video [Free & Paid]
- Part 2: Edit YouTube Videos on iPhone with YouTube Studio
Before we get started, I want to recommend thebest video editing software for YouTubers - Wondershare Filmora video editor , an easy to use while powerful video editor that allows you not only cut, split, crop, resize, reverse your videos, but also offers you multiple video effects specially designed for Fashion, Beauty, Gaming, Travel, Education, etc. Check the video to know more fantastic features:
For Win 7 or later (64-bit)
Secure Download
For macOS 10.14 or later
Secure Download
Click here to get Filmora for PC by email
or Try Filmora App for mobile >>>
download filmora app for ios ](https://app.adjust.com/b0k9hf2%5F4bsu85t ) download filmora app for android ](https://app.adjust.com/b0k9hf2%5F4bsu85t )
- Windows & Mac Cross-Platform compatible
- Various Templates, Effects, Elements, Transitions, Filters for making Hollywood like movie easily
- Practical Audio Editing Tools and Color Grading Feature
Part 1: Best Free Video Editing Apps for iPhone to Edit YouTube Videos You Should Know
Before you opt for one of the apps we’ve featured in our top list, you must first make sure that the app you’re interested in offers all the video editing tools you need to process the footage you recorded for your YouTube channel. Considering the number of audio and video tracks an app supports, the number of visual effects it offers or its file-sharing capabilities can make it easier for you to decide which app you are going to install on your device. However, your choice ultimately depends on how frequently and how professionally you want to edit your YouTube videos. Here are the top 5 video editing apps for iPhones and iPads.
1. Filmora
Price: Free, but offers in-app purchases
Compatibility: Requires iOS 9.0 or later. Compatible with iPhone, iPad, and iPod touch.
This is an easy and convenient video editing app that is going to allow you to turn regular videos into artistic renditions that are going to look as if they were production-valued. All you need to do is choose the video and select the overall theme for it as well as the design and music. Furthermore, the app delivers some fantastic visual effects such as overlays, filters, elements and transitions, basic function. It also allows you to trim and split video clips, rotate and crop the footage, change the video speed, play the video backwards or add your own voiceover. Another special feature is that you can automate the video by selecting the best parts and letting the application handle everything else.
Pros
- Lots of titles, overlays, filters, elements, transitions, themes for making artistic video
- Enough editing tools to trim, split, rotate, crop videos on iPhone and iPad
Cons
- NO advanced features such as Green Screen video compositing
- Not connected to Filmora desktop video editor
2. iMovie
Price: Free
Compatibility: Requires iOS 11.4 or later.
This is a very comprehensive video editing app and a benchmark release for Apple. It is very similar to the desktop iMovie version, and it should definitely be featured on your device if you’re looking for a free YouTube video editing app for iOS. You can use it to add voiceovers, music, titles as well as photos to your work. There are a lot of templates, themes as well as filters for movie trailers that you can take advantage of if you want to make the video even better. You can enhance the video with slow motion and fast forward by changing video speed and add your own narration as well.
Pros
- Totally Free for iPhone and iPad Users
- Trailer Templates, Themes, Filters Available
- Projects can edit on Mac with iMovie or Final Cut Pro X
Cons
- No elements
- Speed up limited to 2X
Learn more details about How to Edit YouTube videos with iMovie >>
3. Adobe Premiere Rush
Price: Free, but offers in-app purchases
Compatibility: Requires iOS 11.0 or later
Adobe’s software products have been at the center of the video editing world for several decades, but most of the company’s video and audio editing products are aimed athigh-end professional users .
Adobe Premiere Rush has a built-in camera feature, which allows you to capture high-resolution footage from the app and edit it as soon as you stop recording. Creating a soundtrack for a video, arranging video clips in any way you want or customizing a title template are just a few among countless video editing options Adobe Premiere Rush offers.
Its file-sharing capabilities are also impressive since you can share your videos to all major social media platforms directly from the app or edit the file on desktop with Premiere Pro CC. This makes Adobe Premiere Rush an excellent choice for YouTubers, vloggers and all other video content creators who often shoot their videos on different locations.
Pros:
- Let users change a video’s aspect ratio effortlessly
- Records high-definition footage
- Rich title template library
- Multitrack timeline
Cons:
- A limited selection of video effects
- The rendering process can be slow
- Offers only a basic set of transitions
4. LumaFusion
Price: $29,00 – offers in-app purchases
Compatibility: Requires iOS 11 or later
The LumaFusion app is equipped with a wide spectrum of professional video editing tools, that enable video content creators to edit their footage with ease. You can choose a project’s frame rate or its aspect ratio in order to meet the content specifications of the social network on which you want to share your videos.
There are six separate video tracks as well as six audio tracks on the app’s timeline, which means that you can use media files like photos, videos and motion graphics in your projects or create stunning soundtracks.
LumaFusion’s selection of visual effects includes effects like Chroma Key or LUTs and you can also utilize the app’s color correction tools to make your own effects. This iOS-based video editor supports fast and slow-motion effects so that you can create smooth slow-motion videos at 120fps or 240fps.
Pros
- Rich media library that contains free videos, sounds, and backgrounds
- Lets users animate effects with keyframes
- The app’s titler grants users full creative control over the process of creating titles for a video
- Excellent file-sharing capabilities
Cons:
- No video recording features
- Requires previous video editing experience
Check the detailed comparison between LumaFusion and Premiere Rush
5. KineMaster
Price: Free, but offers in-app purchases
Compatibility: Requires iOS 10.3 or later
This video editor for iPhones and iPads grants you access to all the tools you are going to need to create videos that attract a lot of attention on YouTube. In fact, a lot of content creators who share their videos on TikTok, Instagram and YouTube are already using KineMaster to edit their footage.
Adding text layers, stickers or overlaying several videos or photos is easy with KineMaster, while you can also choose from a variety of blending modes that let you decide how the images are going to be combined.
The app features rich filters, music, visual and audio effect libraries and it supports 4K video editing. However, each video you create with the free version of KineMaster is going to be watermarked, and you must purchase the monthly or the annual subscription in order to remove the watermark and gain access to all of the app’s features.
Pros:
- Excellent time-lapse and slow-motion video editing tools
- Offers a broad range of image and text overlays
- Allows users to animate layers with keyframes
- The app’s Asset Store contains hundreds of free stickers, transitions, and music
Cons
- You must make an in-app purchase to remove the watermark
- No video recording capability
- Limited color correction options
6. Magisto
Price: Free, but offers in-app purchases
Compatibility: Requires iOS 11.0 or later
Creating a new video with Magisto won’t take much more than a few moments of your time. You just have to select one of the available templates such as Birthday or Wedding, import the footage from your phone’s camera roll and add music to your project. Magisto’s AI-powered super-smart editor will do the rest for you.
Such a quick and simple video editing process makes this video editor for iPhones and iPads an excellent choice for digital marketers who want to create tutorials or promotional videos they can share on social media.
Purchasing the Magisto’s Business Plan will grant you access to dozens of business-based templates that can help you grow your online audience and improve your brand’s visibility. Keep in mind that purchasing one of the available subscription models is necessary if you want to use Magisto for professional purposes.
Pros:
- A simple 3-step video creation process
- Huge library of royalty-free songs
- Offers a wide range of themes and templates
- Lets users create video collages and videos from photos
Cons:
- No 4K video editing support
- The free version of the app has limited capabilities
- More expensive than the competition
7. Filmmaker Pro Video Editor
Price: Free, but offers in-app purchases
Compatibility: Requires iOS 11.0 or later
Filmmaker Pro Video Editor is equipped with a versatile set of video editing tools that allow users to create attention-grabbing video content from their iPhones and iPads. The app lets you create as many audio and video tracks as your project demands, while it also supports 4K editing, although only on iPad Pro, iPhone SE and later iPhone models.
The Filmmaker Pro Video Editor provides more than thirty filters, as well as color grading tools that enable you to adjust a video’s contrast, exposure or brightness. Moreover, the app grants you access to Green Screen and Ken Burns effects that can be used to make your videos more visually dynamic.
In case you’re editing videos with the Filmmaker Pro Video Editor from an iPad you can use Apple Pen to draw over the footage you’re editing. The only downside is that you must make an in-app purchase to remove the watermark from the videos you export from this app.
Pros
- Excellent font selection
- Built-in fade-in and fade-out audio effects
- Offers support for 4K video editing
- The app doesn’t limit the number of projects you can create
Cons
- Pricy
- Limited file-sharing capabilities
- Requires previous video editing experience
8. QUIK
This is an app which was initially designed for Instagram users, but it quickly transitioned to being one of the best apps for video editing on iPhone. You can make a variety of tweaks to your videos such as fonts, titles, filters, styles and pace of the video and trims. It is easy and convenient for usage.
9. SPLICE
This is another convenient option that you can take advantage of. You would be provided with the chance to add transitions, filters, and text. You can adjust the speed as well as trim the video as you see fit. There is a lot of flexibility delivered by the video which is quite convenient.
Part 2: How to Edit YouTube Videos on iPhone with the YouTube Studio Application
Being able to edit the videos you’ve uploaded to YouTube on your iPhone is without a doubt something very beneficial. The YouTube iOS application - YouTube Studio is a powerful mini video-editing tool. You can easily trim your video, add different effects and filters in order to prominently enhance the way that your video looks as well as to add music as a background and many more.
To edit videos with YouTube Studio, you need to upload the video footge first. To upload the video, navigate to the upper corner of your home screen, and click on the icon like a camera. Now that you can allow access to camera and go through and select your videos, you can easily take advantage of the three convenient tools.
You can trim the beginning as well as the ending of the video quickly, and you can select new start as well as end points. However, you wouldn’t be able to separate the clip in two different ones. Once you are through with that, you can easily add different filter effects through the filter option – there are six of them that you can take advantage of. Furthermore, you can easily add background music by tapping on the music icon which is located in the lower-right part of your screen.
The YouTube Studio app might be a good idea, but it doesn’t provide you with all the necessary capabilities as it is rather limited.
As you can see, there are quite a lot of different ways to edit YouTube videos on iPhone and all you need to do is download a specific application or use the one which YouTube has built-in. There is no need for any previous specific knowledge or skills in video editing as they provide quite comprehensive features.
For Win 7 or later (64-bit)
Secure Download
For macOS 10.14 or later
Secure Download
Click here to get Filmora for PC by email
or Try Filmora App for mobile >>>
download filmora app for ios ](https://app.adjust.com/b0k9hf2%5F4bsu85t ) download filmora app for android ](https://app.adjust.com/b0k9hf2%5F4bsu85t )
Check our guide for beginners about How to Edit YouTube videos with Filmora.
Richard Bennett
Richard Bennett is a writer and a lover of all things video.
Follow @Richard Bennett
Also read:
- [Updated] Enter the World of Online Promotion Exclusive Free YouTube Banner Access
- [Updated] Bringing Heartwarmth to the Winter 5 Snug Cinematographic Tips
- Bridging Gaps Transforming Trend Data Into Video Concepts for 2024
- Avoid Blandness in Your Vids Top Recommended YouTube Thumbnail Heights
- Hacking YouTube Success Peak Audience Engagement Timing
- From Beginners to Pros Choosing Webcams for YouTube Live
- Transform with the 10 Most Exceptional Yoga Video Platforms
- [New] The Best Laptops For Video Editing You Should Know
- [Updated] Crafting Exceptional FreeFire Content on YouTube Platforms
- How to Manage YouTube Video Comments for Enhanced Privacy
- [New] Business Breakthroughs on YouTube The Simplest Channel Launches Ranked
- How To Upload Videos to YouTube A Step-by-Step Guide
- [Updated] Boost Views Strategic Partnerships on YouTube for Rapid Growth
- A Compre Written by Daniel Kelley
- Professional Portals 15 YouTube Economic Insights
- Essential Links for Acquiring YouTube Preview Templates Online for 2024
- 2024 Approved Creative Command Center Studio for YouTubers
- [New] Beef up Your CGI with These 8 Online Repositories of FREE Green Screens and Clips
- 2024 Approved A Time Traveler’s Guide to YouTube Queue Watch From End to Start
- The Definitive Guide for Choosing Best YouTube Visual Elements
- Best Yoga Series Online - Stay Active & Healthy
- In 2024, Efficiently Broadcasting Twitch Streams to YouTube Audiences
- Engage Viewers with an Effortless YouTube Animated Subscribe Button Using Filmora for 2024
- Funding Fantasies or Fiscal Facts?
- From Idea to Impact Top 8 Online Courses for New Creators
- Amazing Alchemy YouTube's Most Magical Editing Feats
- Professionals' Choice Premium YouTube Cameras
- [Updated] Deciphering Content Control YouTube Vs. Creative Commons License
- Crafting a Music Career 15 Essential Video Tutorials for Artists for 2024
- Discovering Underrated Gems This Year (Films) for 2024
- Unveiling Income Insights A Triple Step Technique for Tracking YouTube Revenue
- Instructions Clearing Stored Videos on YouTube's Watchlater
- [New] 2024 Approved From Download to Implementation Installing OBS on a MacPC
- How to Fake Snapchat Location on Poco C65 | Dr.fone
- Here are Some Pro Tips for Pokemon Go PvP Battles On Realme Narzo 60 Pro 5G | Dr.fone
- Boost Visual Impact Selecting Excellent Edges for Instagram Shots for 2024
- [Updated] Toy Wheels Tournament Tunes
- [Updated] Rapid Routines Saving Presentations PPT-Wise for 2024
- Updated 2024 Approved Sound Cleanup A Comprehensive Tutorial on Removing Drums From Audio Files
- 3 Solutions to Hard Reset Vivo Y100A Phone Using PC | Dr.fone
- Delving Into Twitter Archives Processes Explained
- [Updated] Android’s Premier Photographic Tool – Is PickUp at the Forefront?
- [Updated] How to Achieve Inverted Movie Time in a Snap
- [Updated] Deactivating Your Discord Server A Device-Centric Approach
- New Echoes to Silence Advanced Noise Reduction Tactics Using Audacity
- New In 2024, Luckily There Are Several Alternative Apps that Allow You to Edit Your Footage From a Mobile Device; See Our Reviews Below
- In 2024, How to Change Location on TikTok to See More Content On your Motorola Defy 2 | Dr.fone
- [New] In 2024, The Definitive Guide to Efficient Screen Recording on an HP Notebook
- How to Simulate GPS Movement in AR games On Nubia Red Magic 8S Pro+? | Dr.fone
- [Updated] Broadcasting Vimeo Content Efficiently for 2024
- [New] Snapchat Voice Tweaks Simple Methods for Smooth Adjustments for 2024
- [Updated] 2024 Approved Quick Fixes for Missing Sound in OBS
- Process of Screen Sharing Poco M6 Pro 5G to PC- Detailed Steps | Dr.fone
- [Updated] How to Shoot IGTV Videos With Smartphone/DLSR Cameras for 2024
- In 2024, Top 10 Telegram Spy Tools On Oppo Find N3 for Parents | Dr.fone
- Title: "2024 Approved Building Your First Channel Essential Video Gear List"
- Author: Brian
- Created at : 2024-05-25 11:02:34
- Updated at : 2024-05-26 11:02:34
- Link: https://youtube-video-recordings.techidaily.com/2024-approved-building-your-first-channel-essential-video-gear-list/
- License: This work is licensed under CC BY-NC-SA 4.0.
