
:max_bytes(150000):strip_icc()/CraigLewis-a22534001b734668a6b9b89811095400.png)
"2024 Approved Bringing Bygone Era Filmmaking to Life Today"
Bringing Bygone Era Filmmaking to Life Today
How to Create Vintage Videos: A Comprehensive Tutorial

Richard Bennett
Mar 27, 2024• Proven solutions
“Every accomplishment starts with a decision to try.” – A Vintage Thought

Vintage videos are ultimately the retro videos you have ever imagined. The look is highly inspirational in itself. The vintage effect in photography and videos results in a must-see look that everyone wants to capture all day long. The meaning of vintage is ‘the time when something of quality was produced.’ When something is called retro, it means old, recognized, and essential. Vintage also resembles love apart from videos and photos. All in all, it’s a positive and result-oriented thing to carry on in your videos. And this is what we want to mention in this post relating to the creation of vintage videos.
Here are some vintage-style video ideas for you to have a look at.
- Part 1: What to Consider When Shooting a Vintage Video?
- Part 2: How to Create a Stunning Vintage Video?
- Part 3: Tips to Make Your Vintage Videos Stand Out
What to Consider When Shooting a Vintage Video?
Vintage videos are kind of old school vibes and must be shooting accordingly by keeping in mind the following points. These are a sort of expert tips given by photographers based on their practical experience. First of all, you have to understand that a video can be made vintage, but you can’t change the actual environment of shooting. Some editing always involves there in every project out there. Still, the tips given below will help you a lot in creating a retro look.
Use Vintage Lenses
The very first helpful tip is to use a vintage lens. They allow chromatic aberration by distorting colors around the frame. Furthermore, you can find various kinds of lenses in terms of a vintage effect.
Decrease Contrast
Do the correct color grading by reducing the contrast a little bit. You must not level the retro videos in black or white or like-new videos. You can simply add a contrasting effect and then reduce it to have that vintage look.
Keep it a little soft
If you have ever noticed, the vintage videos are a little soft and look like degraded with time. It’s a result of decreased sharpness in the camera’s menu settings. You can even add a slight blur to the final video or simply use recognized software made for video editing .
Brighten up the black levels
Lots of black points in the video are not ideal for a vintage effect. The suitable approach is to bring up black levels and make it dark gray instead of inky black. This look can be achieved either by levels effect or curves effect in your editing software.
Reduce Saturation levels
Bringing down the saturation levels is another tip to create a vintage effect. The old videos are also absent in bright colors. Don’t go too crazy about reduction as 20%-30% saturation level is more than enough.
How to Create a Stunning Vintage Video?
What you need to get started as both beginner and professional is Wondershare Filmora Video Editor. It is a highly recommended software to create vintage videos. The intuitive user interface and lots of editing functions are helpful for a video editor. It has both primary as well as advanced editing programs to check. It has various advanced color tuning tools to promote the making of original videos. It features tint, temperature, Vignette, 3D Luts, Lights, and so on.


Steps for the vintage effect to videos on Wondershare Filmora Video Editor
Step 1: Upload video & make specific changes

The very step is to add the video by clicking the + icon. We have added the three sample videos from the library of Wondershare Filmora itself. Adjust them in the timeline as per your requirements.
After doing all the essential editing functions, click on the Effects tab given at the upper-left corner. Simply type the word Old in the Search tab.
The Old Video filter will immediately appear in the list of filters. Tap the “+” icon in Old Video filter to add to the timeline. Drag its ends right or left to adjust the duration.
Step 2: Apply White & Black Filters

The second step is to apply the Black & White filters. Go to the Effects tab and explore five Black & White filters available. Each of these filters is quite different and must be applied accordingly. Check the aesthetic of your video clip before any filter application to retro videos.
Step 3: Add the Sun Kissed or Sepia Tone Rise Filters to the video clip

There are various other categories of filters you can apply, such as Retro, Sun Kissed, and Sepia Tone, etc. The features of Filmora also present several subcategories such as Faux Film or Shake.

On the other hand, the subcategory of Sepia Tone features Sun-Kissed & Rise Filters to stimulate sepia-tinted texture and recreate the old visual style. The Sun Kissed filter presents brown and red colors to give that warm image atmosphere.
Step 4: Desaturate Video Clip

Now, you need to desaturate the video clip with Ash & Willow filters. We have typed Ash in the Search bar, and you can see the filter below. These filters are essential to desaturate the video with preset contrast, brightness, or exposure values.

Then, we have combined the black & white filter with an overlay of Film Reel Horizontal. It will help you sell the effect and make the video look more authentic. However, the only application of Black & White or Ash & Willow filters is not going to make any creative thing in terms of vintage videos. You have to mix overlays with features such as Random Dust or Film Reel Horizontal.
Step 5: Apply Black & White and Old Film Color Correction Presets to the video
You can also access the Advanced color correction Tab of Filmora from the Color button. It also features Preset and Adjusts Tabs to desaturate footage. The Preset presents a variety of options, including Black & White and Old Film. You just need to right-click the particular preset and select the Apply option.

Tips to Make Your Vintage Videos Stand Out
Following the helpful tips would assist you in creating awesome retro videos.
- You can use various vintage apps such as Retro VHS, RTRO Camera, 8mm, Camcorder, VSCO, etc. Or, despite using these limited apps, you can directly use our preferred video editing software called Wondershare Filmora.
- If you use a specific vintage camera, keep it on low highlights and low contrasts. Use color grading, as we have discussed above. They help to provide the ultimate old-school effect.
- Always keep low saturation settings for shooting vintage videos. Take control over Saturation, Hue, and Luminance of video.
- Add overlays and respective filters to recreate a required vintage look. You must add things that dust, scratch, and grain the heck out from the video that you have created.
- Lower the frame rate or FPS to create an excellent vintage look. You can make it to 18 or 14 FPS depending upon the aesthetic requirements.
- Keep an eye on black and white filters you have used. It’s because more of a black and white can ruin the actual vintage experience.
Conclusion
So, this is an ultimate tutorial on the creation of vintage videos. We Hope you have admired the steps and our recommended video editing software. Vintage means grand, and thus you should make it amazing as well. It is the reason we have stated all facts regarding the vintage effect in our post above. Wondering how to add such effect in FCPX? check this article:How to Create a Vignette in Final Cut Pro X?
Surely give a read and thank us later!
Richard Bennett
Richard Bennett is a writer and a lover of all things video.
Follow @Richard Bennett
Richard Bennett
Mar 27, 2024• Proven solutions
“Every accomplishment starts with a decision to try.” – A Vintage Thought
Vintage videos are ultimately the retro videos you have ever imagined. The look is highly inspirational in itself. The vintage effect in photography and videos results in a must-see look that everyone wants to capture all day long. The meaning of vintage is ‘the time when something of quality was produced.’ When something is called retro, it means old, recognized, and essential. Vintage also resembles love apart from videos and photos. All in all, it’s a positive and result-oriented thing to carry on in your videos. And this is what we want to mention in this post relating to the creation of vintage videos.
Here are some vintage-style video ideas for you to have a look at.
- Part 1: What to Consider When Shooting a Vintage Video?
- Part 2: How to Create a Stunning Vintage Video?
- Part 3: Tips to Make Your Vintage Videos Stand Out
What to Consider When Shooting a Vintage Video?
Vintage videos are kind of old school vibes and must be shooting accordingly by keeping in mind the following points. These are a sort of expert tips given by photographers based on their practical experience. First of all, you have to understand that a video can be made vintage, but you can’t change the actual environment of shooting. Some editing always involves there in every project out there. Still, the tips given below will help you a lot in creating a retro look.
Use Vintage Lenses
The very first helpful tip is to use a vintage lens. They allow chromatic aberration by distorting colors around the frame. Furthermore, you can find various kinds of lenses in terms of a vintage effect.
Decrease Contrast
Do the correct color grading by reducing the contrast a little bit. You must not level the retro videos in black or white or like-new videos. You can simply add a contrasting effect and then reduce it to have that vintage look.
Keep it a little soft
If you have ever noticed, the vintage videos are a little soft and look like degraded with time. It’s a result of decreased sharpness in the camera’s menu settings. You can even add a slight blur to the final video or simply use recognized software made for video editing .
Brighten up the black levels
Lots of black points in the video are not ideal for a vintage effect. The suitable approach is to bring up black levels and make it dark gray instead of inky black. This look can be achieved either by levels effect or curves effect in your editing software.
Reduce Saturation levels
Bringing down the saturation levels is another tip to create a vintage effect. The old videos are also absent in bright colors. Don’t go too crazy about reduction as 20%-30% saturation level is more than enough.
How to Create a Stunning Vintage Video?
What you need to get started as both beginner and professional is Wondershare Filmora Video Editor. It is a highly recommended software to create vintage videos. The intuitive user interface and lots of editing functions are helpful for a video editor. It has both primary as well as advanced editing programs to check. It has various advanced color tuning tools to promote the making of original videos. It features tint, temperature, Vignette, 3D Luts, Lights, and so on.
Steps for the vintage effect to videos on Wondershare Filmora Video Editor
Step 1: Upload video & make specific changes
The very step is to add the video by clicking the + icon. We have added the three sample videos from the library of Wondershare Filmora itself. Adjust them in the timeline as per your requirements.
After doing all the essential editing functions, click on the Effects tab given at the upper-left corner. Simply type the word Old in the Search tab.
The Old Video filter will immediately appear in the list of filters. Tap the “+” icon in Old Video filter to add to the timeline. Drag its ends right or left to adjust the duration.
Step 2: Apply White & Black Filters
The second step is to apply the Black & White filters. Go to the Effects tab and explore five Black & White filters available. Each of these filters is quite different and must be applied accordingly. Check the aesthetic of your video clip before any filter application to retro videos.
Step 3: Add the Sun Kissed or Sepia Tone Rise Filters to the video clip
There are various other categories of filters you can apply, such as Retro, Sun Kissed, and Sepia Tone, etc. The features of Filmora also present several subcategories such as Faux Film or Shake.
On the other hand, the subcategory of Sepia Tone features Sun-Kissed & Rise Filters to stimulate sepia-tinted texture and recreate the old visual style. The Sun Kissed filter presents brown and red colors to give that warm image atmosphere.
Step 4: Desaturate Video Clip
Now, you need to desaturate the video clip with Ash & Willow filters. We have typed Ash in the Search bar, and you can see the filter below. These filters are essential to desaturate the video with preset contrast, brightness, or exposure values.
Then, we have combined the black & white filter with an overlay of Film Reel Horizontal. It will help you sell the effect and make the video look more authentic. However, the only application of Black & White or Ash & Willow filters is not going to make any creative thing in terms of vintage videos. You have to mix overlays with features such as Random Dust or Film Reel Horizontal.
Step 5: Apply Black & White and Old Film Color Correction Presets to the video
You can also access the Advanced color correction Tab of Filmora from the Color button. It also features Preset and Adjusts Tabs to desaturate footage. The Preset presents a variety of options, including Black & White and Old Film. You just need to right-click the particular preset and select the Apply option.
Tips to Make Your Vintage Videos Stand Out
Following the helpful tips would assist you in creating awesome retro videos.
- You can use various vintage apps such as Retro VHS, RTRO Camera, 8mm, Camcorder, VSCO, etc. Or, despite using these limited apps, you can directly use our preferred video editing software called Wondershare Filmora.
- If you use a specific vintage camera, keep it on low highlights and low contrasts. Use color grading, as we have discussed above. They help to provide the ultimate old-school effect.
- Always keep low saturation settings for shooting vintage videos. Take control over Saturation, Hue, and Luminance of video.
- Add overlays and respective filters to recreate a required vintage look. You must add things that dust, scratch, and grain the heck out from the video that you have created.
- Lower the frame rate or FPS to create an excellent vintage look. You can make it to 18 or 14 FPS depending upon the aesthetic requirements.
- Keep an eye on black and white filters you have used. It’s because more of a black and white can ruin the actual vintage experience.
Conclusion
So, this is an ultimate tutorial on the creation of vintage videos. We Hope you have admired the steps and our recommended video editing software. Vintage means grand, and thus you should make it amazing as well. It is the reason we have stated all facts regarding the vintage effect in our post above. Wondering how to add such effect in FCPX? check this article:How to Create a Vignette in Final Cut Pro X?
Surely give a read and thank us later!
Richard Bennett
Richard Bennett is a writer and a lover of all things video.
Follow @Richard Bennett
Boost Your Channels: A Guide to Best YouTube SEO Resources
10 Best YouTube Keyword Tools to Get More Views
Richard Bennett
Mar 27, 2024• Proven solutions
If we asked you to name the world’s biggest search engines, undoubtedly you’d come up with Google, but what would be number two? Bing? Yahoo? The truth might surprise you.
According to figures, the world’s second biggest search engine is actually YouTube. Millions of people are using it everyday to search for videos about fitness, hair, marketing and more. With such a large audience already searching directly on the platform, doesn’t it make sense that when we use YouTube keyword research and SEO should be as important as it is on our website?
Luckily, we can use YouTube keyword tools to analyze YouTube keywords. Here we’re going to take a look at 10 best YouTube keyword tools out there, which can help you identify and optimize for the highest traffic keywords for your videos. By optimizing your videos, you can rank higher, get more views and enjoy a larger audience on YouTube.
- Part 1: 10 Best YouTube Keyword Tools Recommendation
- Part 2: Bonues Tips - Google video result keywords
You May Also Like:
YouTube SEO Complete Guide >>
How to Edit and Optimize YouTube Title, Description, and Tags >>
Do you want to edit YouTube video easily? Filmora is a YouTube editor that you should have a try. As a YouTube video editing tool, it is simple to use with dragging and dropping. You can add various video effects, filters and transition to make your video better. Besides, titles and texts are also available to use. After editing, you can directly upload video to YouTube plactform. Now, download it to have a try!
Download Mac Version ](https://tools.techidaily.com/wondershare/filmora/download/ )
Part 1: 10 Best YouTube Keyword Tools Recommendation
Before you can get into using any YouTube SEO tool, you’ll need to identify what the best keywords for your videos are. Let’s start by taking a look at the best YouTube keyword tools available.
1. YouTube autocomplete
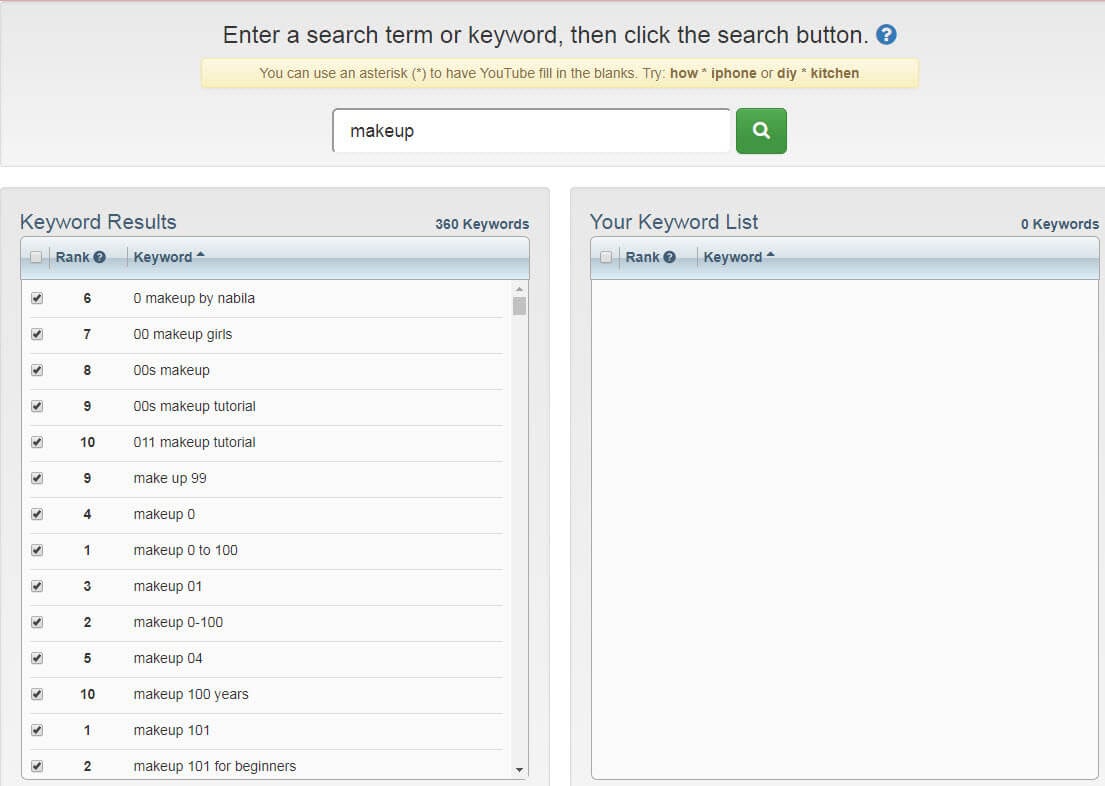
When you start to search for something on YouTube, you’ll probably notice that YouTube suggests some keywords to finish your search. This is called autocomplete, and it works by suggesting the most popular keywords that start with the letters you’ve typed so far. What it is essentially saying is that those are the most frequently searched for terms that use the words you’ve already typed.
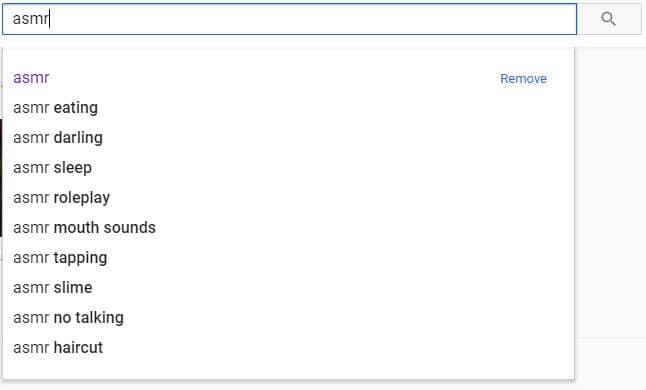
This means it’s a great place to start building your keywords, and a fantastic YouTube keyword tool for your videos. Just start your search for your video (e.g. shoes for…) and see what comes up. In this case, we can see that the most popular keywords are ‘girls’, ‘men’, ‘kids’, ‘summer’ and ‘boys’.
2. Keywordtool.io
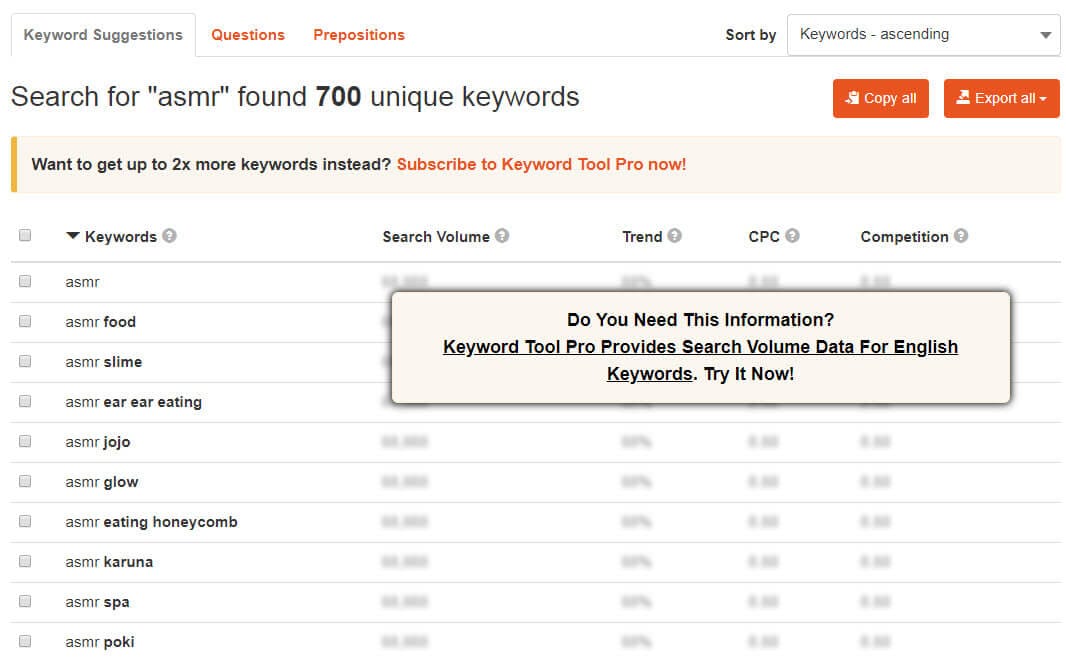
Without doubt, this is one of the most powerful YouTube keyword tools out there, ranking hundreds of keywords by popularity. It captures data from YouTube autocomplete and allows you to create lists of keywords from that data. As well as autocompete data, you can also search for questions people are asking, which makes it highly beneficial as a YouTube SEO tool.

The downside to this particular tool is that it’s fairly limited on the free version. Upgrading to Pro Basic will give you almost double the keyword results and will let you compare the volume of searches made for those terms too. However, this will set you back around $68 a year, so it’s going to be something of an investment if you go for it.
3. SEOChat
SEO Chat is an amazing free tool that can generate keyword ideas from Google, Amazon, Bing and YouTube. You can search for keywords from all of those sources or can just search YouTube alone to find your keyword lists. You’ll need a ‘seed’ keyword, such as ‘shoes’, ‘make up’ or ‘marketing’, and then organizes results alphabetically with other letters following your seed keyword.

Simply scrolling through the results is going to give you loads of ideas for keywords and possibly content too. The tool also allows you to further expand your results by selecting a keyword and running ‘part two’ of the process, which expands those phrases even further. Your chosen keywords can be exported from the software, ready for use in your YouTube SEO tool.
4. Gather keywords from your competitor
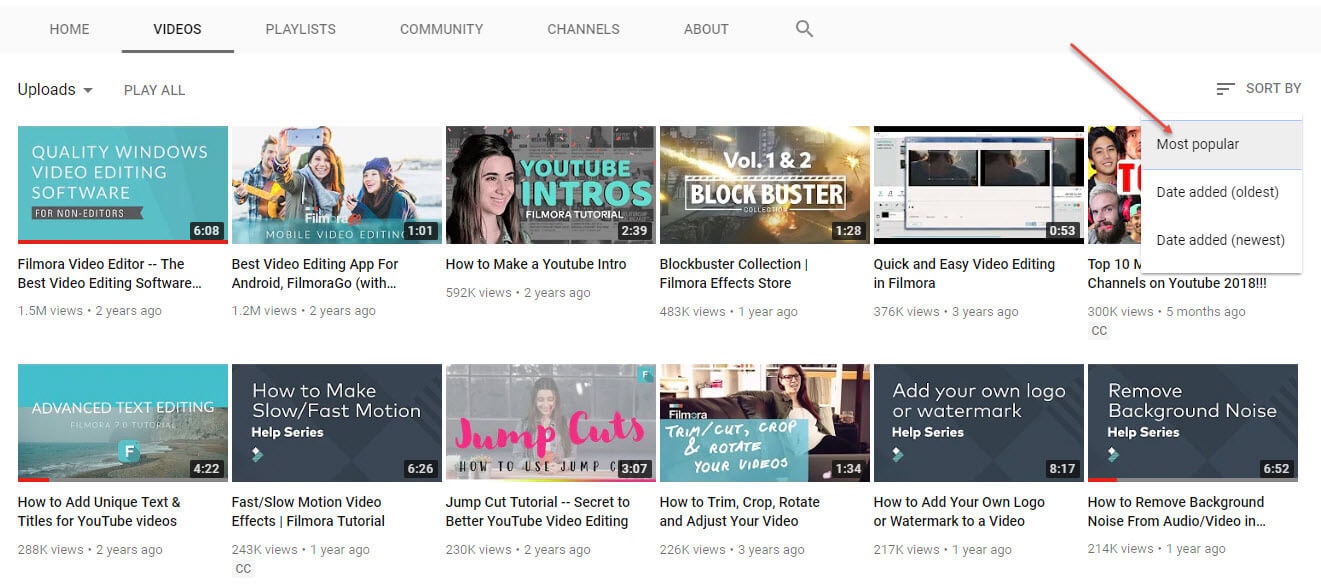
Why not learn from the best and see what’s already working for your competitors? Finding their high traffic keywords is easy and can save a lot of time and energy. To do this, pick a channel that is around your size, as they’re your nearest competitors. Steer clear of the huge channels, as you’ll find it hard to rank next to them.
Click the videos tab to see their content, and sort them by ‘most popular’ to see the ones which got the most views. Take a look at the title and the description of those videos, and you’ll find a good fistful of proven keywords that you can start using yourself.
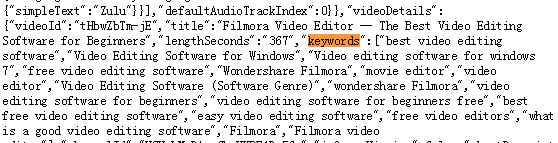
That’s not all though. To maximize your competitor research, let’s dig a little deeper into the tags they have used for their videos too. Unfortunately, these are hidden on YouTube, but are easily seen using the page’s HTML. Simply right click on the page and select ‘view source’. Don’t be alarmed at the great stream of HTML that pops up, it’s easy to search using your search function (press ctrl + f on Windows or ⌘ + f on iOS) by typing in ‘keywords’ to the search box. The following terms are the tags used in the video.
If ploughing through HTML sounds somewhat taxing, there is a handy YouTube SEO tool you can use to display the tags on page. It’s called TubeBuddy and is a Chrome extension which you’ll find in the Chrome store for free.
5. Keyword Tool Dominator
It’s got a grand name, but it’s actually really easy to use and a great place to start if you’re new to YouTube keyword research. Pop in your seed keywords and the Dominator will produce a list of relevant keywords related to those terms. You can then select the most useful and download them to your device.
The drawback with this is that you can only perform three searches a day on the free version. Perhaps that’s enough for you to begin with, but if you want to upgrade to the unlimited version, which will also give you search volumes, it’s a one-off fee of $39.99.
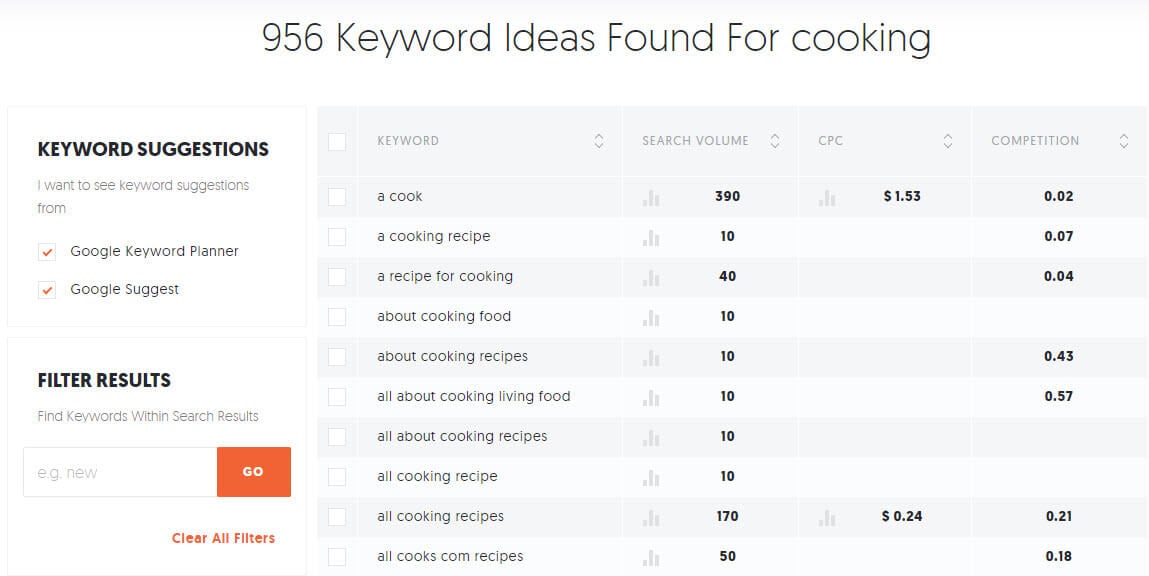
6. Ubersuggest
For getting more data on specific keywords, Ubersuggest from the SEO guru that is Neil Patel is one of the best tools out there. As well as showing search volume and competition, you can see other information such as cost per click and the seasonality of the keyword. It’s free to use with no limitations at all, so is well worth checking out.
7. Google trends
We would highly recommend investigating Google Trends as part of your YouTube keyword research, as it is powerful, accurate and, best of all, free! The options let you narrow down the trend results to just YouTube searches, which is great for gaining insights to your search terms. You can narrow down the results to a specific country too, helping you to gain insight into what your target demographic is currently interested in.
8. VidIQ
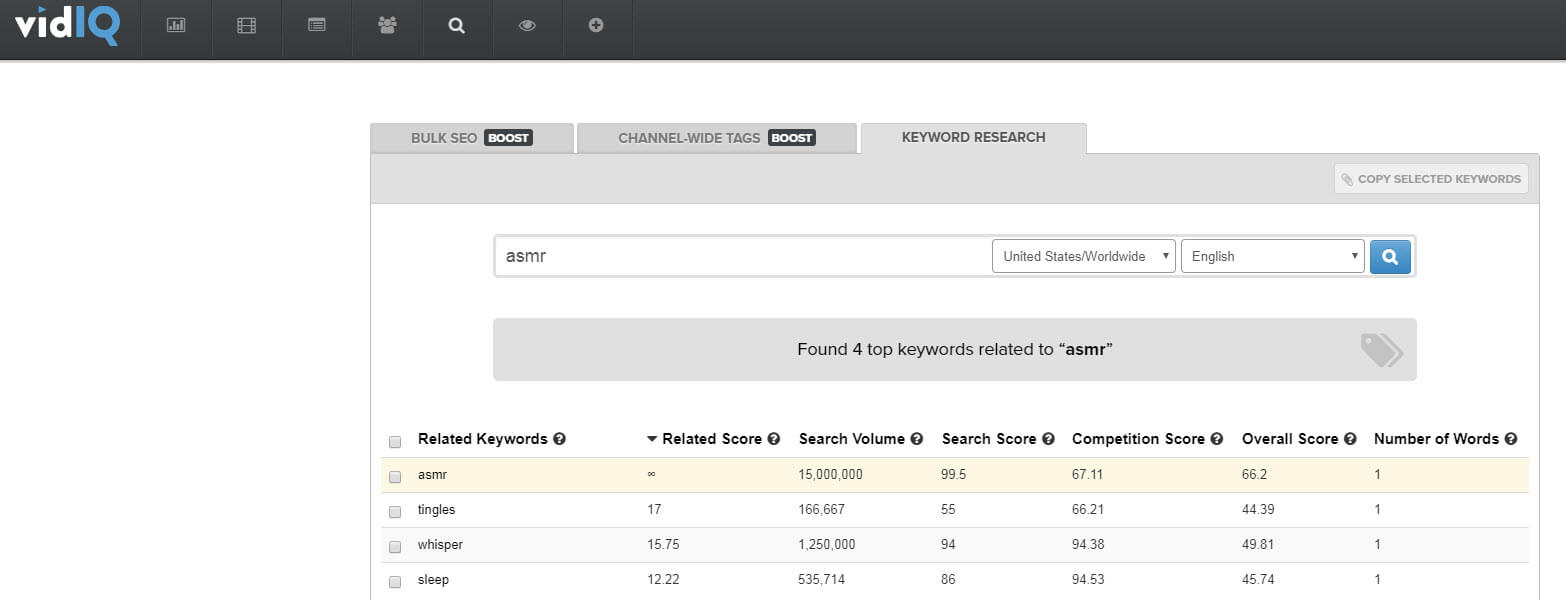
The keyword tool in VidIQ is one of very few research tools that has a function for just YouTube built in. You can paste in the keywords you want to research, choose the country you wish to target, and it will return all the search volumes and amount of competition, and will score your keywords based on these figures.
On the downside, there is a fairly complicated subscription process to go through if you want to upgrade from the free version. To be honest, the free version is OK for new users, but for in depth analytics you’re going to want to upgrade eventually.
9. Keyword Keg
Keyword Keg is definitely one of the most powerful YouTube keyword research tools out there. It offers lots of data, drawn from a variety of data sources including Wikipedia, Alibaba, Playstore and more. There are filters for country and language and you can drill down into issues like buyer intent and product info. However, as with most free YouTube keyword tools, there is a strict limit on what you can do before you pay. In this case, you only get to see the first five results unless you want to upgrade.

10. Kparser
Kparser is a YouTube keyword tool that you should notice. You can use it to find YouTube keywords free to use. More than finding the best core keywords, this tool can also give you suggestions on long tail keywords in every field. By use this, you don’t need to worry that you can’t the right keywords to use in title, description and tags. You also can selcet country and language when searching a YouTube keyword. For searching more than one keyword, remember to seperate them with coma.

Part 2: Bonus Tips - Google Video Result Keywords
Getting your video ranking highly on YouTube is excellent and will certainly bring you more traffic. But, do you know what would be even better than that? Getting your video ranking on Google as well.
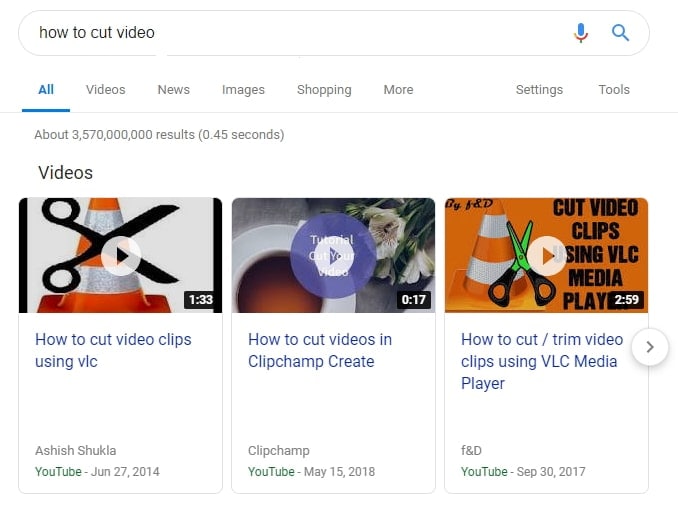
To do this you’ll need to find ‘video result keywords’ in Google, so that yours can be one of the selected videos that sometimes show up in search. Google decides what should and shouldn’t trigger a video result, and usually shows them when a video would make sense, for example when someone asks ‘how to’ or searches for ‘cute’ or ‘funny’ things.
There’s a bit of trial and error involved as there is no YouTube keyword tool to find video result keywords… yet. But you can use Google to search your keywords and see if they are video result keywords. Just type them in, and if a video appears in the listings below, you’ve discovered a video result keyword that is well worth optimizing for.
Richard Bennett
Richard Bennett is a writer and a lover of all things video.
Follow @Richard Bennett
Richard Bennett
Mar 27, 2024• Proven solutions
If we asked you to name the world’s biggest search engines, undoubtedly you’d come up with Google, but what would be number two? Bing? Yahoo? The truth might surprise you.
According to figures, the world’s second biggest search engine is actually YouTube. Millions of people are using it everyday to search for videos about fitness, hair, marketing and more. With such a large audience already searching directly on the platform, doesn’t it make sense that when we use YouTube keyword research and SEO should be as important as it is on our website?
Luckily, we can use YouTube keyword tools to analyze YouTube keywords. Here we’re going to take a look at 10 best YouTube keyword tools out there, which can help you identify and optimize for the highest traffic keywords for your videos. By optimizing your videos, you can rank higher, get more views and enjoy a larger audience on YouTube.
- Part 1: 10 Best YouTube Keyword Tools Recommendation
- Part 2: Bonues Tips - Google video result keywords
You May Also Like:
YouTube SEO Complete Guide >>
How to Edit and Optimize YouTube Title, Description, and Tags >>
Do you want to edit YouTube video easily? Filmora is a YouTube editor that you should have a try. As a YouTube video editing tool, it is simple to use with dragging and dropping. You can add various video effects, filters and transition to make your video better. Besides, titles and texts are also available to use. After editing, you can directly upload video to YouTube plactform. Now, download it to have a try!
Download Mac Version ](https://tools.techidaily.com/wondershare/filmora/download/ )
Part 1: 10 Best YouTube Keyword Tools Recommendation
Before you can get into using any YouTube SEO tool, you’ll need to identify what the best keywords for your videos are. Let’s start by taking a look at the best YouTube keyword tools available.
1. YouTube autocomplete
When you start to search for something on YouTube, you’ll probably notice that YouTube suggests some keywords to finish your search. This is called autocomplete, and it works by suggesting the most popular keywords that start with the letters you’ve typed so far. What it is essentially saying is that those are the most frequently searched for terms that use the words you’ve already typed.
This means it’s a great place to start building your keywords, and a fantastic YouTube keyword tool for your videos. Just start your search for your video (e.g. shoes for…) and see what comes up. In this case, we can see that the most popular keywords are ‘girls’, ‘men’, ‘kids’, ‘summer’ and ‘boys’.
2. Keywordtool.io
Without doubt, this is one of the most powerful YouTube keyword tools out there, ranking hundreds of keywords by popularity. It captures data from YouTube autocomplete and allows you to create lists of keywords from that data. As well as autocompete data, you can also search for questions people are asking, which makes it highly beneficial as a YouTube SEO tool.
The downside to this particular tool is that it’s fairly limited on the free version. Upgrading to Pro Basic will give you almost double the keyword results and will let you compare the volume of searches made for those terms too. However, this will set you back around $68 a year, so it’s going to be something of an investment if you go for it.
3. SEOChat
SEO Chat is an amazing free tool that can generate keyword ideas from Google, Amazon, Bing and YouTube. You can search for keywords from all of those sources or can just search YouTube alone to find your keyword lists. You’ll need a ‘seed’ keyword, such as ‘shoes’, ‘make up’ or ‘marketing’, and then organizes results alphabetically with other letters following your seed keyword.
Simply scrolling through the results is going to give you loads of ideas for keywords and possibly content too. The tool also allows you to further expand your results by selecting a keyword and running ‘part two’ of the process, which expands those phrases even further. Your chosen keywords can be exported from the software, ready for use in your YouTube SEO tool.
4. Gather keywords from your competitor
Why not learn from the best and see what’s already working for your competitors? Finding their high traffic keywords is easy and can save a lot of time and energy. To do this, pick a channel that is around your size, as they’re your nearest competitors. Steer clear of the huge channels, as you’ll find it hard to rank next to them.
Click the videos tab to see their content, and sort them by ‘most popular’ to see the ones which got the most views. Take a look at the title and the description of those videos, and you’ll find a good fistful of proven keywords that you can start using yourself.
That’s not all though. To maximize your competitor research, let’s dig a little deeper into the tags they have used for their videos too. Unfortunately, these are hidden on YouTube, but are easily seen using the page’s HTML. Simply right click on the page and select ‘view source’. Don’t be alarmed at the great stream of HTML that pops up, it’s easy to search using your search function (press ctrl + f on Windows or ⌘ + f on iOS) by typing in ‘keywords’ to the search box. The following terms are the tags used in the video.
If ploughing through HTML sounds somewhat taxing, there is a handy YouTube SEO tool you can use to display the tags on page. It’s called TubeBuddy and is a Chrome extension which you’ll find in the Chrome store for free.
5. Keyword Tool Dominator
It’s got a grand name, but it’s actually really easy to use and a great place to start if you’re new to YouTube keyword research. Pop in your seed keywords and the Dominator will produce a list of relevant keywords related to those terms. You can then select the most useful and download them to your device.
The drawback with this is that you can only perform three searches a day on the free version. Perhaps that’s enough for you to begin with, but if you want to upgrade to the unlimited version, which will also give you search volumes, it’s a one-off fee of $39.99.
6. Ubersuggest
For getting more data on specific keywords, Ubersuggest from the SEO guru that is Neil Patel is one of the best tools out there. As well as showing search volume and competition, you can see other information such as cost per click and the seasonality of the keyword. It’s free to use with no limitations at all, so is well worth checking out.
7. Google trends
We would highly recommend investigating Google Trends as part of your YouTube keyword research, as it is powerful, accurate and, best of all, free! The options let you narrow down the trend results to just YouTube searches, which is great for gaining insights to your search terms. You can narrow down the results to a specific country too, helping you to gain insight into what your target demographic is currently interested in.
8. VidIQ
The keyword tool in VidIQ is one of very few research tools that has a function for just YouTube built in. You can paste in the keywords you want to research, choose the country you wish to target, and it will return all the search volumes and amount of competition, and will score your keywords based on these figures.
On the downside, there is a fairly complicated subscription process to go through if you want to upgrade from the free version. To be honest, the free version is OK for new users, but for in depth analytics you’re going to want to upgrade eventually.
9. Keyword Keg
Keyword Keg is definitely one of the most powerful YouTube keyword research tools out there. It offers lots of data, drawn from a variety of data sources including Wikipedia, Alibaba, Playstore and more. There are filters for country and language and you can drill down into issues like buyer intent and product info. However, as with most free YouTube keyword tools, there is a strict limit on what you can do before you pay. In this case, you only get to see the first five results unless you want to upgrade.
10. Kparser
Kparser is a YouTube keyword tool that you should notice. You can use it to find YouTube keywords free to use. More than finding the best core keywords, this tool can also give you suggestions on long tail keywords in every field. By use this, you don’t need to worry that you can’t the right keywords to use in title, description and tags. You also can selcet country and language when searching a YouTube keyword. For searching more than one keyword, remember to seperate them with coma.
Part 2: Bonus Tips - Google Video Result Keywords
Getting your video ranking highly on YouTube is excellent and will certainly bring you more traffic. But, do you know what would be even better than that? Getting your video ranking on Google as well.
To do this you’ll need to find ‘video result keywords’ in Google, so that yours can be one of the selected videos that sometimes show up in search. Google decides what should and shouldn’t trigger a video result, and usually shows them when a video would make sense, for example when someone asks ‘how to’ or searches for ‘cute’ or ‘funny’ things.
There’s a bit of trial and error involved as there is no YouTube keyword tool to find video result keywords… yet. But you can use Google to search your keywords and see if they are video result keywords. Just type them in, and if a video appears in the listings below, you’ve discovered a video result keyword that is well worth optimizing for.
Richard Bennett
Richard Bennett is a writer and a lover of all things video.
Follow @Richard Bennett
Also read:
- Maximizing Visibility A Comprehensive Guide to YT Gaming Hashes
- Discover 8 YouTube Thumbnail Generators Online
- Quick Fixes Today's Rapidly Watched Videos
- 2024 Approved Cutting-Edge Tips Designing Immersive Educational Videos for Online Learning
- Drive Traffic and Growth with YouTube Analytic Insights
- YouTube Mastery Perfecting Edits on Published Videos
- [Updated] Elevate Your Content Strategy with Social Blade and YouTube Stats
- Platform Predicament Choosing the Right Space
- 2024 Approved Cross-Platform Content Dimensions YouTube, Facebook, Insta & More
- [New] Elevate Your Aspects of Sound and Sight in ASMR Recording
- In 2024, A Beginner's Pathway to Effective Video Tag Usage
- In 2024, Essential Filmmaking Software Exploration
- Illuminate Your Content Creation
- Epicurean Eminence Best Online Chefs & Cooks for 2024
- Audience Augmentation Made Simple - $5 Solutions Available
- [Updated] Essential Knowledge for Engaging with ASMR Videos
- Enhancing Social Media Reach by Uploading to YouTube via Twitch
- YT Prompts Made Simple with GS Techniques
- [New] Cut Buffering Time – Turn On AV1 in YouTube Settings
- Ultimate 10 Yoga Channels Boosting Physical Wellbeing
- 2024 Approved Deciphering the Superior Video-Sharing Platform TikTok or YouTube Shorts?
- In 2024, Charting the Course A Comprehensive Guide to YouTube Teaser Vids
- [Updated] Easy Steps How to Master the Best of 9 Free YouTube Logomakers
- 2024 Approved Crafting Engaging YouTube Beginnings Two Methods
- Breaking Through Barriers Innovative Strategies for Multi-Streaming Success for 2024
- [Updated] 1St Place Video Saver - Download Anywhere, Anytime
- In 2024, Authentic Audience Boosting Legal Practices That Work
- 2024 Approved Compliance in Recording Video Streams on YouTube
- Hide location on Apple iPhone 6s Plus and Android without others knowing | Dr.fone
- 2024 Approved Top Audio Splitter on Mac
- Can Life360 Track You When Your Xiaomi 14 Ultra is off? | Dr.fone
- How To Change Your SIM PIN Code on Your Sony Xperia 10 V Phone
- In 2024, Thumbnail Mastery Boost Your YouTube Videos Visibility and Clicks
- In 2024, Unlock Engaging Videos The Ultimate Guide to Resizing for Social Media
- Updated From Zero to Hero The Best 3D Video Makers for Any Skill Level for 2024
- How To Unlock iPhone XR Without Passcode? 4 Easy Methods | Dr.fone
- Updated In 2024, Why Final Cut Pro Beats Final Cut Express
- [Updated] Top Tips for Silent Screen Capture
- Seamless iPhone Photo & Video Transfers Guide
- [New] 2024 Approved Surge in Popularity The Ultimate List of Viral TikTok Username Suggestions
- [Updated] CaptureCrafter Your Ultimate Guide to Screen Recording
- Can I recover permanently deleted photos from Samsung Galaxy S24+
- Title: "2024 Approved Bringing Bygone Era Filmmaking to Life Today"
- Author: Brian
- Created at : 2024-05-25 11:02:11
- Updated at : 2024-05-26 11:02:11
- Link: https://youtube-video-recordings.techidaily.com/2024-approved-bringing-bygone-era-filmmaking-to-life-today/
- License: This work is licensed under CC BY-NC-SA 4.0.
