
:max_bytes(150000):strip_icc()/Robothandholdinganapple-fbe6ff482ed641e188dd6650b9ac132e.jpg)
"2024 Approved Bridging Content Creation YouTube to TikTok Integration Explained"
Bridging Content Creation: YouTube to TikTok Integration Explained
Best Video Editor for Beginners on Windows and Mac
Wondershare Filmora is one of the most popular video editing software among TikTokers , download and have a try.
There is no better time for singers, actors, and content creators to join TikTok. With over a billion downloads, TikTok is now more influential than ever. Here, you can consider all TikTok users to be prospective audiences or followers. Videos go viral every day, and a substantial portion of them come from a single source: TikTok.
The massively popular short-video app is the latest craze, with individuals from all over the world using it to watch and produce content. Instagram stars, YouTube stars, and even real-life movie stars have switched to this platform, so what’s stopping you? It has so much to offer. Both seem to work in a connected way as Tiktok stars are seen converting videos from YouTube to TikTok.
In this article
01 How to Link a YouTube Video to TikTok Post?
02 How to Convert YouTube Video and Post to TikTok? [3 ways]
Part 1: How to Link a YouTube Video to TikTok Post?
There is no social network available online that gives more relevancy, popularity, and engagement than TikTok. Even though Tiktok’s operations were only launched outside of China a few years ago, Tiktok has entirely taken over the social sphere when it comes to producing amusing and enjoyable short videos, which has been seen after a very long time after the app ‘VINE’ was shut down back in 2016.
You can reap multiple benefits if you’re a content creator by connecting all your social media platforms. You can extend your reach and exposure to an immense number of people by linking your YouTube video to the TikTok post. Let’s look at your options of connecting videos from YouTube to TikTok and highlight how to connect TikTok to YouTube.
Step 1: Open the TikTok app on your phone and tap on your profile option.
Step 2: Tap on the edit profile option and further select Add YouTube to Your Profile option.
Note: If you haven’t previously linked your YouTube account to your TikTok channel, tapping on this will very certainly take you to another page with the Google login screen.
Step 3: Click on “Allow” option. By tapping on this, your YouTube channel will display as a link in your bio area.
Note: However, as we continue with this knowledge, it is worth noting that when you put your channel description and links under the videos you publish, the link is not always clickable. It is recommended that you keep with the bio section and conclude your short films by urging your viewers to visit your YouTube channel, which is included in the bio of your Tiktok profile.
Part 2: How to Convert YouTube Video and Post to TikTok? [3 ways]
Further, we feel that differences in posting (such as formats, aspect ratios , and durations) should be accounted for when YouTube videos are converted into TikTok videos. Tiktok offers a 9:16 aspect ratio compared to most videos on YouTube, where the aspect ratio is primarily 16:9.
As for the format, the resolution can only be set to 1080p since TikTok only supports it to utilize the entire canvas. Tiktok is a platform that promotes videos ranging from 15 seconds to 3 minutes, compared to its initial support for content up to 15 seconds only. You will most likely have to resize your video if you plan to share it on Tiktok with all the above elements. Here are some of the video dimension details for TikTok.
- Dimensions: 1080 x 1920
- Resolution: 9:16 Aspect Ratio
- File Format:.mp4 or .mov
- Code: encoded
We might have left you perplexed with all the information about how to connect TikTok to YouTube, but don’t worry, here are a variety of apps and a step-by-step guide for posting your videos on Tiktok without any issues.
1. Kapwing Studio
Within the various applications available, Kapwing Studio provides users with support and resources to help them edit and convert their YouTube videos to TikTok. It allows creators to upload the video from anywhere, anytime, via media library support since it is a web-base video editor. Moreover, Kapwing supports .mp4, .mov, .png, .gif, .jpg, .avi and plenty of other formats as well. All in all, Kapwing can be a complete transcoding and conversion package to optimize and convert your YouTube videos to post on TikTok.
Step 1: Copy the YouTube Video’s link
To get started, go to YouTube and search for the video you wish to convert. You can copy the link by right-clicking on YouTube’s video and paste it on Kapwing directly.
Note: Alternatively, if you’re already logged in, choose Create New Project. This will lead you to the Kapwing Studio, on which you can access all of Kapwing’s video editing capabilities in a single location.
Step 2: Resize YouTube video to 9:16
Double click the video in the timeline, and then click the Crop menu on the right top corner. To convert a YouTube video to TikTok, click the 9:16 option to start. Or, you can move the handles in the timeline until it reaches the precise length you need.
Note: When you process your video, make sure it has a 9:16 aspect ratio so it will fit on TikTok.

Step 3: Download & share on TikTok!
After you’ve uploaded your video to the Studio, just select the Export Video option in the upper right corner to save your video and share it on TikTok.
2. Kamua
On TikTok, content always takes precedence. One strategy to grow your TikTok audience is to convert your existing YouTube videos to post, and Kamua is the perfect tool for this! Kamua, a cloud-based video tool, allows creators to resize, crop, edit and save videos. Everything, including cutting, retouching, and repurposing of the video, is available in a single place.
Perhaps you have some daring, humorous, or legendary videos in a neglected collection that would be perfect for a TikTok trend or challenge- it’s time to edit them with Kamua! Transforming Landscape films vertically into the 9:16 aspect ratio is now easier and faster than ever before with Kamua.
Step 1: Copy the YouTube Video link and paste it into the Kamua.
Note: You can right-click on any video on YouTube to copy the link or click on the Share option.

Step 2: To turn on AutoCrop, select the Portrait (9:16) setting under the Settings menu on the left. You can also choose Remove Black Bars to resize the video.

Note: To preview how your videos would look on a TikTok mobile app, click the Phone symbol underneath the video
Step 3: Once done, click on the render project option in the below right corner to save the optimized video file. To watch the final video or to download it, click on the Outputs option. From here, you can watch as well as download your video.
3. Use Auto Reframe Feature in Filmora Video Editor
Auto Reframe , as clear from the name, can automatically visualize and detect the video’s focal point to resize or crop it in an optimal way. The Auto Reframe tool can identify a moving item in any video and rapidly trim it to multiple aspect ratios. What initially took hours, if not days, of editing may now be completed in moments with Filmora. You can also manually set the focal point in any video to adjust the aspect ratio and preferences as per your choice.
If you frequently have to upload videos to your social networking networks such as YouTube, Instagram, Facebook, and TikTok, Filmora will ease your life! We’ll teach you how to utilize Filmora’s Auto-Reframe option to reframe sequences for your YouTube to TikTok videos in the below-listed steps.
Step 1: Start by Launching Filmora on your device. Choose the Auto Reframe option from the starting window.

Step 2:Click on Import Media and select the video file you wish to convert. A separate dialogue box will open. From here, choose the aspect ratio and click on Analyze. The reframing process will start automatically.

You can choose from five different aspect ratios: square (1:1), vertical (9:16), standard (4:3), widescreen (16:9), and cinema (21:9). You can also adjust the frame’s dimensions by moving the crop box.

Step 3: When you’re through with the adjustments and reframing, click the Export option to preserve your work.

Note: Click Save after you enter a file name and select a destination folder. Add music, titles, effects, or transitions to improve the clip. You can move the clip to the timeline for more editing. You can share and save your video on TikTok once you have completed editing by clicking the Export option.
This vido tutorial introduces several ways to convert a 16:9 YouTube video to TikTok in Filmora. Download this smart auto reframe tool now and have a try.
For Win 7 or later (64-bit)
For macOS 10.12 or later
Conclusion
Good luck with your endeavors as a content creator, musician, comedian, or whatever else you choose. This article heavily emphasized on how you can convert YouTube to TikTok and be famous. Still, you can also reverse this process by posting your TikTok username on YouTube and in your YouTube videos. We hope this article has proved out to be helpful, if you have any further questions, don’t hesitate to contact us.
There is no better time for singers, actors, and content creators to join TikTok. With over a billion downloads, TikTok is now more influential than ever. Here, you can consider all TikTok users to be prospective audiences or followers. Videos go viral every day, and a substantial portion of them come from a single source: TikTok.
The massively popular short-video app is the latest craze, with individuals from all over the world using it to watch and produce content. Instagram stars, YouTube stars, and even real-life movie stars have switched to this platform, so what’s stopping you? It has so much to offer. Both seem to work in a connected way as Tiktok stars are seen converting videos from YouTube to TikTok.
In this article
01 How to Link a YouTube Video to TikTok Post?
02 How to Convert YouTube Video and Post to TikTok? [3 ways]
Part 1: How to Link a YouTube Video to TikTok Post?
There is no social network available online that gives more relevancy, popularity, and engagement than TikTok. Even though Tiktok’s operations were only launched outside of China a few years ago, Tiktok has entirely taken over the social sphere when it comes to producing amusing and enjoyable short videos, which has been seen after a very long time after the app ‘VINE’ was shut down back in 2016.
You can reap multiple benefits if you’re a content creator by connecting all your social media platforms. You can extend your reach and exposure to an immense number of people by linking your YouTube video to the TikTok post. Let’s look at your options of connecting videos from YouTube to TikTok and highlight how to connect TikTok to YouTube.
Step 1: Open the TikTok app on your phone and tap on your profile option.
Step 2: Tap on the edit profile option and further select Add YouTube to Your Profile option.
Note: If you haven’t previously linked your YouTube account to your TikTok channel, tapping on this will very certainly take you to another page with the Google login screen.
Step 3: Click on “Allow” option. By tapping on this, your YouTube channel will display as a link in your bio area.
Note: However, as we continue with this knowledge, it is worth noting that when you put your channel description and links under the videos you publish, the link is not always clickable. It is recommended that you keep with the bio section and conclude your short films by urging your viewers to visit your YouTube channel, which is included in the bio of your Tiktok profile.
Part 2: How to Convert YouTube Video and Post to TikTok? [3 ways]
Further, we feel that differences in posting (such as formats, aspect ratios , and durations) should be accounted for when YouTube videos are converted into TikTok videos. Tiktok offers a 9:16 aspect ratio compared to most videos on YouTube, where the aspect ratio is primarily 16:9.
As for the format, the resolution can only be set to 1080p since TikTok only supports it to utilize the entire canvas. Tiktok is a platform that promotes videos ranging from 15 seconds to 3 minutes, compared to its initial support for content up to 15 seconds only. You will most likely have to resize your video if you plan to share it on Tiktok with all the above elements. Here are some of the video dimension details for TikTok.
- Dimensions: 1080 x 1920
- Resolution: 9:16 Aspect Ratio
- File Format:.mp4 or .mov
- Code: encoded
We might have left you perplexed with all the information about how to connect TikTok to YouTube, but don’t worry, here are a variety of apps and a step-by-step guide for posting your videos on Tiktok without any issues.
1. Kapwing Studio
Within the various applications available, Kapwing Studio provides users with support and resources to help them edit and convert their YouTube videos to TikTok. It allows creators to upload the video from anywhere, anytime, via media library support since it is a web-base video editor. Moreover, Kapwing supports .mp4, .mov, .png, .gif, .jpg, .avi and plenty of other formats as well. All in all, Kapwing can be a complete transcoding and conversion package to optimize and convert your YouTube videos to post on TikTok.
Step 1: Copy the YouTube Video’s link
To get started, go to YouTube and search for the video you wish to convert. You can copy the link by right-clicking on YouTube’s video and paste it on Kapwing directly.
Note: Alternatively, if you’re already logged in, choose Create New Project. This will lead you to the Kapwing Studio, on which you can access all of Kapwing’s video editing capabilities in a single location.
Step 2: Resize YouTube video to 9:16
Double click the video in the timeline, and then click the Crop menu on the right top corner. To convert a YouTube video to TikTok, click the 9:16 option to start. Or, you can move the handles in the timeline until it reaches the precise length you need.
Note: When you process your video, make sure it has a 9:16 aspect ratio so it will fit on TikTok.
Step 3: Download & share on TikTok!
After you’ve uploaded your video to the Studio, just select the Export Video option in the upper right corner to save your video and share it on TikTok.
2. Kamua
On TikTok, content always takes precedence. One strategy to grow your TikTok audience is to convert your existing YouTube videos to post, and Kamua is the perfect tool for this! Kamua, a cloud-based video tool, allows creators to resize, crop, edit and save videos. Everything, including cutting, retouching, and repurposing of the video, is available in a single place.
Perhaps you have some daring, humorous, or legendary videos in a neglected collection that would be perfect for a TikTok trend or challenge- it’s time to edit them with Kamua! Transforming Landscape films vertically into the 9:16 aspect ratio is now easier and faster than ever before with Kamua.
Step 1: Copy the YouTube Video link and paste it into the Kamua.
Note: You can right-click on any video on YouTube to copy the link or click on the Share option.
Step 2: To turn on AutoCrop, select the Portrait (9:16) setting under the Settings menu on the left. You can also choose Remove Black Bars to resize the video.
Note: To preview how your videos would look on a TikTok mobile app, click the Phone symbol underneath the video
Step 3: Once done, click on the render project option in the below right corner to save the optimized video file. To watch the final video or to download it, click on the Outputs option. From here, you can watch as well as download your video.
3. Use Auto Reframe Feature in Filmora Video Editor
Auto Reframe , as clear from the name, can automatically visualize and detect the video’s focal point to resize or crop it in an optimal way. The Auto Reframe tool can identify a moving item in any video and rapidly trim it to multiple aspect ratios. What initially took hours, if not days, of editing may now be completed in moments with Filmora. You can also manually set the focal point in any video to adjust the aspect ratio and preferences as per your choice.
If you frequently have to upload videos to your social networking networks such as YouTube, Instagram, Facebook, and TikTok, Filmora will ease your life! We’ll teach you how to utilize Filmora’s Auto-Reframe option to reframe sequences for your YouTube to TikTok videos in the below-listed steps.
Step 1: Start by Launching Filmora on your device. Choose the Auto Reframe option from the starting window.
Step 2:Click on Import Media and select the video file you wish to convert. A separate dialogue box will open. From here, choose the aspect ratio and click on Analyze. The reframing process will start automatically.
You can choose from five different aspect ratios: square (1:1), vertical (9:16), standard (4:3), widescreen (16:9), and cinema (21:9). You can also adjust the frame’s dimensions by moving the crop box.
Step 3: When you’re through with the adjustments and reframing, click the Export option to preserve your work.
Note: Click Save after you enter a file name and select a destination folder. Add music, titles, effects, or transitions to improve the clip. You can move the clip to the timeline for more editing. You can share and save your video on TikTok once you have completed editing by clicking the Export option.
This vido tutorial introduces several ways to convert a 16:9 YouTube video to TikTok in Filmora. Download this smart auto reframe tool now and have a try.
For Win 7 or later (64-bit)
For macOS 10.12 or later
Conclusion
Good luck with your endeavors as a content creator, musician, comedian, or whatever else you choose. This article heavily emphasized on how you can convert YouTube to TikTok and be famous. Still, you can also reverse this process by posting your TikTok username on YouTube and in your YouTube videos. We hope this article has proved out to be helpful, if you have any further questions, don’t hesitate to contact us.
The Editor’s Guide to Powerful Notebooks and More
The Best Laptops for Video Editing

Richard Bennett
Oct 26, 2023• Proven solutions
This article lists the 3 best laptops for video editing in 2018.
Whether you’re an industry professional or an avid YouTuber, you know how important it is to produce quality videos consistently.
The quality of the videos you create will depend on your creativity, the editing software you use, and the hardware that software is installed on. And as you probably know, it can be tough to work fast and get good results when your hardware or laptop isn’t strong enough to power your software properly and allow you to work at the pace you want.
The best laptops for video editing in 2018 have three things in common. First, they have top-of-the-line display technology for color accuracy, color depth, and clarity. Next, they have discrete (dedicated) Graphic Processing Units (GPUs) with accompanying RAM to enable them to handle video processing fast without compromising other system functions. And finally, they have Intel core i7 CPU processors and Solid-State Drives (SSD) for faster overall performance.
THE TOP 3 LAPTOPS FOR EDITING VIDEO IN 2018
The top 3 laptops below are quite impressive. They have the right mix of power and function that video editing requires.
1.MACBOOK PRO WITH TOUCH BAR
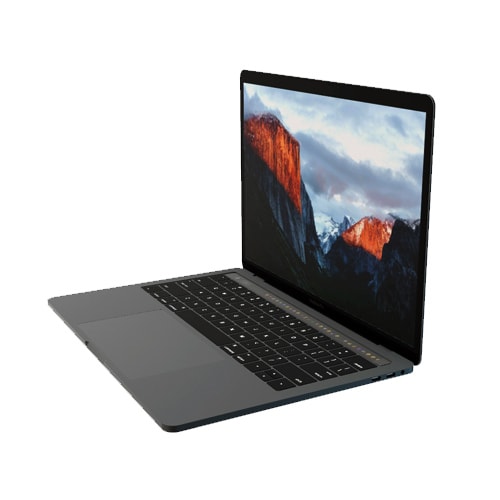
PRICE: $1500 - $1800
SYSTEM SPECS:
CPU: Intel Core i7 Processor
GRAPHICS: Radeon Pro 555 with 2GB memory – 560 with 4GB memory
RAM: 16GB
SCREEN: 15.4” Retina Display
RES: 2880 x 1800px
STORAGE: 128 – 256GB SSD
PROS
- OLED Touch Bar
- Thunderbolt 3 ports
- Large Trackpad
CONS:
- No other input ports available besides Thunderbolt 3
- Expensive
The MacBook Pro with Touch Bar is the best video editing laptop produced by Apple. It has a wide 15.4” screen with thin bezels, and its proprietary OLED Touch bar amps up its flexibility and functionality considerably. The Touch Bar is set-up to show different shortcuts for different apps. It works quite well with Photoshop and will show thumbnails, filter options, a color picker, and more while you’re editing videos or stills.
Working with large 4K video files is much easier with the MacBook Pro. It’s fitted with Thunderbolt 3 Ports which have the highest data and video bandwidth available for USB-C connections. With these Thunderbolt ports, you can also use high-speed and high-power peripherals without a hitch. This laptop also has an extra-wide touchpad or Trackpad (as Apple calls it) which expands your physical working surface while also making it easier to do detailed video editing.
Unfortunately, if you need a variety of ports like most videographers, working with the MacBook Pro could be a challenge as it only has Thunderbolt 3 ports. If this is the laptop you prefer, you’ll need to buy additional connection hardware to work with different input devices. And while this laptop impresses in many ways, it’s also quite expensive. There are certainly other laptops on the market which can give you similar performance at a lower cost.
2. DELL XPS 15
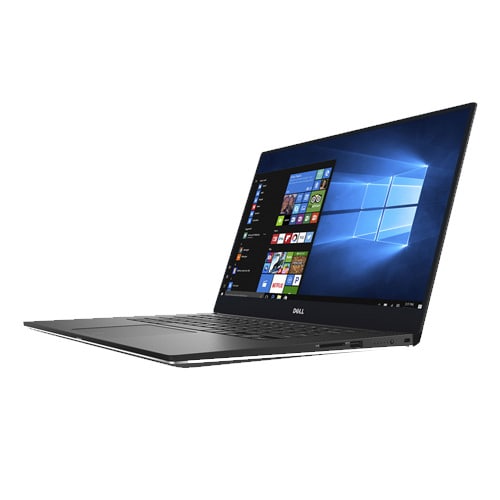
PRICE: $999 - $1300
SYSTEM SPECS:
CPU: Intel Core i7 Processor
GRAPHICS: NVIDIA GeForce GTX 1050
RAM: 8 - 16GB
SCREEN: 15.6”
RES: FHD - 4k UHD 3840 x 2160px
STORAGE: 256GB – 1TB SSD
PROS
- 4k InfinityEdge display
- Good battery life
- Has multiple input ports
CONS:
- Webcam is oddly positioned
The Dell XPS 15 is one laptop that hits the sweet spot for many videographers. It’s considered the closest competitor to the MacBook Pro reviewed above. In fact, many would argue that it tops the MacBook Pro when it comes to speed, color accuracy, and color depth. Its 15.6” screen has very thin bezels for minimal distraction and immersive work experience. At 4K resolution and displaying a wide range of the sRGB gamut, video editing with the Dell XPS 15 promises to be both smooth and enjoyable.
The Dell XPS 15 is certainly more affordable, while still delivering excellent graphics performance. It features an Intel i7 processor and the NVIDIA GeForce GTX 1050 graphics processor. This makes it remarkably fast for video editing, as well as energy-efficient. People who work with different input devices will also like that this laptop has legacy adapters (USB, HDMI, ethernet) alongside a USB type C port.
The biggest downside to the Dell XPS 15 laptop is its oddly positioned webcam. It feels awkward and can be an inconvenience to use since you’ll have to adjust your position significantly while making video calls or recording for your YouTube channel.
3. MICROSOFT SURFACE BOOK 2
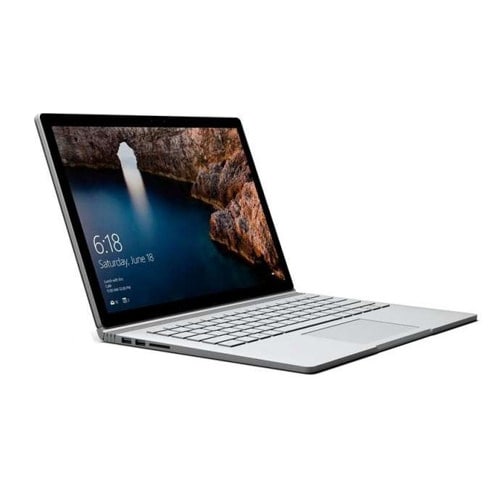
PRICE: $1499 - $2499
SYSTEM SPECS:
CPU: Intel Core i7 Processor
GRAPHICS: Intel HD 620 or Nvidia GTX 1050 / GTX 1060
RAM: 16GB
SCREEN: 15.0”
RES: 3240 x 2160px
STORAGE: 256GB, 512GB – 1TB SSD
PROS
- Detachable screen
- Has multiple input ports (USB Type-A, USB Type-C, SD card reader)
- Works with a Stylus
CONS:
- Expensive
- Fulcrum hinge
The Microsoft Surface Book 2 is a laptop and a tablet thanks to its detachable screen. At a resolution of 3240 x 2160px, its screen is nearly 4k and can handle Full HD and HD footage with ease. Add to this its capacity to show a considerable portion of the sRGB gamut and its easy-to-use stylus and you can see why this 2-in-1 combo from Microsoft is one of the top 3 laptops for video editing in 2018.
Surface Book 2 also has the right combination of power and storage capacity that video editing requires. It boasts a state-of-the-art NVIDIA graphics processor and an Intel i7 processor for a smooth workflow no matter the size or level of detail involved in your video editing project.
On the downside, this laptop is undoubtedly very expensive. Compared to the function and power you can get from the DELL XPS 15, it’s hard to justify paying nearly $2500 for the Surface Book 2. Its detachable screen, supported by a fulcrum hinge, also comes at a price. It makes the laptop a bit bulky at one end when it’s folded. This in turn can make day-to-day handling a bit more tricky than it has to be.
CONCLUSION
If you’re searching for a good laptop to help you improve the quality of your videos in 2018, look no further than these 3. They have all the power, function, and storage capacity you need to handle any project with ease. Just be mindful of your budget and consider which extras are worth the expense. Go for the MacBook Pro with Touch Bar if customizing your workflow is a priority. Opt for the Dell XPS 15 if you want the best combination of display quality and graphics processing. Finally, consider the Surface Book 2 if you need the flexibility of a 2-in-1 device.
What do you think is the best laptop for video editing?
Equip Your Laptop with the Best Video Editing Software


Richard Bennett
Richard Bennett is a writer and a lover of all things video.
Follow @Richard Bennett
Richard Bennett
Oct 26, 2023• Proven solutions
This article lists the 3 best laptops for video editing in 2018.
Whether you’re an industry professional or an avid YouTuber, you know how important it is to produce quality videos consistently.
The quality of the videos you create will depend on your creativity, the editing software you use, and the hardware that software is installed on. And as you probably know, it can be tough to work fast and get good results when your hardware or laptop isn’t strong enough to power your software properly and allow you to work at the pace you want.
The best laptops for video editing in 2018 have three things in common. First, they have top-of-the-line display technology for color accuracy, color depth, and clarity. Next, they have discrete (dedicated) Graphic Processing Units (GPUs) with accompanying RAM to enable them to handle video processing fast without compromising other system functions. And finally, they have Intel core i7 CPU processors and Solid-State Drives (SSD) for faster overall performance.
THE TOP 3 LAPTOPS FOR EDITING VIDEO IN 2018
The top 3 laptops below are quite impressive. They have the right mix of power and function that video editing requires.
1.MACBOOK PRO WITH TOUCH BAR
PRICE: $1500 - $1800
SYSTEM SPECS:
CPU: Intel Core i7 Processor
GRAPHICS: Radeon Pro 555 with 2GB memory – 560 with 4GB memory
RAM: 16GB
SCREEN: 15.4” Retina Display
RES: 2880 x 1800px
STORAGE: 128 – 256GB SSD
PROS
- OLED Touch Bar
- Thunderbolt 3 ports
- Large Trackpad
CONS:
- No other input ports available besides Thunderbolt 3
- Expensive
The MacBook Pro with Touch Bar is the best video editing laptop produced by Apple. It has a wide 15.4” screen with thin bezels, and its proprietary OLED Touch bar amps up its flexibility and functionality considerably. The Touch Bar is set-up to show different shortcuts for different apps. It works quite well with Photoshop and will show thumbnails, filter options, a color picker, and more while you’re editing videos or stills.
Working with large 4K video files is much easier with the MacBook Pro. It’s fitted with Thunderbolt 3 Ports which have the highest data and video bandwidth available for USB-C connections. With these Thunderbolt ports, you can also use high-speed and high-power peripherals without a hitch. This laptop also has an extra-wide touchpad or Trackpad (as Apple calls it) which expands your physical working surface while also making it easier to do detailed video editing.
Unfortunately, if you need a variety of ports like most videographers, working with the MacBook Pro could be a challenge as it only has Thunderbolt 3 ports. If this is the laptop you prefer, you’ll need to buy additional connection hardware to work with different input devices. And while this laptop impresses in many ways, it’s also quite expensive. There are certainly other laptops on the market which can give you similar performance at a lower cost.
2. DELL XPS 15
PRICE: $999 - $1300
SYSTEM SPECS:
CPU: Intel Core i7 Processor
GRAPHICS: NVIDIA GeForce GTX 1050
RAM: 8 - 16GB
SCREEN: 15.6”
RES: FHD - 4k UHD 3840 x 2160px
STORAGE: 256GB – 1TB SSD
PROS
- 4k InfinityEdge display
- Good battery life
- Has multiple input ports
CONS:
- Webcam is oddly positioned
The Dell XPS 15 is one laptop that hits the sweet spot for many videographers. It’s considered the closest competitor to the MacBook Pro reviewed above. In fact, many would argue that it tops the MacBook Pro when it comes to speed, color accuracy, and color depth. Its 15.6” screen has very thin bezels for minimal distraction and immersive work experience. At 4K resolution and displaying a wide range of the sRGB gamut, video editing with the Dell XPS 15 promises to be both smooth and enjoyable.
The Dell XPS 15 is certainly more affordable, while still delivering excellent graphics performance. It features an Intel i7 processor and the NVIDIA GeForce GTX 1050 graphics processor. This makes it remarkably fast for video editing, as well as energy-efficient. People who work with different input devices will also like that this laptop has legacy adapters (USB, HDMI, ethernet) alongside a USB type C port.
The biggest downside to the Dell XPS 15 laptop is its oddly positioned webcam. It feels awkward and can be an inconvenience to use since you’ll have to adjust your position significantly while making video calls or recording for your YouTube channel.
3. MICROSOFT SURFACE BOOK 2
PRICE: $1499 - $2499
SYSTEM SPECS:
CPU: Intel Core i7 Processor
GRAPHICS: Intel HD 620 or Nvidia GTX 1050 / GTX 1060
RAM: 16GB
SCREEN: 15.0”
RES: 3240 x 2160px
STORAGE: 256GB, 512GB – 1TB SSD
PROS
- Detachable screen
- Has multiple input ports (USB Type-A, USB Type-C, SD card reader)
- Works with a Stylus
CONS:
- Expensive
- Fulcrum hinge
The Microsoft Surface Book 2 is a laptop and a tablet thanks to its detachable screen. At a resolution of 3240 x 2160px, its screen is nearly 4k and can handle Full HD and HD footage with ease. Add to this its capacity to show a considerable portion of the sRGB gamut and its easy-to-use stylus and you can see why this 2-in-1 combo from Microsoft is one of the top 3 laptops for video editing in 2018.
Surface Book 2 also has the right combination of power and storage capacity that video editing requires. It boasts a state-of-the-art NVIDIA graphics processor and an Intel i7 processor for a smooth workflow no matter the size or level of detail involved in your video editing project.
On the downside, this laptop is undoubtedly very expensive. Compared to the function and power you can get from the DELL XPS 15, it’s hard to justify paying nearly $2500 for the Surface Book 2. Its detachable screen, supported by a fulcrum hinge, also comes at a price. It makes the laptop a bit bulky at one end when it’s folded. This in turn can make day-to-day handling a bit more tricky than it has to be.
CONCLUSION
If you’re searching for a good laptop to help you improve the quality of your videos in 2018, look no further than these 3. They have all the power, function, and storage capacity you need to handle any project with ease. Just be mindful of your budget and consider which extras are worth the expense. Go for the MacBook Pro with Touch Bar if customizing your workflow is a priority. Opt for the Dell XPS 15 if you want the best combination of display quality and graphics processing. Finally, consider the Surface Book 2 if you need the flexibility of a 2-in-1 device.
What do you think is the best laptop for video editing?
Equip Your Laptop with the Best Video Editing Software
Richard Bennett
Richard Bennett is a writer and a lover of all things video.
Follow @Richard Bennett
Also read:
- Crafting Content for Specific Youtube Subsets for 2024
- Masterful Content Creation and Branding via #Top 5 YouTube Strategies
- Essential List 10 Leading Online Video Length Reducers
- Content Creation Battleground Choosing Between Vimeo, YouTube, DailyMotion for 2024
- Exploring Best Pairing Practices in the YouTube Space
- [New] Elevate Your Content' Writability with These Best Fonts
- [Updated] Building Blocks for Movie Making YouTube's Framework & More
- Strategies for Designing YouTube Video Flow
- In 2024, Crafting Video Magic with iMovie, Directed to YouTube
- Optimal Options High-Performance Laptops for Videographers
- Avoid Blandness in Your Vids Top Recommended YouTube Thumbnail Heights
- In 2024, Best YouTube Music Gurus to Follow
- Optimized Video Scale to Mac Aspect Proportion
- [Updated] Elevate the Visual Appeal of Your Video Credits
- Channel Your Inner DJ Discover These Innovative 20 Music Sources on YouTube
- [New] Amplify Your Brand’s Voice The Power of Shaped Videos
- [New] A Blueprint for Exceptional Product Showcasing
- Android & iOS Users' Choice Top Playlist Saving Apps for YouTube for 2024
- Break Down Long-Form Videos The Insider's Guide to YouTube Chapter Inclusion
- 2024 Approved Chart a Course for Success Top 5 Effective Video Marketing Strategies on YouTube
- Craft Stellar YouTube Thumbnails with These 8 Software Alternatives
- Celebratory Moments Captured A List of the Most Beautiful Wedding Videos (8)
- 2024 Approved Behind the Scenes Choosing Ideal Winter Backdrops
- The Ultimate Guide to Brightening Up Your YouTube Content
- Bypassing Blackouts with Video Tips for 2024
- Comfortable Viewing Looping YouTube Videos on Big Displays for 2024
- [Updated] Amplifying Your Brand The FameBit Approach to YouTube Affiliates
- [New] Building a Loyal Following with Respectful Requests
- Essential List 5 Leading YouTube Shortened URL Services
- 2024 Approved Efficiently Implementing Youtube End Screens
- [New] A Comprehensive List of Top Video-Making Software (iPhone, Android)
- Innovating Engagement Integrate Thoughtful Chapters Into Your YouTube Videos
- [Updated] Behind the Scenes How-To Create YouTube Trailers in Filmora
- How to Insert YouTube Links for an Engaging PPT Experience
- Comprehensive Breakdown of ZD Soft Recording Features for 2024
- In 2024, How to Transfer Data from Nokia G42 5G to Any iOS Devices | Dr.fone
- In 2024, Self-Verification on Instagram - What Does It Mean for Us?
- In 2024, Unlocking Maximum Video Sizes in Instagram Upload
- In 2024, Prime Selection of TikTok-to-GIF Converters Reviewed and Rated
- [Updated] Unlock Your View Best Bargain Cam Recording Apps
- 2024 Approved Masterclass in Creating Dynamic Facebook Slideshows
- In 2024, Bridging Gaps in Communication Automating Story Captions
- In 2024, The Best Way To Color Grading & Color Correction in Filmora
- What Is an AI Headshot Generator? | Wondershare Virbo Glossary for 2024
- Funniest Punchlines Reddit Vs. Twitter Memes
- [Updated] In 2024, First Steps on Social Landscape Creating a Facebook Account
- Optimal Viewing Angles for FB Videos
- [Updated] VisualSnitch Capture and Save Tweets' Images & Videos for 2024
- Cellular Network Not Available for Voice Calls On Vivo S18 Pro | Dr.fone
- In 2024, 10 Free Location Spoofers to Fake GPS Location on your Vivo Y78+ | Dr.fone
- Title: "2024 Approved Bridging Content Creation YouTube to TikTok Integration Explained"
- Author: Brian
- Created at : 2024-05-25 11:02:01
- Updated at : 2024-05-26 11:02:01
- Link: https://youtube-video-recordings.techidaily.com/2024-approved-bridging-content-creation-youtube-to-tiktok-integration-explained/
- License: This work is licensed under CC BY-NC-SA 4.0.
