
:max_bytes(150000):strip_icc()/AirTags-d0c59672dec24b1b947c239fd7c6b934.jpg)
"2024 Approved Boosting Clickthrough Rates with Attention-Grabbing YouTube Thumbnails"
Boosting Clickthrough Rates with Attention-Grabbing YouTube Thumbnails
Best YouTube Thumbnail Size: How to Make a Thumbnail for YouTube in 2024

Benjamin Arango
Mar 27, 2024• Proven solutions
You must have heard the phrase, Never judge a book by its cover. But actually, we do judge everything by its cover. The same is the case with Youtube videos. No matter how good the content of your video is if you are unable to convey that with the thumbnail of your video, it will not bring any good to your channel. If you are looking forward to growing your channel and attracting more viewers, then having an appealing and eye-catching thumbnail is one of the most important factors. There are several things to be considered while creating a custom thumbnail if you want to make your videos look stunning and engaging. By following all these points, you can increase the chances of your channel’s growth.
In this article, we have 5 chapters for you:
- Best YouTube Thumbnail Size
- How Important is a Custom Thumbnail?
- Best Practices From Experiences
- How to Make a Fortnite Thumbnail
- How to Add a Custom Thumbnail to Your Video
Best YouTube Thumbnail Size
Being a content creator, you never know which device is being used by the viewer to watch your videos. It can be a smartphone, laptop, pc, or smart TV. It is very important to keep all these devices in mind while choosing a Youtube thumbnail size. For the best possible results, consider the following points while making a thumbnail for your Youtube videos.
- To cover all the devices perfectly, set the thumbnail resolution to 1280x720
- Save the thumbnail in JPG, GIF, or PNG format
- Try not to cross the 2MB limit
- Make sure to use a 16:9 aspect ratio for perfect results throughout the devices

How Important is a Custom Thumbnail?
Custom Thumbnail is a tool through which the viewers can understand everything about a video. It tells the viewers what to expect from a video, what not to expect, and what the video is all about. no matter if you create amazing content, if the thumbnail is not good enough to covey that to the viewers, all your hard work will be of no use and will not bring any good to your channel and its growth. According to Google ,90% of best-performing videos have custom thumbnails. It shows the importance of custom thumbnails.

Best Practice From Experiences
Now, since we know the importance of having a custom thumbnail, it is important to know how to make a thumbnail for Youtube look perfect, appealing, and eye-catching at the same time. There are some points to be considered while creating a thumbnail for Youtube. We will provide you with the best practices that we have learned throughout our journey of using Youtube and growing it from zero.
7 best practices can help you make your Youtube thumbnail stand out from the crowd and make its way out.
In a world full of machines and computers, people love to listen and interact with people instead of computer-generated voices and a voice without a face. Showing your face on a Youtube thumbnail makes it more appealing to users to click and listen to the person who is being shown in the thumbnail. Humans are more inclined towards faces. When there is a human element in a video, it increases its effectiveness. Check out the pics below, which one are you most likely to click through?

With your face, it is necessary to put some text on your Youtube thumbnail to let viewers know what this video is all about without clicking or watching it. Don’t use fancy fonts on Youtube thumbnail. It makes it hard for the viewers to read and understand what to expect in the video, especially for those watching YouTube on their 5 inches screen smartphone, ultimately decreasing the chances of your video being clicked and watched. I personally recommend you to use give these fonts a go while making YouTube thumbnail.

If you have ever noticed, Youtube thumbnails are very small in size, making it hard for viewers to notice any small elements. According to YouTube , more than 70% of Youtube watch time comes from mobile devices. While adding text in a thumbnail, instead of using sentences, make sure to use only words and make them large in size that can easily be noticed on small screens. Summurise your video in no more than 5 words.


When we navigate to a Youtube thumbnail and place the cursor on it, it shows us two icons, “Watch Later” and “Add to Queue,” located on its right size. Come on, you don’t want your beautiful thumbnail that cost you a few hours be covered. To avoid these icons from hiding your important stuff of thumbnail, make sure to put everything on the right side of your thumbnail.

Try to make all your thumbnails follow the same style. Following the same style for all your Youtube thumbnails will make your channel look unique and all your videos identical. It will be easy for viewers to identify your videos when they see them. It gives your channel a touch of its unique brand.

To make your Youtube thumbnail more appealing to the viewers, add circles and arrows to grab viewers’ attention to something very important in the video. It will increase the curiosity in the viewers and make them click your videos to learn more.

This whole process seems to be very hectic and time taking, but do you know, you can do everything on just one software? There is no need to edit a video in a different software then make a thumbnail in another software. With Filmora X, you can perform all these tasks on a single platform with so many amazing features. Whether you want to remove the background of your image or add attractive titles to it, Filmora X has got you covered.
It is one of the old tricks that so many people on Youtube use. It undoubtedly brings you clicks and more views, but once the viewer realizes that you have used irrelevant pictures or texts to attract them**. I**n reality, your video doesn’t contain any information related to it, you are going to lose their trust. They are never going to click on your videos again. Even if you don’t use such a trick anymore. Try to avoid such activities. Avoiding such activities can make your channel grow in the long term. Only use the text and images that are relevant to your content and stick to that.
Do you know that Youtube can show a 3-second preview of your video when someone hovers the cursor over it? It is one of the best ways to show the viewers the content of your video even when they don’t click on your video. These three seconds will help them decide whether to click on your video or not. This preview is selected by the system from the first half of your video according to its relevance and similarity with the topic. That’s why it is very important to add related information in the first half of the video, otherwise, Youtube will choose it randomly. If the preview is not selected for two days, it means your video is not eligible for it.

How to Make a Fortnite Thumbnail Super Fast and Free?
Many of you might be interested in how to make a fortnite thumbnail, so here it is. To make a Fortnite thumbnail for free, we are going to use Filmora X. Filmora X contains all kinds of features and elements that are required for a perfect and eye-catching thumbnail. To get started, make sure to download and install the latest version of Filmora X.
- Before we start making Fortnite Thumbnails, we have to take a screenshot of the gameplay. Open Fortnite and go to the Career tab. Here you will find Replays.

- It contains all your recent gameplays. We can use it to take a screenshot. If you are using a console, you will find 10 recent gameplays here. But if you are a PC user, you can find the last 100 gameplays. Select the gameplay you want to take a screenshot from.

- For our preferred angle, choose “Drone Free Camera” mode from the bottom right corner of the screen. It will allow us to use our preferred angle without any restriction. Choose an angle and take a screenshot.

- Open Filmora X, make sure to select the 16:9 screen ratio. Import the screenshot that you have taken from Fortnite.

- Place it into the timeline to start working on it.

- Now to separate the character from the background, go to the Effects. Under effects, you can find a tab named AI Portraits. Click on AI Portrait. Now drag the Human Segmentation and drop it on the screenshot in the timeline.

- It will ask you to purchase it. But there is no need to do that. Just hit Try It.

- This effect will remove the background of your screenshot.

- Now you can add a background of your choice. You can upload an image or choose a simple color from Filmora’s Media tab and drag it below the screenshot in the timeline.

- To add text to the screenshot, go to Titles. Here you can find a wide range of different and unique titles to choose from for your Fortnite Thumbnail. Choose any of the titles and place them accordingly.

- To make it more attractive, we can add icons and other elements from Filmora’s Element tab. You can also download the stickers from the internet and use them.

- After completing the thumbnail, click on the Snapshot icon located below the preview tab of Filmora. Or press “CTRL+ALT+S”. It will save a screenshot into the media panel of Filmora.

- Right-click on the screenshot and navigate to “Reveal in Explorer”. It will open the folder that contains all the screenshots taken from Filmora. Now you can use it as a Fortnite Thumbnail.

How to Add a Custom YouTube Thumbnail to Your Video in YouTube
Once you have successfully created a custom thumbnail, you can use it in your videos on Youtube.
- Open Youtube Studio and upload your video. While uploading the video, you can see a section named “Thumbnail”. Under this section, click on “Upload Thumbnail”.

- Select the thumbnail that you have made. Just like the one Fortnite thumbnail that we have created using Filmora X.

- The thumbnail will be uploaded and attached to the video. Now you can process all the settings and publish the video.

Conclusion
Thumbnail is the first thing that helps the viewer decide whether to click on a video or ignore it. Which increases the importance of having a well-structured and attractive thumbnail. By following the above guide, you can make an astonishing and clickable thumbnail in no time. For better and quick results, we recommend you using Filmora X. It allows you to perform all the tasks from video editing to thumbnail creation on a single platform.


Benjamin Arango
Benjamin Arango is a writer and a lover of all things video.
Follow @Benjamin Arango
Benjamin Arango
Mar 27, 2024• Proven solutions
You must have heard the phrase, Never judge a book by its cover. But actually, we do judge everything by its cover. The same is the case with Youtube videos. No matter how good the content of your video is if you are unable to convey that with the thumbnail of your video, it will not bring any good to your channel. If you are looking forward to growing your channel and attracting more viewers, then having an appealing and eye-catching thumbnail is one of the most important factors. There are several things to be considered while creating a custom thumbnail if you want to make your videos look stunning and engaging. By following all these points, you can increase the chances of your channel’s growth.
In this article, we have 5 chapters for you:
- Best YouTube Thumbnail Size
- How Important is a Custom Thumbnail?
- Best Practices From Experiences
- How to Make a Fortnite Thumbnail
- How to Add a Custom Thumbnail to Your Video
Best YouTube Thumbnail Size
Being a content creator, you never know which device is being used by the viewer to watch your videos. It can be a smartphone, laptop, pc, or smart TV. It is very important to keep all these devices in mind while choosing a Youtube thumbnail size. For the best possible results, consider the following points while making a thumbnail for your Youtube videos.
- To cover all the devices perfectly, set the thumbnail resolution to 1280x720
- Save the thumbnail in JPG, GIF, or PNG format
- Try not to cross the 2MB limit
- Make sure to use a 16:9 aspect ratio for perfect results throughout the devices
How Important is a Custom Thumbnail?
Custom Thumbnail is a tool through which the viewers can understand everything about a video. It tells the viewers what to expect from a video, what not to expect, and what the video is all about. no matter if you create amazing content, if the thumbnail is not good enough to covey that to the viewers, all your hard work will be of no use and will not bring any good to your channel and its growth. According to Google ,90% of best-performing videos have custom thumbnails. It shows the importance of custom thumbnails.
Best Practice From Experiences
Now, since we know the importance of having a custom thumbnail, it is important to know how to make a thumbnail for Youtube look perfect, appealing, and eye-catching at the same time. There are some points to be considered while creating a thumbnail for Youtube. We will provide you with the best practices that we have learned throughout our journey of using Youtube and growing it from zero.
7 best practices can help you make your Youtube thumbnail stand out from the crowd and make its way out.
In a world full of machines and computers, people love to listen and interact with people instead of computer-generated voices and a voice without a face. Showing your face on a Youtube thumbnail makes it more appealing to users to click and listen to the person who is being shown in the thumbnail. Humans are more inclined towards faces. When there is a human element in a video, it increases its effectiveness. Check out the pics below, which one are you most likely to click through?
With your face, it is necessary to put some text on your Youtube thumbnail to let viewers know what this video is all about without clicking or watching it. Don’t use fancy fonts on Youtube thumbnail. It makes it hard for the viewers to read and understand what to expect in the video, especially for those watching YouTube on their 5 inches screen smartphone, ultimately decreasing the chances of your video being clicked and watched. I personally recommend you to use give these fonts a go while making YouTube thumbnail.
If you have ever noticed, Youtube thumbnails are very small in size, making it hard for viewers to notice any small elements. According to YouTube , more than 70% of Youtube watch time comes from mobile devices. While adding text in a thumbnail, instead of using sentences, make sure to use only words and make them large in size that can easily be noticed on small screens. Summurise your video in no more than 5 words.
When we navigate to a Youtube thumbnail and place the cursor on it, it shows us two icons, “Watch Later” and “Add to Queue,” located on its right size. Come on, you don’t want your beautiful thumbnail that cost you a few hours be covered. To avoid these icons from hiding your important stuff of thumbnail, make sure to put everything on the right side of your thumbnail.
Try to make all your thumbnails follow the same style. Following the same style for all your Youtube thumbnails will make your channel look unique and all your videos identical. It will be easy for viewers to identify your videos when they see them. It gives your channel a touch of its unique brand.
To make your Youtube thumbnail more appealing to the viewers, add circles and arrows to grab viewers’ attention to something very important in the video. It will increase the curiosity in the viewers and make them click your videos to learn more.
This whole process seems to be very hectic and time taking, but do you know, you can do everything on just one software? There is no need to edit a video in a different software then make a thumbnail in another software. With Filmora X, you can perform all these tasks on a single platform with so many amazing features. Whether you want to remove the background of your image or add attractive titles to it, Filmora X has got you covered.
It is one of the old tricks that so many people on Youtube use. It undoubtedly brings you clicks and more views, but once the viewer realizes that you have used irrelevant pictures or texts to attract them**. I**n reality, your video doesn’t contain any information related to it, you are going to lose their trust. They are never going to click on your videos again. Even if you don’t use such a trick anymore. Try to avoid such activities. Avoiding such activities can make your channel grow in the long term. Only use the text and images that are relevant to your content and stick to that.
Do you know that Youtube can show a 3-second preview of your video when someone hovers the cursor over it? It is one of the best ways to show the viewers the content of your video even when they don’t click on your video. These three seconds will help them decide whether to click on your video or not. This preview is selected by the system from the first half of your video according to its relevance and similarity with the topic. That’s why it is very important to add related information in the first half of the video, otherwise, Youtube will choose it randomly. If the preview is not selected for two days, it means your video is not eligible for it.
How to Make a Fortnite Thumbnail Super Fast and Free?
Many of you might be interested in how to make a fortnite thumbnail, so here it is. To make a Fortnite thumbnail for free, we are going to use Filmora X. Filmora X contains all kinds of features and elements that are required for a perfect and eye-catching thumbnail. To get started, make sure to download and install the latest version of Filmora X.
- Before we start making Fortnite Thumbnails, we have to take a screenshot of the gameplay. Open Fortnite and go to the Career tab. Here you will find Replays.
- It contains all your recent gameplays. We can use it to take a screenshot. If you are using a console, you will find 10 recent gameplays here. But if you are a PC user, you can find the last 100 gameplays. Select the gameplay you want to take a screenshot from.
- For our preferred angle, choose “Drone Free Camera” mode from the bottom right corner of the screen. It will allow us to use our preferred angle without any restriction. Choose an angle and take a screenshot.
- Open Filmora X, make sure to select the 16:9 screen ratio. Import the screenshot that you have taken from Fortnite.
- Place it into the timeline to start working on it.
- Now to separate the character from the background, go to the Effects. Under effects, you can find a tab named AI Portraits. Click on AI Portrait. Now drag the Human Segmentation and drop it on the screenshot in the timeline.
- It will ask you to purchase it. But there is no need to do that. Just hit Try It.
- This effect will remove the background of your screenshot.
- Now you can add a background of your choice. You can upload an image or choose a simple color from Filmora’s Media tab and drag it below the screenshot in the timeline.
- To add text to the screenshot, go to Titles. Here you can find a wide range of different and unique titles to choose from for your Fortnite Thumbnail. Choose any of the titles and place them accordingly.
- To make it more attractive, we can add icons and other elements from Filmora’s Element tab. You can also download the stickers from the internet and use them.
- After completing the thumbnail, click on the Snapshot icon located below the preview tab of Filmora. Or press “CTRL+ALT+S”. It will save a screenshot into the media panel of Filmora.
- Right-click on the screenshot and navigate to “Reveal in Explorer”. It will open the folder that contains all the screenshots taken from Filmora. Now you can use it as a Fortnite Thumbnail.
How to Add a Custom YouTube Thumbnail to Your Video in YouTube
Once you have successfully created a custom thumbnail, you can use it in your videos on Youtube.
- Open Youtube Studio and upload your video. While uploading the video, you can see a section named “Thumbnail”. Under this section, click on “Upload Thumbnail”.
- Select the thumbnail that you have made. Just like the one Fortnite thumbnail that we have created using Filmora X.
- The thumbnail will be uploaded and attached to the video. Now you can process all the settings and publish the video.
Conclusion
Thumbnail is the first thing that helps the viewer decide whether to click on a video or ignore it. Which increases the importance of having a well-structured and attractive thumbnail. By following the above guide, you can make an astonishing and clickable thumbnail in no time. For better and quick results, we recommend you using Filmora X. It allows you to perform all the tasks from video editing to thumbnail creation on a single platform.
Benjamin Arango
Benjamin Arango is a writer and a lover of all things video.
Follow @Benjamin Arango
The Smooth Watcher’s Guide to Pacing Down Videos on YouTube (60 Chars, Minor Exception Due to Title Length but Provides Rich Context)
YouTube Slow: How to Slow Down YouTube Videos [3 Ways]

Richard Bennett
Mar 27, 2024• Proven solutions
Have you ever wanted to learn something from a YouTube video, but found that the video is too fast? If you are wondering how to slow down YouTube videos, then you’re in the right place. Well, there are different ways to slow down YouTube videos and in this article, we will show you how to slow down the YouTube videos with 3 most effective ways: slow down the YouTube videos by changing playback video speed at playback, slow down YouTube video using YouTube’s Video Editor tools or change YouTube video speed to slow down or speed up with Wondershare Filmora video editor .
- Part 1: How to Play YouTube Videos in Slow Motion
- Part 2: Add Slow Motion with Wondershare Filmora (originally Wondershare Video Editor)
- Part 3: Add Slow Motion with YouTube Video Editor
Part 1: YouTube Slow Down: How to Play YouTube Videos in Slow Motion
While, you can now change the speed of any YouTube videos easily and watch YouTube videos in slow motion in a few steps. Below is how to slow down YouTube Videos:
- Open the video in YouTube
- Click the Settings icon on the bottom right and then you will see Autoplay, Annotations, Speed, Subtitles, and Quality options. By default, the speed is set to Normal. Click Speed and open the speed change options. The speed options are in multiples.
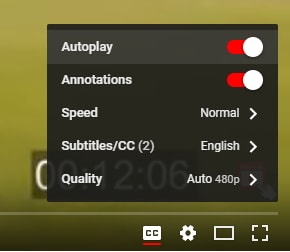
- Choose the target video speed from 0.25x, 0.5x, 0.75x to slow down the play back speed of the YouTube video. You can also select 1.25x, 1.5x, 1.75x or 2x to fast forward this YouTube video depending on how fast or slow you want the playback of the YouTube video to be.
- That’s it how to make a YouTube video slow down by changing the playback speed. If you selected 0.5X, you will see the playback speed is half of the original speed. You can now see the YouTube video is played back in a slower speed.
You May Also Like: Take good use of YouTube’s Enhancements feature to improve your video quality.
Besides, watching YouTube videos in slow motion, you can also make a slow motion video and upload to YouTube. The Flash from Zootopia is so impressive and you can see a lot of memes and gifs online about this funny cute sloth. In the following part, we will show you how to make a slow motion YouTube video like the sloth Flash in two ways by adding slow motion effects.
Part 2: Add Slow Motion to YT Videos with Wondershare Filmora video editor [3 Steps]
Wondershare Filmora is an easy-to-use yet powerful video editing tool to which let beginners edit their YouTube videos in minutes. It includes every classic video editing functions including adjust playback speed, trim, crop, rotate, split as well as many special editing features like Jump Cut, Mosaic Blur and Tilt Shift. Now let’s see how to add slow motion with this video editing software.
Step 1. Import Video Footage to Filmora Video Editor
First of all, you need to import all your video footage for YouTube videos to Filmora. If you want to slow down a video downloaded from online, like youtube, please make sure there is copyright issue for you to use the video before processing. In case that you want to download YouTube with free youtube downloader, you can try Wondershare Free Youtube Downloader and Video DownloadHelper (Firefox Add-on).
After downloading YouTube videos on hard disk, you can now import it to this YouTube video editor. The downloaded YouTube videos is usually in FLV format, and Filmora has a wide range of support for video formats, which includes FLV as well. You can either click “Import” on the primary windows and select YouTube FLV video file from your computer, or simply drag and drop YouTube FLV file to the User’s Album. Next, drag YouTube video from User’s Album to Timeline for editing.

Step 2. One click to add slow motion to YouTube video
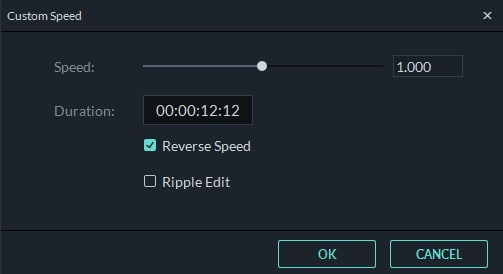
On the Timeline, click on the added YouTube video and select Speed and Duration to open up the video custom speed window. You will see the Speed option, Duration, Reverse Speed and Ripple Edit options. and the speed number indicates fast or slow motion. To slow down the YouTube video, drag the speed slider to left and you get a slow down version of the YouTube video. You can slow down the YouTube video in 0.01x. Click the OK button to save the slow motion settings and then click the Play button in the preview windows to have a look at the new YouTube slow down video. You can also change the duration of the YouTube video to change the YouTube video speed. For example, if you want to slow down a 30-second YouTube video to half speed, you can just enter the duration to 60 seconds to get a slow down motion effect.
With Filmora youtube video editor, you can also add the slow motion effects to some certain clips of the video footage. What you need to do is use the split feature to split the video first. Learn more details about How to Cut / Split / Trim Videos without Quality Loss
Step 3. Export slow down YouTube video
You could continue editing YouTube videos. When all done, click “Export” to save the result. You can save YouTube video in any popular formats on the computer by clicking “Format”. If you want to play YouTube video on iPod, iPhone, iPad, click “Device” and select your device. You can also share the YouTube video up to YouTube or Vimeo directly or burn YouTube video to DVD.

See, with Filmora video editor you can slow down YouTube videos with ease, what’s more, you can also apply reverse effects to play Youtube videos backwards. Download and try this YouTube Slow motion effect and you will master how to slow down YouTube videos.
Related:How to Make Slow/Fast Motion Videos
Part 3: Slow down YouTube videos with Slow Motion in YouTube Video Editor
Updated: From 20th September 2017 users will no longer be able to use the complimentary editing suite. Check the best YouTube video editor alternatives from this complete guide.
If you’ve ever been annoyed by the speed of your user-generated videos on YouTube, try out its own video editor. As YouTube has added a new “slow motion” tool to its YouTube Editor, it does pretty much exactly what it sounds like. Here is a simple guide on how to add slow motion with it.
Step 1: Get Access to YouTube Video Editor. You can either go directly to the URL, which is https://www.youtube.com/editor , or click “Upload”>”Edit” to the Video Editor tab.
Step 2: Drag your video on the timeline and double click it. In the pop up window, you will see the “Slow Motion” option. Enable it and then select how slow you want the video to be. This applies the effect to the entire video that you’ve selected.
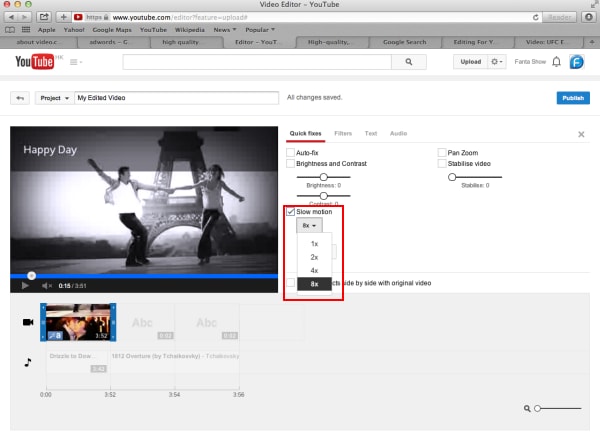
If you just want to slow down parts of the video, go back to the main editing tab, clip it from the original video using the slicing tool and add the slow-motion effect to that clip only. You can then arrange the different clips you have in the editor to create your final video.
Step 3: Tick the option “Preview effects side-by-side” with original video and then you can see how the original video plays compared to the one you’ve slowed down. If you’re happy with the result, hit “Done” to save the settings.
Conclusion
Above are the 3 ways that you can watch a YouTube video in slow motion, and slow down YouTube videos. You can directly change the playback speed of the YouTube video on Youtube, or download the YouTube video first and then slow down the speed of the YouTube video with some video editing software for YouTube like Filmora. No matter which way you prefer, we hope these information can help you slow down youtube videos.
Richard Bennett
Richard Bennett is a writer and a lover of all things video.
Follow @Richard Bennett
Richard Bennett
Mar 27, 2024• Proven solutions
Have you ever wanted to learn something from a YouTube video, but found that the video is too fast? If you are wondering how to slow down YouTube videos, then you’re in the right place. Well, there are different ways to slow down YouTube videos and in this article, we will show you how to slow down the YouTube videos with 3 most effective ways: slow down the YouTube videos by changing playback video speed at playback, slow down YouTube video using YouTube’s Video Editor tools or change YouTube video speed to slow down or speed up with Wondershare Filmora video editor .
- Part 1: How to Play YouTube Videos in Slow Motion
- Part 2: Add Slow Motion with Wondershare Filmora (originally Wondershare Video Editor)
- Part 3: Add Slow Motion with YouTube Video Editor
Part 1: YouTube Slow Down: How to Play YouTube Videos in Slow Motion
While, you can now change the speed of any YouTube videos easily and watch YouTube videos in slow motion in a few steps. Below is how to slow down YouTube Videos:
- Open the video in YouTube
- Click the Settings icon on the bottom right and then you will see Autoplay, Annotations, Speed, Subtitles, and Quality options. By default, the speed is set to Normal. Click Speed and open the speed change options. The speed options are in multiples.
- Choose the target video speed from 0.25x, 0.5x, 0.75x to slow down the play back speed of the YouTube video. You can also select 1.25x, 1.5x, 1.75x or 2x to fast forward this YouTube video depending on how fast or slow you want the playback of the YouTube video to be.
- That’s it how to make a YouTube video slow down by changing the playback speed. If you selected 0.5X, you will see the playback speed is half of the original speed. You can now see the YouTube video is played back in a slower speed.
You May Also Like: Take good use of YouTube’s Enhancements feature to improve your video quality.
Besides, watching YouTube videos in slow motion, you can also make a slow motion video and upload to YouTube. The Flash from Zootopia is so impressive and you can see a lot of memes and gifs online about this funny cute sloth. In the following part, we will show you how to make a slow motion YouTube video like the sloth Flash in two ways by adding slow motion effects.
Part 2: Add Slow Motion to YT Videos with Wondershare Filmora video editor [3 Steps]
Wondershare Filmora is an easy-to-use yet powerful video editing tool to which let beginners edit their YouTube videos in minutes. It includes every classic video editing functions including adjust playback speed, trim, crop, rotate, split as well as many special editing features like Jump Cut, Mosaic Blur and Tilt Shift. Now let’s see how to add slow motion with this video editing software.
Step 1. Import Video Footage to Filmora Video Editor
First of all, you need to import all your video footage for YouTube videos to Filmora. If you want to slow down a video downloaded from online, like youtube, please make sure there is copyright issue for you to use the video before processing. In case that you want to download YouTube with free youtube downloader, you can try Wondershare Free Youtube Downloader and Video DownloadHelper (Firefox Add-on).
After downloading YouTube videos on hard disk, you can now import it to this YouTube video editor. The downloaded YouTube videos is usually in FLV format, and Filmora has a wide range of support for video formats, which includes FLV as well. You can either click “Import” on the primary windows and select YouTube FLV video file from your computer, or simply drag and drop YouTube FLV file to the User’s Album. Next, drag YouTube video from User’s Album to Timeline for editing.
Step 2. One click to add slow motion to YouTube video
On the Timeline, click on the added YouTube video and select Speed and Duration to open up the video custom speed window. You will see the Speed option, Duration, Reverse Speed and Ripple Edit options. and the speed number indicates fast or slow motion. To slow down the YouTube video, drag the speed slider to left and you get a slow down version of the YouTube video. You can slow down the YouTube video in 0.01x. Click the OK button to save the slow motion settings and then click the Play button in the preview windows to have a look at the new YouTube slow down video. You can also change the duration of the YouTube video to change the YouTube video speed. For example, if you want to slow down a 30-second YouTube video to half speed, you can just enter the duration to 60 seconds to get a slow down motion effect.
With Filmora youtube video editor, you can also add the slow motion effects to some certain clips of the video footage. What you need to do is use the split feature to split the video first. Learn more details about How to Cut / Split / Trim Videos without Quality Loss
Step 3. Export slow down YouTube video
You could continue editing YouTube videos. When all done, click “Export” to save the result. You can save YouTube video in any popular formats on the computer by clicking “Format”. If you want to play YouTube video on iPod, iPhone, iPad, click “Device” and select your device. You can also share the YouTube video up to YouTube or Vimeo directly or burn YouTube video to DVD.
See, with Filmora video editor you can slow down YouTube videos with ease, what’s more, you can also apply reverse effects to play Youtube videos backwards. Download and try this YouTube Slow motion effect and you will master how to slow down YouTube videos.
Related:How to Make Slow/Fast Motion Videos
Part 3: Slow down YouTube videos with Slow Motion in YouTube Video Editor
Updated: From 20th September 2017 users will no longer be able to use the complimentary editing suite. Check the best YouTube video editor alternatives from this complete guide.
If you’ve ever been annoyed by the speed of your user-generated videos on YouTube, try out its own video editor. As YouTube has added a new “slow motion” tool to its YouTube Editor, it does pretty much exactly what it sounds like. Here is a simple guide on how to add slow motion with it.
Step 1: Get Access to YouTube Video Editor. You can either go directly to the URL, which is https://www.youtube.com/editor , or click “Upload”>”Edit” to the Video Editor tab.
Step 2: Drag your video on the timeline and double click it. In the pop up window, you will see the “Slow Motion” option. Enable it and then select how slow you want the video to be. This applies the effect to the entire video that you’ve selected.
If you just want to slow down parts of the video, go back to the main editing tab, clip it from the original video using the slicing tool and add the slow-motion effect to that clip only. You can then arrange the different clips you have in the editor to create your final video.
Step 3: Tick the option “Preview effects side-by-side” with original video and then you can see how the original video plays compared to the one you’ve slowed down. If you’re happy with the result, hit “Done” to save the settings.
Conclusion
Above are the 3 ways that you can watch a YouTube video in slow motion, and slow down YouTube videos. You can directly change the playback speed of the YouTube video on Youtube, or download the YouTube video first and then slow down the speed of the YouTube video with some video editing software for YouTube like Filmora. No matter which way you prefer, we hope these information can help you slow down youtube videos.
Richard Bennett
Richard Bennett is a writer and a lover of all things video.
Follow @Richard Bennett
Also read:
- [Updated] Audience Expansion Strategies That Honor YouTube Standards
- [New] Curating Tunes A Comprehensive Guide to YouTube Lists
- Smooth Streaming Selective Stabilizer Guidebook
- In 2024, Channel Dominance Plan Studio Protocol Vs. Beta Update
- [New] Discovering the Excellent 10 Yoga Programs for Better Wellness
- [New] Copycatting Charisma Making Ingenious Parodies
- Convenient Techniques for Customizing Your Own Short Videos for 2024
- How to See Your Subscribers on YouTube?
- [New] Command the YouTube Stage Mastering Visibility Through Tactics
- Curating Tunes A Comprehensive Guide to YouTube Lists
- YouTube's Finest Unveiling the Best Reaction Tricks
- [New] Eternal Banishment of YouTube's Quick Clips
- Grandview Media Mastering the Art of Selecting a CMS
- In 2024, Chuckling Challenge Brainstroming 7 Humorous YouTube Videos
- The Ultimate Playlist Tweaking on YouTube
- A Taste of Film Home Cook's Visual Journey for 2024
- Audio Perfection Achieved Expert Tips Without a Microphone for 2024
- Earnings Expansion on Glamour Channels
- [New] Essential Insights Into YouTube Live Image Crafting
- 2024 Approved Elevating Video Marketing with YouTube Thumbnails
- Choosing Between TikTok and YouTube Shorts A User's Guide for 2024
- In 2024, A Peek Into the Heart of YouTube's Video Operations
- 2024 Approved Deep Dive The Economy and Impact of Online Stars
- In 2024, Elevating YouTube Live with High-Quality Webcam Cameras
- [New] Accelerate Your Content's View Count 1K+ in Time
- In 2024, Best of Both Worlds YouTube’s VR Gems
- [Updated] In 2024, Mastering the Art of Digital Recording for GoToMeet Sessions
- Updated 2024 Approved Best 10 Video to GIF Converters Top Picks
- New 2024 Approved MP4 to MP3 Fast and Easy Conversion with These Top Tools
- Unlocking iPhone 6 Lock Screen 3 Foolproof Methods that Actually Work
- In 2024, 7 Ways to Unlock a Locked Xiaomi 14 Phone
- Ways to Fix the Failed to Parse the Corrupted Excel 2013 File Error
- Best iPhone Video Editors Ranked and Reviewed for 2024
- [New] 2024 Approved Instagram Featured Posts with Video
- Top 10 Password Cracking Tools For Itel P55 5G
- [Updated] In 2024, Top 10 Terraria Game Boosters
- 2024 Approved Enhancing Aural Experiences Implementing Progressive Volume Changes Today
- [New] PeakRecorder A Comprehensive Screen Capture Analysis for 2024
- Updated Best Sound Remover From Video Windows/Mac/Online
- In 2024, Iconic Public Music Pieces for Sequential Artworks
- In 2024, Symphony of Screens How Music Enhances Vimeo Content
- How To Bypass iCloud Activation Lock On iPod and iPhone 6 Plus The Right Way
- In 2024, How to Track Asus ROG Phone 8 Location without Installing Software? | Dr.fone
- In 2024, How to Unlock iPhone 6 Plus Passcode Screen? | Dr.fone
- How to Transfer Text Messages from Lava Agni 2 5G to New Phone | Dr.fone
- [Updated] In 2024, Capturing Every Moment Unveiling 5 Exceptional Streamer Webcams
- How can I get more stardust in pokemon go On Xiaomi Redmi Note 13 5G? | Dr.fone
- Gameplay in Focus Scrutinizing Screen Recorders for 2024
- [New] 2024 Approved CamStudio's Screen Recorder A Deep Dive Into Its Latest Features
- Title: "2024 Approved Boosting Clickthrough Rates with Attention-Grabbing YouTube Thumbnails"
- Author: Brian
- Created at : 2024-05-25 11:01:32
- Updated at : 2024-05-26 11:01:32
- Link: https://youtube-video-recordings.techidaily.com/2024-approved-boosting-clickthrough-rates-with-attention-grabbing-youtube-thumbnails/
- License: This work is licensed under CC BY-NC-SA 4.0.
