
:max_bytes(150000):strip_icc():format(webp)/istabletworthit-a75b20684e5241b8a64efc0733092fcd.jpg)
"2024 Approved Best 7 High-Motion DSLRs for Dynamic Live Content Creation"
Best 7 High-Motion DSLRs for Dynamic Live Content Creation
Best 7 DSLR Vlogging Cameras

Shanoon Cox
Nov 01, 2022• Proven solutions
DSLR cameras are great for vloggers who are serious about filmmaking. But with so many DSLR cameras to choose from, it can be difficult to make a decision on one. We have come up with a list of seven of the best DSLR vlogging cameras to help you with your search.
WHAT TO LOOK FOR IN A VLOGGING CAMERA
1. Fully articulated screen (flip screen)
2. Good continual autofocus while recording video
3. Good focus priority through face recognition
4. Touch to focus
5. Good low-light performance
6. external mic jack, hot/cold shoe bracket
7. optical image stabilization
8. good battery life
Check out my full list of 10 Things To Look For In A Vlogging Camera to understand the importance of these camera features.
THE 7 BEST DSLR CAMERAS FOR VLOGGING
| Camera | Release Date | Sensor Size | Flip Screen | Mic Port | Price | |
|---|---|---|---|---|---|---|
| CanonEOS6D Mark II | 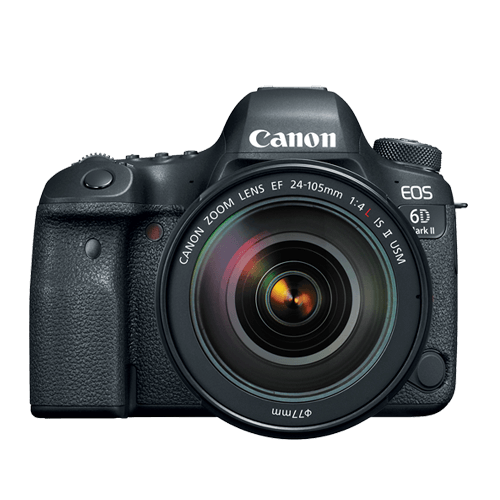 |
June2017 | Full frame(35.9 x 24 mm) | Fully Articulated | Yes | $$ |
| CanonEOS RebelSL2 | 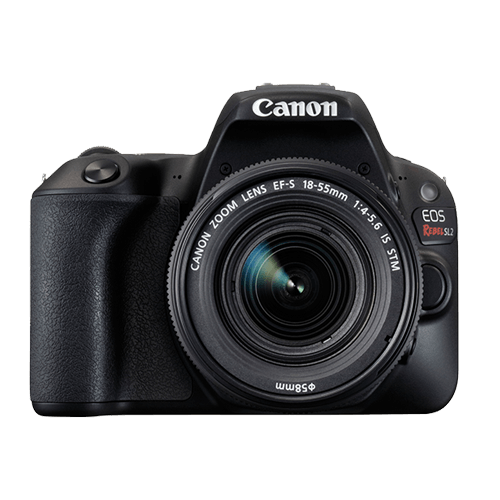 |
June2017 | APS-C(22.3 x 14.9 mm) | Fully Articulated | Yes | $ |
| CanonEOS RebelT7i | 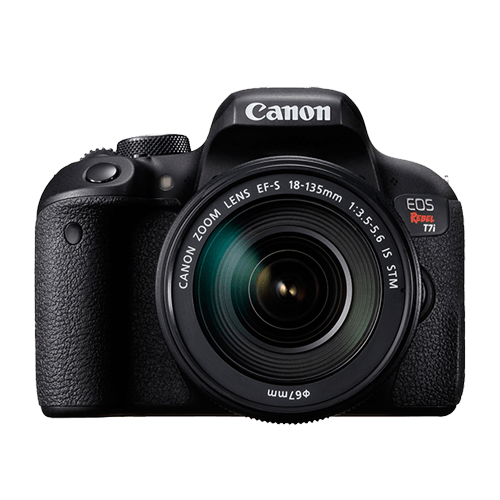 |
February2017 | APS-C(22.3 x 14.9 mm) | Fully Articulated | Yes | $- |
| CanonEOS77D |  |
February2017 | APS-C(22.3 x 14.9 mm) | Fully Articulated | Yes | $- |
| NikonD5600 | 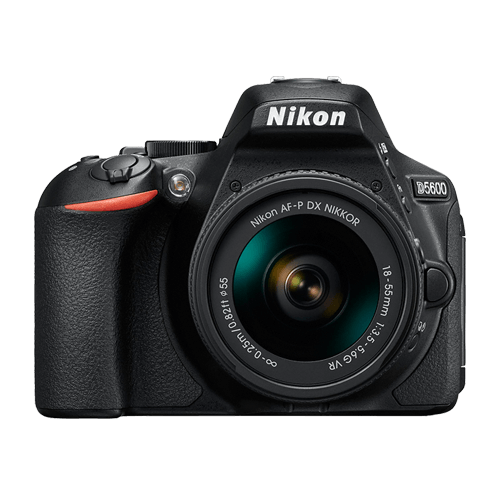 |
November2016 | APS-C(23.5 x 15.6 mm) | Fully Articulated | Yes | $- |
| CanonEOS5D Mark IV | 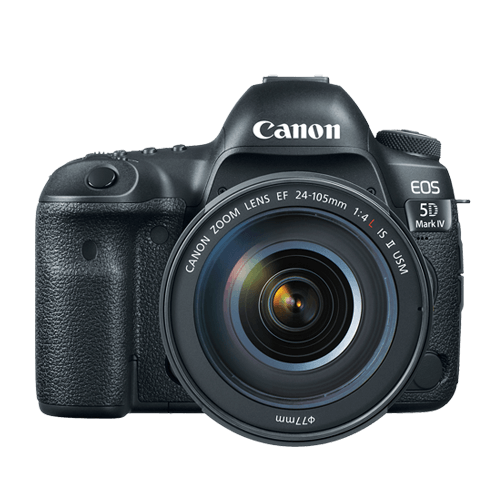 |
August2017 | Full frame(36 x 24 mm) | No | Yes | $$$ |
| CanonEOS80D | 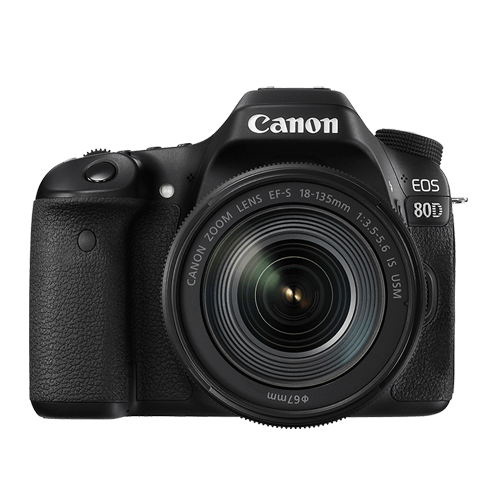 |
February2016 | APS-C(22.5 x 15 mm) | Fully Articulated | Yes | $$ |
|
Best daily DSLR camera for vlogging: Canon EOS T7i The camera you use to record your daily vlogs doesn’t have to be the best camera on the market. It just has to offer enough options to make the process of making a vlog as smooth as it can possibly be. The T7i is not the most powerful DSLR camera out there, but its 24.2 MP APS-C CMOS sensor and a DIGIC 7 image processor are more than enough to meet the needs of most daily vloggers. You can record full HD 1080p videos at 60 fps and use this camera to create HDR and time-lapse movies. You can set the T7i’s ISO up as high as 51200, which is pretty good. The T7i’s dual pixel CMOS AF system makes sure that the camera focuses quickly and it helps you avoid creating video clips that are out focus. There’s also a built-in Wi-FI with an NFC feature that enables you to share your videos with a smartphone device you connect to the camera. PROS - Long battery life - Remarkable image quality at high ISO values CONS - Can’t record 4K videos - Viewfinder is tiny |
|---|---|
|
Best entry-level DSLR camera for vlogging: Canon EOS SL2 The Canon EOS SL2 was released just a year ago and it wins our 2018 vote for the best entry-level DSLR camera for vlogging. The SL2 packs a lot of features in a compact camera body. The camera only weighs 1 lb, which is considered light among most DSLR cameras. Many vloggers may enjoy the fact that they can hold up this light camera in front of themselves with more ease. Like a lot of entry-level DSLR cameras, the SL2 comes with an APS-C crop sensor. With ISO capabilities that can reach up to 51200, you’ll be able to film up to full HD 1080p videos at 60 fps, even under low light conditions. All recent Canon cameras perform very well when it comes to autofocus and the SL2 is no exception. It does, however, have fewer points of focus. The SL2 comes with a 9-point AF system. The SL2 also has a fully-articulated screen and a microphone jack. PROS - Microphone jack - Wi-Fi connectivity CONS - No 4K video support - Optical image stabilizer could be better |
|
Best mid-range DSLR camera for vlogging: Canon EOS 80D The Canon EOS 80D is the successor of the 70D which was at one time considered by many YouTubers the ultimate DSLR camera for vlogging. The 80D is a larger camera than the SL2, weighing 1.61 lbs. In its larger build, this camera additionally (compared to the SL2) packs a 45-point AF system, longer battery life, a headphone port, and it is environmentally sealed so you can shoot in tough conditions. This camera’s great performance in autofocusing makes it a great mid-range DSLR camera for vlogging. PROS - Feature-rich - Continuous AF feature performs beautifully while recording high-res videos CONS - Just one SD card slot - PC sync connection features could be better |
|
Best professional DSLR camera for vlogging: Canon EOS 6D Mark II There’s a lot of DSLR cameras that come with a fully-articulated screen and a microphone jack, but the Canon EOS 6D Mark II is actually the only one in the market that comes equipped with both of those, plus a full-frame sensor. It is its full-frame sensor that really sets this camera apart from the other vlogging DLSR cameras. Because of its full-frame sensor, this camera performs much better in low light conditions. With this larger sensor, you’ll also be able to capture footage that looks more cinematic with high-quality bokeh (more blur to your out-of-focus areas). The 6D Mark II also has great battery life compared to all the reviewed cameras above. Unfortunately, this camera does not shoot in 4K. PROS - ISO sensitivity goes up to 102400 - Amazing touchscreen controls CONS - No 4K video recording option - No USB 3.0 |
Want to compare even more cameras? Check out…
12 Best Vlogging Cameras
Top 11 Cheap Vlogging Cameras
8 Best Mirrorless Cameras For Vlogging
12 Best Vlogging Cameras With A Flip Screen
Shanoon Cox
Shanoon Cox is a writer and a lover of all things video.
Follow @Shanoon Cox
Shanoon Cox
Nov 01, 2022• Proven solutions
DSLR cameras are great for vloggers who are serious about filmmaking. But with so many DSLR cameras to choose from, it can be difficult to make a decision on one. We have come up with a list of seven of the best DSLR vlogging cameras to help you with your search.
WHAT TO LOOK FOR IN A VLOGGING CAMERA
1. Fully articulated screen (flip screen)
2. Good continual autofocus while recording video
3. Good focus priority through face recognition
4. Touch to focus
5. Good low-light performance
6. external mic jack, hot/cold shoe bracket
7. optical image stabilization
8. good battery life
Check out my full list of 10 Things To Look For In A Vlogging Camera to understand the importance of these camera features.
THE 7 BEST DSLR CAMERAS FOR VLOGGING
| Camera | Release Date | Sensor Size | Flip Screen | Mic Port | Price | |
|---|---|---|---|---|---|---|
| CanonEOS6D Mark II | |
June2017 | Full frame(35.9 x 24 mm) | Fully Articulated | Yes | $$ |
| CanonEOS RebelSL2 | |
June2017 | APS-C(22.3 x 14.9 mm) | Fully Articulated | Yes | $ |
| CanonEOS RebelT7i | |
February2017 | APS-C(22.3 x 14.9 mm) | Fully Articulated | Yes | $- |
| CanonEOS77D | |
February2017 | APS-C(22.3 x 14.9 mm) | Fully Articulated | Yes | $- |
| NikonD5600 | |
November2016 | APS-C(23.5 x 15.6 mm) | Fully Articulated | Yes | $- |
| CanonEOS5D Mark IV | |
August2017 | Full frame(36 x 24 mm) | No | Yes | $$$ |
| CanonEOS80D | |
February2016 | APS-C(22.5 x 15 mm) | Fully Articulated | Yes | $$ |
|
Best daily DSLR camera for vlogging: Canon EOS T7i The camera you use to record your daily vlogs doesn’t have to be the best camera on the market. It just has to offer enough options to make the process of making a vlog as smooth as it can possibly be. The T7i is not the most powerful DSLR camera out there, but its 24.2 MP APS-C CMOS sensor and a DIGIC 7 image processor are more than enough to meet the needs of most daily vloggers. You can record full HD 1080p videos at 60 fps and use this camera to create HDR and time-lapse movies. You can set the T7i’s ISO up as high as 51200, which is pretty good. The T7i’s dual pixel CMOS AF system makes sure that the camera focuses quickly and it helps you avoid creating video clips that are out focus. There’s also a built-in Wi-FI with an NFC feature that enables you to share your videos with a smartphone device you connect to the camera. PROS - Long battery life - Remarkable image quality at high ISO values CONS - Can’t record 4K videos - Viewfinder is tiny |
|---|---|
|
Best entry-level DSLR camera for vlogging: Canon EOS SL2 The Canon EOS SL2 was released just a year ago and it wins our 2018 vote for the best entry-level DSLR camera for vlogging. The SL2 packs a lot of features in a compact camera body. The camera only weighs 1 lb, which is considered light among most DSLR cameras. Many vloggers may enjoy the fact that they can hold up this light camera in front of themselves with more ease. Like a lot of entry-level DSLR cameras, the SL2 comes with an APS-C crop sensor. With ISO capabilities that can reach up to 51200, you’ll be able to film up to full HD 1080p videos at 60 fps, even under low light conditions. All recent Canon cameras perform very well when it comes to autofocus and the SL2 is no exception. It does, however, have fewer points of focus. The SL2 comes with a 9-point AF system. The SL2 also has a fully-articulated screen and a microphone jack. PROS - Microphone jack - Wi-Fi connectivity CONS - No 4K video support - Optical image stabilizer could be better |
|
Best mid-range DSLR camera for vlogging: Canon EOS 80D The Canon EOS 80D is the successor of the 70D which was at one time considered by many YouTubers the ultimate DSLR camera for vlogging. The 80D is a larger camera than the SL2, weighing 1.61 lbs. In its larger build, this camera additionally (compared to the SL2) packs a 45-point AF system, longer battery life, a headphone port, and it is environmentally sealed so you can shoot in tough conditions. This camera’s great performance in autofocusing makes it a great mid-range DSLR camera for vlogging. PROS - Feature-rich - Continuous AF feature performs beautifully while recording high-res videos CONS - Just one SD card slot - PC sync connection features could be better |
|
Best professional DSLR camera for vlogging: Canon EOS 6D Mark II There’s a lot of DSLR cameras that come with a fully-articulated screen and a microphone jack, but the Canon EOS 6D Mark II is actually the only one in the market that comes equipped with both of those, plus a full-frame sensor. It is its full-frame sensor that really sets this camera apart from the other vlogging DLSR cameras. Because of its full-frame sensor, this camera performs much better in low light conditions. With this larger sensor, you’ll also be able to capture footage that looks more cinematic with high-quality bokeh (more blur to your out-of-focus areas). The 6D Mark II also has great battery life compared to all the reviewed cameras above. Unfortunately, this camera does not shoot in 4K. PROS - ISO sensitivity goes up to 102400 - Amazing touchscreen controls CONS - No 4K video recording option - No USB 3.0 |
Want to compare even more cameras? Check out…
12 Best Vlogging Cameras
Top 11 Cheap Vlogging Cameras
8 Best Mirrorless Cameras For Vlogging
12 Best Vlogging Cameras With A Flip Screen
Shanoon Cox
Shanoon Cox is a writer and a lover of all things video.
Follow @Shanoon Cox
Navigate Your Video Framing Journey Without a Budget on YouTube
How to Go Frame by Frame on YouTube Video? [5 Methods]

Richard Bennett
Mar 27, 2024• Proven solutions
It’s always a handy process to be able to move the frame one by one if you binge-watch YouTube videos. Be it as complex as time-lapse or as simple as makeup tutorial, viewing YouTube video frame-by-frame is never an underestimated process.
To be able to achieve this, you ought to master the methods to move frame-by-frame using a frame by a frame video editor or frame by the frame video player.
But this might make you wonder which one would be best for you?
Then here are some methods to move a video frame-by-frame that may come handy for you.
Option 1: Frame-By-Frame Editing and Watching Video Offline
If you are looking for how to edit frame by frame on YouTube or how to go frame by frame on YouTube then you may use a variety of offline applications.
Below are the 2 highlighting benefits of making use of offline video editors instead of online ones:
- You are not required to have a fast and smooth internet connection once the targeted video has been downloaded and will have full liberty to edit or video vide while staying offline.
- You are granted with the full editing facilities whilst staying offline. You can trim, cut or do any video alterations using offline video editors.
If you don’t know how to download a YouTube video easily and quickly, check this guide on How to Download YouTube Videos without Any Software .
Beneath are some of the efficient offline video editors you can work with for editing and viewing videos of YouTube frame by frame.
How to Go Frame by Frame in YouTube Video Using Filmora
Filmora is a great video editor designed for those who are interested in video editing but lack professional experience. It’s very easy to use. Filmora is free to download. You can choose version that is compatible with your operating system.
Compatibility: Windows and Mac


Step 1: Tap on “New Project”.
Step 2: In “project settings” select the desired ratio rate.
Step 3: You can import files by clicking the “import” tab or drag-drop the desired file to this tool.

Step 4: Drag the file to the timeline.
Step 5: You can separate frames from video by hovering the mouse over the first desired frame and complete it by hovering mouse all the way to the end of the frame.
Step 6: Perform editing operations.
Step 7: Save the file by clicking “export” by selecting the desired format under the “format” option and set parameters in “advanced settings” or directly upload the final product to YouTube.

How to Move Frame by Frame in YouTube Video Using Movie Maker
Compatibility: windows
This video editing tool gives you enough option to perform basic editing. With its timeline option, one can edit the videos frame-by-frame which can be performed as guided below:
Step 1: The first step is to download the desired YouTube video.
Step 2: Import that video to movie maker.
Step 3: You have the facility to skip the video frame-by-frame and can also edit it by selecting a specific portion from the timeline.
Step 4: Tap on “edit” beneath video tools after selecting the targeted portion.
Step 5: You will have numerous editing options like transition, add texts, split, music, etc. for each of the frames one by one.
You may also like: YouTube to WAV File: 4 Best Free Convert Solutions >>
How to Advance Frame by Frame in YouTube Video Using iMovie
Compatibility: Mac
This is a free editing tool with a bundle of editing features. The steps are given below:
Step 1: Click “file”, then “new project” followed by “create” option
Step 2: Click “Import” to import video
Step 3: Tap on “edit” followed by the “play head” option to segregate the desired portion of the video to edit.
Step 4: Now apply editing features on the portion of the video given in this tool
Step 5: Press “share” and “export” option once done with editing.
Option 2: Frame-By-Frame Advancement Using YouTube Player
Why even bother ourselves to get a third-party program for the purpose of moving a video frame-by-frame when the YouTube player provides you the same facility within itself. Following are the steps to guide you about how to skip frame by frame on YouTube by using YouTube frame by frame hotkey:
Step 1: Make the video pause.
Step 2: To answer the query regarding how to go frame by frame on YouTube editor, you can make use of 2 keys on the keyboard which are basically used as a shortcut process for the sake of forwarding video frame-by-frame.
You can press “<” in order to skip a frame backward or you could either use a comma as well for the same purpose. For moving the frame forwards, you need to press “>” key or a full stop key will serve you with the same operation.
This is how to move frame by frame on YouTube.

Option 3: Go Frame-By-Frame In YouTube Video Using Online Application
If your work requires intricate analysis of the video where you have to view the view very closely then you may make use of an online external application for this purpose.
The following are the steps to show you how to advance frame by frame on YouTube using this online tool.
Step 1: Into the URL bar of the browser, paste the link www.watchframebyframe.com there where you will be redirected to the online tool which has quite an easy interface with several controls provided built-in.
Step 2: Tap on “Enter Video URL” box and paste the copied URL of a targeted YouTube video
Step 3: The video will get loaded after hitting enter. At the bottom, buttons are given to control accordingly for skipping the frame forwards and backward respectively.
Step 4: You can also personalize the frame skipping setting with the option given beside the forwards and backward button where you can customize fps (frame per second) setting and also adjust the number of frames to be skipped upon clicking forwards and backward button.
An application granting such diverse options gives precise accuracy level which would help make the learning process easier and accurate.

Where Will Need to Go Frame by Frame on YouTube?
- Viewing time-lapse:
Capturing minor details in a video having time-lapse is such a complicated task. It often becomes harder even after slowing the video down. Therefore, a frame-by-frame view is the perfect yet only way out to this problem.
- Viewing how-to video:
The main purpose of a learning video is to get the sound and thorough details of the process and hence can be made not only possible but easier through frame-by-frame scrolling.
- Video sharing or editing:
Clean editing or cropping from a particular position is an intricate process and becomes easier to pause at the desired moment by frame-by-frame forwarding.
- Learning tutorial
Learning needs an in-depth and clear delivery of the content which is made easier by the feature of frame-by-frame skipping of the video.
YouTube studio is the basement for YouTubers to upload and track their videos. To some newbies, they might don’t know how to use the YouTube Manager. If you happen to be one of them, check this article to get: Everything You Need to Know about YouTube Video Manager >>
Conclusion
The precise control over separate frames as well as set of frames, diverse OS support, and liberty to use a variety of editing features make Wondershare Filmora stand out among all other tools. But depending upon the suitability with respect to one’s available resources, any of the above tool will help you watch and edit YouTube video frame by frame.
Richard Bennett
Richard Bennett is a writer and a lover of all things video.
Follow @Richard Bennett
Richard Bennett
Mar 27, 2024• Proven solutions
It’s always a handy process to be able to move the frame one by one if you binge-watch YouTube videos. Be it as complex as time-lapse or as simple as makeup tutorial, viewing YouTube video frame-by-frame is never an underestimated process.
To be able to achieve this, you ought to master the methods to move frame-by-frame using a frame by a frame video editor or frame by the frame video player.
But this might make you wonder which one would be best for you?
Then here are some methods to move a video frame-by-frame that may come handy for you.
Option 1: Frame-By-Frame Editing and Watching Video Offline
If you are looking for how to edit frame by frame on YouTube or how to go frame by frame on YouTube then you may use a variety of offline applications.
Below are the 2 highlighting benefits of making use of offline video editors instead of online ones:
- You are not required to have a fast and smooth internet connection once the targeted video has been downloaded and will have full liberty to edit or video vide while staying offline.
- You are granted with the full editing facilities whilst staying offline. You can trim, cut or do any video alterations using offline video editors.
If you don’t know how to download a YouTube video easily and quickly, check this guide on How to Download YouTube Videos without Any Software .
Beneath are some of the efficient offline video editors you can work with for editing and viewing videos of YouTube frame by frame.
How to Go Frame by Frame in YouTube Video Using Filmora
Filmora is a great video editor designed for those who are interested in video editing but lack professional experience. It’s very easy to use. Filmora is free to download. You can choose version that is compatible with your operating system.
Compatibility: Windows and Mac
Step 1: Tap on “New Project”.
Step 2: In “project settings” select the desired ratio rate.
Step 3: You can import files by clicking the “import” tab or drag-drop the desired file to this tool.
Step 4: Drag the file to the timeline.
Step 5: You can separate frames from video by hovering the mouse over the first desired frame and complete it by hovering mouse all the way to the end of the frame.
Step 6: Perform editing operations.
Step 7: Save the file by clicking “export” by selecting the desired format under the “format” option and set parameters in “advanced settings” or directly upload the final product to YouTube.
How to Move Frame by Frame in YouTube Video Using Movie Maker
Compatibility: windows
This video editing tool gives you enough option to perform basic editing. With its timeline option, one can edit the videos frame-by-frame which can be performed as guided below:
Step 1: The first step is to download the desired YouTube video.
Step 2: Import that video to movie maker.
Step 3: You have the facility to skip the video frame-by-frame and can also edit it by selecting a specific portion from the timeline.
Step 4: Tap on “edit” beneath video tools after selecting the targeted portion.
Step 5: You will have numerous editing options like transition, add texts, split, music, etc. for each of the frames one by one.
You may also like: YouTube to WAV File: 4 Best Free Convert Solutions >>
How to Advance Frame by Frame in YouTube Video Using iMovie
Compatibility: Mac
This is a free editing tool with a bundle of editing features. The steps are given below:
Step 1: Click “file”, then “new project” followed by “create” option
Step 2: Click “Import” to import video
Step 3: Tap on “edit” followed by the “play head” option to segregate the desired portion of the video to edit.
Step 4: Now apply editing features on the portion of the video given in this tool
Step 5: Press “share” and “export” option once done with editing.
Option 2: Frame-By-Frame Advancement Using YouTube Player
Why even bother ourselves to get a third-party program for the purpose of moving a video frame-by-frame when the YouTube player provides you the same facility within itself. Following are the steps to guide you about how to skip frame by frame on YouTube by using YouTube frame by frame hotkey:
Step 1: Make the video pause.
Step 2: To answer the query regarding how to go frame by frame on YouTube editor, you can make use of 2 keys on the keyboard which are basically used as a shortcut process for the sake of forwarding video frame-by-frame.
You can press “<” in order to skip a frame backward or you could either use a comma as well for the same purpose. For moving the frame forwards, you need to press “>” key or a full stop key will serve you with the same operation.
This is how to move frame by frame on YouTube.
Option 3: Go Frame-By-Frame In YouTube Video Using Online Application
If your work requires intricate analysis of the video where you have to view the view very closely then you may make use of an online external application for this purpose.
The following are the steps to show you how to advance frame by frame on YouTube using this online tool.
Step 1: Into the URL bar of the browser, paste the link www.watchframebyframe.com there where you will be redirected to the online tool which has quite an easy interface with several controls provided built-in.
Step 2: Tap on “Enter Video URL” box and paste the copied URL of a targeted YouTube video
Step 3: The video will get loaded after hitting enter. At the bottom, buttons are given to control accordingly for skipping the frame forwards and backward respectively.
Step 4: You can also personalize the frame skipping setting with the option given beside the forwards and backward button where you can customize fps (frame per second) setting and also adjust the number of frames to be skipped upon clicking forwards and backward button.
An application granting such diverse options gives precise accuracy level which would help make the learning process easier and accurate.
Where Will Need to Go Frame by Frame on YouTube?
- Viewing time-lapse:
Capturing minor details in a video having time-lapse is such a complicated task. It often becomes harder even after slowing the video down. Therefore, a frame-by-frame view is the perfect yet only way out to this problem.
- Viewing how-to video:
The main purpose of a learning video is to get the sound and thorough details of the process and hence can be made not only possible but easier through frame-by-frame scrolling.
- Video sharing or editing:
Clean editing or cropping from a particular position is an intricate process and becomes easier to pause at the desired moment by frame-by-frame forwarding.
- Learning tutorial
Learning needs an in-depth and clear delivery of the content which is made easier by the feature of frame-by-frame skipping of the video.
YouTube studio is the basement for YouTubers to upload and track their videos. To some newbies, they might don’t know how to use the YouTube Manager. If you happen to be one of them, check this article to get: Everything You Need to Know about YouTube Video Manager >>
Conclusion
The precise control over separate frames as well as set of frames, diverse OS support, and liberty to use a variety of editing features make Wondershare Filmora stand out among all other tools. But depending upon the suitability with respect to one’s available resources, any of the above tool will help you watch and edit YouTube video frame by frame.
Richard Bennett
Richard Bennett is a writer and a lover of all things video.
Follow @Richard Bennett
Also read:
- Youth Voices Channeling Life's Milestinasubscriber Channel for Impactful Personal Storytelling.
- The Art of Profit-Driven Online Shopping Blogosynthesis
- Deciphering How To Find My YouTube Comments Posts for 2024
- [New] 11 Useful YouTube SEO Tips to Rank Your Video
- How Frequent Uploads Can Skyro Cookie Sales on Your YouTube Channel
- In 2024, Audio Dialogue Recorder
- [Updated] Erase the Obvious Techniques for Masked YouTube Content
- 2024 Approved Beginner's OBS Techniques for YouTube Live Streaming
- Profiting From Gaming Channels
- In 2024, Boundless Creativity Celebrating Our Top 10 Female YouTubers
- Masterclass on Minimizing Video Footage in YouTube
- 2024 Approved Efficient Deletion Techniques for Online Discussions
- 2024 Approved Adapting Your Favorite Songs From Spotify to YouTube Music Service
- [Updated] Best Free YouTube Video Editing Apps for iPhone & iPad & How-Tos
- Decoding YouTube Exchange Threads
- Unveiling the Most Authoritative YouTube News Outlets
- Premium Video Recorder for Cutting-Edge YouTube Content
- [New] Essential Hash Strategies for Optimizing YouTube Gameplay Videos
- 1-5 Best URL Trimmer Tools for YouTube Videos
- In 2024, 5 Winter YouTube Background Ideas to Warm Up Your Videos
- Hitting the High Notes of YouTube Editing Audio Addition Secrets Revealed
- [Updated] Enhancing YouTube Visibility with Featured Channels Techniques
- [Updated] Elevate Well-Being The Leading Online Yoga Vids
- Partnered Filmmaking Expand Your Channel's Reach
- YouTube Cover Pics Made Easy – Top 5 Free Downloader Lists
- Incorporating YouTube's Video Content on Your Domain
- In 2024, Demystifying the Money Behind 1M on YouTube
- Creating Heartfelt YouTube Journeys
- 2024 Approved Crafting Comedy The Art of Parody Videos
- Critical ASMR Video Elements to Note for 2024
- 5 Best Sites for Quick Templates on YouTube
- [Updated] Creating an Athletic Channel on Apple Hardware
- [Updated] Cohesive Labeling Approach for YTB, Ins & Others
- Effortless Guide to Designing YouTube Follow Links
- 2024 Approved Elevate Your Soundbites Insights for YouTube Short Tunes
- Elite Recording Devices for Livestream Producers for 2024
- Step-by-Step Process to Craft Memorable GIFs From Any YouTube Video on Devices
- [Updated] Content Creators' Dilemma Which Site Reigns - Vimeo, YouTube?
- In 2024, Charting the Unknown Visual Facts From 2017'S Youtube World
- Facing Copyright Challenges on YouTube Know Your Rights
- Updated Create Stunning Movies Online for Free Top 9 Options
- [Updated] 2024 Approved Universal Method for Screen Recording Across Systems
- Updated The Unveiling of Cambridges CXU Audio Performance - A 2023 Assessment for 2024
- Updated 2024 Approved The One-Stop Shop for Podcast Platforms and Directories
- In 2024, How to Show Wi-Fi Password on Samsung Galaxy A15 4G
- [New] Windows 11 Excellent Video Capture Tools Compared for 2024
- In 2024, How and Where to Find a Shiny Stone Pokémon For Apple iPhone 6s Plus? | Dr.fone
- In 2024, How to use Pokemon Go Joystick on Oppo Reno 10 5G? | Dr.fone
- [Updated] Flavorful Feeds Top TikTok Food Influencers
- Do Reviewers Get Dollars for Commentary?
- How To Get the Apple ID Verification Code On Apple iPhone XR in the Best Ways
- Recommended Best Applications for Mirroring Your Honor Magic 5 Pro Screen | Dr.fone
- Step-by-Step Save MOVs on Windows 10
- Complete Tutorial to Use GPS Joystick to Fake GPS Location On Oppo Reno 9A | Dr.fone
- [Updated] 2024 Approved Enhanced Social Presence Posting Tweets' Vids via Snapchat
- Solved Warning Camera Failed on Vivo T2 5G | Dr.fone
- TikTok Aspect Ratio Secrets Boost Engagement with the Right Dimensions for 2024
- Easy Tutorial for Activating iCloud on Apple iPhone 6 Safe and Legal
- In 2024, How To Transfer From Apple iPhone 13 Pro to Samsung Simplified Guide | Dr.fone
- In 2024, IOS-Compatible PS2 Games Simulator Roundup
- In 2024, Quotable Moments 50+ Top TikTok Inspirational Lyrics
- [Updated] 2024 Approved Trendsetters in Instagram AE Best-Selling Template Collections
- Steady Snapstreaks Tips to Never Miss a Snap
- How to Flash Dead Xiaomi Redmi Note 12 Pro+ 5G Safely | Dr.fone
- Updated 2024 Approved Easily Trim, Cut, and Merge AVI Files on Windows 8 - 2023 Guide
- How to Restore Deleted Asus ROG Phone 7 Photos An Easy Method Explained.
- [New] 2024 Approved The 6 Best TikTop-to-MP3 Converters - Free & Online Version
- Navigating Through Gesture Detection Methods
- How to 80 Pro Straight Screen Edition Get Deleted photos Back with Ease and Safety?
- Title: "2024 Approved Best 7 High-Motion DSLRs for Dynamic Live Content Creation"
- Author: Brian
- Created at : 2024-05-25 11:00:27
- Updated at : 2024-05-26 11:00:27
- Link: https://youtube-video-recordings.techidaily.com/2024-approved-best-7-high-motion-dslrs-for-dynamic-live-content-creation/
- License: This work is licensed under CC BY-NC-SA 4.0.
