
:max_bytes(150000):strip_icc()/GN5C2337-2ecd1ef3d21c4203bd652b800943a5c2.jpg)
"2024 Approved Affordable Acoustic Amps and Mics for Video Voyagers"
Affordable Acoustic Amps and Mics for Video Voyagers
Cheap Microphones for Youtubers on a Budget

Richard Bennett
Dec 30, 2022• Proven solutions
An expensive microphone doesn’t mean it is the best option — at least, not for YouTubers. Without professional experience or additional equipment, having a $1000 studio microphone could be wasted money.
If you are on a budget or new to YouTube, and what you want is to improve the audio quality of your video gradually, you should look into the cheaper options first.
In this article, I will highlight microphones in 3 price ranges.
We will have a look at each of these microphones, their pros, and cons, and then you can decide which one will be best for your channel and your budget.
As for keeping with your financial needs, we aren’t going to be looking at any XLR microphones, as they will require an audio interface, thus increasing your price range. The microphones in this list will be plug-and-plays, and you will only need the basic audio recording skills to get started.
Disclaimer: Prices are subjected to change.
YouTube Microphones for Under $20
BOYA BY-M1 - $16.99
TheBOYA BY-M1 is a lavalier microphone (a hand-free mic that clips onto your clothing) that connects to smartphones, DSLR, computers, and other audio recorders.

Pro: As an omnidirectional condenser microphone, it will be able to pick up audio from 360 degrees, and with 20 feet (6 meters) of cable, you can have a significant range movement even if you are connected to the camera.
The BOYA BY-M1 is a terrific choice for YouTubers on a budget that is frequently making videos on the go. It’s easy to carry around, and the ability to simply connect to a smartphone means you can set up and shoot your video on the fly.
Con: This mic, although it has a great range, can also pick up subtle movements you make as it is clipped onto you. Not great if there is a lot of action in your videos.
TONOR PC Microphone Computer Condenser - $15.99
The TONOR is an easy-to-setup condenser microphone that you can connect to your computer via USB and start recording in seconds.

Pro: The value of this microphone is in its ease of use. With a flexible, foldable stand, you can adjust the TONOR PC microphone the way it suits your setup. The legs of the stand are retractable, which makes it easy for you to store. If you are a gamer or creating videos primarily from your desk, this is a perfectly suitable microphone for you to start your YouTube journey with.
Con: The audio quality of this mic can help you get the job done, but it won’t blow you away. The cable is attached to the microphone and is 6.5 feet (2 meters) long, which isn’t a wide range. It’s pretty much restricted to the desk with your computer. This microphone has limitations, and high-achieving YouTubers will certainly grow out of it.
YouTube Microphones for Under $50
Purple Panda Lavalier Microphone - $23.99
The Purple Panda lavalier microphone comes with multiple adapters and is compatible with nearly all devices, including smartphone, DSLR, computers, and even GoPro cameras. The only device where you will need anadditional adapter is if you have an iPhone 7.

Pro: This microphone is a versatile option for YouTubers who create a variety of content. It doesn’t require any battery and is powered by whatever device it is plugged into, which is great for YouTubers with already so many devices to keep charged.
Con: Much like the BOYA BY-M1, the Purple Panda, as it is clipped onto your lapel or shirt collar, will capture the sound of your clothes brushing against it if too much movement occurs.
Samson Go Mic Portable USB Condenser Microphone - $37.73
The Samson Go microphone is the kind of mic that can fit in your pocket and be taken with you anywhere.

Pro: This microphone has both a cardioid and an omnidirectional mode. This means that you can choose to have your microphone focused more on the subject speaking by switching to cardio or switch to Omni-directional to capture audio from the entire surrounding.
It is designed to be able to clip onto a flat surface such as your computer screen. This allows you to place the microphone on different levels to record.
Con: Because of its unique design and the portability of the device, it will suffer wear-and-tear faster. Attention to storage is necessary to increase the lifespan of the device.
XIAOKOA Mini Condenser Microphone with Stand - $24.99
TheXIAOKOA portable mini condenser microphone is compatible with smartphones, computers, and any devices using 3.5mm recording jacks.

Pro: With a cardioid pickup, this condenser microphone will do a fine job picking up vocals. If you are a YouTuber who does a lot of singing videos, this is definitely an affordable microphone to check out.
Con: This microphone, perhaps primarily designed for karaoke, has an echo feature that, although might create new dimensions to your vocals, may not be desired for your YouTube video. This feature can be problematic, as it could spoil your recording.
TAKSTAR SGC-598 - $26.93
The TAKSTAR SGC is a condenser microphone, and it can be fixed onto your camera, which simplifies your YouTube setup. This camera can plug directly into your camera, reducing the audio tracks you need to manage when editing.

Pro: The camera-mounted microphone has a shock-resistant design that reduces noise when the camera is moved. The cardioid microphone will be able to pick up audio in the direction it is pointed in, reducing noise capturing from behind the camera. This is a good microphone for vlogging or interviews.
Con: The TAKSTAR SGC requires one AA battery, so you’ll have to remember to carry a backup every time you film.
Limited to a vocal subject standing 4-5 feet away, any more and the microphone will be hard-pressed to pick up the audio without capturing a lot of surround audio.
The design requires it to be mounted to the camera. If you want to separate it from the camera and still have it recorded, a bit of creativity is required to keep it standing.
YouTube Microphones for Under $100
Behringer C-1U - $59.99
The Behringer C-1U is a condenser microphone with a cardioid pickup pattern that connects to your computer via USB.

Pro: This microphone has a solid metal build and has a good weight. It is quick and easy to set up and is a good microphone for anyone wanting a simple solution for better audio on YouTube.
Con: A pop filter is recommended for this microphone as it picks up a lot of popping sounds when the subject speaks.
Blue Microphones Snowball iCE - $64.94
The Blue Microphones Snowball iCE is a cardioid condenser microphone that connects to your computer via USB.

Pro: The Snowball iCE is a plug-and-play microphone that is super easy to use and doesn’t require any additional battery. Simply connect it to the computer, and you are ready to record your voice. It captures clear and crisp audio for a single voice or single-person recording.
Con: The range of this microphone is not that great; you’ll have to be close and be speaking directly into the microphone to get the best audio. It is not ideal for recording moving subjects or those who are further than 2-3 feet away.
Marantz Professional MPM-1000U - $57.06
The Marantz Professional MPM-1000U is a condenser microphone that records in a cardioid polar pattern that connects to your computer via USB.

Pro: This budget microphone has excellent all-metal construction. It has a plug-and-play setup and doesn’t require any drivers or installations. It records great instrumentals and would recommend it to those who are recording music for YouTube.
Con: May pick up extraneous noises if you are recording vocals while there are movements in your surrounding, but otherwise, this is an excellent microphone in its price range.
Final Thoughts
When looking for microphones under $100, the difference in audio quality is not going to be drastic. What you need to consider is how you are going to be using this piece of equipment.
If your YouTube videos consist of you in a quiet studio environment, I would recommend the Marantz Professional MPM-1000U .
However, if you will be recording on the go and require your hands to be free in the scene, I recommend getting a lavalier microphone such as the Purple Panda .
But, if you are going to be recording other people, in addition to yourself, I’d say go with the TAKSTAR SGC as it will give you more audio control in busy environments.
What are you looking for in a budget microphone? Let us know in the comments below.
If you want to find a video editing solution that empowers your imagination and creativity yet takes less effort, please try this robust and user-friendly video editing software Wondershare Filmora. It provides special effects, stock photo & video, sound library, etc., which will definitely enhance your productivity and helps to make money by making videos much accessible.


Richard Bennett
Richard Bennett is a writer and a lover of all things video.
Follow @Richard Bennett
Richard Bennett
Dec 30, 2022• Proven solutions
An expensive microphone doesn’t mean it is the best option — at least, not for YouTubers. Without professional experience or additional equipment, having a $1000 studio microphone could be wasted money.
If you are on a budget or new to YouTube, and what you want is to improve the audio quality of your video gradually, you should look into the cheaper options first.
In this article, I will highlight microphones in 3 price ranges.
We will have a look at each of these microphones, their pros, and cons, and then you can decide which one will be best for your channel and your budget.
As for keeping with your financial needs, we aren’t going to be looking at any XLR microphones, as they will require an audio interface, thus increasing your price range. The microphones in this list will be plug-and-plays, and you will only need the basic audio recording skills to get started.
Disclaimer: Prices are subjected to change.
YouTube Microphones for Under $20
BOYA BY-M1 - $16.99
TheBOYA BY-M1 is a lavalier microphone (a hand-free mic that clips onto your clothing) that connects to smartphones, DSLR, computers, and other audio recorders.
Pro: As an omnidirectional condenser microphone, it will be able to pick up audio from 360 degrees, and with 20 feet (6 meters) of cable, you can have a significant range movement even if you are connected to the camera.
The BOYA BY-M1 is a terrific choice for YouTubers on a budget that is frequently making videos on the go. It’s easy to carry around, and the ability to simply connect to a smartphone means you can set up and shoot your video on the fly.
Con: This mic, although it has a great range, can also pick up subtle movements you make as it is clipped onto you. Not great if there is a lot of action in your videos.
TONOR PC Microphone Computer Condenser - $15.99
The TONOR is an easy-to-setup condenser microphone that you can connect to your computer via USB and start recording in seconds.
Pro: The value of this microphone is in its ease of use. With a flexible, foldable stand, you can adjust the TONOR PC microphone the way it suits your setup. The legs of the stand are retractable, which makes it easy for you to store. If you are a gamer or creating videos primarily from your desk, this is a perfectly suitable microphone for you to start your YouTube journey with.
Con: The audio quality of this mic can help you get the job done, but it won’t blow you away. The cable is attached to the microphone and is 6.5 feet (2 meters) long, which isn’t a wide range. It’s pretty much restricted to the desk with your computer. This microphone has limitations, and high-achieving YouTubers will certainly grow out of it.
YouTube Microphones for Under $50
Purple Panda Lavalier Microphone - $23.99
The Purple Panda lavalier microphone comes with multiple adapters and is compatible with nearly all devices, including smartphone, DSLR, computers, and even GoPro cameras. The only device where you will need anadditional adapter is if you have an iPhone 7.
Pro: This microphone is a versatile option for YouTubers who create a variety of content. It doesn’t require any battery and is powered by whatever device it is plugged into, which is great for YouTubers with already so many devices to keep charged.
Con: Much like the BOYA BY-M1, the Purple Panda, as it is clipped onto your lapel or shirt collar, will capture the sound of your clothes brushing against it if too much movement occurs.
Samson Go Mic Portable USB Condenser Microphone - $37.73
The Samson Go microphone is the kind of mic that can fit in your pocket and be taken with you anywhere.
Pro: This microphone has both a cardioid and an omnidirectional mode. This means that you can choose to have your microphone focused more on the subject speaking by switching to cardio or switch to Omni-directional to capture audio from the entire surrounding.
It is designed to be able to clip onto a flat surface such as your computer screen. This allows you to place the microphone on different levels to record.
Con: Because of its unique design and the portability of the device, it will suffer wear-and-tear faster. Attention to storage is necessary to increase the lifespan of the device.
XIAOKOA Mini Condenser Microphone with Stand - $24.99
TheXIAOKOA portable mini condenser microphone is compatible with smartphones, computers, and any devices using 3.5mm recording jacks.
Pro: With a cardioid pickup, this condenser microphone will do a fine job picking up vocals. If you are a YouTuber who does a lot of singing videos, this is definitely an affordable microphone to check out.
Con: This microphone, perhaps primarily designed for karaoke, has an echo feature that, although might create new dimensions to your vocals, may not be desired for your YouTube video. This feature can be problematic, as it could spoil your recording.
TAKSTAR SGC-598 - $26.93
The TAKSTAR SGC is a condenser microphone, and it can be fixed onto your camera, which simplifies your YouTube setup. This camera can plug directly into your camera, reducing the audio tracks you need to manage when editing.
Pro: The camera-mounted microphone has a shock-resistant design that reduces noise when the camera is moved. The cardioid microphone will be able to pick up audio in the direction it is pointed in, reducing noise capturing from behind the camera. This is a good microphone for vlogging or interviews.
Con: The TAKSTAR SGC requires one AA battery, so you’ll have to remember to carry a backup every time you film.
Limited to a vocal subject standing 4-5 feet away, any more and the microphone will be hard-pressed to pick up the audio without capturing a lot of surround audio.
The design requires it to be mounted to the camera. If you want to separate it from the camera and still have it recorded, a bit of creativity is required to keep it standing.
YouTube Microphones for Under $100
Behringer C-1U - $59.99
The Behringer C-1U is a condenser microphone with a cardioid pickup pattern that connects to your computer via USB.
Pro: This microphone has a solid metal build and has a good weight. It is quick and easy to set up and is a good microphone for anyone wanting a simple solution for better audio on YouTube.
Con: A pop filter is recommended for this microphone as it picks up a lot of popping sounds when the subject speaks.
Blue Microphones Snowball iCE - $64.94
The Blue Microphones Snowball iCE is a cardioid condenser microphone that connects to your computer via USB.
Pro: The Snowball iCE is a plug-and-play microphone that is super easy to use and doesn’t require any additional battery. Simply connect it to the computer, and you are ready to record your voice. It captures clear and crisp audio for a single voice or single-person recording.
Con: The range of this microphone is not that great; you’ll have to be close and be speaking directly into the microphone to get the best audio. It is not ideal for recording moving subjects or those who are further than 2-3 feet away.
Marantz Professional MPM-1000U - $57.06
The Marantz Professional MPM-1000U is a condenser microphone that records in a cardioid polar pattern that connects to your computer via USB.
Pro: This budget microphone has excellent all-metal construction. It has a plug-and-play setup and doesn’t require any drivers or installations. It records great instrumentals and would recommend it to those who are recording music for YouTube.
Con: May pick up extraneous noises if you are recording vocals while there are movements in your surrounding, but otherwise, this is an excellent microphone in its price range.
Final Thoughts
When looking for microphones under $100, the difference in audio quality is not going to be drastic. What you need to consider is how you are going to be using this piece of equipment.
If your YouTube videos consist of you in a quiet studio environment, I would recommend the Marantz Professional MPM-1000U .
However, if you will be recording on the go and require your hands to be free in the scene, I recommend getting a lavalier microphone such as the Purple Panda .
But, if you are going to be recording other people, in addition to yourself, I’d say go with the TAKSTAR SGC as it will give you more audio control in busy environments.
What are you looking for in a budget microphone? Let us know in the comments below.
If you want to find a video editing solution that empowers your imagination and creativity yet takes less effort, please try this robust and user-friendly video editing software Wondershare Filmora. It provides special effects, stock photo & video, sound library, etc., which will definitely enhance your productivity and helps to make money by making videos much accessible.
Richard Bennett
Richard Bennett is a writer and a lover of all things video.
Follow @Richard Bennett
A Step-by-Step Manual on Repetitive Watch Experiences in YT
How to Loop a YouTube Video: The Ultimate Guide 2024

Shanoon Cox
Mar 27, 2024• Proven solutions
You must have watched a thrilling YouTube video and repeated it several times. The challenge to most of us is how to loop a YouTube video automatically while at the comfort of our seats.
This guide will show you three methods on how to put a YouTube video on loop easily on your laptop, iPhone or desktop. And how to loop a video differs from one device to another. Moreover, there are many different types you play over and over again; a favorite sermon, yoga tutorials, a motivational speech, and the list is endless.
In the last sections of this article, I’ll introduce you to the best YouTube video loopers that will keep replaying videos infinitely.
To keep playing your YouTube videos on loop in a very simple way, just keep reading:
How to Loop YouTube Video: for Both Computer and Phone
- Option 1: Using the YouTube in-built loop technique
- Option 2: Using playlist to set video loop
- Option 3: Editing URL
- Option 4: Using Looping sites
- Option 5: Using Looping Apps
- Option 6: Using Google Chrome extension
How to Loop YouTube Video: for Both Computer and Phone
Every human being has his/her most favorite types of videos. What’s yours? To date, how many times have replayed them? Majority of internet users have access to both smartphones and computers. So, are there YouTube video looping techniques applicable to both computers and phones?
The answer is, Yes.
Stop using the reverse button to replay your videos on YouTube and use the options below.
Read More to Get : How to Download YouTube Videos without Any Software Easily >>
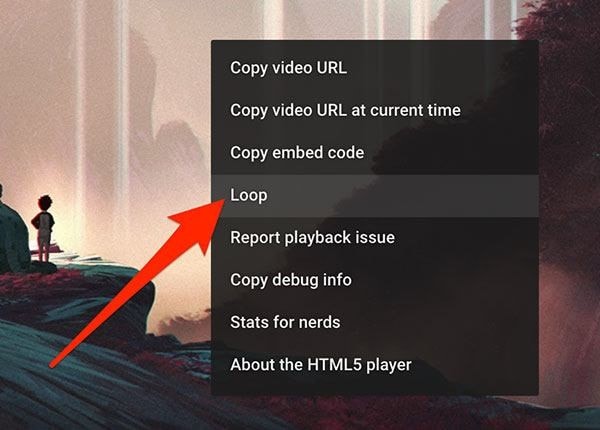
Option 1: Using the YouTube in-built loop technique: right-click technique
This is the easiest and most used technique to create YouTube video loops.
For Computer Users:
Step 1: Open the YouTube app on your computer or laptop and select the video to replay in a loop. Click to start enjoying your video.
Step 2: While the video is on the play, right-click the video and a prompt action suggestion box will pop up. Click the “loop” option and the playing video will be replay.
Step 3: To remove the YouTube embedded autoplay loop, click the loop option and you are done.
For Phone Users:
To loop YouTube videos using the In-built loop technique on iPhone, the procedure isn’t much different from that of a computer. Here are the steps;
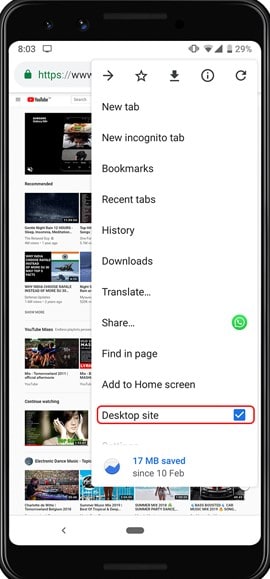
Step 1: Open YouTube videos using m.youtube.com on your phone. Using m.youtube.com prevents opening the video directly from the YouTube app.
Step 2: Browse the video you would like to set loops. Got it? Now start playing the YouTube video.
Step 3: At the top right corner of the video are 3 dots menu. Click the dots and scroll down to the “desktop site” option and select it.
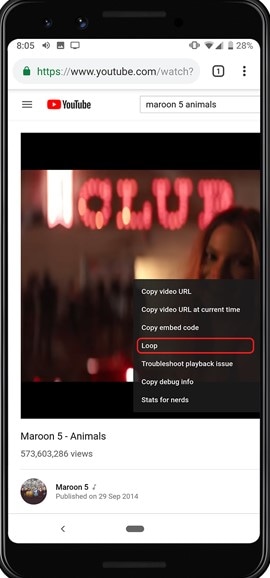
Step 4: While on the mobile browser version, long-press the playing video to open the video menu. Click the “loop” option. Now your Youtube replay loop is set.
Option 2: Using playlist to set video loop
To play two YouTube videos at once, this is the method to use. Before you can begin the process of setting videos on repeat, you have to sign in first.
Step 1: Select the videos to play on repeat.
Step 2: Sign in to your YouTube.
Step 3: After signing in to YouTube, click the “**+**” icon at the bottom of the video. Select the “create new playlist” to add the chosen videos. Name your playlist and choose to view public or private.
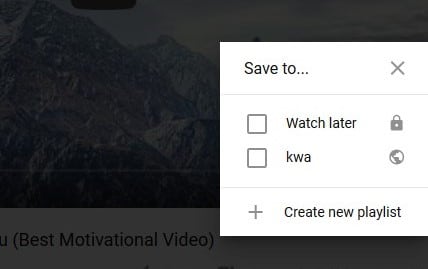
Step 4: Back to the main YouTube app; click the shown three bars and a long list of options pop up.
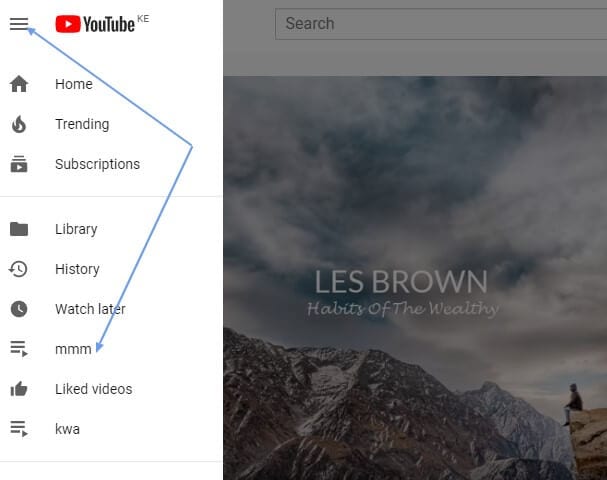
Step 5: Select the playlist “mmm” and then click “play all”.

Option 3: Editing URL
This is among the least known method of creating a video loop. It involves editing the video URL of YouTube to replay. URL is usually divided in to different sections. This is the simplest option as involves only deleting the hypertext transfer protocol (https) and the World Wide Web (www) and inserting the word “repeat” immediately after “Youtube”.
This is how to do it:
Step 1: Search for the video to set on replay.
In our case, let’s choose - https://www.youtube.com/watch?v=xo1VInw-SKc
Step 2: Delete the first part “**https://www.**” in the address bar.
The remaining sections will be- youtube.com/watch?v=xo1VInw-SKc
Step 3: After “Youtube” and before “.com” write “repeat”.
So it looks like this “youtuberepeat.com/watch/?v=xo1VInw-SKc” in your address bar.
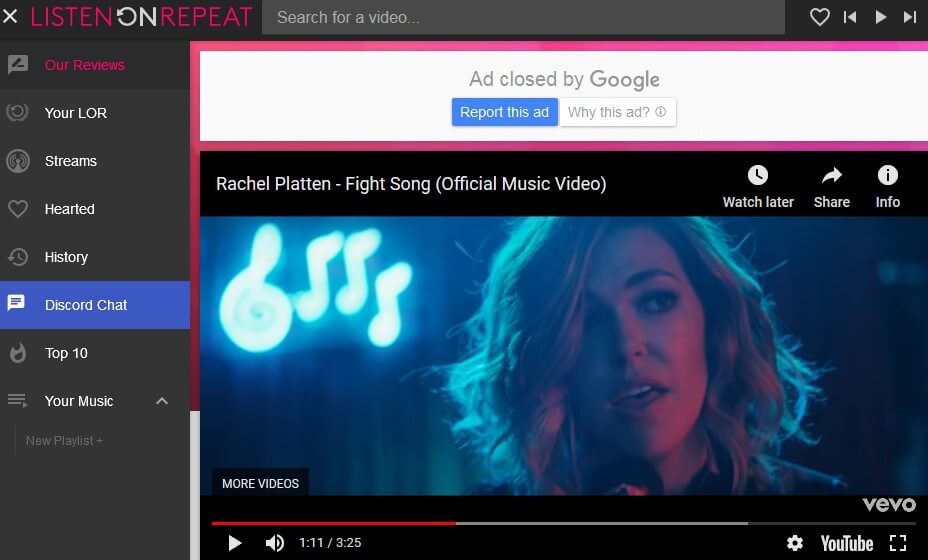
Step 4: Click to play and your video will start playing in a loop in the ListenOnRepeat app.
2. Loop YouTube video with Youtubeloop.net
Step 1: Click to open any of the above looping sites .i.e. Youtubeloop.net
Step 2: Search for the video to set on loop.
Step 3: Copy- paste the video URL to the top blank space of the site.
Step 4: Click “_Go loop_” at the top right and the video is ready to play in a loop.
How To Loop YouTube Videos On Phone
The most suitable method you can use to set YouTube replay loop is by downloading video looper apps. There a lot of video looping apps for android and smartphones in the market today.
Apps are developed to simplify how we do things and make them more fun. To use video loopers on phones, you only need to download and install it. Next is to search the video to loop and with the slider, loop part of YouTube video that most fascinates you.
Whether you want to play a video on loop on an android phone, iPhone, iOS or tablet, there is mobile app compatible with your phone. This is how to loop your video on an android phone.
Option 5: Using Looping Apps To Set YouTube video loops
#App 1: Musepic

The Musepic looper app allows you to set video loops at any point within the play. Select the sections to loop and slide the loop button. You can now watch the YouTube embed autoplay loop for as long as you want.
In this case, we’ll use the Musepic app which is a third-party app available for download. It’s accessible via Google Play Store.
Step 1: Open your phones Google Play Store and search for the free version of the Musepic app. It has In-app purchases which you can use to add more features. Download and install.
Step 2: Click the first apps page option “Search-Find your videos” to select the video to set play on repeat. The best part of this app is the auto-suggestion of the videos you are likely to replay.
Step 3: Musepic app openly shows YouTube video looper controls. Click the selected video to start playing. Among the top, applicable features include loop button, sticky button and time slider.
#App 2: Repeat Player
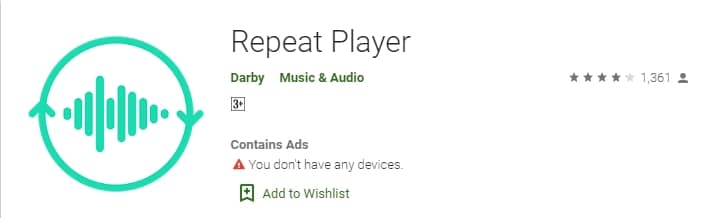
With Repeat Player installed on your phone, you can all 3gp, mp3, mp4 and xmf audios in loops the whole day. Its functions are oversimplified. Among the important features in this app include setting video loops in intervals, playback speed control and sleep timer control.
This app requires android 4.1 and up to function.
Just download the app and at the top 4bars, tap to select the video to loop. Use the two red slides to set the video repeat loop.
#App 3: Loop Player - A B Repeat Player
If you want to loop part of the YouTube video, Loop Player has two sliders to select the exact parts to repeat. It’s simple to use and is compatible with 4.2+ android phones.
To use this app, download and install it to your phone. Upload the video to loop and with slider A and B, set the video where to repeat.
Loop Player can be used to play background music, change playback speed and save an unlimited number of loops.
How to Loop YouTube Video: Only on PC
There is no much is required to set videos on repeat. The best and easy-to-use option is using Google Chrome Extensions. They are best suited for playing YouTube videos on loop online.
Option 6: Using Google Chrome extension
The number of free-to-use online Google Chrome extensions to set YouTube video loops continues to increase every day. To set YouTube repeat loops online, you just open the extension, copy video URL and you are ready to watch. One disadvantage of this option is you cannot set part of a video to replay on loop.
Here the top extensions;
#Extension 1: ListenOnRepea

This is the best app when you want to loop part of the YouTube video. Use the timing slider at the bottom of the video to select the part to loop.
ListenOnRepeat is available on Google Play and suitable for android 4.1+. If you are looking for music video loops app, this will never disappoint you. It’s simple and easy to use.
You can watch the top trending videos as suggested in its community section every day.
Only one thing will disappoint you; you can never multiple videos at once.
Step 1: Download ListenOnRepeat from Google Chrome extension.
Step 2: After you’ve downloaded and installed, search the video you want to watch repeatedly at the search bar at the top of the app.
Step 3: Click the selected video and it will be replayed continuously.
#Extension 2: Kapwing
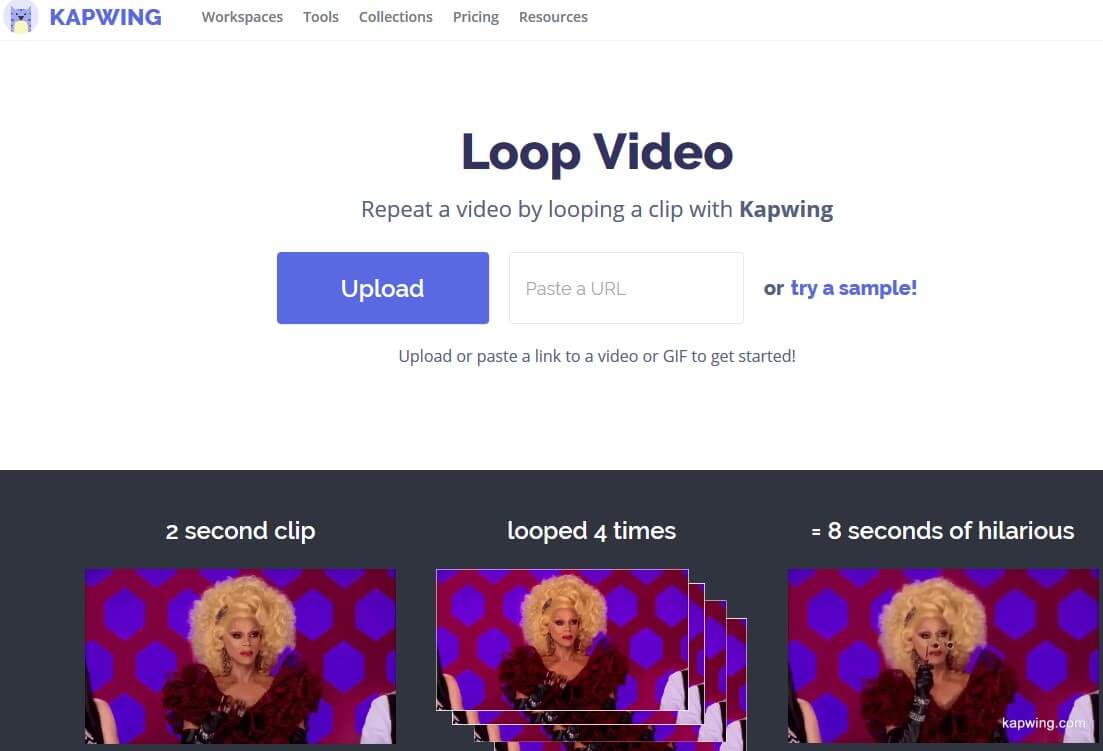
Kapwing is the extension to go for if you want to make YouTube videos longer, create a loop on your snaps and make a cinemagraph.
Some of the advanced features are on paid plans and just a few are available for free. You can trim and cut any unwanted parts of the video to replay. This extension allows you to set the number of loops to watch.
Like the other Google Chrome extension video lopper, open the extension, search for URL to watch on repeat and pest its URL and it will play on loop.
#Extension 3: InfiniteLooper
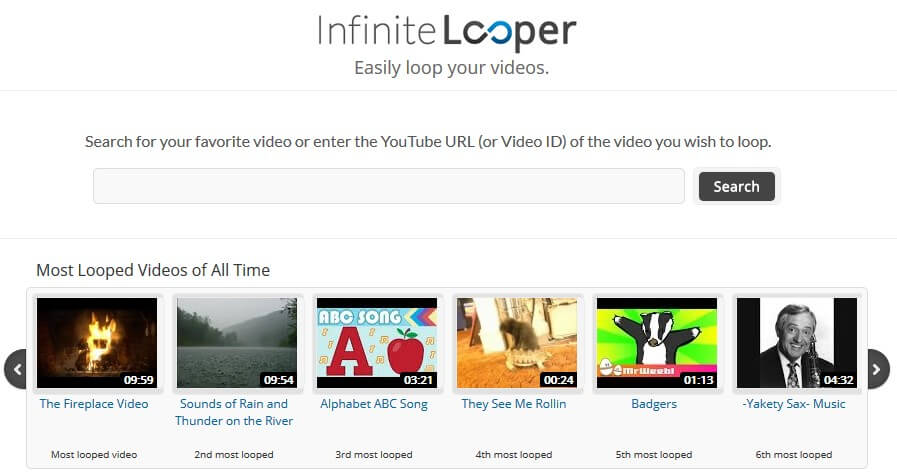
This app will make you glued to the computer with infinite loops on the best part of the YouTube video. Whether you want to watch the full video on repeat or a specific part, the infinite loop should be your choice.
However, this is not a to- go-for app if you intend to watch the video later without spending a single byte. To solve this problem, use a video downloader and with Filmora edit the video as much as you want then save it to your library.
It’s not common to be attracted to only one video. InfiniteLooper designers never thought of this. You have to use other technologies to play two YouTube videos at once.
Read More to Get : Best Video Websites Like YouTube >>
Screen Record Looping Videos With Filmora
But with Filmora Screen Recorder , you can watch as many videos as you want on Infinite Looper as you record them. Filmora is compatible with Win10, Win8, and Win7. You can buy this application or download it for free and upgrade it later.

Since InfiniteLooper allows only one video, use Filmora to record several videos, edit them and create up to 100 layers. This way, you’ll watch the 100 video loops in one video. Download and Try it Today!
Conclusion
Before you can decide to play a YouTube video repeatedly, there is a great reason. The fascination in it is so captivating that you require humble time as you watch it. A simple and seamless YouTube video looper best suits such videos.
Time to learn how to loop a YouTube video is of no essence during such moments. To disconnect your soul from that captivating video, try using video loopers that are complex and signing in to gain access to use is mandatory.
As new apps and features emerge every day, which is your best YouTube video looper and how do you put videos on repeat mode? You can leave a comment or suggestion below.
Shanoon Cox
Shanoon Cox is a writer and a lover of all things video.
Follow @Shanoon Cox
Shanoon Cox
Mar 27, 2024• Proven solutions
You must have watched a thrilling YouTube video and repeated it several times. The challenge to most of us is how to loop a YouTube video automatically while at the comfort of our seats.
This guide will show you three methods on how to put a YouTube video on loop easily on your laptop, iPhone or desktop. And how to loop a video differs from one device to another. Moreover, there are many different types you play over and over again; a favorite sermon, yoga tutorials, a motivational speech, and the list is endless.
In the last sections of this article, I’ll introduce you to the best YouTube video loopers that will keep replaying videos infinitely.
To keep playing your YouTube videos on loop in a very simple way, just keep reading:
How to Loop YouTube Video: for Both Computer and Phone
- Option 1: Using the YouTube in-built loop technique
- Option 2: Using playlist to set video loop
- Option 3: Editing URL
- Option 4: Using Looping sites
- Option 5: Using Looping Apps
- Option 6: Using Google Chrome extension
How to Loop YouTube Video: for Both Computer and Phone
Every human being has his/her most favorite types of videos. What’s yours? To date, how many times have replayed them? Majority of internet users have access to both smartphones and computers. So, are there YouTube video looping techniques applicable to both computers and phones?
The answer is, Yes.
Stop using the reverse button to replay your videos on YouTube and use the options below.
Read More to Get : How to Download YouTube Videos without Any Software Easily >>
Option 1: Using the YouTube in-built loop technique: right-click technique
This is the easiest and most used technique to create YouTube video loops.
For Computer Users:
Step 1: Open the YouTube app on your computer or laptop and select the video to replay in a loop. Click to start enjoying your video.
Step 2: While the video is on the play, right-click the video and a prompt action suggestion box will pop up. Click the “loop” option and the playing video will be replay.
Step 3: To remove the YouTube embedded autoplay loop, click the loop option and you are done.
For Phone Users:
To loop YouTube videos using the In-built loop technique on iPhone, the procedure isn’t much different from that of a computer. Here are the steps;
Step 1: Open YouTube videos using m.youtube.com on your phone. Using m.youtube.com prevents opening the video directly from the YouTube app.
Step 2: Browse the video you would like to set loops. Got it? Now start playing the YouTube video.
Step 3: At the top right corner of the video are 3 dots menu. Click the dots and scroll down to the “desktop site” option and select it.
Step 4: While on the mobile browser version, long-press the playing video to open the video menu. Click the “loop” option. Now your Youtube replay loop is set.
Option 2: Using playlist to set video loop
To play two YouTube videos at once, this is the method to use. Before you can begin the process of setting videos on repeat, you have to sign in first.
Step 1: Select the videos to play on repeat.
Step 2: Sign in to your YouTube.
Step 3: After signing in to YouTube, click the “**+**” icon at the bottom of the video. Select the “create new playlist” to add the chosen videos. Name your playlist and choose to view public or private.
Step 4: Back to the main YouTube app; click the shown three bars and a long list of options pop up.
Step 5: Select the playlist “mmm” and then click “play all”.
Option 3: Editing URL
This is among the least known method of creating a video loop. It involves editing the video URL of YouTube to replay. URL is usually divided in to different sections. This is the simplest option as involves only deleting the hypertext transfer protocol (https) and the World Wide Web (www) and inserting the word “repeat” immediately after “Youtube”.
This is how to do it:
Step 1: Search for the video to set on replay.
In our case, let’s choose - https://www.youtube.com/watch?v=xo1VInw-SKc
Step 2: Delete the first part “**https://www.**” in the address bar.
The remaining sections will be- youtube.com/watch?v=xo1VInw-SKc
Step 3: After “Youtube” and before “.com” write “repeat”.
So it looks like this “youtuberepeat.com/watch/?v=xo1VInw-SKc” in your address bar.
Step 4: Click to play and your video will start playing in a loop in the ListenOnRepeat app.
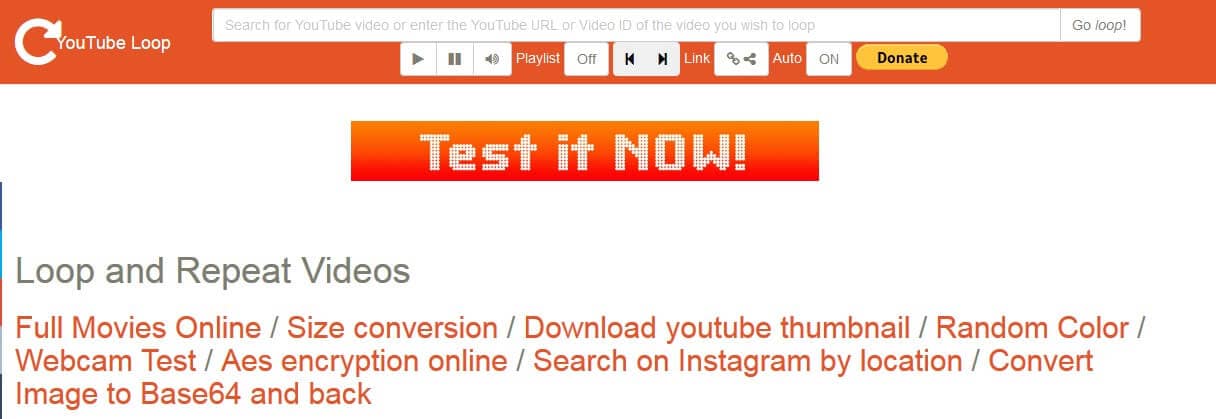
2. Loop YouTube video with Youtubeloop.net
Step 1: Click to open any of the above looping sites .i.e. Youtubeloop.net
Step 2: Search for the video to set on loop.
Step 3: Copy- paste the video URL to the top blank space of the site.
Step 4: Click “_Go loop_” at the top right and the video is ready to play in a loop.
How To Loop YouTube Videos On Phone
The most suitable method you can use to set YouTube replay loop is by downloading video looper apps. There a lot of video looping apps for android and smartphones in the market today.
Apps are developed to simplify how we do things and make them more fun. To use video loopers on phones, you only need to download and install it. Next is to search the video to loop and with the slider, loop part of YouTube video that most fascinates you.
Whether you want to play a video on loop on an android phone, iPhone, iOS or tablet, there is mobile app compatible with your phone. This is how to loop your video on an android phone.
Option 5: Using Looping Apps To Set YouTube video loops
#App 1: Musepic
The Musepic looper app allows you to set video loops at any point within the play. Select the sections to loop and slide the loop button. You can now watch the YouTube embed autoplay loop for as long as you want.
In this case, we’ll use the Musepic app which is a third-party app available for download. It’s accessible via Google Play Store.
Step 1: Open your phones Google Play Store and search for the free version of the Musepic app. It has In-app purchases which you can use to add more features. Download and install.
Step 2: Click the first apps page option “Search-Find your videos” to select the video to set play on repeat. The best part of this app is the auto-suggestion of the videos you are likely to replay.
Step 3: Musepic app openly shows YouTube video looper controls. Click the selected video to start playing. Among the top, applicable features include loop button, sticky button and time slider.
#App 2: Repeat Player
With Repeat Player installed on your phone, you can all 3gp, mp3, mp4 and xmf audios in loops the whole day. Its functions are oversimplified. Among the important features in this app include setting video loops in intervals, playback speed control and sleep timer control.
This app requires android 4.1 and up to function.
Just download the app and at the top 4bars, tap to select the video to loop. Use the two red slides to set the video repeat loop.
#App 3: Loop Player - A B Repeat Player
If you want to loop part of the YouTube video, Loop Player has two sliders to select the exact parts to repeat. It’s simple to use and is compatible with 4.2+ android phones.
To use this app, download and install it to your phone. Upload the video to loop and with slider A and B, set the video where to repeat.
Loop Player can be used to play background music, change playback speed and save an unlimited number of loops.
How to Loop YouTube Video: Only on PC
There is no much is required to set videos on repeat. The best and easy-to-use option is using Google Chrome Extensions. They are best suited for playing YouTube videos on loop online.
Option 6: Using Google Chrome extension
The number of free-to-use online Google Chrome extensions to set YouTube video loops continues to increase every day. To set YouTube repeat loops online, you just open the extension, copy video URL and you are ready to watch. One disadvantage of this option is you cannot set part of a video to replay on loop.
Here the top extensions;
#Extension 1: ListenOnRepea
This is the best app when you want to loop part of the YouTube video. Use the timing slider at the bottom of the video to select the part to loop.
ListenOnRepeat is available on Google Play and suitable for android 4.1+. If you are looking for music video loops app, this will never disappoint you. It’s simple and easy to use.
You can watch the top trending videos as suggested in its community section every day.
Only one thing will disappoint you; you can never multiple videos at once.
Step 1: Download ListenOnRepeat from Google Chrome extension.
Step 2: After you’ve downloaded and installed, search the video you want to watch repeatedly at the search bar at the top of the app.
Step 3: Click the selected video and it will be replayed continuously.
#Extension 2: Kapwing
Kapwing is the extension to go for if you want to make YouTube videos longer, create a loop on your snaps and make a cinemagraph.
Some of the advanced features are on paid plans and just a few are available for free. You can trim and cut any unwanted parts of the video to replay. This extension allows you to set the number of loops to watch.
Like the other Google Chrome extension video lopper, open the extension, search for URL to watch on repeat and pest its URL and it will play on loop.
#Extension 3: InfiniteLooper
This app will make you glued to the computer with infinite loops on the best part of the YouTube video. Whether you want to watch the full video on repeat or a specific part, the infinite loop should be your choice.
However, this is not a to- go-for app if you intend to watch the video later without spending a single byte. To solve this problem, use a video downloader and with Filmora edit the video as much as you want then save it to your library.
It’s not common to be attracted to only one video. InfiniteLooper designers never thought of this. You have to use other technologies to play two YouTube videos at once.
Read More to Get : Best Video Websites Like YouTube >>
Screen Record Looping Videos With Filmora
But with Filmora Screen Recorder , you can watch as many videos as you want on Infinite Looper as you record them. Filmora is compatible with Win10, Win8, and Win7. You can buy this application or download it for free and upgrade it later.
Since InfiniteLooper allows only one video, use Filmora to record several videos, edit them and create up to 100 layers. This way, you’ll watch the 100 video loops in one video. Download and Try it Today!
Conclusion
Before you can decide to play a YouTube video repeatedly, there is a great reason. The fascination in it is so captivating that you require humble time as you watch it. A simple and seamless YouTube video looper best suits such videos.
Time to learn how to loop a YouTube video is of no essence during such moments. To disconnect your soul from that captivating video, try using video loopers that are complex and signing in to gain access to use is mandatory.
As new apps and features emerge every day, which is your best YouTube video looper and how do you put videos on repeat mode? You can leave a comment or suggestion below.
Shanoon Cox
Shanoon Cox is a writer and a lover of all things video.
Follow @Shanoon Cox
Shanoon Cox
Mar 27, 2024• Proven solutions
You must have watched a thrilling YouTube video and repeated it several times. The challenge to most of us is how to loop a YouTube video automatically while at the comfort of our seats.
This guide will show you three methods on how to put a YouTube video on loop easily on your laptop, iPhone or desktop. And how to loop a video differs from one device to another. Moreover, there are many different types you play over and over again; a favorite sermon, yoga tutorials, a motivational speech, and the list is endless.
In the last sections of this article, I’ll introduce you to the best YouTube video loopers that will keep replaying videos infinitely.
To keep playing your YouTube videos on loop in a very simple way, just keep reading:
How to Loop YouTube Video: for Both Computer and Phone
- Option 1: Using the YouTube in-built loop technique
- Option 2: Using playlist to set video loop
- Option 3: Editing URL
- Option 4: Using Looping sites
- Option 5: Using Looping Apps
- Option 6: Using Google Chrome extension
How to Loop YouTube Video: for Both Computer and Phone
Every human being has his/her most favorite types of videos. What’s yours? To date, how many times have replayed them? Majority of internet users have access to both smartphones and computers. So, are there YouTube video looping techniques applicable to both computers and phones?
The answer is, Yes.
Stop using the reverse button to replay your videos on YouTube and use the options below.
Read More to Get : How to Download YouTube Videos without Any Software Easily >>
Option 1: Using the YouTube in-built loop technique: right-click technique
This is the easiest and most used technique to create YouTube video loops.
For Computer Users:
Step 1: Open the YouTube app on your computer or laptop and select the video to replay in a loop. Click to start enjoying your video.
Step 2: While the video is on the play, right-click the video and a prompt action suggestion box will pop up. Click the “loop” option and the playing video will be replay.
Step 3: To remove the YouTube embedded autoplay loop, click the loop option and you are done.
For Phone Users:
To loop YouTube videos using the In-built loop technique on iPhone, the procedure isn’t much different from that of a computer. Here are the steps;
Step 1: Open YouTube videos using m.youtube.com on your phone. Using m.youtube.com prevents opening the video directly from the YouTube app.
Step 2: Browse the video you would like to set loops. Got it? Now start playing the YouTube video.
Step 3: At the top right corner of the video are 3 dots menu. Click the dots and scroll down to the “desktop site” option and select it.
Step 4: While on the mobile browser version, long-press the playing video to open the video menu. Click the “loop” option. Now your Youtube replay loop is set.
Option 2: Using playlist to set video loop
To play two YouTube videos at once, this is the method to use. Before you can begin the process of setting videos on repeat, you have to sign in first.
Step 1: Select the videos to play on repeat.
Step 2: Sign in to your YouTube.
Step 3: After signing in to YouTube, click the “**+**” icon at the bottom of the video. Select the “create new playlist” to add the chosen videos. Name your playlist and choose to view public or private.
Step 4: Back to the main YouTube app; click the shown three bars and a long list of options pop up.
Step 5: Select the playlist “mmm” and then click “play all”.
Option 3: Editing URL
This is among the least known method of creating a video loop. It involves editing the video URL of YouTube to replay. URL is usually divided in to different sections. This is the simplest option as involves only deleting the hypertext transfer protocol (https) and the World Wide Web (www) and inserting the word “repeat” immediately after “Youtube”.
This is how to do it:
Step 1: Search for the video to set on replay.
In our case, let’s choose - https://www.youtube.com/watch?v=xo1VInw-SKc
Step 2: Delete the first part “**https://www.**” in the address bar.
The remaining sections will be- youtube.com/watch?v=xo1VInw-SKc
Step 3: After “Youtube” and before “.com” write “repeat”.
So it looks like this “youtuberepeat.com/watch/?v=xo1VInw-SKc” in your address bar.
Step 4: Click to play and your video will start playing in a loop in the ListenOnRepeat app.
2. Loop YouTube video with Youtubeloop.net
Step 1: Click to open any of the above looping sites .i.e. Youtubeloop.net
Step 2: Search for the video to set on loop.
Step 3: Copy- paste the video URL to the top blank space of the site.
Step 4: Click “_Go loop_” at the top right and the video is ready to play in a loop.
How To Loop YouTube Videos On Phone
The most suitable method you can use to set YouTube replay loop is by downloading video looper apps. There a lot of video looping apps for android and smartphones in the market today.
Apps are developed to simplify how we do things and make them more fun. To use video loopers on phones, you only need to download and install it. Next is to search the video to loop and with the slider, loop part of YouTube video that most fascinates you.
Whether you want to play a video on loop on an android phone, iPhone, iOS or tablet, there is mobile app compatible with your phone. This is how to loop your video on an android phone.
Option 5: Using Looping Apps To Set YouTube video loops
#App 1: Musepic
The Musepic looper app allows you to set video loops at any point within the play. Select the sections to loop and slide the loop button. You can now watch the YouTube embed autoplay loop for as long as you want.
In this case, we’ll use the Musepic app which is a third-party app available for download. It’s accessible via Google Play Store.
Step 1: Open your phones Google Play Store and search for the free version of the Musepic app. It has In-app purchases which you can use to add more features. Download and install.
Step 2: Click the first apps page option “Search-Find your videos” to select the video to set play on repeat. The best part of this app is the auto-suggestion of the videos you are likely to replay.
Step 3: Musepic app openly shows YouTube video looper controls. Click the selected video to start playing. Among the top, applicable features include loop button, sticky button and time slider.
#App 2: Repeat Player
With Repeat Player installed on your phone, you can all 3gp, mp3, mp4 and xmf audios in loops the whole day. Its functions are oversimplified. Among the important features in this app include setting video loops in intervals, playback speed control and sleep timer control.
This app requires android 4.1 and up to function.
Just download the app and at the top 4bars, tap to select the video to loop. Use the two red slides to set the video repeat loop.
#App 3: Loop Player - A B Repeat Player
If you want to loop part of the YouTube video, Loop Player has two sliders to select the exact parts to repeat. It’s simple to use and is compatible with 4.2+ android phones.
To use this app, download and install it to your phone. Upload the video to loop and with slider A and B, set the video where to repeat.
Loop Player can be used to play background music, change playback speed and save an unlimited number of loops.
How to Loop YouTube Video: Only on PC
There is no much is required to set videos on repeat. The best and easy-to-use option is using Google Chrome Extensions. They are best suited for playing YouTube videos on loop online.
Option 6: Using Google Chrome extension
The number of free-to-use online Google Chrome extensions to set YouTube video loops continues to increase every day. To set YouTube repeat loops online, you just open the extension, copy video URL and you are ready to watch. One disadvantage of this option is you cannot set part of a video to replay on loop.
Here the top extensions;
#Extension 1: ListenOnRepea
This is the best app when you want to loop part of the YouTube video. Use the timing slider at the bottom of the video to select the part to loop.
ListenOnRepeat is available on Google Play and suitable for android 4.1+. If you are looking for music video loops app, this will never disappoint you. It’s simple and easy to use.
You can watch the top trending videos as suggested in its community section every day.
Only one thing will disappoint you; you can never multiple videos at once.
Step 1: Download ListenOnRepeat from Google Chrome extension.
Step 2: After you’ve downloaded and installed, search the video you want to watch repeatedly at the search bar at the top of the app.
Step 3: Click the selected video and it will be replayed continuously.
#Extension 2: Kapwing
Kapwing is the extension to go for if you want to make YouTube videos longer, create a loop on your snaps and make a cinemagraph.
Some of the advanced features are on paid plans and just a few are available for free. You can trim and cut any unwanted parts of the video to replay. This extension allows you to set the number of loops to watch.
Like the other Google Chrome extension video lopper, open the extension, search for URL to watch on repeat and pest its URL and it will play on loop.
#Extension 3: InfiniteLooper
This app will make you glued to the computer with infinite loops on the best part of the YouTube video. Whether you want to watch the full video on repeat or a specific part, the infinite loop should be your choice.
However, this is not a to- go-for app if you intend to watch the video later without spending a single byte. To solve this problem, use a video downloader and with Filmora edit the video as much as you want then save it to your library.
It’s not common to be attracted to only one video. InfiniteLooper designers never thought of this. You have to use other technologies to play two YouTube videos at once.
Read More to Get : Best Video Websites Like YouTube >>
Screen Record Looping Videos With Filmora
But with Filmora Screen Recorder , you can watch as many videos as you want on Infinite Looper as you record them. Filmora is compatible with Win10, Win8, and Win7. You can buy this application or download it for free and upgrade it later.
Since InfiniteLooper allows only one video, use Filmora to record several videos, edit them and create up to 100 layers. This way, you’ll watch the 100 video loops in one video. Download and Try it Today!
Conclusion
Before you can decide to play a YouTube video repeatedly, there is a great reason. The fascination in it is so captivating that you require humble time as you watch it. A simple and seamless YouTube video looper best suits such videos.
Time to learn how to loop a YouTube video is of no essence during such moments. To disconnect your soul from that captivating video, try using video loopers that are complex and signing in to gain access to use is mandatory.
As new apps and features emerge every day, which is your best YouTube video looper and how do you put videos on repeat mode? You can leave a comment or suggestion below.
Shanoon Cox
Shanoon Cox is a writer and a lover of all things video.
Follow @Shanoon Cox
Also read:
- In 2024, A Filmmaker's Companion The Journey From Capturing to Post-Production of 360 Videos
- A Deep-Dive Into Digital Platform Wealth Dailymotion & YouTube Comparison
- Your Quick Guide to Securing a Youtube Revenue Stream
- [New] Enhancing YouTube Videos with Professional Techniques Using WMM
- Simplified Sound Conversion Top 6 Apps for YouTube to MP3 on iPhone
- Adobe Premiere Power Enhancing Your YouTube Presence
- Leveraging YouTube's Power for Enhanced TikTok Presence
- In 2024, Breaking the Internet Hashtag Wisdom for Short Films
- [New] Effective Engagement Incorporating YouTube Videos Into Slides
- Swiftly Uninstalling YouTube Videos From Devices
- In 2024, Essential Gear for Video Blogging Top-Rated Camera Lenses Revealed
- [New] Convert with Precision 10 Leading Tools From Flv to YouTube Platforms
- [Updated] Crafting Comfortable Cinematography Amidst the Chill
- In 2024, Essential Steps to Apply a Creative Commons Copyright
- How to Make a Playlist on YouTube
- YouTube's Copyright Landscape Decoded A Complete Analysis
- 2024 Approved Discover These 10 Quickly Rising YouTube Inspirations
- [Updated] Download All YouTube Images for Free
- [New] Breaking Down the Fastest Green Screen Methods
- [New] Essential, Inexpensive Vlogging Tools Listed
- [New] Elevate Viewership 3 Key Storytelling Approaches
- Rhythmic Revelry Selecting Ultimate Event Templates
- Dancefloor Dynamics Top-Rated DJ Video Selections
- [New] Budget-Friendly Recorder Choices for YouTube Vloggers
- [New] Channel Growth Blueprint Selecting Between Studio and Latest Beta
- 2024 Approved Essential Insights Mastering YouTube Keyword Strategies
- [New] Cultivating a Community The Key to Surpassing 1000 Views
- Ultimate Voice Transformation Devices for Creators
- [Updated] Audio Purging Techniques for Streaming Success
- Endless Viewing with iPhone' Writes of Video
- 10 Ultimate Immersive VR Video Hits
- 2024 Approved Charting the Course A Comprehensive Guide to YouTube Teaser Vids
- Disable Non-Specific YouTube Video Alerts for 2024
- In 2024, A Guide to Essential ASMR Video Facts
- Crafting the Ideal YouTube Playlist An Easy, Step-by-Step Method for 2024
- [New] Building a Loyal Following with Respectful Requests
- Updated Enhancing Sound Quality From Anywhere A Guide to Modifying Speed and Pitch Through the Web for 2024
- [Updated] 2024 Approved Responding Right A Comprehensive Guide to Discord Communication
- In 2024, What is the best Pokemon for pokemon pvp ranking On Samsung Galaxy F54 5G? | Dr.fone
- How to Change/Fake Your OnePlus Ace 2 Location on Viber | Dr.fone
- [Updated] In 2024, FB Cover Videos Demystified What Everyone Should Know
- Spoofing Life360 How to Do it on Xiaomi Redmi Note 12T Pro? | Dr.fone
- [Updated] TikTok Demystified A Complete Guide for Computer Users for 2024
- Updated 2024 Approved Best Top-Rated Video Animation Software for Smartphones and Tablets
- Unlocking the Power of Smart Lock A Beginners Guide for Vivo Y78 5G Users
- Updated 2024 Approved Effective Approaches for Transferring Audacity Productions Into MP3 Format
- In 2024, Which Pokémon can Evolve with a Moon Stone For Samsung Galaxy S24 Ultra? | Dr.fone
- Title: "2024 Approved Affordable Acoustic Amps and Mics for Video Voyagers"
- Author: Brian
- Created at : 2024-05-25 10:58:29
- Updated at : 2024-05-26 10:58:29
- Link: https://youtube-video-recordings.techidaily.com/2024-approved-affordable-acoustic-amps-and-mics-for-video-voyagers/
- License: This work is licensed under CC BY-NC-SA 4.0.
