
:max_bytes(150000):strip_icc()/GettyImages-527951743-5995afca6f53ba00102523d7.jpg)
"2024 Approved Add a Pop of Color to Your Videos Implementing Neons in YouTubes"
Add a Pop of Color to Your Videos: Implementing Neons in YouTubes
Your YouTube video, or any other clip published on any forum, gets a larger number of hits if it has an attractive thumbnail. And, the fact is, a thumbnail becomes 10x more attractive when the main character that the image has have a neon border around it.
With that said, in the following sections, you will learn a couple of methods on how to add a YouTube thumbnail border around the main characters and/or objects that are significant to the clip.
In this article
01 Add Glowing Neon Border to YouTube Thumbnail with Filmora
02 Add a Glowing Neon Border in YouTube Thumbnail with Canva
03 Outline a Person in a YouTube Thumbnail with Photoshop
Part 1: How to Add Neon Border to YouTube Thumbnail for Free with Filmora
Being one of the most versatile and intuitive post-production tools available in the market today, Wondershare Filmora X allows you to add a neon border to a YouTube thumbnail quite conveniently. You can learn how to get this done on Windows or Mac by following the steps given below.
For Win 7 or later (64-bit)
For macOS 10.12 or later
Step 1: Define Project Settings and Add Image to the Timeline
Launch Wondershare Filmora X on your PC (a MacBook Pro M1 is used here), ensure that the project aspect ratio is set to 16:9 (Widescreen) on the splash screen, and click New Project. On the main interface, click the Preview quality and display settings icon from the upper-right area of the Timeline, click Change Project Aspect Ratio, click to select 1280 x 720 (HD) from the Resolution menu of the Project Settings box, and click OK to save the custom project settings.

Then select My Media from the menu bar if not already selected, click Project Media from the navigation pane, and click Import from the Media box to select and import the image of the main character or object that you want to use in the thumbnail.

Now, drag the image from the Media box to the Timeline at the bottom.

Step 2: Clear Image Background, Add Border, and Add Custom Background
Go to Effects from the menu bar, click to select the Default tab and then AI Portrait from the navigation pane, and click and drag the Human Segmentation preset from the right box, and place it over the image track in the Timeline.

Double-click the image layer, scroll down the upper-left box to the Video Effects section, and use the Edge Thickness and Edge Feather sliders to adjust the character’s edges to make them as realistic as possible. Click OK when done.

Next, click and drag the Human Border preset over the image track in the Timeline, and follow the same procedure to customize the border. This will give the character a neon border effect.

Now, use the method explained earlier to import a custom image for the background, and drag and place it under the previous track in the Timeline.

If you are running the latest version of Filmora, you will find there are some neon light effects available under AI Portrait as well.

Step 3: Add Titles to Thumbnail
Go to Titles from the menu bar, click to select the Default tab and then Lower 3rds from the navigation pane, and click and drag your preferred lower-third preset from the right window to a separate layer in the Timeline. Double-click the lower-third layer, and use the available options in the upper-left window to change the text, its color, etc., and drag the textbox to place it to your preferred position on the image as well. Click OK to save the changes.
Next, click to select Titles from the navigation pane, and drag your preferred title from the right window to the upper-most track in the Timeline. Now use the method explained earlier to edit the text, its color, position, etc. to make it look professional.

For more tips and tricks for creating YouTube thumbnail, you can check this You Tube thumbnail creating guide.
Step 4: Get the Neon Border Thumbnail
Click the Snapshot (Camera) icon from the upper-right area of the Timeline, go to My Media from the menu bar, right-click the thumbnail of the screenshot you captured, and click Reveal in Finder (on Mac) or Reveal in Explorer (on Windows) to get to the folder the YouTube thumbnail border is saved in.

Part 2: How to Add a Glowing Neon Border in Your YouTube Thumbnail with Canva
Canva is another intuitive editing program that works on the web interface rather than having you download and install an app on your PC. You can add a neon border for YouTube thumbnails using Canva by following the instructions given below:
Step 1: Define Project Settings and Add a Background
After signing in to your Canva account, click Create a design from the top-right corner of the page, click Custom size from the bottom, define 1280 and 720 in the Width and Height fields on the box that appears respectively, and click Create new design.

Now, click to select Background from the navigation bar on the left (if the Background tool is not visible, click More and then choose Background from the expanded list), and click to select a background from the images available in the center pane.

Step 2: Upload an Image and Add Effects
Click Uploads from the navigation bar, click the More icon from the right of the Upload media button present at the top of the center pane, choose your preferred method to upload the image (with the transparent background) that you want to use, upload the image, and drag it from the center pane to the Canvas.
Note: You can use any of the tools available online to remove the background from your image for free.

To add a YouTube thumbnail border, make sure that the image that you added to the Canvas is selected, click the Duplicate icon from the upper-right area, and use the scaling handles of the copy of the image to increase its size a bit. Reposition the image back to its original location as well.
Then, click Edit image from the upper-left corner of the Canvas, click Duotone from the Edit image pane at the center, if need be, click See all, choose your preferred duotone effect to apply on the image, choose your preferred highlight and shadow colors from the box that appears next, and click Back from the top of the pane.

Next, click See all next to the Adjust section from the center pane, and drag the Blur slider to the right to increase the blur effect on the image.

Step 3: Position the Layers
While keeping the duplicate image selected, click the Position button from the upper-right area of the Canvas, and click Background to send the second image behind the first one to get the neon border effect for the photo.

Part 3: How to Outline a Person in a YouTube Thumbnail with Photoshop
Because YouTube thumbnails are nothing but static images, creating YouTube thumbnail border with Adobe Photoshop is comparatively easier. The process of doing this is given below:
Step 1: Define Document Preferences and Import an Image
Launch Adobe Photoshop on your PC, click Create new, and on the New Document customization box, define the width and height values to 1280 and 720 pixels respectively. Select Transparent from the Background Contents menu as well if not already selected. Click Create from the bottom to create a new Photoshop document with the specified document settings. Next, open the folder that contains the source image, drag the photo to Photoshop, and press Enter to place the photo.

Step 2: Remove Background from the Image
Make sure that the image layer is selected in the Layers panel on the right, go to Select from the menu bar at the top, and click Subject. From the bottom of the Layers panel, click the Add a mask icon to get rid of the background, leaving only the human on the Canvas.

Step 3: Add a Custom Background and an Outline Around the Subject
Use the method explained earlier to import a background image of your choice to Photoshop. Drag the background image layer to the bottom in the Layers panel. Double-click the masked layer, click to select Stroke from the left pane of the Layer Style box, and use the options available on the right to manage the size, color, position, etc. of the stroke that has been added around the human subject. Click OK when done, and then export the image normally to use it as a YouTube thumbnail border.

Summary
It is important to know that the default resolution of a YouTube thumbnail is 1280 x 720 pixels that is usually written and referred to as 720p. While adding a YouTube thumbnail border, it is also imperative to have a good sense of color combination and fonts. Furthermore, a decent tool like Wondershare Filmora X must be used to add an appealing neon border around the main subject in the thumbnail image easily and quickly.
02 Add a Glowing Neon Border in YouTube Thumbnail with Canva
03 Outline a Person in a YouTube Thumbnail with Photoshop
Part 1: How to Add Neon Border to YouTube Thumbnail for Free with Filmora
Being one of the most versatile and intuitive post-production tools available in the market today, Wondershare Filmora X allows you to add a neon border to a YouTube thumbnail quite conveniently. You can learn how to get this done on Windows or Mac by following the steps given below.
For Win 7 or later (64-bit)
For macOS 10.12 or later
Step 1: Define Project Settings and Add Image to the Timeline
Launch Wondershare Filmora X on your PC (a MacBook Pro M1 is used here), ensure that the project aspect ratio is set to 16:9 (Widescreen) on the splash screen, and click New Project. On the main interface, click the Preview quality and display settings icon from the upper-right area of the Timeline, click Change Project Aspect Ratio, click to select 1280 x 720 (HD) from the Resolution menu of the Project Settings box, and click OK to save the custom project settings.
Then select My Media from the menu bar if not already selected, click Project Media from the navigation pane, and click Import from the Media box to select and import the image of the main character or object that you want to use in the thumbnail.
Now, drag the image from the Media box to the Timeline at the bottom.
Step 2: Clear Image Background, Add Border, and Add Custom Background
Go to Effects from the menu bar, click to select the Default tab and then AI Portrait from the navigation pane, and click and drag the Human Segmentation preset from the right box, and place it over the image track in the Timeline.
Double-click the image layer, scroll down the upper-left box to the Video Effects section, and use the Edge Thickness and Edge Feather sliders to adjust the character’s edges to make them as realistic as possible. Click OK when done.
Next, click and drag the Human Border preset over the image track in the Timeline, and follow the same procedure to customize the border. This will give the character a neon border effect.
Now, use the method explained earlier to import a custom image for the background, and drag and place it under the previous track in the Timeline.
If you are running the latest version of Filmora, you will find there are some neon light effects available under AI Portrait as well.
Step 3: Add Titles to Thumbnail
Go to Titles from the menu bar, click to select the Default tab and then Lower 3rds from the navigation pane, and click and drag your preferred lower-third preset from the right window to a separate layer in the Timeline. Double-click the lower-third layer, and use the available options in the upper-left window to change the text, its color, etc., and drag the textbox to place it to your preferred position on the image as well. Click OK to save the changes.
Next, click to select Titles from the navigation pane, and drag your preferred title from the right window to the upper-most track in the Timeline. Now use the method explained earlier to edit the text, its color, position, etc. to make it look professional.
For more tips and tricks for creating YouTube thumbnail, you can check this You Tube thumbnail creating guide.
Step 4: Get the Neon Border Thumbnail
Click the Snapshot (Camera) icon from the upper-right area of the Timeline, go to My Media from the menu bar, right-click the thumbnail of the screenshot you captured, and click Reveal in Finder (on Mac) or Reveal in Explorer (on Windows) to get to the folder the YouTube thumbnail border is saved in.
Part 2: How to Add a Glowing Neon Border in Your YouTube Thumbnail with Canva
Canva is another intuitive editing program that works on the web interface rather than having you download and install an app on your PC. You can add a neon border for YouTube thumbnails using Canva by following the instructions given below:
Step 1: Define Project Settings and Add a Background
After signing in to your Canva account, click Create a design from the top-right corner of the page, click Custom size from the bottom, define 1280 and 720 in the Width and Height fields on the box that appears respectively, and click Create new design.
Now, click to select Background from the navigation bar on the left (if the Background tool is not visible, click More and then choose Background from the expanded list), and click to select a background from the images available in the center pane.
Step 2: Upload an Image and Add Effects
Click Uploads from the navigation bar, click the More icon from the right of the Upload media button present at the top of the center pane, choose your preferred method to upload the image (with the transparent background) that you want to use, upload the image, and drag it from the center pane to the Canvas.
Note: You can use any of the tools available online to remove the background from your image for free.
To add a YouTube thumbnail border, make sure that the image that you added to the Canvas is selected, click the Duplicate icon from the upper-right area, and use the scaling handles of the copy of the image to increase its size a bit. Reposition the image back to its original location as well.
Then, click Edit image from the upper-left corner of the Canvas, click Duotone from the Edit image pane at the center, if need be, click See all, choose your preferred duotone effect to apply on the image, choose your preferred highlight and shadow colors from the box that appears next, and click Back from the top of the pane.
Next, click See all next to the Adjust section from the center pane, and drag the Blur slider to the right to increase the blur effect on the image.
Step 3: Position the Layers
While keeping the duplicate image selected, click the Position button from the upper-right area of the Canvas, and click Background to send the second image behind the first one to get the neon border effect for the photo.
Part 3: How to Outline a Person in a YouTube Thumbnail with Photoshop
Because YouTube thumbnails are nothing but static images, creating YouTube thumbnail border with Adobe Photoshop is comparatively easier. The process of doing this is given below:
Step 1: Define Document Preferences and Import an Image
Launch Adobe Photoshop on your PC, click Create new, and on the New Document customization box, define the width and height values to 1280 and 720 pixels respectively. Select Transparent from the Background Contents menu as well if not already selected. Click Create from the bottom to create a new Photoshop document with the specified document settings. Next, open the folder that contains the source image, drag the photo to Photoshop, and press Enter to place the photo.
Step 2: Remove Background from the Image
Make sure that the image layer is selected in the Layers panel on the right, go to Select from the menu bar at the top, and click Subject. From the bottom of the Layers panel, click the Add a mask icon to get rid of the background, leaving only the human on the Canvas.
Step 3: Add a Custom Background and an Outline Around the Subject
Use the method explained earlier to import a background image of your choice to Photoshop. Drag the background image layer to the bottom in the Layers panel. Double-click the masked layer, click to select Stroke from the left pane of the Layer Style box, and use the options available on the right to manage the size, color, position, etc. of the stroke that has been added around the human subject. Click OK when done, and then export the image normally to use it as a YouTube thumbnail border.
Summary
It is important to know that the default resolution of a YouTube thumbnail is 1280 x 720 pixels that is usually written and referred to as 720p. While adding a YouTube thumbnail border, it is also imperative to have a good sense of color combination and fonts. Furthermore, a decent tool like Wondershare Filmora X must be used to add an appealing neon border around the main subject in the thumbnail image easily and quickly.
Navigating the Digital Arena as an Aspiring Online Star
Create High-Quality Video - Wondershare Filmora
An easy and powerful YouTube video editor
Numerous video and audio effects to choose from
Detailed tutorials provided by the official channel
Faceless creators, or people who do not show their faces in their films, have become more prevalent on YouTube. Although being a faceless artist allows you to have a little more privacy on the internet, some viewers like to see a person on-screen.
So, what’s the best way to win over both sides? However, becoming a virtual YouTuber allows you to have your cake and eat it, as well. Vtubing is similar to live streaming, only that instead of showing your face, your facial emotions and movements are recorded by a digital avatar. Vtubing has grown considerably more accessible, with a large number of people watching Vtubing videos on YouTube.
Moreover, Every VTuber is essentially a character. Whether they’re just being themselves on camera or acting out a backstory they made up, watching a VTuber is like watching an anime in and of itself. The avatars or characters provide VTubers with a lot of creative freedom, allowing them to create unique material.
Being a VTuber isn’t all that different from being a regular one in terms of technicalities. However, it would be beneficial if you still had a good notion of what you want to do with your channel. Even though the two activities are conceptually equivalent, VTubing has a little greater entry barrier due to equipment needs.
In this article
01 What is a virtual YouTuber?
02 What Does It Take to Become a Virtual YouTuber?
03 How to become a virtual youtuber?
What is a virtual YouTuber?
A virtual YouTuber, or VTuber for short, is an online video maker or entertainment who represents themselves through a virtual avatar. This avatar is created using computer graphics (CG), and it frequently has an anime-inspired look. Most VTubers, as the name implies, utilize YouTube as their primary platform, while others do upload videos or host streams on other platforms (e.g., Twitch, Facebook Gaming, and so on) and are still referred to as such.
Vtuber’s Brief History
Kizuna AI, a Japanese VTuber, created and popularized the phrase “virtual YouTuber” in 2016. While she wasn’t the first to employ a CG avatar for video blogging, she is almost entirely to blame for the VTubers craze exploding in Japan and then the rest of the world in late 2016. Because Kizuna AI grew in popularity so quickly, new VTubers began to appear regularly. Some creators, who had already established their platform and/or displayed their faces on camera, created VTuber versions of themselves simply to jump on the bandwagon.
According to User Local, a Japanese data technology firm, over 10,000 active VTubers will exist on YouTube alone by 2020. Kizuna AI, who has the highest following of all VTubers on the internet at the time of writing, has over 10 million subscribers across all of her social media sites (YouTube, Twitter, TikTok, and Bilibili).
Is VTubers the Next Big Thing in Video Content?
If you follow video marketing trends, you may have seen an uptick in animated videos featuring anime-style avatars. VTubers are the creators of this content, and it’s taking the world by storm. Top VTubers earn hundreds of thousands of dollars every month and have millions of followers. The industry, according to analysts, is on the increase.
In 2019, the overall number of VTuber subscribers climbed by 28%, while total views of Vtuber content increased by 99 percent, according to HyperSense. This may not appear to be a severe trend at first sight. Virtual YouTubers, on the other hand, are being used by marketers and corporations like Mattel and KFC to promote genuine engagement.
Top 5 Virtual YouTubers
The following are the top 5 virtual YouTubers. Each of their videos can be watched for a few minutes with English subtitles.
1. Kizuna AI
Kizuna AI is one of Japan’s most well-known and popular female vloggers, with over two million subscribers to her channel. She appears to be a pop star, but she is artificial intelligence, as she boasts. Since she began posting videos on her main channel, A.I.Channel, in 2016, she has gained a considerable following. On the channel, she discusses various topics and plays popular games. A.I.Games, a Kizuna AI YouTube channel dedicated to games, A.I.Games is also available. She is enthusiastic and honest in both good and bad ways, which is one of her best qualities.
Link: https://www.youtube.com/channel/UC4YaOt1yT-ZeyB0OmxHgolA
2. Kaguya Luna
Kaguya Luna is a popular Japanese vlogger who launched her Kaguya Luna Official channel in 2017. She is one of the Big Four VTubers, with over a million subscribers. Kaguya Luna is adored because she presents herself in such a way. Her videos are mostly made up of her free-wheeling speaking without any acting scripts. Her high-pitched voice is striking, and she is always active and talkative. She also performs as a pop vocalist in a live presentation.v
Link: https://www.youtube.com/channel/UCQYADFw7xEJ9oZSM5ZbqyBw
3. Hoshimachi Suisei
Suisei is an idol singer who debuted independently in 2018 before joining the Hololive group. She aims to perform onstage at the Tokyo Budokan. Her deep alto voice is ideal for covers such as Zombieland Saga’s “Saga Jihen,” as well as her original compositions such as “Next Color Planet” and “Ghost.” She also has a reputation as a sociopath, which was established after she violently backstabbed her fellow Hololive stars in a Project Winter playthrough.
Link: https://www.youtube.com/channel/UC5CwaMl1eIgY8h02uZw7u8A
4. Usada Pekora
This adorable little kitten is the most popular VTuber from VShojo’s English-language agency, and it’s easy to understand why her “Nyanderthals” like her. Nyatasha is best known for covering rap songs and going off on obscene tangents with lines like “It’s not about wiping my ass, it’s about sending a message,” despite how innocent she appears and sounds.
Link: https://www.youtube.com/channel/UC1DCedRgGHBdm81E1llLhOQ
5. Sakura Miko
Nyahello! Sakura, a shrine maiden with a theatrical demeanour and a dubious aptitude for video games, began her career as a freelance VTuber before joining Hololive. Her bombastic attitude is part of her appeal: she gets overly passionate about unimportant games, uses any excuse to stare up a female character’s skirt, and swears profusely in Japanese and English whenever she is frustrated. It’s never boring to see her shenanigans.
Link: https://www.youtube.com/channel/UC-hM6YJuNYVAmUWxeIr9FeA
What Does It Take to Become a Virtual YouTuber?
If you’ve been watching YouTube for a while, you’ve most likely noticed the VTuber trend, which began in 2017. Instead of displaying their faces, VTubers, or Virtual YouTubers, communicate with their viewers using an avatar. As this trend grows in popularity (and VTubers gain more subscribers), a lot of people are curious about how they do it. Here are answers to all of your questions on how to become a VTuber on YouTube so you may live out your virtual fantasies.
A high-end PC with enough storage space and a powerful graphics card is required for VTubers. A webcam that tracks motion and connects to your computer is required. The most prominent VTubers employ a blue screen and green room arrangement, which simply consists of walls with one color painted on them in the background of their vlogs so that everything looks to be happening inside an empty virtual area while they walk around.
Investing a lot of money in supplies or equipment for your virtual YouTuber setup isn’t essential, just like it isn’t required for any other creative endeavor. Buying such items may yield greater results if you know how to utilize them effectively but becoming a VTuber may be done for very little money, if at all.
How to become a virtual youtuber?
1. Selecting a Model
To become a virtual YouTuber, you’ll need a model to play the role of your online persona. There are several other ways to do this, but Live2D is the most popular among elite VTubers.
2. Make your model move
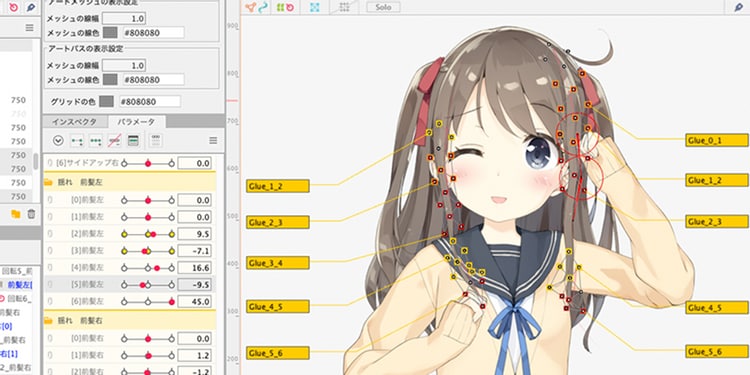
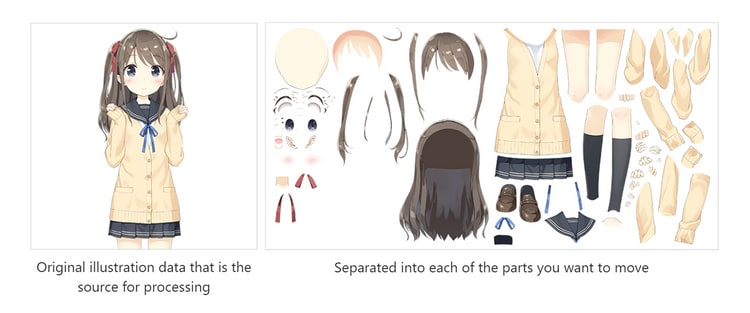
A model must be set up before it can move. In computer graphics, rigging is the process of generating and connecting a rig or bone structure to a model, which can subsequently be animated. When working in two dimensions, this usually entails dividing an image into the pieces you want to move.
You’ll want to set up a webcam to track your movements once you’ve created a rigged model. As a result, your model will adjust to fit you every time you move. Most VTubers only track their faces, but hand movements are becoming increasingly popular.
3. Streaming and/or Recording
This portion of VTubing isn’t all that dissimilar from creating regular video material. You’ll need something to record footage of your model as it moves in lockstep with you. VirtualCast, a free VR communication tool that allows you to be “anyone you choose to be” in a virtual world, may be used for pre-recorded videos. It does, however, necessitate the usage of a virtual reality headset.
Conclusion
● In 2020, the popularity of VTuber content surged. There’s no better time than now to become a virtual YouTuber if you’ve been thinking about it for a long. After all, the nicest part about VTubing is that it’s available to everyone with a smart device and a camera.
● As VTubers are always looking for authenticity, you can become a successful VTuber by sharing the things that matter. Keep an eye on VTubers with a large following and observe what they do. Seek feedback to help you improve your skills or ask for assistance if you require it. Create stuff that will pique the interest of others while also maintaining your own.
Faceless creators, or people who do not show their faces in their films, have become more prevalent on YouTube. Although being a faceless artist allows you to have a little more privacy on the internet, some viewers like to see a person on-screen.
So, what’s the best way to win over both sides? However, becoming a virtual YouTuber allows you to have your cake and eat it, as well. Vtubing is similar to live streaming, only that instead of showing your face, your facial emotions and movements are recorded by a digital avatar. Vtubing has grown considerably more accessible, with a large number of people watching Vtubing videos on YouTube.
Moreover, Every VTuber is essentially a character. Whether they’re just being themselves on camera or acting out a backstory they made up, watching a VTuber is like watching an anime in and of itself. The avatars or characters provide VTubers with a lot of creative freedom, allowing them to create unique material.
Being a VTuber isn’t all that different from being a regular one in terms of technicalities. However, it would be beneficial if you still had a good notion of what you want to do with your channel. Even though the two activities are conceptually equivalent, VTubing has a little greater entry barrier due to equipment needs.
In this article
01 What is a virtual YouTuber?
02 What Does It Take to Become a Virtual YouTuber?
03 How to become a virtual youtuber?
What is a virtual YouTuber?
A virtual YouTuber, or VTuber for short, is an online video maker or entertainment who represents themselves through a virtual avatar. This avatar is created using computer graphics (CG), and it frequently has an anime-inspired look. Most VTubers, as the name implies, utilize YouTube as their primary platform, while others do upload videos or host streams on other platforms (e.g., Twitch, Facebook Gaming, and so on) and are still referred to as such.
Vtuber’s Brief History
Kizuna AI, a Japanese VTuber, created and popularized the phrase “virtual YouTuber” in 2016. While she wasn’t the first to employ a CG avatar for video blogging, she is almost entirely to blame for the VTubers craze exploding in Japan and then the rest of the world in late 2016. Because Kizuna AI grew in popularity so quickly, new VTubers began to appear regularly. Some creators, who had already established their platform and/or displayed their faces on camera, created VTuber versions of themselves simply to jump on the bandwagon.
According to User Local, a Japanese data technology firm, over 10,000 active VTubers will exist on YouTube alone by 2020. Kizuna AI, who has the highest following of all VTubers on the internet at the time of writing, has over 10 million subscribers across all of her social media sites (YouTube, Twitter, TikTok, and Bilibili).
Is VTubers the Next Big Thing in Video Content?
If you follow video marketing trends, you may have seen an uptick in animated videos featuring anime-style avatars. VTubers are the creators of this content, and it’s taking the world by storm. Top VTubers earn hundreds of thousands of dollars every month and have millions of followers. The industry, according to analysts, is on the increase.
In 2019, the overall number of VTuber subscribers climbed by 28%, while total views of Vtuber content increased by 99 percent, according to HyperSense. This may not appear to be a severe trend at first sight. Virtual YouTubers, on the other hand, are being used by marketers and corporations like Mattel and KFC to promote genuine engagement.
Top 5 Virtual YouTubers
The following are the top 5 virtual YouTubers. Each of their videos can be watched for a few minutes with English subtitles.
1. Kizuna AI
Kizuna AI is one of Japan’s most well-known and popular female vloggers, with over two million subscribers to her channel. She appears to be a pop star, but she is artificial intelligence, as she boasts. Since she began posting videos on her main channel, A.I.Channel, in 2016, she has gained a considerable following. On the channel, she discusses various topics and plays popular games. A.I.Games, a Kizuna AI YouTube channel dedicated to games, A.I.Games is also available. She is enthusiastic and honest in both good and bad ways, which is one of her best qualities.
Link: https://www.youtube.com/channel/UC4YaOt1yT-ZeyB0OmxHgolA
2. Kaguya Luna
Kaguya Luna is a popular Japanese vlogger who launched her Kaguya Luna Official channel in 2017. She is one of the Big Four VTubers, with over a million subscribers. Kaguya Luna is adored because she presents herself in such a way. Her videos are mostly made up of her free-wheeling speaking without any acting scripts. Her high-pitched voice is striking, and she is always active and talkative. She also performs as a pop vocalist in a live presentation.v
Link: https://www.youtube.com/channel/UCQYADFw7xEJ9oZSM5ZbqyBw
3. Hoshimachi Suisei
Suisei is an idol singer who debuted independently in 2018 before joining the Hololive group. She aims to perform onstage at the Tokyo Budokan. Her deep alto voice is ideal for covers such as Zombieland Saga’s “Saga Jihen,” as well as her original compositions such as “Next Color Planet” and “Ghost.” She also has a reputation as a sociopath, which was established after she violently backstabbed her fellow Hololive stars in a Project Winter playthrough.
Link: https://www.youtube.com/channel/UC5CwaMl1eIgY8h02uZw7u8A
4. Usada Pekora
This adorable little kitten is the most popular VTuber from VShojo’s English-language agency, and it’s easy to understand why her “Nyanderthals” like her. Nyatasha is best known for covering rap songs and going off on obscene tangents with lines like “It’s not about wiping my ass, it’s about sending a message,” despite how innocent she appears and sounds.
Link: https://www.youtube.com/channel/UC1DCedRgGHBdm81E1llLhOQ
5. Sakura Miko
Nyahello! Sakura, a shrine maiden with a theatrical demeanour and a dubious aptitude for video games, began her career as a freelance VTuber before joining Hololive. Her bombastic attitude is part of her appeal: she gets overly passionate about unimportant games, uses any excuse to stare up a female character’s skirt, and swears profusely in Japanese and English whenever she is frustrated. It’s never boring to see her shenanigans.
Link: https://www.youtube.com/channel/UC-hM6YJuNYVAmUWxeIr9FeA
What Does It Take to Become a Virtual YouTuber?
If you’ve been watching YouTube for a while, you’ve most likely noticed the VTuber trend, which began in 2017. Instead of displaying their faces, VTubers, or Virtual YouTubers, communicate with their viewers using an avatar. As this trend grows in popularity (and VTubers gain more subscribers), a lot of people are curious about how they do it. Here are answers to all of your questions on how to become a VTuber on YouTube so you may live out your virtual fantasies.
A high-end PC with enough storage space and a powerful graphics card is required for VTubers. A webcam that tracks motion and connects to your computer is required. The most prominent VTubers employ a blue screen and green room arrangement, which simply consists of walls with one color painted on them in the background of their vlogs so that everything looks to be happening inside an empty virtual area while they walk around.
Investing a lot of money in supplies or equipment for your virtual YouTuber setup isn’t essential, just like it isn’t required for any other creative endeavor. Buying such items may yield greater results if you know how to utilize them effectively but becoming a VTuber may be done for very little money, if at all.
How to become a virtual youtuber?
1. Selecting a Model
To become a virtual YouTuber, you’ll need a model to play the role of your online persona. There are several other ways to do this, but Live2D is the most popular among elite VTubers.
2. Make your model move
A model must be set up before it can move. In computer graphics, rigging is the process of generating and connecting a rig or bone structure to a model, which can subsequently be animated. When working in two dimensions, this usually entails dividing an image into the pieces you want to move.
You’ll want to set up a webcam to track your movements once you’ve created a rigged model. As a result, your model will adjust to fit you every time you move. Most VTubers only track their faces, but hand movements are becoming increasingly popular.
3. Streaming and/or Recording
This portion of VTubing isn’t all that dissimilar from creating regular video material. You’ll need something to record footage of your model as it moves in lockstep with you. VirtualCast, a free VR communication tool that allows you to be “anyone you choose to be” in a virtual world, may be used for pre-recorded videos. It does, however, necessitate the usage of a virtual reality headset.
Conclusion
● In 2020, the popularity of VTuber content surged. There’s no better time than now to become a virtual YouTuber if you’ve been thinking about it for a long. After all, the nicest part about VTubing is that it’s available to everyone with a smart device and a camera.
● As VTubers are always looking for authenticity, you can become a successful VTuber by sharing the things that matter. Keep an eye on VTubers with a large following and observe what they do. Seek feedback to help you improve your skills or ask for assistance if you require it. Create stuff that will pique the interest of others while also maintaining your own.
Also read:
- 2024 Approved 8 Mistakes People Should Avoid as a New YouTuber
- YouTube's Best Lighting Tools Ranked #17-1
- [New] Editing Excellence Identifying 10 Superior Online Trimmer Apps
- [Updated] Enhancing Visual Impact A Guide to Jump Cut Techniques
- [Updated] Avoiding Illegal Content YouTube to MP4 Transfer Safely
- Deciding the Optimal Social Media Platform TikTok Vs. YouTube Shorts
- Essential Science YouTube Networks Expand Your Mind
- Splitting Screen Techniques for Engaging YouTube Content
- [New] Enjoy Your Content – YouTube Shorts Are Shown Again
- Breaking Down 8 Common Blunders in Early-Stage YouTube Success for 2024
- Innovative Video Concepts Through Google Trends Exploration
- [Updated] Elevating Videography Mastery of the Green Screen Effect
- [New] Creating Automated YouTube Subscribe Links
- The Year Ahead Social Media Infographic Insights
- Finalizing Your Video with a Bold Statement
- In 2024, Essential Knowledge The Do's and Don'ts on YouTube
- Visionary Vistas Accessible Designs for YouTube Artists
- [Updated] Cutting-Edge Filmmaking Techniques YouTube's Insights & Competitors
- Auto-Play YouTube - Keep It Hidden, Stay Connected for 2024
- [Updated] Amassing Audiences and Assets Launching a Livestream Business
- [Updated] Boost Your Content Access Free Vocal SFX
- In 2024, Channel Your Creativity Convert YouTube Clips Into Dynamic Gifs
- [New] Duality of Delivery Engaging Audiences Through Alternative Perspectives for Reaction Videos
- [New] Avoiding Piracy Safe Techniques for Youtube-to-MP4
- Transforming From Obscure to Popular on Youtube
- 2024 Approved Top 16 Best Free AVI Video Rotators Windows, MAC, Android, iPhone, An
- New Zoom Voice Transformation Hacks Top 6 Tips to Spice Up Your Speech and Spark Laughter
- 2024 Approved Capturing the World in iPhone Slow Motion
- Fast & Flawless Mastering the Art of Multi-Snap Chats
- Updated MacVideoEditor for 2024
- In 2024, How to Transfer Contacts from Honor 100 Pro to Other Android Devices Using Bluetooth? | Dr.fone
- In 2024, Planning to Use a Pokemon Go Joystick on OnePlus 12R? | Dr.fone
- 2024 Approved Premium Mark Extraction TikTok Identity Eraser Guide
- Image Interpretation Illumination Ideal Photo-to-Cartoony Tools
- How to Watch Hulu Outside US On Tecno Spark Go (2023) | Dr.fone
- Top 10 Fixes for Phone Keep Disconnecting from Wi-Fi On Samsung Galaxy A25 5G | Dr.fone
- [New] Top-Notch Chromebook Snapshot Tool
- [Updated] Unlock Discord Networking on PC/Android & iOS
- In 2024, How to Transfer Data from Samsung Galaxy S23 Ultra to Samsung Phone | Dr.fone
- 2024 Approved The Route to a Great Twitch Recording Journey
- Guide to Posting Twitter Video Content on Instagram for 2024
- Step-by-Step Procedure to Effective Video Capturing Using ZD's Tools
- In 2024, The Ultimate Guide to Realme C53 Pattern Lock Screen Everything You Need to Know
- In 2024, How to Cast Realme 11 Pro Screen to PC Using WiFi | Dr.fone
- 2024 Approved MyVidHub Testing A Quest for More Features?
- New In 2024, Legends Awakened A Library of Mythical Creatures Sounds
- [New] 10 Excellent, Cost-Free Video Meeting Solutions for 2024
- [Updated] From Viewers to Valuables Mastering Video Monetization on Vimeo for 2024
- Title: "2024 Approved Add a Pop of Color to Your Videos Implementing Neons in YouTubes"
- Author: Brian
- Created at : 2024-05-25 10:58:14
- Updated at : 2024-05-26 10:58:14
- Link: https://youtube-video-recordings.techidaily.com/2024-approved-add-a-pop-of-color-to-your-videos-implementing-neons-in-youtubes/
- License: This work is licensed under CC BY-NC-SA 4.0.
