:max_bytes(150000):strip_icc()/shutterstock_641960737-59b1795103f4020010acd114.png)
"2024 Approved A Stepwise Approach to Unlinking and Removing YouTube Content"
A Stepwise Approach to Unlinking and Removing YouTube Content
How to Remove YouTube Videos

Richard Bennett
Mar 27, 2024• Proven solutions
There are quite a few different reasons for which you might want to consider removing your YouTube video. From outdated content to mistakes in editing – the reasons are quite extensive. In the part 1, we will teach you how to remove your own videos on YouTube and things you should note when removing. The part 2 will tell you how to remove the videos from other YouTube channel.
If you need more advanced features like PIP, Green Screen, or audio mixing, check this easy to use and powerful video editor-Wondershare Filmora , and ignite your video by clicks.
 Download Mac Version ](https://tools.techidaily.com/wondershare/filmora/download/ )
You may also like:What is YouTube Creative Commons and How to Use it >>
Part 1: How to Remove YouTube Videos that You’ve Uploaded
You may also like:How to Edit Uploaded YouTube Videos >>
The first thing that we are going to show you is how to remove your own videos. This might be needed if you have uploaded content quite some time ago and it is already outdated. Or, if you have too many videos on your channel and you need to clear up those who aren’t that interesting.
The fact of the matter is that it’s quite easy to remove YouTube videos. The first thing that you would need to do is going ahead and hop on the website and log into your account. Afterwards, you need to go to the “My Channel” option and click on the “Video Manager”.
Upon doing this, a new page is going to pop up, and you are going to see a list of all the videos that you’ve uploaded.

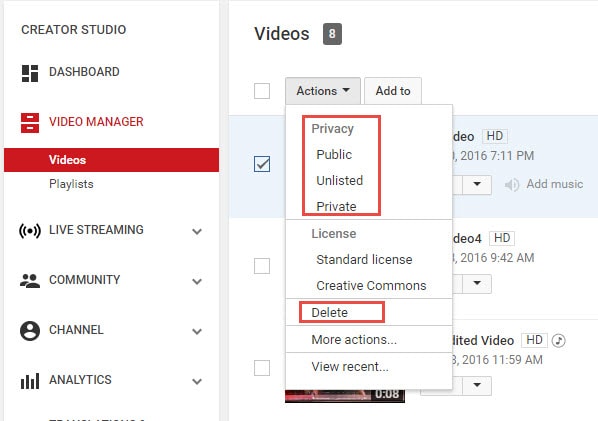
There are little tick boxes on the left side which you can click in order to mark. Mark the videos that you want to edit and click on the “Actions” button on top. There is going to be a drop-down menu, and you can click on the delete option to remove the video permanently. Furthermore, you can also hide the video if you don’t want to delete it but only to hide it away from your subscribers. In order to do so, you should simply click on the Private or Unlisted button.
That’s pretty much it – there’s nothing further to it, and the entire thing is rather comprehensive and easy to carry out, which makes it convenient to go through.
Part 2: How to Remove YouTube Videos on Other Channels
Now that we’ve covered how to remove videos from your own channel, it’s time to dig a little bit deeper. There are certain instances in which you might want to remove YouTube videos from other channels as well. The reasons for this are usually rather personal. For instance – someone has uploaded a video including you or something yours without your consent, and this harms your reputation. Furthermore, it may display sensitive information that you don’t want to reveal to anyone else – the reasons are rather different, but they are related to your own individual privacy which is an important legal right.
You may also like:How to Blur Faces in YouTube Videos >>
The first thing you can do is contact the person who uploaded the video and kindly asks him to remove it using the procedure that we described above. This is going to be the best choice because it’s going to achieve the result quickly and without any hassle. However, in certain cases, the person might not be active, or he might disagree with you and keep the video posted. If that’s the case, you have one option which is likely to be the best alternative.
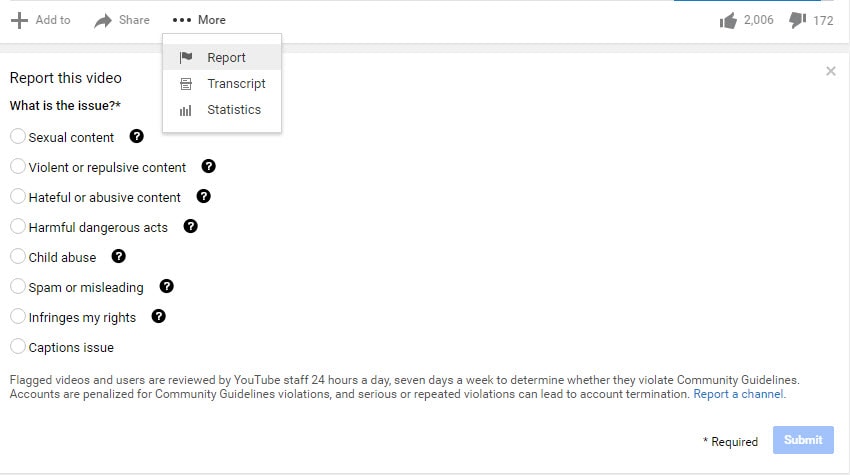
You need to report the video as an inappropriate and flag it with the remark that it’s invading your privacy. This is going to lead you to the page of the YouTube Safety Center. You will have to explain the issue in details in a six-step wizard which extensively asks you about how the video is invasive to your privacy rights. The process is quite comprehensive, and it’s easy to go through. However, you will have to wait for the YouTube support team to assess it and make the decision for the removal.
The truth is that being able to remove YouTube videos is something important that you should be able to do. It’s going to ensure that your channel is perfectly updated, aligned and structured while at the same time making sure that everything is in line with your privacy. YouTube is a powerful website, and you need to be able to stay in control in order to be protected.
Richard Bennett
Richard Bennett is a writer and a lover of all things video.
Follow @Richard Bennett
Richard Bennett
Mar 27, 2024• Proven solutions
There are quite a few different reasons for which you might want to consider removing your YouTube video. From outdated content to mistakes in editing – the reasons are quite extensive. In the part 1, we will teach you how to remove your own videos on YouTube and things you should note when removing. The part 2 will tell you how to remove the videos from other YouTube channel.
If you need more advanced features like PIP, Green Screen, or audio mixing, check this easy to use and powerful video editor-Wondershare Filmora , and ignite your video by clicks.
Download Mac Version ](https://tools.techidaily.com/wondershare/filmora/download/ )
You may also like:What is YouTube Creative Commons and How to Use it >>
Part 1: How to Remove YouTube Videos that You’ve Uploaded
You may also like:How to Edit Uploaded YouTube Videos >>
The first thing that we are going to show you is how to remove your own videos. This might be needed if you have uploaded content quite some time ago and it is already outdated. Or, if you have too many videos on your channel and you need to clear up those who aren’t that interesting.
The fact of the matter is that it’s quite easy to remove YouTube videos. The first thing that you would need to do is going ahead and hop on the website and log into your account. Afterwards, you need to go to the “My Channel” option and click on the “Video Manager”.
Upon doing this, a new page is going to pop up, and you are going to see a list of all the videos that you’ve uploaded.
There are little tick boxes on the left side which you can click in order to mark. Mark the videos that you want to edit and click on the “Actions” button on top. There is going to be a drop-down menu, and you can click on the delete option to remove the video permanently. Furthermore, you can also hide the video if you don’t want to delete it but only to hide it away from your subscribers. In order to do so, you should simply click on the Private or Unlisted button.
That’s pretty much it – there’s nothing further to it, and the entire thing is rather comprehensive and easy to carry out, which makes it convenient to go through.
Part 2: How to Remove YouTube Videos on Other Channels
Now that we’ve covered how to remove videos from your own channel, it’s time to dig a little bit deeper. There are certain instances in which you might want to remove YouTube videos from other channels as well. The reasons for this are usually rather personal. For instance – someone has uploaded a video including you or something yours without your consent, and this harms your reputation. Furthermore, it may display sensitive information that you don’t want to reveal to anyone else – the reasons are rather different, but they are related to your own individual privacy which is an important legal right.
You may also like:How to Blur Faces in YouTube Videos >>
The first thing you can do is contact the person who uploaded the video and kindly asks him to remove it using the procedure that we described above. This is going to be the best choice because it’s going to achieve the result quickly and without any hassle. However, in certain cases, the person might not be active, or he might disagree with you and keep the video posted. If that’s the case, you have one option which is likely to be the best alternative.
You need to report the video as an inappropriate and flag it with the remark that it’s invading your privacy. This is going to lead you to the page of the YouTube Safety Center. You will have to explain the issue in details in a six-step wizard which extensively asks you about how the video is invasive to your privacy rights. The process is quite comprehensive, and it’s easy to go through. However, you will have to wait for the YouTube support team to assess it and make the decision for the removal.
The truth is that being able to remove YouTube videos is something important that you should be able to do. It’s going to ensure that your channel is perfectly updated, aligned and structured while at the same time making sure that everything is in line with your privacy. YouTube is a powerful website, and you need to be able to stay in control in order to be protected.
Richard Bennett
Richard Bennett is a writer and a lover of all things video.
Follow @Richard Bennett
Checking Credentials on YouTube
How to Verify Your YouTube Account - a Simple Guide
Richard Bennett
Oct 26, 2023• Proven solutions
YouTube verify isn’t just for big channels, it’s for just about anyone serious about YouTube. The main benefits of verifying your channel are live streaming and the ability to publish longer videos. You must also verify your account to apply for monetization, although there are other qualifications for that as well.
How to verify your YouTube channel
To verify your YouTube channel, start by visiting this link: https://www.youtube.com/verify .
You’ll need to provide a phone number. A verification code will be either texted or sent via an automated voice call (your choice). Once you have the code, you just have to enter in the field YouTube provides.
How to post videos on YouTube longer than 15 minutes
The default settings on YouTube only allow creators to upload videos that are 15 minutes or shorter. To upload longer videos you will need to verify your YouTube account. Luckily this feature is easy to access.
From the YouTube upload page, you will see an option that says increase your limit at the bottom of the page. From there you will be redirected to the main YouTube verification page. In this area, you can follow the steps to verify your account, which will involve receiving a verification code via text message on your mobile phone or an automated voice call. Once you are verified you can upload videos that are up to 12 hours long or have a file size of up to 128 GB.
How to live stream on YouTube
Live streaming lets you reach out to your viewers an engage with them directly. With a verified YouTube account you can start the process of streaming directly from your channel page. Live streams will appear as recommended for your subscribers just like any other piece of the published content. After a live stream is finished content creators have the chance to publish the video that was captured during the live stream.
To live stream on YouTube you must have a verified channel and zero live stream restrictions for 90 days. An account may not be able to live stream within the first 24 hours of account creation.
To enable live streaming go to the creator studio, click on the live streaming tab, and enable the live stream. Live streams are also available through the YouTube mobile app from the ‘create a live stream’ button.
Customize YouTube Videos with Easy-to-Use Video Editor

Richard Bennett
Richard Bennett is a writer and a lover of all things video.
Follow @Richard Bennett
Richard Bennett
Oct 26, 2023• Proven solutions
YouTube verify isn’t just for big channels, it’s for just about anyone serious about YouTube. The main benefits of verifying your channel are live streaming and the ability to publish longer videos. You must also verify your account to apply for monetization, although there are other qualifications for that as well.
How to verify your YouTube channel
To verify your YouTube channel, start by visiting this link: https://www.youtube.com/verify .
You’ll need to provide a phone number. A verification code will be either texted or sent via an automated voice call (your choice). Once you have the code, you just have to enter in the field YouTube provides.
How to post videos on YouTube longer than 15 minutes
The default settings on YouTube only allow creators to upload videos that are 15 minutes or shorter. To upload longer videos you will need to verify your YouTube account. Luckily this feature is easy to access.
From the YouTube upload page, you will see an option that says increase your limit at the bottom of the page. From there you will be redirected to the main YouTube verification page. In this area, you can follow the steps to verify your account, which will involve receiving a verification code via text message on your mobile phone or an automated voice call. Once you are verified you can upload videos that are up to 12 hours long or have a file size of up to 128 GB.
How to live stream on YouTube
Live streaming lets you reach out to your viewers an engage with them directly. With a verified YouTube account you can start the process of streaming directly from your channel page. Live streams will appear as recommended for your subscribers just like any other piece of the published content. After a live stream is finished content creators have the chance to publish the video that was captured during the live stream.
To live stream on YouTube you must have a verified channel and zero live stream restrictions for 90 days. An account may not be able to live stream within the first 24 hours of account creation.
To enable live streaming go to the creator studio, click on the live streaming tab, and enable the live stream. Live streams are also available through the YouTube mobile app from the ‘create a live stream’ button.
Customize YouTube Videos with Easy-to-Use Video Editor
Richard Bennett
Richard Bennett is a writer and a lover of all things video.
Follow @Richard Bennett
Also read:
- [New] 10 Best GBA Emulators for Android You Can Find for 2024
- [New] Crafting Engaging YouTube Videos Using FinalCut Pro Expertise for 2024
- [New] Discover Top Screen Capture Apps for Windows/macOS for 2024
- [New] Earnings Insights for Video Content Surpassing 1 Million Views
- [New] Filming On-the-Go – What You Need
- [New] In 2024, SnapperView 4 Review Synopsis
- [Updated] Hype Generator Chief Architect for 2024
- 2024 Approved Broadcast Your Google Meet Directly to YouTube's Stage
- 2024 Approved Curate a Perfect Playlist on YouTube A Step-by-Step Guide
- 2024 Approved Enhancing Watchability Adding Time Stamps to YouTube Videos
- 5 Ways to Move Contacts From Oppo Find X6 to iPhone (13/14/15) | Dr.fone
- Best YouTube Names Generators [+ How to Brainstorm] for 2024
- Burger King Reacts to Customer Complaints Twice on Public Platform - A Deep Dive by ZDNet
- Creators Uniting for Marvel's Digital Future
- Discover Why AV1 Is a Game Changer for YouTube Viewers for 2024
- Exploring the YouTube Content Manager Toolkit
- Magix's ACID Pro Critique with Comparison Tools for 2024
- Transform Your Presence Advanced Tricks for Live Video Graphics for 2024
- Your First Step to a Profitable Youtube Experience
- Title: 2024 Approved A Stepwise Approach to Unlinking and Removing YouTube Content
- Author: Brian
- Created at : 2025-01-08 05:01:00
- Updated at : 2025-01-10 02:23:55
- Link: https://youtube-video-recordings.techidaily.com/2024-approved-a-stepwise-approach-to-unlinking-and-removing-youtube-content/
- License: This work is licensed under CC BY-NC-SA 4.0.