
:max_bytes(150000):strip_icc()/firetvremoteapp-5c05dd3546e0fb0001924ea6.jpg)
"2024 Approved A Stepwise Approach to Add YouTube Videos Into Slate"
A Stepwise Approach to Add YouTube Videos Into Slate
Create High-Quality Video - Wondershare Filmora
An easy and powerful YouTube video editor
Numerous video and audio effects to choose from
Detailed tutorials provided by the official channel
Google Slide presentation is a powerful tool for creators to keep their audience engaged. This online platform lets you create and demonstrate your ideas. It will capture your viewers’ attention from the very beginning. It also doesn’t matter whatever learning style you engage. Adding YouTube videos to Google Slide will appeal to all levels of individuals.
More so, it is the best way to provide a break for both the audience and the creator. You can break Google Slide presentations with videos to offer some break. Viewers and the presenter get a breather in the process. The presenter can take a short break from speaking while the video plays. Let’s now dive into how to embed a YouTube video in Google Slides.

In this article
01 Why should we add a video to Google Slides?
02 How to add a YouTube video to Google Slide
03 How to choose the right video for your Slides?
Why should we add a video to Google Slides?
There is a great impact of adding video to Google Slides.
For attention
Videos will automatically awaken you, especially if your thoughts have started to sway during a presentation. A video has a direct way of showing creativity. The audience automatically connects the dots between the video and the presentation lines alike.
To stimulate discussion
A picture is worth a thousand words. There is a way that an added video will help the audience connect to the day’s topic. It will bring up several ideas and stir up discussion with the presenter.
Easy following
With videos embedded in Google Slide, viewers will find it easy to understand and digest. Videos automatically eliminate boredom and make any topic interesting.
How to add a YouTube video to Google Slide
Use these two methods to add a YouTube video to Google Slides. Via the Search and Direct link.
Method 1. Embed YouTube video to Google Slide by search and selection
Google has owned YouTube since the year 2006. You can, therefore, integrate Google’s products with YouTube easily.
Step 1. First, go to the slide where you want to embed your video.
Step 2. Then choose the “Insert” option from the menu bar and hit the “Video” option.

Step 3. It would be best if you now viewed the “YouTube” search bar to type in the video you want to embed. You can use keywords to search for the video in question and view instant search results.
Step 4. Then select the video you want to embed, and you’ll see it appear on the “Slide.”

Step 5. Format your video. Remember that the entire video will be embedded. You don’t necessarily need the whole video. It is time to select just a brief but relevant clip from the video to use. Then position your video to the right point using the axes from the exact starting point to the finished part you want the video to appear in.
Method 2. Embed YouTube video to Google Slide by direct link
You can engage this method if you want to include the entire video.
Step 1. Get the URL of the specific YouTube video that you want to use.

Step 2. Then go to your browser’s “Address bar” to copy the YouTube link.
Step 3. Next, open the “Presentation” slide to put your video to.
Step 4. Choose the “Insert” tab from the menu bar.
Step 5. Then hit on the “Video” option from the drop-down menu that appears.
Step 6. A new window will open automatically. Choose the “By URL” tab.
Step 7. Then paste the YouTube video URL in the “Paste YouTube URL Here” bar section.

Step 8. Wait for the video file to load and press the “Select” option. The video will immediately appear in the presentation slide. Just drag and drop the video in your preferred position.
Note: You can do a few edits inside the application. Set the timer when your video should start and when to stop. You can also adjust the video player size.
How to choose the right video for your Slides?
Not all videos will make an impact on your Google Slide. You need to use the best shot that adds value to your presentation. These guidelines will help you to settle on the best video.
Be Professional – choose the best video for your presentation. Remember that the video is part of the presentation and carries more weight. Settling for quality video will bring out the professionalism in you.
Relevant – how do you know that what you are showing your audience corresponds to the presentation piece? Ensure that the video you add has something to do with the Google Slide presentation topic. The two should naturally flow to make it easy to understand the whole concept.
Precise – your presentation is not about the video. The ideal length should not exceed 60 seconds. The longer the video, the greater the chance for your audience to lose track along the way.
Know every footage you are working with – this will help you pick the best shots for your presentation. So, learn every aspect of the video before settling down to use it.
Add new content – even though one content may suit several presentations, don’t rely on the same piece each time. Your audience will want to feel something fresh each time you are presenting. So, compose different videos for different scenarios to make that big impact.
Create an eye-catching video for your Slides with Filmora
The video quality matters when it comes to creating your Slides. The best video creator – Filmora – works in simple steps to give you an eye-catching video. It will create videos for all scenarios like marketing, tutorial, gaming, etc.
Key features of Filmora
- It offers you advanced video effects like filters, motion elements, etc
- You can multiply your fun with multiple screens with the Split Screen feature
- Easily change backgrounds using the Green Screen feature
- The speed control lets you fast forward or slow down a special moment
- Import your video clips to social media platforms
- You can also adjust the audio of your tracks using the Audio Mixer feature
Follow this guide to create a video for your slide with Filmora
Step 1. Launch Filmora
First, begin by downloading and installing Filmora on your computer device. Once installed, launch it and allow it to run. You can either create a new project or open an existing project to work on.
Step 2. Create a new project
Here, click on the “New Project” tab on the app’s welcome screen. The editor should load immediately. Then proceed to register the product. Just hit on the “Register” tab.
Step 3. Import video
Check the upper left corner of your screen to see the “Import” tab. Click on it and choose the “Import Media Files” option. Next, navigate to the location of your computer’s local list to select the clip or video you want to edit. Then, hit the “Import” button to add the video to the timeline for editing.
Step 4. Edit video
Drag and drop the raw footage to Filmora’s timeline to begin editing. Here, you can trim, add other video clips, merge, and add effects as you wish. Likewise, you can add opening titles, subtitles, and end credits to your video. More so, this tool offers different templates to use. Just drag and drop the templates you wish to use to a specific location on the timeline.
Step 5. Preview your file
Last but not least, you can preview your files. Click on the “Play” tab to start previewing your video clips. The main essence of this part is to allow you to make the necessary changes to your clips if there is a need.
Step 6. Export and Share
With Filmora, you can export your file to various social media platforms. But first, go to the “Output window” and select the video file format to use. This software supports several output formats to apply to any platform and device. Just click on the “Format” tab and choose the file format to use. Then also change the resolution and other parameters like frame rate and channel of your video in the “Settings” section. Finally, share your video to your YouTube channel and get ready to add the video to the Google Slide presentation.
For Win 7 or later (64-bit)
For macOS 10.12 or later
Conclusion
● You now know how to put a YouTube video in Google Slides the simple way. You can search for your YouTube videos or directly use the URL link. Whatever the case, remember that it’s the quality of your video that carries more weight. Thanks to the availability of third-party apps that you can use to create and improve the quality of your videos.
● Filmora is at your service to create high-resolution videos that you can export in any format to your YouTube channel. The tool is intuitive, and it won’t matter whether you haven’t tried it before. It is a perfect choice for both professionals and first-time users.
Google Slide presentation is a powerful tool for creators to keep their audience engaged. This online platform lets you create and demonstrate your ideas. It will capture your viewers’ attention from the very beginning. It also doesn’t matter whatever learning style you engage. Adding YouTube videos to Google Slide will appeal to all levels of individuals.
More so, it is the best way to provide a break for both the audience and the creator. You can break Google Slide presentations with videos to offer some break. Viewers and the presenter get a breather in the process. The presenter can take a short break from speaking while the video plays. Let’s now dive into how to embed a YouTube video in Google Slides.
In this article
01 Why should we add a video to Google Slides?
02 How to add a YouTube video to Google Slide
03 How to choose the right video for your Slides?
Why should we add a video to Google Slides?
There is a great impact of adding video to Google Slides.
For attention
Videos will automatically awaken you, especially if your thoughts have started to sway during a presentation. A video has a direct way of showing creativity. The audience automatically connects the dots between the video and the presentation lines alike.
To stimulate discussion
A picture is worth a thousand words. There is a way that an added video will help the audience connect to the day’s topic. It will bring up several ideas and stir up discussion with the presenter.
Easy following
With videos embedded in Google Slide, viewers will find it easy to understand and digest. Videos automatically eliminate boredom and make any topic interesting.
How to add a YouTube video to Google Slide
Use these two methods to add a YouTube video to Google Slides. Via the Search and Direct link.
Method 1. Embed YouTube video to Google Slide by search and selection
Google has owned YouTube since the year 2006. You can, therefore, integrate Google’s products with YouTube easily.
Step 1. First, go to the slide where you want to embed your video.
Step 2. Then choose the “Insert” option from the menu bar and hit the “Video” option.
Step 3. It would be best if you now viewed the “YouTube” search bar to type in the video you want to embed. You can use keywords to search for the video in question and view instant search results.
Step 4. Then select the video you want to embed, and you’ll see it appear on the “Slide.”
Step 5. Format your video. Remember that the entire video will be embedded. You don’t necessarily need the whole video. It is time to select just a brief but relevant clip from the video to use. Then position your video to the right point using the axes from the exact starting point to the finished part you want the video to appear in.
Method 2. Embed YouTube video to Google Slide by direct link
You can engage this method if you want to include the entire video.
Step 1. Get the URL of the specific YouTube video that you want to use.
Step 2. Then go to your browser’s “Address bar” to copy the YouTube link.
Step 3. Next, open the “Presentation” slide to put your video to.
Step 4. Choose the “Insert” tab from the menu bar.
Step 5. Then hit on the “Video” option from the drop-down menu that appears.
Step 6. A new window will open automatically. Choose the “By URL” tab.
Step 7. Then paste the YouTube video URL in the “Paste YouTube URL Here” bar section.
Step 8. Wait for the video file to load and press the “Select” option. The video will immediately appear in the presentation slide. Just drag and drop the video in your preferred position.
Note: You can do a few edits inside the application. Set the timer when your video should start and when to stop. You can also adjust the video player size.
How to choose the right video for your Slides?
Not all videos will make an impact on your Google Slide. You need to use the best shot that adds value to your presentation. These guidelines will help you to settle on the best video.
Be Professional – choose the best video for your presentation. Remember that the video is part of the presentation and carries more weight. Settling for quality video will bring out the professionalism in you.
Relevant – how do you know that what you are showing your audience corresponds to the presentation piece? Ensure that the video you add has something to do with the Google Slide presentation topic. The two should naturally flow to make it easy to understand the whole concept.
Precise – your presentation is not about the video. The ideal length should not exceed 60 seconds. The longer the video, the greater the chance for your audience to lose track along the way.
Know every footage you are working with – this will help you pick the best shots for your presentation. So, learn every aspect of the video before settling down to use it.
Add new content – even though one content may suit several presentations, don’t rely on the same piece each time. Your audience will want to feel something fresh each time you are presenting. So, compose different videos for different scenarios to make that big impact.
Create an eye-catching video for your Slides with Filmora
The video quality matters when it comes to creating your Slides. The best video creator – Filmora – works in simple steps to give you an eye-catching video. It will create videos for all scenarios like marketing, tutorial, gaming, etc.
Key features of Filmora
- It offers you advanced video effects like filters, motion elements, etc
- You can multiply your fun with multiple screens with the Split Screen feature
- Easily change backgrounds using the Green Screen feature
- The speed control lets you fast forward or slow down a special moment
- Import your video clips to social media platforms
- You can also adjust the audio of your tracks using the Audio Mixer feature
Follow this guide to create a video for your slide with Filmora
Step 1. Launch Filmora
First, begin by downloading and installing Filmora on your computer device. Once installed, launch it and allow it to run. You can either create a new project or open an existing project to work on.
Step 2. Create a new project
Here, click on the “New Project” tab on the app’s welcome screen. The editor should load immediately. Then proceed to register the product. Just hit on the “Register” tab.
Step 3. Import video
Check the upper left corner of your screen to see the “Import” tab. Click on it and choose the “Import Media Files” option. Next, navigate to the location of your computer’s local list to select the clip or video you want to edit. Then, hit the “Import” button to add the video to the timeline for editing.
Step 4. Edit video
Drag and drop the raw footage to Filmora’s timeline to begin editing. Here, you can trim, add other video clips, merge, and add effects as you wish. Likewise, you can add opening titles, subtitles, and end credits to your video. More so, this tool offers different templates to use. Just drag and drop the templates you wish to use to a specific location on the timeline.
Step 5. Preview your file
Last but not least, you can preview your files. Click on the “Play” tab to start previewing your video clips. The main essence of this part is to allow you to make the necessary changes to your clips if there is a need.
Step 6. Export and Share
With Filmora, you can export your file to various social media platforms. But first, go to the “Output window” and select the video file format to use. This software supports several output formats to apply to any platform and device. Just click on the “Format” tab and choose the file format to use. Then also change the resolution and other parameters like frame rate and channel of your video in the “Settings” section. Finally, share your video to your YouTube channel and get ready to add the video to the Google Slide presentation.
For Win 7 or later (64-bit)
For macOS 10.12 or later
Conclusion
● You now know how to put a YouTube video in Google Slides the simple way. You can search for your YouTube videos or directly use the URL link. Whatever the case, remember that it’s the quality of your video that carries more weight. Thanks to the availability of third-party apps that you can use to create and improve the quality of your videos.
● Filmora is at your service to create high-resolution videos that you can export in any format to your YouTube channel. The tool is intuitive, and it won’t matter whether you haven’t tried it before. It is a perfect choice for both professionals and first-time users.
Video Content Creation Evolution: Choosing Studio Over Beta
YouTube Creator Studio vs. YouTube Studio (Beta): Which One is Better?

Richard Bennett
Oct 26, 2023• Proven solutions
In 2017, YouTube revealed YouTube Studio Beta , a video management and analytics dashboard that will replace the classic Creator Studio that most YouTubers are familiar with by 2021.
In this article, we will look at the new features YouTube Studio Beta has, what we can expect from it in the future, and why YouTube will eventually phase out the older YouTube Creator Studio… and whether that change will be an improvement.
Edit YouTube Videos with Filmora
As one of the most widely used video editing software in YouTube video editing, Filmora provides lots of templates and effects with an intuitive interface, which saves much time. Download the free trial version and get started now.


Why YouTube Is Getting Rid of Classic Creator Studio?
Data-driven YouTubers have long loved the YouTube Creator Studio. It has supplied so much information that it took this comprehensive post about Analytics to highlight all the insights. So why would YouTube change it?
Change to a popular social media platform is always worrisome to content creators because it means there will be a new learning phase forced upon them. While the Classic YouTube Creator Studio has a lot of features and functionality, the data was often hard to interpret and inconvenient to find. Many creators weren’t sure where their data was located or how to use the information presented to them.
YouTube Studio was designed to be a friendly management and analysis tool. YouTube also offers more guidance, showcasing the key metrics the algorithm uses to evaluate the success of a video more prominently. Additionally, the graphs presented offer more clarity, shortening the time a creator spends finding the information they need.
Undoubtedly, YouTube updated its Creator Studio to offer a tool that enables its users to better understand their video performance and make better content that serves YouTube’s requirements.
Intro to YouTube Studio (Beta)
YouTube Studio (Beta), for many YouTubers, is now the default. However, for the time being, creators can still switch back to the Classic view (as some of the features are still being built). YouTube’s objective is to receive data of their own by understanding how creators are using the new Studio and gaining feedback to improve upon it.
If you have any feedback, simply click on this button on the bottom left menu of the YouTube Studio (Beta) and send YouTube your thoughts.
In addition to the new layout of the tools and dashboards, YouTube Studio (Beta) will also debut 3 metrics for creators:
1. Impressions: See the total reach of all your videos or each individual video. Each time your video thumbnail and title are visible to the user counts as an impression.
2. Click-through rate: Determine how click-worthy your thumbnails and titles are, by seeing the percentage of people who click into your video.
3. Unique viewers: Know how many different people have watched your videos. This data can be used to compare the size of your subscriber base to the actual number of your audience.
Tips for Using YouTube Studio Beta Features
Now that you are more familiar with the new YouTube Studio (Beta), let us dive into what you can accomplish with all the new features.
1. Optimization Tips
In the past, there has been a lot of speculations about how creators should treat their video titles and descriptions. Well, now YouTube is letting you know exactly which area to focus on. Simply hover over any “?” icon to see the advice and click “Learn More” to go to YouTube Creator Academy to get more details.
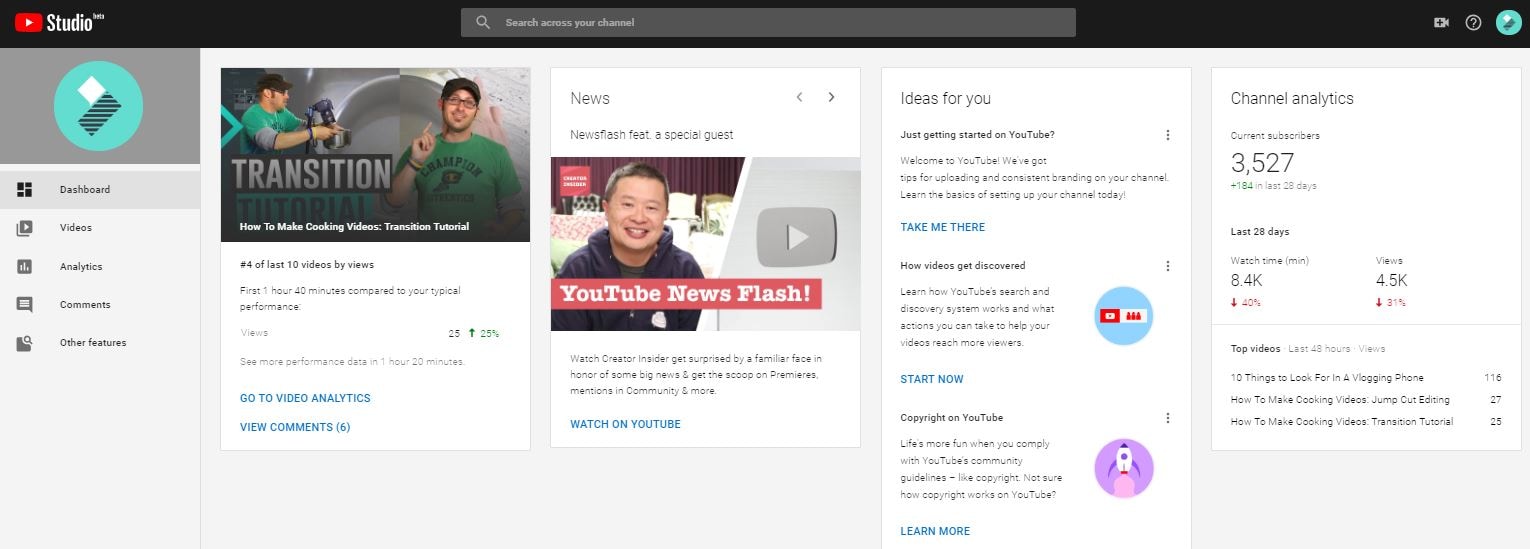
2. Recent Video Data
See data and improvement tips for your latest video. If YouTube identifies a notable issue with your video, they will help you by offering tips, which you can click “Tell Me More” to look into.
YouTube wants you to know how your videos are performing in the first few days. In order for YouTube to determine whether your content is worth sharing, it wants to know how your audience is responding to it right away. This means, the launch of your video matters.
3. Video Analysis
In the Classic Creator Studio, you couldn’t get an aggregated view of all the important video data on one dashboard. You would have to click to each set of analytics individually and then dive deeper. This ate up your precious content creation time and made it hard to combine insights. Now with Studio Beta, you can see all the critical data in one spot. Right away, you can see how that video is performing through different factors. This will let you know where audience retention is dropping off or which traffic source is supplying most of the views.
4. Watch Time Funnel
The objective is to increase watch time, the metric YouTube puts the most weight on. With the new Watch Time Funnel, which you can find in the Analytics section under the Reach Viewer dashboard, you can see exactly at which level of your channel or wherein an individual video you will need to improve.
If the impression numbers are low, that means you need to improve how your video is being discovered by doing more research to understand what your viewers are searching for.
If the click-through rate (CTR) is low, then you will have to improve your thumbnail and title. This will better entice your audience to click. According to Google, half of all videos have an average CTR of 2-10%.
If the average view duration is not up to your standards, then you will have to improve your content itself. While it is most ideal to have all your viewers watch all the way to the end of all your videos, that is certainly unrealistic. However, 60-70% is a great number to aim towards.

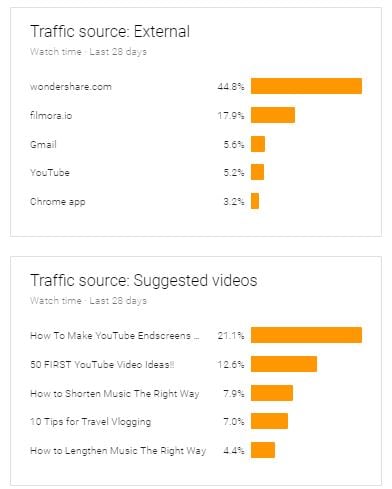
5. Traffic Sources
YouTube now presents all the different traffic sources in one easy-to-find page in the Reach Viewer tab, so creators no longer have to click between them to analyze where their traffic is coming from. This new design is far less intimidating and messy. At a glance, you can now see where the majority of your audiences are coming from.
YouTube has always put a lot of value into its analytic tools, and with YouTube Studio Beta the features and design are continuously improving. Having better data and understanding of how an individual video or an entire channel is performing will help creators succeed on this ever more competitive platform.
Have you tried the new YouTube Studio (Beta)? What are your thoughts? Please let us know in the comments below.
Richard Bennett
Richard Bennett is a writer and a lover of all things video.
Follow @Richard Bennett
Richard Bennett
Oct 26, 2023• Proven solutions
In 2017, YouTube revealed YouTube Studio Beta , a video management and analytics dashboard that will replace the classic Creator Studio that most YouTubers are familiar with by 2021.
In this article, we will look at the new features YouTube Studio Beta has, what we can expect from it in the future, and why YouTube will eventually phase out the older YouTube Creator Studio… and whether that change will be an improvement.
Edit YouTube Videos with Filmora
As one of the most widely used video editing software in YouTube video editing, Filmora provides lots of templates and effects with an intuitive interface, which saves much time. Download the free trial version and get started now.
Why YouTube Is Getting Rid of Classic Creator Studio?
Data-driven YouTubers have long loved the YouTube Creator Studio. It has supplied so much information that it took this comprehensive post about Analytics to highlight all the insights. So why would YouTube change it?
Change to a popular social media platform is always worrisome to content creators because it means there will be a new learning phase forced upon them. While the Classic YouTube Creator Studio has a lot of features and functionality, the data was often hard to interpret and inconvenient to find. Many creators weren’t sure where their data was located or how to use the information presented to them.
YouTube Studio was designed to be a friendly management and analysis tool. YouTube also offers more guidance, showcasing the key metrics the algorithm uses to evaluate the success of a video more prominently. Additionally, the graphs presented offer more clarity, shortening the time a creator spends finding the information they need.
Undoubtedly, YouTube updated its Creator Studio to offer a tool that enables its users to better understand their video performance and make better content that serves YouTube’s requirements.
Intro to YouTube Studio (Beta)
YouTube Studio (Beta), for many YouTubers, is now the default. However, for the time being, creators can still switch back to the Classic view (as some of the features are still being built). YouTube’s objective is to receive data of their own by understanding how creators are using the new Studio and gaining feedback to improve upon it.
If you have any feedback, simply click on this button on the bottom left menu of the YouTube Studio (Beta) and send YouTube your thoughts.
In addition to the new layout of the tools and dashboards, YouTube Studio (Beta) will also debut 3 metrics for creators:
1. Impressions: See the total reach of all your videos or each individual video. Each time your video thumbnail and title are visible to the user counts as an impression.
2. Click-through rate: Determine how click-worthy your thumbnails and titles are, by seeing the percentage of people who click into your video.
3. Unique viewers: Know how many different people have watched your videos. This data can be used to compare the size of your subscriber base to the actual number of your audience.
Tips for Using YouTube Studio Beta Features
Now that you are more familiar with the new YouTube Studio (Beta), let us dive into what you can accomplish with all the new features.
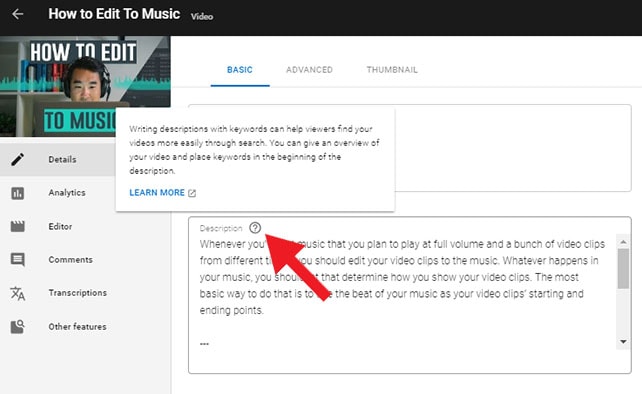
1. Optimization Tips
In the past, there has been a lot of speculations about how creators should treat their video titles and descriptions. Well, now YouTube is letting you know exactly which area to focus on. Simply hover over any “?” icon to see the advice and click “Learn More” to go to YouTube Creator Academy to get more details.
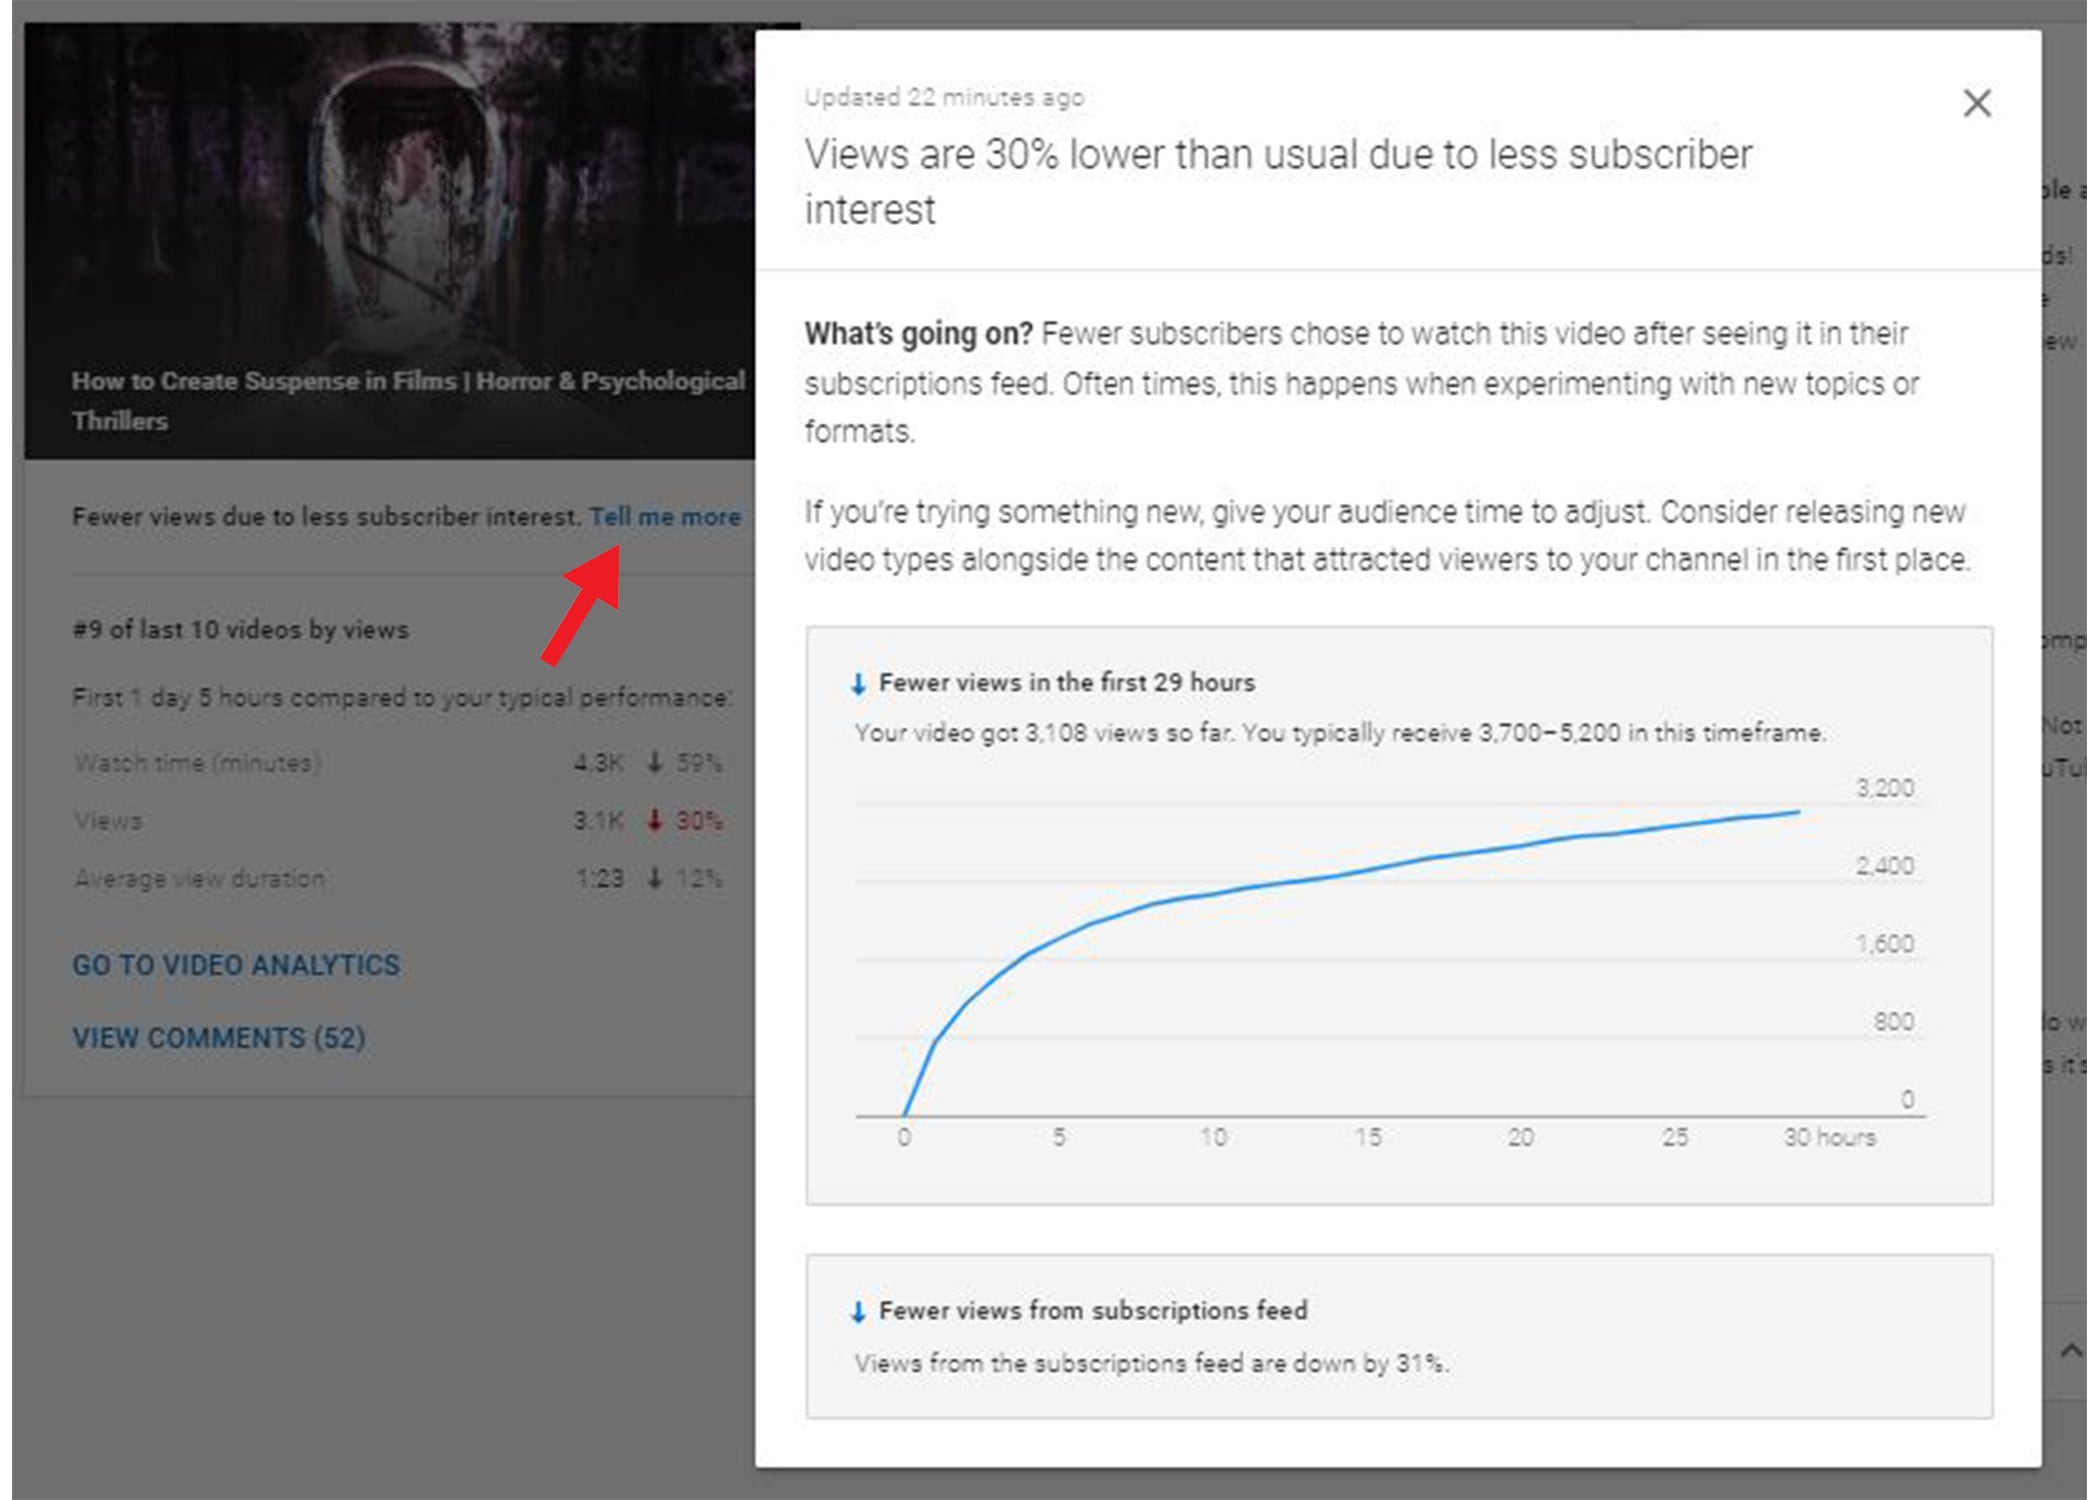
2. Recent Video Data
See data and improvement tips for your latest video. If YouTube identifies a notable issue with your video, they will help you by offering tips, which you can click “Tell Me More” to look into.
YouTube wants you to know how your videos are performing in the first few days. In order for YouTube to determine whether your content is worth sharing, it wants to know how your audience is responding to it right away. This means, the launch of your video matters.
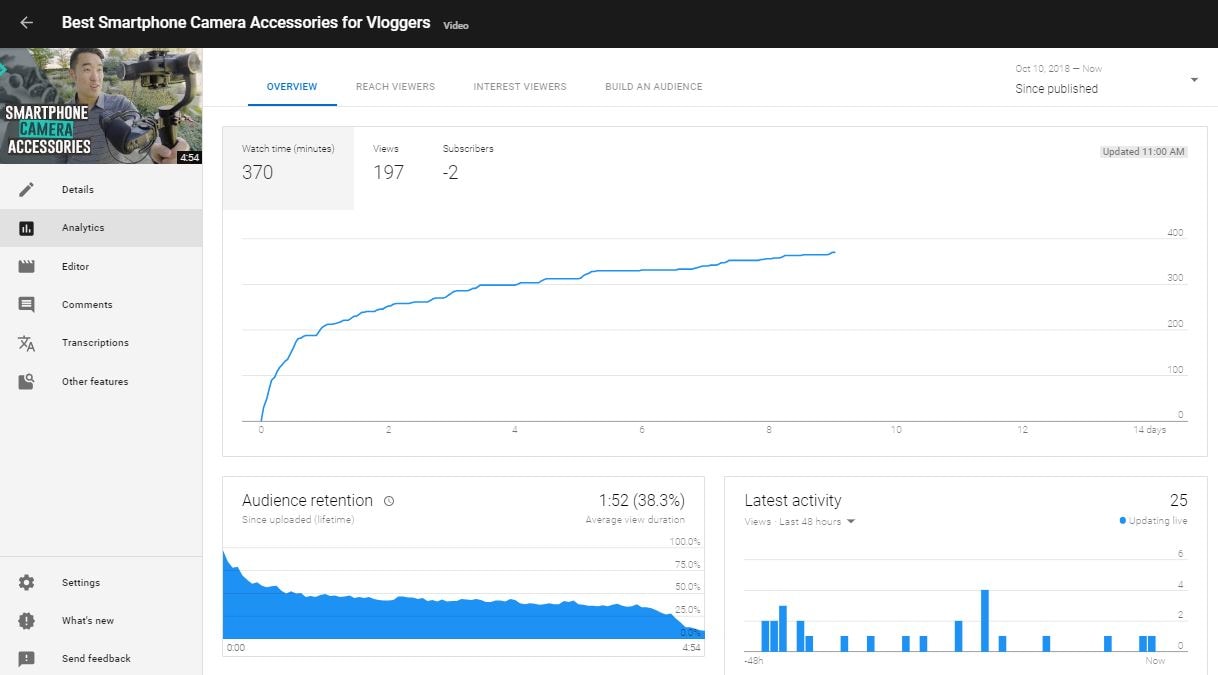
3. Video Analysis
In the Classic Creator Studio, you couldn’t get an aggregated view of all the important video data on one dashboard. You would have to click to each set of analytics individually and then dive deeper. This ate up your precious content creation time and made it hard to combine insights. Now with Studio Beta, you can see all the critical data in one spot. Right away, you can see how that video is performing through different factors. This will let you know where audience retention is dropping off or which traffic source is supplying most of the views.
4. Watch Time Funnel
The objective is to increase watch time, the metric YouTube puts the most weight on. With the new Watch Time Funnel, which you can find in the Analytics section under the Reach Viewer dashboard, you can see exactly at which level of your channel or wherein an individual video you will need to improve.
If the impression numbers are low, that means you need to improve how your video is being discovered by doing more research to understand what your viewers are searching for.
If the click-through rate (CTR) is low, then you will have to improve your thumbnail and title. This will better entice your audience to click. According to Google, half of all videos have an average CTR of 2-10%.
If the average view duration is not up to your standards, then you will have to improve your content itself. While it is most ideal to have all your viewers watch all the way to the end of all your videos, that is certainly unrealistic. However, 60-70% is a great number to aim towards.
5. Traffic Sources
YouTube now presents all the different traffic sources in one easy-to-find page in the Reach Viewer tab, so creators no longer have to click between them to analyze where their traffic is coming from. This new design is far less intimidating and messy. At a glance, you can now see where the majority of your audiences are coming from.
YouTube has always put a lot of value into its analytic tools, and with YouTube Studio Beta the features and design are continuously improving. Having better data and understanding of how an individual video or an entire channel is performing will help creators succeed on this ever more competitive platform.
Have you tried the new YouTube Studio (Beta)? What are your thoughts? Please let us know in the comments below.
Richard Bennett
Richard Bennett is a writer and a lover of all things video.
Follow @Richard Bennett
Richard Bennett
Oct 26, 2023• Proven solutions
In 2017, YouTube revealed YouTube Studio Beta , a video management and analytics dashboard that will replace the classic Creator Studio that most YouTubers are familiar with by 2021.
In this article, we will look at the new features YouTube Studio Beta has, what we can expect from it in the future, and why YouTube will eventually phase out the older YouTube Creator Studio… and whether that change will be an improvement.
Edit YouTube Videos with Filmora
As one of the most widely used video editing software in YouTube video editing, Filmora provides lots of templates and effects with an intuitive interface, which saves much time. Download the free trial version and get started now.
Why YouTube Is Getting Rid of Classic Creator Studio?
Data-driven YouTubers have long loved the YouTube Creator Studio. It has supplied so much information that it took this comprehensive post about Analytics to highlight all the insights. So why would YouTube change it?
Change to a popular social media platform is always worrisome to content creators because it means there will be a new learning phase forced upon them. While the Classic YouTube Creator Studio has a lot of features and functionality, the data was often hard to interpret and inconvenient to find. Many creators weren’t sure where their data was located or how to use the information presented to them.
YouTube Studio was designed to be a friendly management and analysis tool. YouTube also offers more guidance, showcasing the key metrics the algorithm uses to evaluate the success of a video more prominently. Additionally, the graphs presented offer more clarity, shortening the time a creator spends finding the information they need.
Undoubtedly, YouTube updated its Creator Studio to offer a tool that enables its users to better understand their video performance and make better content that serves YouTube’s requirements.
Intro to YouTube Studio (Beta)
YouTube Studio (Beta), for many YouTubers, is now the default. However, for the time being, creators can still switch back to the Classic view (as some of the features are still being built). YouTube’s objective is to receive data of their own by understanding how creators are using the new Studio and gaining feedback to improve upon it.
If you have any feedback, simply click on this button on the bottom left menu of the YouTube Studio (Beta) and send YouTube your thoughts.
In addition to the new layout of the tools and dashboards, YouTube Studio (Beta) will also debut 3 metrics for creators:
1. Impressions: See the total reach of all your videos or each individual video. Each time your video thumbnail and title are visible to the user counts as an impression.
2. Click-through rate: Determine how click-worthy your thumbnails and titles are, by seeing the percentage of people who click into your video.
3. Unique viewers: Know how many different people have watched your videos. This data can be used to compare the size of your subscriber base to the actual number of your audience.
Tips for Using YouTube Studio Beta Features
Now that you are more familiar with the new YouTube Studio (Beta), let us dive into what you can accomplish with all the new features.
1. Optimization Tips
In the past, there has been a lot of speculations about how creators should treat their video titles and descriptions. Well, now YouTube is letting you know exactly which area to focus on. Simply hover over any “?” icon to see the advice and click “Learn More” to go to YouTube Creator Academy to get more details.
2. Recent Video Data
See data and improvement tips for your latest video. If YouTube identifies a notable issue with your video, they will help you by offering tips, which you can click “Tell Me More” to look into.
YouTube wants you to know how your videos are performing in the first few days. In order for YouTube to determine whether your content is worth sharing, it wants to know how your audience is responding to it right away. This means, the launch of your video matters.
3. Video Analysis
In the Classic Creator Studio, you couldn’t get an aggregated view of all the important video data on one dashboard. You would have to click to each set of analytics individually and then dive deeper. This ate up your precious content creation time and made it hard to combine insights. Now with Studio Beta, you can see all the critical data in one spot. Right away, you can see how that video is performing through different factors. This will let you know where audience retention is dropping off or which traffic source is supplying most of the views.
4. Watch Time Funnel
The objective is to increase watch time, the metric YouTube puts the most weight on. With the new Watch Time Funnel, which you can find in the Analytics section under the Reach Viewer dashboard, you can see exactly at which level of your channel or wherein an individual video you will need to improve.
If the impression numbers are low, that means you need to improve how your video is being discovered by doing more research to understand what your viewers are searching for.
If the click-through rate (CTR) is low, then you will have to improve your thumbnail and title. This will better entice your audience to click. According to Google, half of all videos have an average CTR of 2-10%.
If the average view duration is not up to your standards, then you will have to improve your content itself. While it is most ideal to have all your viewers watch all the way to the end of all your videos, that is certainly unrealistic. However, 60-70% is a great number to aim towards.
5. Traffic Sources
YouTube now presents all the different traffic sources in one easy-to-find page in the Reach Viewer tab, so creators no longer have to click between them to analyze where their traffic is coming from. This new design is far less intimidating and messy. At a glance, you can now see where the majority of your audiences are coming from.
YouTube has always put a lot of value into its analytic tools, and with YouTube Studio Beta the features and design are continuously improving. Having better data and understanding of how an individual video or an entire channel is performing will help creators succeed on this ever more competitive platform.
Have you tried the new YouTube Studio (Beta)? What are your thoughts? Please let us know in the comments below.
Richard Bennett
Richard Bennett is a writer and a lover of all things video.
Follow @Richard Bennett
Also read:
- The Roadmap to Creating Successful YouTube Collaborations
- 5 Next-Level Editors to Transcend the Standard Youtube Videos
- Dance Directives Finding Ideal DJ Templates for 2024
- 2024 Approved Essential Screen Recording Software List for Vloggers
- Key Tactics for Identifying Potential YouTube Co-Stars
- The Essential Tips for Maximizing YouTuber Profits on Mobile
- 2024 Approved Classic Film Aesthetics Masterclass in Video Production
- 2024 Approved Avoid Piracy Safe YouTube to MP4 Conversion Tips
- Streamlining Your YouTube Content with FinalCut Pro Expertise
- Best Affordable Video Editors in the Market - 2023 Edition for 2024
- [New] Elevating Your Style with YouTube's Best Hauls
- [New] Discovering 6 Interactive Workout Ideas for Social Media Success
- Inspire Curiosity YouTube Thumbnail Makeovers with Stunning BGs
- [New] Content Creator's Arena Vs. Beta Studio Evolutionary Path
- Constructing Captivating Conclusions
- In 2024, Boosting Bank Balance Effective Tactics for Mobile Video Money-Making
- The Art of Amplifying Popularity on YouTube
- 2024 Approved Beam It Up A Step-By-Step Approach to YouTube Video Luminance
- Tackling Social Media Platforms An In-Depth Look at IGTV and YouTube
- [New] Digital Detox Ignoring Negativity on YouTube
- [Updated] Charting Your Course From Creator to Major Label
- YouTube Yielding The Manual to Merging Media with Moolah
- 2024 Approved Brightening Up Your Online Videos
- 2024 Approved Buzzing Tracks Ultimate Backdrops for YouTube Shorts
- In 2024, Accelerate/Decelerate Your YouTube Videos A Step-by-Step Guide
- Launching Success Streamline Your First YouTube Business Channels
- In 2024, Aesthetic Enigma The Ultimate Backdrop Collection for Video Thumbnails
- In 2024, A Compreranstive Approach to High-Fidelity Recording, No Mic Necessary
- 2024 Approved Charting New Pathways in Art An Exclusive Look at the Top 10 Low-Cost Creator Platforms on YouTube
- 2024 Approved Drafting Dynamic News Endings
- [Updated] Cutting-Edge Techniques Top Lenses for YouTube Stars
- [New] Craft Cinematic Magic Learn Green Screen Wonders with YouTube
- Foundational Codes for YouTube Enthusiasts
- [Updated] Calculating Your Digital Footprint Understanding Views & Income From YouTube
- In 2024, Elevate Your Content Top 8 No-Cost Video Editing Software
- [New] Clearing Process for YouTube's Pending Video List
- Probing Into YouTube Discussions
- Conquer Zero Viewers 10 Essential Tips for Video Popularity
- [New] Building Interest with Budget-Friendly YouTube Video Intros
- Streamlined Processes for Swift Comment Removal on YouTube
- Visionary Vistas Accessible Designs for YouTube Artists
- Updated 2024 Approved Virtual Vibrance Instructions for Weaving Echo Into the Fabric of Windows and Internet Audio Streams
- Possible solutions to restore deleted contacts from Xiaomi .
- Updated Free and Paid 3D Animation Software A Comprehensive Review for 2024
- Updated In 2024, Saving Instagram Songs A Beginners Guide
- 2024 Approved Essential 11 Audio-Focused Smartphone Applications
- In 2024, Change Location on Yik Yak For your Samsung Galaxy A05 to Enjoy More Fun | Dr.fone
- [New] FB Content Takedown What Are Your Rights and Recourse for 2024
- In 2024, Facebook's Forgotten Treasures How to Rescue Conversations and Videos
- In 2024, Masterful Media Moments Innovative Bio Ideas for TikTok Audience Expansion via Filmora
- [Updated] In 2024, Decoding Silent Snapchat User Possible Block
- [Updated] 2024 Approved Mastering Game Recording Steam Edition Techniques
- Pattern Locks Are Unsafe Secure Your Vivo Y100i Phone Now with These Tips
- [Updated] In 2024, Sharing Wisdom The Art of Insta Duplication
- [Updated] Aesthetic Annotations on Photos The Top 20 Snap Filters Selection for 2024
- Best Fixes For Lenovo ThinkPhone Hard Reset | Dr.fone
- [Updated] 2024 Approved Epic Eats Escapades #TopTiktokFoodies
- Title: "2024 Approved A Stepwise Approach to Add YouTube Videos Into Slate"
- Author: Brian
- Created at : 2024-05-25 10:57:28
- Updated at : 2024-05-26 10:57:28
- Link: https://youtube-video-recordings.techidaily.com/2024-approved-a-stepwise-approach-to-add-youtube-videos-into-slate/
- License: This work is licensed under CC BY-NC-SA 4.0.
