
:max_bytes(150000):strip_icc()/PabloMartinez-32190b42c0114fdd92613612a5a2aa3e.png)
"2024 Approved A Simple Path to Enhanced YouTube Sign-Ups - Create Animated Subscription Bar Using Filmora"
A Simple Path to Enhanced YouTube Sign-Ups - Create Animated Subscription Bar Using Filmora
How to Make Your YouTube Animated Subscribe Button Easily With Filmora

Richard Bennett
Mar 27, 2024• Proven solutions
The main goal of every content creator is to increase its audience to expand its reach and views. To do so, it’s essential to provide something unique and different to the viewer. Without providing them the content they are looking for, it is impossible to grow your channel and reach. Once your content is ready and you are getting many views, it is essential to make these potential viewers your permanent viewers. The animated subscribe button will help you achieve this goal. While your viewers are watching your videos, you must remind them about subscribing to your channel for receiving such incredible content in the future. Subscribe animation plays a vital role in converting your viewers into subscribers.
There are so many platforms on the internet from where you can get Youtube subscribe button animation free, and you can also purchase these subscribe png gifs. But creating your own animated subscribe button can make you stand out from the crowd and make your videos unique and exclusive. Because it enables you to design it the way you want according to your brand, so, let’s create your own subscribe animation using Wondershare Filmora .
Step-By-Step guide
Step 1: To get started,open Filmora X. On your upper left corner, click on the “Sample Colors,” select the Green color and drag it to Video Track into the timeline. We are using a Green background to easily remove it using the green screen feature in Filmora to use it in our future projects after exporting it, without creating it again. Adjust the duration of this track according to your requirement. In my case, I am trying to make an animated subscribe button of 5 seconds.
Step 2: Lock this track by clicking on the lock icon to work on subscribe animation without disturbing the background easily.
Step 3: Now it’s time to design the subscribe png gif. Go to the Sample colors again and drag the red color into the time above the green background.
Step 4: Double click on the red color in the timeline and adjust its size. Make it look like a subscribe button that is a rectangle and place it at the bottom center of the background. You can put it anywhere you want it to appear in your future videos.
Step 5: Now, let’s add Subscribe text into the button. Go to the Title and select any style that you like. “Basic 6” will work perfectly fine for this purpose. Drag and drop it into the timeline above all tracks.
Step 6: Double click on the Title on the timeline and edit it with “Subscribe” and place it under the red rectangle and click OK.
Step 7: We have put a cursor that can click on the animated subscribe button. You can use Google Search to find a transparent cursor. Make sure to save it in png format. Download it and import it into Filmora.
Step 8: Drag and drop the cursor into the timeline and place it above all the other three tracks to make it prominent. Adjust the size of the cursor place it on the Subscribe button where you want it to appear.
Step 9: Now, it’s time to animate the design using keyframes. First of all, let’s animate the red rectangle. Double click on the red color on the timeline. Go to the ‘Animation’ tab and then click ‘Customize.’ Move to the 1 second in the timeline and click ‘Add.’
Step 10: Now go back to the beginning in the timeline and adjust the scale to 0%. It will make the rectangle pop up when you play the clip.
Step 11: Text needs to be animated as well to match it with the rectangle. Double click on the text in the timeline and click ‘ADVANCED.’
Step 12: In this Advance text editor, go to the ‘Animation’ tab and select any animation that you like. On the timeline under the preview screen, adjusts the dark areas according to the time you set on the rectangle, which was 1 second. We want the text to appear on the screen in 1 second, like the rectangle. Also, adjust the ending time when you want the text to disappear again. We have set it on 4 seconds. Which means it will start to fade after 4 seconds.
Step 13: Now, to animate the mouse cursor, we will use the same process we used for a rectangle that is key framing. Double click on the cursor track on the timeline and move the time on your timeline to a point when you want the cursor to appear. Now add a key frame by clicking ‘Add’.
Step 14: Now jump back to a point in your timeline, when the cursor will start appearing from outside the screen. Move the cursor outside the screen from where you want it to start moving toward the subscribe animation.
Step 15: To animate the click of the cursor, move ahead a little bit into your timeline and scale down the cursor to around 70%. Move it a little further and scale it up to 100%.
Step 16: You can add the sound of mouse click to make it more realistic. You can find this sound anywhere on the internet. Download it and import it into Filmora. Now place it into the timeline where it can match the movement of the cursor.
Step 17: Now it’s time to make this subscribe animation button disappear. Move forward into the time to the end, at around 4 seconds. Double click on the red button in the timeline and add a key frame at its actual scale.
Step 18: After that, move further in the timeline to the end and make its scale 0. It will make it disappear.
Step 19: Do the same with the cursor. Double click on the cursor in the time and add a key frame at its actual position.
Step 20: Move ahead when you want it to disappear. Move the cursor out of the screen and click ‘OK’.
Step 21: Your Subscribe png gif is ready to be exported and used in your videos. Click on export and choose from various formats and options to choose from while exporting it.
You may also like: How to Get People to Subscribe Channel
Conclusion:Your own Animated Subscribe Button is ready to be used in your future videos and projects. This is a ready-to-use subscribe button that can be easily used using the green screen effect in Filmora. Just import the clip, remove the green screen, and you are good to go. You can also customize this Subscribe Animation using your channel and more. Keep experimenting with new things using Filmora.


Richard Bennett
Richard Bennett is a writer and a lover of all things video.
Follow @Richard Bennett
Richard Bennett
Mar 27, 2024• Proven solutions
The main goal of every content creator is to increase its audience to expand its reach and views. To do so, it’s essential to provide something unique and different to the viewer. Without providing them the content they are looking for, it is impossible to grow your channel and reach. Once your content is ready and you are getting many views, it is essential to make these potential viewers your permanent viewers. The animated subscribe button will help you achieve this goal. While your viewers are watching your videos, you must remind them about subscribing to your channel for receiving such incredible content in the future. Subscribe animation plays a vital role in converting your viewers into subscribers.
There are so many platforms on the internet from where you can get Youtube subscribe button animation free, and you can also purchase these subscribe png gifs. But creating your own animated subscribe button can make you stand out from the crowd and make your videos unique and exclusive. Because it enables you to design it the way you want according to your brand, so, let’s create your own subscribe animation using Wondershare Filmora .
Step-By-Step guide
Step 1: To get started,open Filmora X. On your upper left corner, click on the “Sample Colors,” select the Green color and drag it to Video Track into the timeline. We are using a Green background to easily remove it using the green screen feature in Filmora to use it in our future projects after exporting it, without creating it again. Adjust the duration of this track according to your requirement. In my case, I am trying to make an animated subscribe button of 5 seconds.
Step 2: Lock this track by clicking on the lock icon to work on subscribe animation without disturbing the background easily.
Step 3: Now it’s time to design the subscribe png gif. Go to the Sample colors again and drag the red color into the time above the green background.
Step 4: Double click on the red color in the timeline and adjust its size. Make it look like a subscribe button that is a rectangle and place it at the bottom center of the background. You can put it anywhere you want it to appear in your future videos.
Step 5: Now, let’s add Subscribe text into the button. Go to the Title and select any style that you like. “Basic 6” will work perfectly fine for this purpose. Drag and drop it into the timeline above all tracks.
Step 6: Double click on the Title on the timeline and edit it with “Subscribe” and place it under the red rectangle and click OK.
Step 7: We have put a cursor that can click on the animated subscribe button. You can use Google Search to find a transparent cursor. Make sure to save it in png format. Download it and import it into Filmora.
Step 8: Drag and drop the cursor into the timeline and place it above all the other three tracks to make it prominent. Adjust the size of the cursor place it on the Subscribe button where you want it to appear.
Step 9: Now, it’s time to animate the design using keyframes. First of all, let’s animate the red rectangle. Double click on the red color on the timeline. Go to the ‘Animation’ tab and then click ‘Customize.’ Move to the 1 second in the timeline and click ‘Add.’
Step 10: Now go back to the beginning in the timeline and adjust the scale to 0%. It will make the rectangle pop up when you play the clip.
Step 11: Text needs to be animated as well to match it with the rectangle. Double click on the text in the timeline and click ‘ADVANCED.’
Step 12: In this Advance text editor, go to the ‘Animation’ tab and select any animation that you like. On the timeline under the preview screen, adjusts the dark areas according to the time you set on the rectangle, which was 1 second. We want the text to appear on the screen in 1 second, like the rectangle. Also, adjust the ending time when you want the text to disappear again. We have set it on 4 seconds. Which means it will start to fade after 4 seconds.
Step 13: Now, to animate the mouse cursor, we will use the same process we used for a rectangle that is key framing. Double click on the cursor track on the timeline and move the time on your timeline to a point when you want the cursor to appear. Now add a key frame by clicking ‘Add’.
Step 14: Now jump back to a point in your timeline, when the cursor will start appearing from outside the screen. Move the cursor outside the screen from where you want it to start moving toward the subscribe animation.
Step 15: To animate the click of the cursor, move ahead a little bit into your timeline and scale down the cursor to around 70%. Move it a little further and scale it up to 100%.
Step 16: You can add the sound of mouse click to make it more realistic. You can find this sound anywhere on the internet. Download it and import it into Filmora. Now place it into the timeline where it can match the movement of the cursor.
Step 17: Now it’s time to make this subscribe animation button disappear. Move forward into the time to the end, at around 4 seconds. Double click on the red button in the timeline and add a key frame at its actual scale.
Step 18: After that, move further in the timeline to the end and make its scale 0. It will make it disappear.
Step 19: Do the same with the cursor. Double click on the cursor in the time and add a key frame at its actual position.
Step 20: Move ahead when you want it to disappear. Move the cursor out of the screen and click ‘OK’.
Step 21: Your Subscribe png gif is ready to be exported and used in your videos. Click on export and choose from various formats and options to choose from while exporting it.
You may also like: How to Get People to Subscribe Channel
Conclusion:Your own Animated Subscribe Button is ready to be used in your future videos and projects. This is a ready-to-use subscribe button that can be easily used using the green screen effect in Filmora. Just import the clip, remove the green screen, and you are good to go. You can also customize this Subscribe Animation using your channel and more. Keep experimenting with new things using Filmora.
Richard Bennett
Richard Bennett is a writer and a lover of all things video.
Follow @Richard Bennett
Add Fun to YouTube Comments: A Quick Guide to Emojis
How to Add Emojis on YouTube Comments
Richard Bennett
Mar 27, 2024• Proven solutions
Emojis are a great way to make your videos and comments stand out from the rest. You may also be able to catch the attention of millennials and improve your YouTube and Google ranking. Beginners can use emojis as a great strategy to improve YouTube SEO performance and get ahead of others. Experts suggest using emojis wisely; that is not to overload or spam whole titles or comments with smileys!
Here are some great ways to add YouTube comments emojis:
Part 1: How to Type Emojis in a YouTube Comment on Windows
Here are several ways to type emojis in YouTube comments. Follow the instructions below to write YouTube comments with emojis:
1. Adding Emojis to YouTube Videos on Windows with Keyboard
If you are using Windows 10, then you can use the keyboard shortcut to open the emoji icons. Press Windows + ; (semi-colon) or Windows + . (period) to open the emoji keyboard. And you will see the emojis.
Currently, there are 6 types of emojis you can add on Windows, including smiley faces and animals, people, celebrities and objects, foods and plants, transportation and places, and symbols.
You can then click the emoji that you’d like to add to the YouTube video directly.
2. Copy and Paste Emojis from Websites
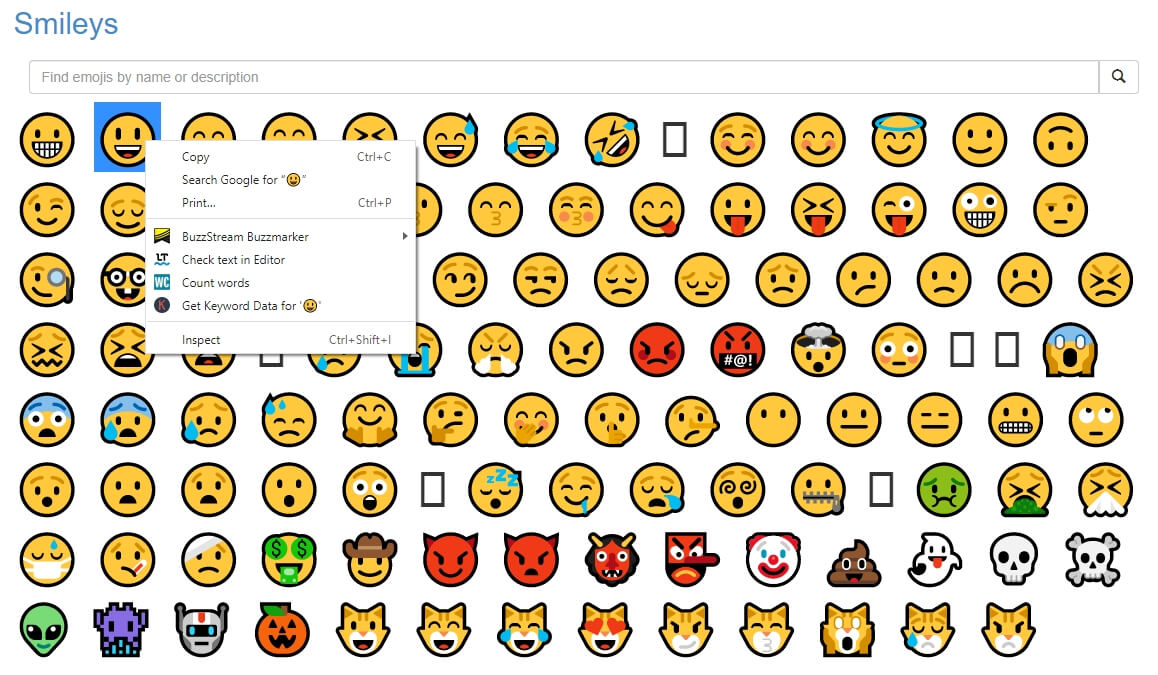
One of the easiest ways to add emojis to YouTube comments is to copy-paste them from an emoji database. You can right-click on the emoji and then select “copy.”
Now, go to your YouTube comment and right-click again. Scroll down and click on “paste” to use the emoji.
Here are some of the best websites to download emojis that you may need. In these websites, you can get a range of smileys and icons to use for your YouTube comments. You can start with smiley faces that help you express many emotions. Then you can get emojis of objects like cars, mountains, drinks, fruits, bells, guitars, and more.
The list is just endless, and you will never face any shortage of emojis.
Part 2: How to Add Emojis to YouTube Comments on Mac?
Mac users enjoy a wide selection of emojis without any hassles and can easily add emojis to comments they type on YouTube. Just follow the steps below to add emoji to YouTube comments.
You can select any emoji from the emoji resources website and ctrl-click your mouse to copy it. Now, navigate to your YouTube comment and ctrl-click your mouse. Click on “paste” to add the smiley to your comments.
If you want to use your keyboard, select the emoji and press “Command” and “C.” Now, press “Command” and “V” to paste the emoji in your YouTube comment.
Your emoji is now added to your YouTube comments.
You can also use your Mac’s inbuilt emojis in your YouTube comments. Start typing your YouTube comment and then use your keyboard shortcut Command + Control + Space to access the emoji list.
You can now double-click on any emoji to include it in your comment. The free emoji lists are full of smileys, animal faces, everyday objects and things, sports emojis, vehicles, and more. and more. You will find an emoji to suit every comment you type on YouTube.
If your Mac has a Touch Bar, then you can tap the smile face and then tap an emoji to add to YouTube video comments.
YouTuber Javier Mercedes has made a quick tutorial and introduced many more ways to typing emojis on Mac. Check it below and find the best way based on your preferences.
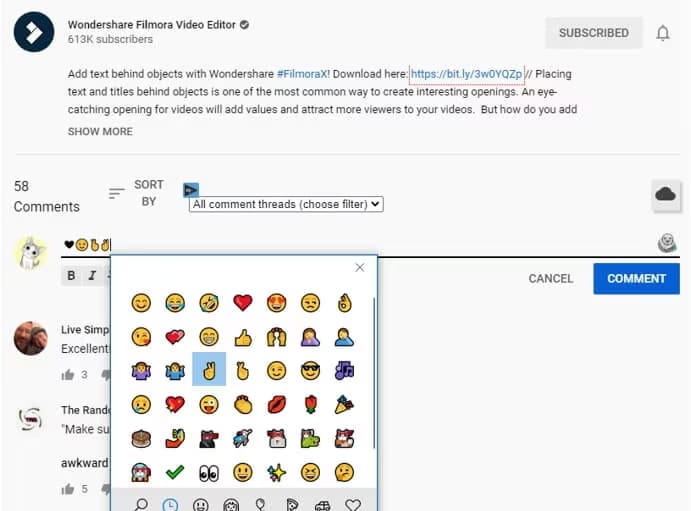
Part 3: How to Add Emoji to YouTube Comments with TubeBuddy?
TubeBuddy is a suite of tools for YouTubers to grow their success. You can access a range of tools, including YouTube comments emojis to improve your visual appeal. It is a free browser extension that you can add to Chrome, Opera, Firefox, and more.
TubeBuddy provides a large collection of emojis and smileys for you to use in your YouTube comments. Additionally, you don’t need to copy-paste anything. The plugin lets you insert emojis from a list with a click. Here are the steps to add emojis to YouTube comments using TubeBuddy:
Step 1: Install TubeBuddy
Visit the TubeBuddy website and install the plugin for your browser. TubeBuddy is available on both Chrome, FireFox, Opera, and Edge, as well as iOS and Android devices.
Step 2: Sign in to YouTube
Sign in to your YouTube account to allow TubeBuddy access to your comments. You will find the TubeBuddy icon beside the YouTube search bar on your browser.
Step 3: Add Emojis at Commenting
A window with a list of emojis will appear on YouTube as you type your comments. You can select any emoji and add it to your comments.
Types of Emojis in TubeBuddy
TubeBuddy is home to a large collection of emojis. You won’t find many emojis anywhere else on the internet. All emojis are grouped under categories like smileys, places, food and drinks, buildings, and more.
You can quickly select a category and then add emoji to YouTube comments. The tool also adds new emojis daily.
Bonus: How to Add Emojis to YouTube Video Title and Description?
You can add cool emojis to your video titles and descriptions for more innovation. People will also be more likely to choose your video as they pop-out on the search results or playlists.
Here is how you can add emojis to YouTube video titles and descriptions:
You can access any list of YouTube comments emojis and select the one you like. Then use your mouse to copy the emoji and paste it into your YouTube titles and description. Or press “Ctrl” + “C” for Windows and “Command” + “C” for Mac to copy your emoji.
Now go to your title or description and press “Ctrl” + “V” for Windows and “Command” + “V” for Mac to paste the emoji.
FAQs about YouTube Video Comments
- Are Emojis Harmful to Use for YouTube?
We all have heard rumors of using emojis in YouTube video titles or comments may damage views or reputation. However, it’s not true, and emojis have no negative consequences on YouTube.
Rather, you can attract more viewers and even improve YouTube SEO by using emojis. Google also allows emojis in search results, and data shows they rank better. You can use emojis for YouTube with complete peace of mind.
In my opinion, there will be no harmful effects on your views, subscribers, or credibility. Instead, you may be able to appeal to a younger crowd and get more clicks.
- Will adding Emojis Impact YouTube SEO?
Many people don’t use emojis in their YouTube videos, fearing a negative impact. But all the rumors out there are just rumors without any truth. YouTube doesn’t penalize you in any way if you use emojis in comments, titles, or descriptions. You will not experience any penal actions by including emojis on YouTube.
Google is also friendly with emojis, and many websites use them to stand apart from the crowd. Using emojis on YouTube can be an excellent way to improve your SEO performance. Your videos will also have a chance to show up on Google results and YouTube. Emojis also help your videos look innovative to draw in more views.
Final Thoughts
Using emojis in YouTube comments is a great way to boost the popularity of your videos. You can also use emojis in your video titles and descriptions to appear more innovative. Additionally, emojis can improve your YouTube SEO performance and even help you rank on Google search results.
Copy-pasting emojis is a simple way to use them, but you can also go for other methods. TubeBuddy is a great choice if you want to eliminate the whole copy-paste scenario and include more types of emojis in your comments directly.
Richard Bennett
Richard Bennett is a writer and a lover of all things video.
Follow @Richard Bennett
Richard Bennett
Mar 27, 2024• Proven solutions
Emojis are a great way to make your videos and comments stand out from the rest. You may also be able to catch the attention of millennials and improve your YouTube and Google ranking. Beginners can use emojis as a great strategy to improve YouTube SEO performance and get ahead of others. Experts suggest using emojis wisely; that is not to overload or spam whole titles or comments with smileys!
Here are some great ways to add YouTube comments emojis:
Part 1: How to Type Emojis in a YouTube Comment on Windows
Here are several ways to type emojis in YouTube comments. Follow the instructions below to write YouTube comments with emojis:
1. Adding Emojis to YouTube Videos on Windows with Keyboard
If you are using Windows 10, then you can use the keyboard shortcut to open the emoji icons. Press Windows + ; (semi-colon) or Windows + . (period) to open the emoji keyboard. And you will see the emojis.
Currently, there are 6 types of emojis you can add on Windows, including smiley faces and animals, people, celebrities and objects, foods and plants, transportation and places, and symbols.
You can then click the emoji that you’d like to add to the YouTube video directly.
2. Copy and Paste Emojis from Websites
One of the easiest ways to add emojis to YouTube comments is to copy-paste them from an emoji database. You can right-click on the emoji and then select “copy.”
Now, go to your YouTube comment and right-click again. Scroll down and click on “paste” to use the emoji.
Here are some of the best websites to download emojis that you may need. In these websites, you can get a range of smileys and icons to use for your YouTube comments. You can start with smiley faces that help you express many emotions. Then you can get emojis of objects like cars, mountains, drinks, fruits, bells, guitars, and more.
The list is just endless, and you will never face any shortage of emojis.
Part 2: How to Add Emojis to YouTube Comments on Mac?
Mac users enjoy a wide selection of emojis without any hassles and can easily add emojis to comments they type on YouTube. Just follow the steps below to add emoji to YouTube comments.
You can select any emoji from the emoji resources website and ctrl-click your mouse to copy it. Now, navigate to your YouTube comment and ctrl-click your mouse. Click on “paste” to add the smiley to your comments.
If you want to use your keyboard, select the emoji and press “Command” and “C.” Now, press “Command” and “V” to paste the emoji in your YouTube comment.
Your emoji is now added to your YouTube comments.
You can also use your Mac’s inbuilt emojis in your YouTube comments. Start typing your YouTube comment and then use your keyboard shortcut Command + Control + Space to access the emoji list.
You can now double-click on any emoji to include it in your comment. The free emoji lists are full of smileys, animal faces, everyday objects and things, sports emojis, vehicles, and more. and more. You will find an emoji to suit every comment you type on YouTube.
If your Mac has a Touch Bar, then you can tap the smile face and then tap an emoji to add to YouTube video comments.
YouTuber Javier Mercedes has made a quick tutorial and introduced many more ways to typing emojis on Mac. Check it below and find the best way based on your preferences.
Part 3: How to Add Emoji to YouTube Comments with TubeBuddy?
TubeBuddy is a suite of tools for YouTubers to grow their success. You can access a range of tools, including YouTube comments emojis to improve your visual appeal. It is a free browser extension that you can add to Chrome, Opera, Firefox, and more.
TubeBuddy provides a large collection of emojis and smileys for you to use in your YouTube comments. Additionally, you don’t need to copy-paste anything. The plugin lets you insert emojis from a list with a click. Here are the steps to add emojis to YouTube comments using TubeBuddy:
Step 1: Install TubeBuddy
Visit the TubeBuddy website and install the plugin for your browser. TubeBuddy is available on both Chrome, FireFox, Opera, and Edge, as well as iOS and Android devices.
Step 2: Sign in to YouTube
Sign in to your YouTube account to allow TubeBuddy access to your comments. You will find the TubeBuddy icon beside the YouTube search bar on your browser.
Step 3: Add Emojis at Commenting
A window with a list of emojis will appear on YouTube as you type your comments. You can select any emoji and add it to your comments.
Types of Emojis in TubeBuddy
TubeBuddy is home to a large collection of emojis. You won’t find many emojis anywhere else on the internet. All emojis are grouped under categories like smileys, places, food and drinks, buildings, and more.
You can quickly select a category and then add emoji to YouTube comments. The tool also adds new emojis daily.
Bonus: How to Add Emojis to YouTube Video Title and Description?
You can add cool emojis to your video titles and descriptions for more innovation. People will also be more likely to choose your video as they pop-out on the search results or playlists.
Here is how you can add emojis to YouTube video titles and descriptions:
You can access any list of YouTube comments emojis and select the one you like. Then use your mouse to copy the emoji and paste it into your YouTube titles and description. Or press “Ctrl” + “C” for Windows and “Command” + “C” for Mac to copy your emoji.
Now go to your title or description and press “Ctrl” + “V” for Windows and “Command” + “V” for Mac to paste the emoji.
FAQs about YouTube Video Comments
- Are Emojis Harmful to Use for YouTube?
We all have heard rumors of using emojis in YouTube video titles or comments may damage views or reputation. However, it’s not true, and emojis have no negative consequences on YouTube.
Rather, you can attract more viewers and even improve YouTube SEO by using emojis. Google also allows emojis in search results, and data shows they rank better. You can use emojis for YouTube with complete peace of mind.
In my opinion, there will be no harmful effects on your views, subscribers, or credibility. Instead, you may be able to appeal to a younger crowd and get more clicks.
- Will adding Emojis Impact YouTube SEO?
Many people don’t use emojis in their YouTube videos, fearing a negative impact. But all the rumors out there are just rumors without any truth. YouTube doesn’t penalize you in any way if you use emojis in comments, titles, or descriptions. You will not experience any penal actions by including emojis on YouTube.
Google is also friendly with emojis, and many websites use them to stand apart from the crowd. Using emojis on YouTube can be an excellent way to improve your SEO performance. Your videos will also have a chance to show up on Google results and YouTube. Emojis also help your videos look innovative to draw in more views.
Final Thoughts
Using emojis in YouTube comments is a great way to boost the popularity of your videos. You can also use emojis in your video titles and descriptions to appear more innovative. Additionally, emojis can improve your YouTube SEO performance and even help you rank on Google search results.
Copy-pasting emojis is a simple way to use them, but you can also go for other methods. TubeBuddy is a great choice if you want to eliminate the whole copy-paste scenario and include more types of emojis in your comments directly.
Richard Bennett
Richard Bennett is a writer and a lover of all things video.
Follow @Richard Bennett
Also read:
- Inalterable Action Plan to Expunge YouTube Shorts
- In 2024, Dialing in the Perfect Aspect Ratio for YouTube Images
- [New] Economical Entrance to YouTube Ecosystem Affiliate Assistance for Small Sets
- [Updated] Efficient Processes for Uploading Videos From iOS Gadgets
- In 2024, Direct Your Media Essential Flv-to-YouTube Applications Ranked
- [New] Complete Guide to Crafting Killer YouTube Outros
- Affordable Tutorial on Professional Looking YouTube Intros/Ends for 2024
- Edit with Ease #10 Video-to-Mp3 Tools of the Trade
- How to Snip and Save From YouTube The Ultimate Guide
- [Updated] Analyzing TSeries Earnings via YouTube Engagement
- [New] Aspect Ratios for Stellar Youtube Thumbnails
- 2024 Approved Amplify Audience on Both Platforms Youtube + Twitch Strategy
- Maximizing Visibility A Comprehensive Guide to YT Gaming Hashes
- Elevate Videos Innovative YouTube Editing Techniques Revealed
- How to Upload a Video From iMovie to YouTube?
- 2024 Approved Elite 7 Cameras Elevating Interactive Learning Vlogs & Tutorials
- Hurry Up, Get Professional Valorant Thumbnail Skills Now
- [Updated] Enhancing Visuals The Role of a Tripod in Video Content
- 2024 Approved Cutting Edge YouTube Video Editing Techniques - Premiere Pro
- Billion-Views Video Hall YouTube's Top Ever Watches for 2024
- Stepwise Strategy Creating Effective YouTube Subscriber Buttons
- Quick Resize YouTube Videos to Right Aspect Ratio on Mac
- 2024 Approved Earnings Escalation via YouTube Channel Initiatives
- Essential Techniques to Elevate Your Channel's Visibility
- Balancing Frequency & Quality in YouTube Video Uploads
- Is There a Science to YouTube's Quick Subscribe Tactic?
- [Updated] Arena of Games 100+ Channel Spectrums Galore
- [New] Content Hub Hierarchy Stand Out Amongst Titans – Vimeo, YouTube & Dailymotion?
- Channel Combat Determining Which Earns More From Videos—Dailymotion or YouTube for 2024
- [New] Elite Filmmakers Merging Sounds, Images
- Effortless Audio Transfer on iPhone Pick Top 6 Tools to Convert YouTube for 2024
- In 2024, Critical ASMR Series to Experience
- 10 Must-Watch Historical Channels for Students for 2024
- Delightful Yuletide Cinema on YouTube Savor Nine Whole-Film Gems
- In 2024, Content Creators' Revenue Gain From Each Click
- Captivate and Conquer with Customized Content Shorts
- Best 7 LIVE Streaming Apps to Amplify Your YouTube Presence on iPhone and Android
- Bursting Boundaries, Breaking Barriers The Top Ten Reasons for Your YouTube Viewer Void
- A Step-by-Step Guide to Forming Effective YouTube Partner Relationships for 2024
- [New] Break Bot Patterns, Enhance Organic Video Reach
- Top 6 YouTube Outro Makers-Lots of FREE Options
- Download YouTube Beats on Android The Ultimate 6-App Guide for 2024
- In 2024, Amplify Your Video Content with Precision Insights From Social Blade & YouTube
- Techniques for Rapid Deletion of Youtube Feedback
- [Updated] Comprehensive Directory Extracting YT Template Videos Online
- Achieving a Noiseless Presence on Social Video Platforms
- YouTube Copyrights Demystified Understanding and Managing Strikes
- [Updated] Copyright Rules for Screenshotting and Archiving YouTube Videos
- Pro-Tips for Conquering Photo & Video Importers on Windows 10
- [Updated] In 2024, Anonymizing Videos Tips for Keeping Personal Data Hidden
- Revamp Your Rewind The Top 15 Game Capture Tools Listed Here
- Transforming Photos Into Videos An Expert's Complete Tutorial Series
- [Updated] In 2024, 11 Must-Know Tricks for Effective FB Video SEO and Performance
- Bring Your Text to Life Techniques for 3D Design in PS
- [Updated] Dividing Drama A Step-by-Step Chapters Integration on Vimeo
- New Elevate Your Game Top 10 Online Gaming Intro Generators for 2024
- In 2024, 2 Ways to Monitor Xiaomi Redmi Note 13 5G Activity | Dr.fone
- In 2024, 3 Ways for Android Pokemon Go Spoofing On Lava Yuva 3 | Dr.fone
- [New] Crafting Compelling Narratives in TikTok The Top 5 Caption Techniques to Try for 2024
- Quick Route Downloading and Launching TikTok App in MacBook
- In 2024, Artful Humor ChuckleDrawings
- All You Need To Know About Mega Greninja For Xiaomi Redmi Note 12 Pro 4G | Dr.fone
- Ways to stop parent tracking your Samsung Galaxy F54 5G | Dr.fone
- Best Honor X9a Pattern Lock Removal Tools Remove Android Pattern Lock Without Losing Data
- [New] Efficient Utilization of Whiteboard Features in Zoom Meetings
- Why is iPogo not working On Realme 10T 5G? Fixed | Dr.fone
- Title: "2024 Approved A Simple Path to Enhanced YouTube Sign-Ups - Create Animated Subscription Bar Using Filmora"
- Author: Brian
- Created at : 2024-05-25 10:57:21
- Updated at : 2024-05-26 10:57:21
- Link: https://youtube-video-recordings.techidaily.com/2024-approved-a-simple-path-to-enhanced-youtube-sign-ups-create-animated-subscription-bar-using-filmora/
- License: This work is licensed under CC BY-NC-SA 4.0.
