
:max_bytes(150000):strip_icc():format(webp)/duetinslides-fd2c11f1a91a4d7388cc25f2f4719cca.jpg)
"2024 Approved 15 Best Free Tools for Downloading High-Fidelity Soundtracks Directly From YouTube"
15 Best Free Tools for Downloading High-Fidelity Soundtracks Directly From YouTube
11 FREE YouTube Audio Rippers to Download Audio from YouTube

Shanoon Cox
Mar 27, 2024• Proven solutions
YouTube audio ripper is an application or web tool that lets you download the background audio of any particular video. It is free and easy to use and allows us to download audio from YouTube without any hassle.
We can download MP3, MP4, and many other popular formats. You can use a YouTube music ripper to download videos for offline listening or use it in any of your customized videos as background audio.
In this article, we are going to discuss briefly the 11 best YouTube music rippers that can be used to extract audio from YouTube.
Note: We resolutely oppose all forms of copyright-infringing downloads. This tutorial is only for downloading YouTube videos/audio materials from your own channel.
Part 1: Top 11 YouTube Audio Rippers to Download YouTube Audio
Here are some of the best and most commonly used YouTube audio ripper tools to convert and extract audio from YouTube videos. Read ahead and choose the best that is suitable according to your needs.
| 1 - Filmora YouTube Audio Ripper | 2 - Ytmp3 Converter | 3 - YouTube to MP3 Music |
|---|---|---|
| 4 - Yt1s.com | 5 - 320YTMp3 | 6 - Clickmp3 |
| 7 - Converto.io | 8 - Loader.to | 9 - Flv2mp3 |
| 10 - Ontiva | 11 - Y2mate |
1. Filmora YouTube Audio Ripper
Filmora YouTube Audio Ripper is the best audio ripper to achieve YouTube audio downloads. You only need 2 steps to extract audio files from any video including YouTube, with the highest audio quality. Plus, Filmora owns plenty of AI editing tools to help you upgrade and polish your media files.
For Win 7 or later (64-bit)
 Secure Download
For macOS 10.14 or later
Secure Download


Step 1: First, download Filmora Video Editor from the button above and launch it. Click the ‘Screen Recorder‘ feature to record the screen. You can play YouTube Music or video in the background, then stop recording while the music finishes playing.
Step 2: Drag and drop the recording file to the timelime, click on the video track and select ‘Detach Audio‘ to extract audio track from recorded YouTube video/music. Then choose the audio track and click the ‘Export‘ button to save ripped audio files.
Here are more features of Filmora YouTube Audio Ripper:
- Download and record video or audio from YouTube or any other website.
- Easily edit video and audio with multiple AI tools.
- Offer popular effects, filters and stickers to make your video professional.
- Export video and audio with multiple formats, share on social media directly.
For Win 7 or later (64-bit)
Secure Download
For macOS 10.14 or later
Secure Download
2. Ytmp3 Converter
Ytmp3 Converter is a free and online YouTube audio ripper that will allow us to extract audio from YouTube video easily within a couple of minutes and does not require any software registration or installation. To convert a video, you simply need to copy the URL of the desired YouTube video, paste the copied URL in the address bar of the YouTube music ripper tool, choose a format and click the convert button. Once the video is converted and completed, you can download it by clicking the download button and enjoy your music in high-quality MP3 or MP4 format. It only has a single limitation that the video cannot be of more than 90 minutes for easy and quick conversion.
3. YouTube to MP3 Music
YouTube to MP3 Music is another leading YouTube music ripper tool that allows us to extract audio from YouTube video within few seconds. This YouTube audio ripper tool supports high-quality MP3 files up to 320 kbps. It supports multiple platforms, including Windows, Mac, Android, and iPhone. This tool does not require any installation. It has an amazing feature that other YouTube music ripper might not have and that it also supports video search by keyword and YouTube playlist and can even upload the file to the DropBox or Google Drive after it is converted.
4. Yt1s.com
Yt1s.com is a fast, safe, and very easy-to-use YouTube audio ripper tool that converts YouTube to MP3. You can extract audio from YouTube and download it for offline use. It does not have any limitations, so you can download as many videos as you want. It is completely safe and secure and has no virus as it is under the intense supervision of professionals. By using this YouTube music ripper, you can convert audio files in many different formats such as MP3, MP4, 3GP, M4A, and many more in the best quality available.
Try Filmora to Download YouTube Audio and Free Edit with AI!
Filmora YouTube Audio Ripper can easily download and extract audio from YouTube Video & Music with the original high quality. What’s more, it owns multiple AI tools for helping you edit audio and video for free. You can edit the soundtrack or mix the song if needed. Then you can share it with your friends or upload it to YouTube and other social media directly and gain more views!
Download and Edit YouTube Audio Download and Edit YouTube Audio Learn More >
5. 320YTMp3
320YTMp3 enables us to freely download audio from YouTube without any download limitation. It allows us to extract audio from YouTube in high-quality formats of Mp3, MP4, etc. This YouTube audio ripper is compatible with all the latest browsers and can extract audio from YouTube and other 1000+ popular sites. It includes three easy steps to convert audio to MP3. Just copy the video URL and paste that into the search box, and press the search button, now choose the MP3 quality and download your desired audio.
6. Clickmp3
Clickmp3 is a professional YouTube audio ripper tool that downloads high-quality MP3 files from YouTube within 5 seconds which usually might take up to several minutes. It is free to use and does not need any registration or browser extension. It is compatible with all platforms, devices, and operating systems. This YouTube music ripper does not contain any ads that might distract your conversion and is also completely safe from viruses that might infect your system. Click mp3 also offer unlimited downloads of YouTube video and duration limit.
7. Converto.io
Converto.io is an online music ripper tool that extract audio from YouTube videos. It is hundred percent free, fast, and easy to use. Through this YouTube audio ripper, you can download any video to MP3 or MP4 format. Simply copy the YouTube URL, paste the URL on Converto.io and click the convert button. This Converto.io also allows us to edit the filename, ID tags and select the part of the video that you want to cut or change by clicking the settings button. This YouTube audio ripper also provides a feature to add a cover to all the MP3s of your music collection.
8. Loader.to
Loader.to is one of the best YouTube audio ripper converters that enables us to download YouTube videos or even complete playlists. This YouTube music ripper is extremely easy and is user-friendly. By using Loader.io, you can not only extract audio from YouTube but also can convert the videos into many audio and video formats such as MP3, MP4, WAV, 4K, 8K, etc. Another feature of this tool is that you can convert and download one video at a time but can also convert an entire playlist at high speed. Loader.io also guarantees security while using this online tool and is trusted to provide reliable and smooth service.

Filmora YouTube Audio Ripper & Editor
Extract YouTube Audio and Edit with AI
Rip audio or video from YouTube with Filmora’s built-in screen recorder function. Edit YouTube audio & videos with the latest AI tools to enhance your creative vision. Upgrade your video and audio to get more attention.
Rip YouTube Audio Rip YouTube Audio Learn More >
9. Flv2mp3
Flv2mp3 YouTube audio ripper is an online tool to download audio from YouTube and 23 other supported video streaming services like TikTok, Facebook, Vimeo, and many more. Flv2mp3 converter is free and saves time by downloading multiple audio files at once. It is a multiformat youTube music ripper that supports a number of different and popular formats and will ensure a high-quality format no matter what quality of the video is provided in the URL. This Flv2mp3 converter is also available in Spanish, Portuguese, and Turkish language. There are two simple steps for using this YouTube music ripper; Just copy-paste the URL of the chosen video, click the convert button, and your file will start downloading to your device.
10. Ontiva Youtube Audio Ripper
Ontiva YouTube to MP3 converter is an online tool to extract audio from YouTube videos. There are multiple features and services of this YouTube audio ripper. You can download YouTube videos in MP3, MP4 as well as WAV format. Not just these, but there are other formats that we can choose from for our video. The quality of the video will totally depend on the internet speed that is being used while converting the video. It also allows conversion of YouTube playlist hassle-free, but this feature is for premium users only after registering an account, but the basic and simple features are free to use. It also supports multiple popular languages.
11. Y2mate
Y2mate is an easy and free-of-cost YouTube audio ripper to extract audio from YouTube videos in the best quality available in MP3 and MP4 formats. This tool uses high-speed encoders that ensure fast conversion. No registration is required. Y2mate is totally free. This YouTube music ripper tool also allows us to upload the converted files to the cloud platforms such as Google Drive, Dropbox, etc. It supports all browsers like Google Chrome, Firefox, Safari, and many more.
FAQs about YouTube Audio Ripper
Here we sorted out some frequently asked questions for YouTube audio ripper.
1. Is it legal to use a YouTube audio ripper?
Technically, it is not illegal to use a YouTube audio ripper to extract audio from YouTube videos, but it is illegal to use or download any copyright video without proper permission. Google has attempted to shut down numerous YouTube music ripper tools as YouTube proposes that it is a violation of their Terms and Services.
2. What are the common features of good YouTube audio rippers?
A good YouTube audio ripper will be easy to use; it will be free of cost without any registration or software installation, it should have multi-platform and multi-language support, it should maintain high quality and popular formats and ensuring security as well. Bulk download of converted videos and uploading to the cloud will be a plus for a good YouTube music ripper.
3. How can I get higher-quality audio?
To get higher quality audio using a YouTube audio ripper, you should have stable and high-speed internet. Many YouTube music ripper supports 128Kbps, 320Kbps and depends mostly on the internet speed.
4. What’s the highest audio quality conversion supported for the audio ripping?
The highest quality YouTube to MP3 conversion is of WAV file. Several YouTube audio rippers support WAV file conversion. WAV is a high-quality format due to the fact that it does compress the audio and contains all the raw information. The WAV file format is of much higher quality than the MP3 file.
Bonus Tip: The Most Recommended Audio Editor - Filmora
The latest version of Wondershare Filmora now offer AI technology to edit and manage your audio with ease! It has several AI features of audio editing that are discussed here.
For Win 7 or later (64-bit)
Secure Download
For macOS 10.14 or later
Secure Download
Using Filmora audio editor, we can add the audio downloaded from YouTube as a background and can change the tone. Filmora also offers a free music library that we can choose from. You can also split the audio by using the playhead in the timeline, or you can adjust the pitch, volume, or length of the audio. You can even mute the audio in a particular clip.
Filmora also allows us to add real-time voiceovers by just clicking the record button, and you will have 3 seconds before the recording starts and once you are completed, click the stop button to end the recording. There are many more audio editing features that Filmora offers, such as customizing and adding multiple tracks in a clip, audio fade in and out, adjusting audio speed, audio equalizer for changing frequency, and many more.
Shanoon Cox
Shanoon Cox is a writer and a lover of all things video.
Follow @Shanoon Cox
Shanoon Cox
Mar 27, 2024• Proven solutions
YouTube audio ripper is an application or web tool that lets you download the background audio of any particular video. It is free and easy to use and allows us to download audio from YouTube without any hassle.
We can download MP3, MP4, and many other popular formats. You can use a YouTube music ripper to download videos for offline listening or use it in any of your customized videos as background audio.
In this article, we are going to discuss briefly the 11 best YouTube music rippers that can be used to extract audio from YouTube.
Note: We resolutely oppose all forms of copyright-infringing downloads. This tutorial is only for downloading YouTube videos/audio materials from your own channel.
Part 1: Top 11 YouTube Audio Rippers to Download YouTube Audio
Here are some of the best and most commonly used YouTube audio ripper tools to convert and extract audio from YouTube videos. Read ahead and choose the best that is suitable according to your needs.
| 1 - Filmora YouTube Audio Ripper | 2 - Ytmp3 Converter | 3 - YouTube to MP3 Music |
|---|---|---|
| 4 - Yt1s.com | 5 - 320YTMp3 | 6 - Clickmp3 |
| 7 - Converto.io | 8 - Loader.to | 9 - Flv2mp3 |
| 10 - Ontiva | 11 - Y2mate |
1. Filmora YouTube Audio Ripper
Filmora YouTube Audio Ripper is the best audio ripper to achieve YouTube audio downloads. You only need 2 steps to extract audio files from any video including YouTube, with the highest audio quality. Plus, Filmora owns plenty of AI editing tools to help you upgrade and polish your media files.
For Win 7 or later (64-bit)
Secure Download
For macOS 10.14 or later
Secure Download
Step 1: First, download Filmora Video Editor from the button above and launch it. Click the ‘Screen Recorder‘ feature to record the screen. You can play YouTube Music or video in the background, then stop recording while the music finishes playing.
Step 2: Drag and drop the recording file to the timelime, click on the video track and select ‘Detach Audio‘ to extract audio track from recorded YouTube video/music. Then choose the audio track and click the ‘Export‘ button to save ripped audio files.
Here are more features of Filmora YouTube Audio Ripper:
- Download and record video or audio from YouTube or any other website.
- Easily edit video and audio with multiple AI tools.
- Offer popular effects, filters and stickers to make your video professional.
- Export video and audio with multiple formats, share on social media directly.
For Win 7 or later (64-bit)
Secure Download
For macOS 10.14 or later
Secure Download
2. Ytmp3 Converter
Ytmp3 Converter is a free and online YouTube audio ripper that will allow us to extract audio from YouTube video easily within a couple of minutes and does not require any software registration or installation. To convert a video, you simply need to copy the URL of the desired YouTube video, paste the copied URL in the address bar of the YouTube music ripper tool, choose a format and click the convert button. Once the video is converted and completed, you can download it by clicking the download button and enjoy your music in high-quality MP3 or MP4 format. It only has a single limitation that the video cannot be of more than 90 minutes for easy and quick conversion.
3. YouTube to MP3 Music
YouTube to MP3 Music is another leading YouTube music ripper tool that allows us to extract audio from YouTube video within few seconds. This YouTube audio ripper tool supports high-quality MP3 files up to 320 kbps. It supports multiple platforms, including Windows, Mac, Android, and iPhone. This tool does not require any installation. It has an amazing feature that other YouTube music ripper might not have and that it also supports video search by keyword and YouTube playlist and can even upload the file to the DropBox or Google Drive after it is converted.
4. Yt1s.com
Yt1s.com is a fast, safe, and very easy-to-use YouTube audio ripper tool that converts YouTube to MP3. You can extract audio from YouTube and download it for offline use. It does not have any limitations, so you can download as many videos as you want. It is completely safe and secure and has no virus as it is under the intense supervision of professionals. By using this YouTube music ripper, you can convert audio files in many different formats such as MP3, MP4, 3GP, M4A, and many more in the best quality available.
Try Filmora to Download YouTube Audio and Free Edit with AI!
Filmora YouTube Audio Ripper can easily download and extract audio from YouTube Video & Music with the original high quality. What’s more, it owns multiple AI tools for helping you edit audio and video for free. You can edit the soundtrack or mix the song if needed. Then you can share it with your friends or upload it to YouTube and other social media directly and gain more views!
Download and Edit YouTube Audio Download and Edit YouTube Audio Learn More >
5. 320YTMp3
320YTMp3 enables us to freely download audio from YouTube without any download limitation. It allows us to extract audio from YouTube in high-quality formats of Mp3, MP4, etc. This YouTube audio ripper is compatible with all the latest browsers and can extract audio from YouTube and other 1000+ popular sites. It includes three easy steps to convert audio to MP3. Just copy the video URL and paste that into the search box, and press the search button, now choose the MP3 quality and download your desired audio.
6. Clickmp3
Clickmp3 is a professional YouTube audio ripper tool that downloads high-quality MP3 files from YouTube within 5 seconds which usually might take up to several minutes. It is free to use and does not need any registration or browser extension. It is compatible with all platforms, devices, and operating systems. This YouTube music ripper does not contain any ads that might distract your conversion and is also completely safe from viruses that might infect your system. Click mp3 also offer unlimited downloads of YouTube video and duration limit.
7. Converto.io
Converto.io is an online music ripper tool that extract audio from YouTube videos. It is hundred percent free, fast, and easy to use. Through this YouTube audio ripper, you can download any video to MP3 or MP4 format. Simply copy the YouTube URL, paste the URL on Converto.io and click the convert button. This Converto.io also allows us to edit the filename, ID tags and select the part of the video that you want to cut or change by clicking the settings button. This YouTube audio ripper also provides a feature to add a cover to all the MP3s of your music collection.
8. Loader.to
Loader.to is one of the best YouTube audio ripper converters that enables us to download YouTube videos or even complete playlists. This YouTube music ripper is extremely easy and is user-friendly. By using Loader.io, you can not only extract audio from YouTube but also can convert the videos into many audio and video formats such as MP3, MP4, WAV, 4K, 8K, etc. Another feature of this tool is that you can convert and download one video at a time but can also convert an entire playlist at high speed. Loader.io also guarantees security while using this online tool and is trusted to provide reliable and smooth service.
Filmora YouTube Audio Ripper & Editor
Extract YouTube Audio and Edit with AI
Rip audio or video from YouTube with Filmora’s built-in screen recorder function. Edit YouTube audio & videos with the latest AI tools to enhance your creative vision. Upgrade your video and audio to get more attention.
Rip YouTube Audio Rip YouTube Audio Learn More >
9. Flv2mp3
Flv2mp3 YouTube audio ripper is an online tool to download audio from YouTube and 23 other supported video streaming services like TikTok, Facebook, Vimeo, and many more. Flv2mp3 converter is free and saves time by downloading multiple audio files at once. It is a multiformat youTube music ripper that supports a number of different and popular formats and will ensure a high-quality format no matter what quality of the video is provided in the URL. This Flv2mp3 converter is also available in Spanish, Portuguese, and Turkish language. There are two simple steps for using this YouTube music ripper; Just copy-paste the URL of the chosen video, click the convert button, and your file will start downloading to your device.
10. Ontiva Youtube Audio Ripper
Ontiva YouTube to MP3 converter is an online tool to extract audio from YouTube videos. There are multiple features and services of this YouTube audio ripper. You can download YouTube videos in MP3, MP4 as well as WAV format. Not just these, but there are other formats that we can choose from for our video. The quality of the video will totally depend on the internet speed that is being used while converting the video. It also allows conversion of YouTube playlist hassle-free, but this feature is for premium users only after registering an account, but the basic and simple features are free to use. It also supports multiple popular languages.
11. Y2mate
Y2mate is an easy and free-of-cost YouTube audio ripper to extract audio from YouTube videos in the best quality available in MP3 and MP4 formats. This tool uses high-speed encoders that ensure fast conversion. No registration is required. Y2mate is totally free. This YouTube music ripper tool also allows us to upload the converted files to the cloud platforms such as Google Drive, Dropbox, etc. It supports all browsers like Google Chrome, Firefox, Safari, and many more.
FAQs about YouTube Audio Ripper
Here we sorted out some frequently asked questions for YouTube audio ripper.
1. Is it legal to use a YouTube audio ripper?
Technically, it is not illegal to use a YouTube audio ripper to extract audio from YouTube videos, but it is illegal to use or download any copyright video without proper permission. Google has attempted to shut down numerous YouTube music ripper tools as YouTube proposes that it is a violation of their Terms and Services.
2. What are the common features of good YouTube audio rippers?
A good YouTube audio ripper will be easy to use; it will be free of cost without any registration or software installation, it should have multi-platform and multi-language support, it should maintain high quality and popular formats and ensuring security as well. Bulk download of converted videos and uploading to the cloud will be a plus for a good YouTube music ripper.
3. How can I get higher-quality audio?
To get higher quality audio using a YouTube audio ripper, you should have stable and high-speed internet. Many YouTube music ripper supports 128Kbps, 320Kbps and depends mostly on the internet speed.
4. What’s the highest audio quality conversion supported for the audio ripping?
The highest quality YouTube to MP3 conversion is of WAV file. Several YouTube audio rippers support WAV file conversion. WAV is a high-quality format due to the fact that it does compress the audio and contains all the raw information. The WAV file format is of much higher quality than the MP3 file.
Bonus Tip: The Most Recommended Audio Editor - Filmora
The latest version of Wondershare Filmora now offer AI technology to edit and manage your audio with ease! It has several AI features of audio editing that are discussed here.
For Win 7 or later (64-bit)
Secure Download
For macOS 10.14 or later
Secure Download
Using Filmora audio editor, we can add the audio downloaded from YouTube as a background and can change the tone. Filmora also offers a free music library that we can choose from. You can also split the audio by using the playhead in the timeline, or you can adjust the pitch, volume, or length of the audio. You can even mute the audio in a particular clip.
Filmora also allows us to add real-time voiceovers by just clicking the record button, and you will have 3 seconds before the recording starts and once you are completed, click the stop button to end the recording. There are many more audio editing features that Filmora offers, such as customizing and adding multiple tracks in a clip, audio fade in and out, adjusting audio speed, audio equalizer for changing frequency, and many more.
Shanoon Cox
Shanoon Cox is a writer and a lover of all things video.
Follow @Shanoon Cox
Crafting Eye-Catching Video Summaries: 3 Neon Border Methods
Your YouTube video, or any other clip published on any forum, gets a larger number of hits if it has an attractive thumbnail. And, the fact is, a thumbnail becomes 10x more attractive when the main character that the image has have a neon border around it.
With that said, in the following sections, you will learn a couple of methods on how to add a YouTube thumbnail border around the main characters and/or objects that are significant to the clip.
In this article
01 Add Glowing Neon Border to YouTube Thumbnail with Filmora
02 Add a Glowing Neon Border in YouTube Thumbnail with Canva
03 Outline a Person in a YouTube Thumbnail with Photoshop
Part 1: How to Add Neon Border to YouTube Thumbnail for Free with Filmora
Being one of the most versatile and intuitive post-production tools available in the market today, Wondershare Filmora X allows you to add a neon border to a YouTube thumbnail quite conveniently. You can learn how to get this done on Windows or Mac by following the steps given below.
For Win 7 or later (64-bit)
For macOS 10.12 or later
Step 1: Define Project Settings and Add Image to the Timeline
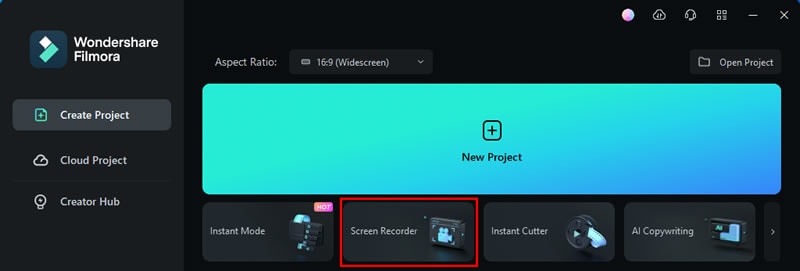
Launch Wondershare Filmora X on your PC (a MacBook Pro M1 is used here), ensure that the project aspect ratio is set to 16:9 (Widescreen) on the splash screen, and click New Project. On the main interface, click the Preview quality and display settings icon from the upper-right area of the Timeline, click Change Project Aspect Ratio, click to select 1280 x 720 (HD) from the Resolution menu of the Project Settings box, and click OK to save the custom project settings.

Then select My Media from the menu bar if not already selected, click Project Media from the navigation pane, and click Import from the Media box to select and import the image of the main character or object that you want to use in the thumbnail.

Now, drag the image from the Media box to the Timeline at the bottom.

Step 2: Clear Image Background, Add Border, and Add Custom Background
Go to Effects from the menu bar, click to select the Default tab and then AI Portrait from the navigation pane, and click and drag the Human Segmentation preset from the right box, and place it over the image track in the Timeline.

Double-click the image layer, scroll down the upper-left box to the Video Effects section, and use the Edge Thickness and Edge Feather sliders to adjust the character’s edges to make them as realistic as possible. Click OK when done.

Next, click and drag the Human Border preset over the image track in the Timeline, and follow the same procedure to customize the border. This will give the character a neon border effect.

Now, use the method explained earlier to import a custom image for the background, and drag and place it under the previous track in the Timeline.

If you are running the latest version of Filmora, you will find there are some neon light effects available under AI Portrait as well.

Step 3: Add Titles to Thumbnail
Go to Titles from the menu bar, click to select the Default tab and then Lower 3rds from the navigation pane, and click and drag your preferred lower-third preset from the right window to a separate layer in the Timeline. Double-click the lower-third layer, and use the available options in the upper-left window to change the text, its color, etc., and drag the textbox to place it to your preferred position on the image as well. Click OK to save the changes.
Next, click to select Titles from the navigation pane, and drag your preferred title from the right window to the upper-most track in the Timeline. Now use the method explained earlier to edit the text, its color, position, etc. to make it look professional.

For more tips and tricks for creating YouTube thumbnail, you can check this You Tube thumbnail creating guide.
Step 4: Get the Neon Border Thumbnail
Click the Snapshot (Camera) icon from the upper-right area of the Timeline, go to My Media from the menu bar, right-click the thumbnail of the screenshot you captured, and click Reveal in Finder (on Mac) or Reveal in Explorer (on Windows) to get to the folder the YouTube thumbnail border is saved in.

Part 2: How to Add a Glowing Neon Border in Your YouTube Thumbnail with Canva
Canva is another intuitive editing program that works on the web interface rather than having you download and install an app on your PC. You can add a neon border for YouTube thumbnails using Canva by following the instructions given below:
Step 1: Define Project Settings and Add a Background
After signing in to your Canva account, click Create a design from the top-right corner of the page, click Custom size from the bottom, define 1280 and 720 in the Width and Height fields on the box that appears respectively, and click Create new design.

Now, click to select Background from the navigation bar on the left (if the Background tool is not visible, click More and then choose Background from the expanded list), and click to select a background from the images available in the center pane.

Step 2: Upload an Image and Add Effects
Click Uploads from the navigation bar, click the More icon from the right of the Upload media button present at the top of the center pane, choose your preferred method to upload the image (with the transparent background) that you want to use, upload the image, and drag it from the center pane to the Canvas.
Note: You can use any of the tools available online to remove the background from your image for free.

To add a YouTube thumbnail border, make sure that the image that you added to the Canvas is selected, click the Duplicate icon from the upper-right area, and use the scaling handles of the copy of the image to increase its size a bit. Reposition the image back to its original location as well.
Then, click Edit image from the upper-left corner of the Canvas, click Duotone from the Edit image pane at the center, if need be, click See all, choose your preferred duotone effect to apply on the image, choose your preferred highlight and shadow colors from the box that appears next, and click Back from the top of the pane.

Next, click See all next to the Adjust section from the center pane, and drag the Blur slider to the right to increase the blur effect on the image.

Step 3: Position the Layers
While keeping the duplicate image selected, click the Position button from the upper-right area of the Canvas, and click Background to send the second image behind the first one to get the neon border effect for the photo.

Part 3: How to Outline a Person in a YouTube Thumbnail with Photoshop
Because YouTube thumbnails are nothing but static images, creating YouTube thumbnail border with Adobe Photoshop is comparatively easier. The process of doing this is given below:
Step 1: Define Document Preferences and Import an Image
Launch Adobe Photoshop on your PC, click Create new, and on the New Document customization box, define the width and height values to 1280 and 720 pixels respectively. Select Transparent from the Background Contents menu as well if not already selected. Click Create from the bottom to create a new Photoshop document with the specified document settings. Next, open the folder that contains the source image, drag the photo to Photoshop, and press Enter to place the photo.

Step 2: Remove Background from the Image
Make sure that the image layer is selected in the Layers panel on the right, go to Select from the menu bar at the top, and click Subject. From the bottom of the Layers panel, click the Add a mask icon to get rid of the background, leaving only the human on the Canvas.

Step 3: Add a Custom Background and an Outline Around the Subject
Use the method explained earlier to import a background image of your choice to Photoshop. Drag the background image layer to the bottom in the Layers panel. Double-click the masked layer, click to select Stroke from the left pane of the Layer Style box, and use the options available on the right to manage the size, color, position, etc. of the stroke that has been added around the human subject. Click OK when done, and then export the image normally to use it as a YouTube thumbnail border.

Summary
It is important to know that the default resolution of a YouTube thumbnail is 1280 x 720 pixels that is usually written and referred to as 720p. While adding a YouTube thumbnail border, it is also imperative to have a good sense of color combination and fonts. Furthermore, a decent tool like Wondershare Filmora X must be used to add an appealing neon border around the main subject in the thumbnail image easily and quickly.
02 Add a Glowing Neon Border in YouTube Thumbnail with Canva
03 Outline a Person in a YouTube Thumbnail with Photoshop
Part 1: How to Add Neon Border to YouTube Thumbnail for Free with Filmora
Being one of the most versatile and intuitive post-production tools available in the market today, Wondershare Filmora X allows you to add a neon border to a YouTube thumbnail quite conveniently. You can learn how to get this done on Windows or Mac by following the steps given below.
For Win 7 or later (64-bit)
For macOS 10.12 or later
Step 1: Define Project Settings and Add Image to the Timeline
Launch Wondershare Filmora X on your PC (a MacBook Pro M1 is used here), ensure that the project aspect ratio is set to 16:9 (Widescreen) on the splash screen, and click New Project. On the main interface, click the Preview quality and display settings icon from the upper-right area of the Timeline, click Change Project Aspect Ratio, click to select 1280 x 720 (HD) from the Resolution menu of the Project Settings box, and click OK to save the custom project settings.
Then select My Media from the menu bar if not already selected, click Project Media from the navigation pane, and click Import from the Media box to select and import the image of the main character or object that you want to use in the thumbnail.
Now, drag the image from the Media box to the Timeline at the bottom.
Step 2: Clear Image Background, Add Border, and Add Custom Background
Go to Effects from the menu bar, click to select the Default tab and then AI Portrait from the navigation pane, and click and drag the Human Segmentation preset from the right box, and place it over the image track in the Timeline.
Double-click the image layer, scroll down the upper-left box to the Video Effects section, and use the Edge Thickness and Edge Feather sliders to adjust the character’s edges to make them as realistic as possible. Click OK when done.
Next, click and drag the Human Border preset over the image track in the Timeline, and follow the same procedure to customize the border. This will give the character a neon border effect.
Now, use the method explained earlier to import a custom image for the background, and drag and place it under the previous track in the Timeline.
If you are running the latest version of Filmora, you will find there are some neon light effects available under AI Portrait as well.
Step 3: Add Titles to Thumbnail
Go to Titles from the menu bar, click to select the Default tab and then Lower 3rds from the navigation pane, and click and drag your preferred lower-third preset from the right window to a separate layer in the Timeline. Double-click the lower-third layer, and use the available options in the upper-left window to change the text, its color, etc., and drag the textbox to place it to your preferred position on the image as well. Click OK to save the changes.
Next, click to select Titles from the navigation pane, and drag your preferred title from the right window to the upper-most track in the Timeline. Now use the method explained earlier to edit the text, its color, position, etc. to make it look professional.
For more tips and tricks for creating YouTube thumbnail, you can check this You Tube thumbnail creating guide.
Step 4: Get the Neon Border Thumbnail
Click the Snapshot (Camera) icon from the upper-right area of the Timeline, go to My Media from the menu bar, right-click the thumbnail of the screenshot you captured, and click Reveal in Finder (on Mac) or Reveal in Explorer (on Windows) to get to the folder the YouTube thumbnail border is saved in.
Part 2: How to Add a Glowing Neon Border in Your YouTube Thumbnail with Canva
Canva is another intuitive editing program that works on the web interface rather than having you download and install an app on your PC. You can add a neon border for YouTube thumbnails using Canva by following the instructions given below:
Step 1: Define Project Settings and Add a Background
After signing in to your Canva account, click Create a design from the top-right corner of the page, click Custom size from the bottom, define 1280 and 720 in the Width and Height fields on the box that appears respectively, and click Create new design.
Now, click to select Background from the navigation bar on the left (if the Background tool is not visible, click More and then choose Background from the expanded list), and click to select a background from the images available in the center pane.
Step 2: Upload an Image and Add Effects
Click Uploads from the navigation bar, click the More icon from the right of the Upload media button present at the top of the center pane, choose your preferred method to upload the image (with the transparent background) that you want to use, upload the image, and drag it from the center pane to the Canvas.
Note: You can use any of the tools available online to remove the background from your image for free.
To add a YouTube thumbnail border, make sure that the image that you added to the Canvas is selected, click the Duplicate icon from the upper-right area, and use the scaling handles of the copy of the image to increase its size a bit. Reposition the image back to its original location as well.
Then, click Edit image from the upper-left corner of the Canvas, click Duotone from the Edit image pane at the center, if need be, click See all, choose your preferred duotone effect to apply on the image, choose your preferred highlight and shadow colors from the box that appears next, and click Back from the top of the pane.
Next, click See all next to the Adjust section from the center pane, and drag the Blur slider to the right to increase the blur effect on the image.
Step 3: Position the Layers
While keeping the duplicate image selected, click the Position button from the upper-right area of the Canvas, and click Background to send the second image behind the first one to get the neon border effect for the photo.
Part 3: How to Outline a Person in a YouTube Thumbnail with Photoshop
Because YouTube thumbnails are nothing but static images, creating YouTube thumbnail border with Adobe Photoshop is comparatively easier. The process of doing this is given below:
Step 1: Define Document Preferences and Import an Image
Launch Adobe Photoshop on your PC, click Create new, and on the New Document customization box, define the width and height values to 1280 and 720 pixels respectively. Select Transparent from the Background Contents menu as well if not already selected. Click Create from the bottom to create a new Photoshop document with the specified document settings. Next, open the folder that contains the source image, drag the photo to Photoshop, and press Enter to place the photo.
Step 2: Remove Background from the Image
Make sure that the image layer is selected in the Layers panel on the right, go to Select from the menu bar at the top, and click Subject. From the bottom of the Layers panel, click the Add a mask icon to get rid of the background, leaving only the human on the Canvas.
Step 3: Add a Custom Background and an Outline Around the Subject
Use the method explained earlier to import a background image of your choice to Photoshop. Drag the background image layer to the bottom in the Layers panel. Double-click the masked layer, click to select Stroke from the left pane of the Layer Style box, and use the options available on the right to manage the size, color, position, etc. of the stroke that has been added around the human subject. Click OK when done, and then export the image normally to use it as a YouTube thumbnail border.
Summary
It is important to know that the default resolution of a YouTube thumbnail is 1280 x 720 pixels that is usually written and referred to as 720p. While adding a YouTube thumbnail border, it is also imperative to have a good sense of color combination and fonts. Furthermore, a decent tool like Wondershare Filmora X must be used to add an appealing neon border around the main subject in the thumbnail image easily and quickly.
Also read:
- [Updated] Elevate Engagement Top Video Release Slots
- [New] Decoding YouTube Exchange Threads
- Easy Guide to YouTube Livestreaming From Google Meet for 2024
- Your Next Travel Companion Best Youtubers' List
- [Updated] Boost Your Projects' Quality Rankings of the Best Free Editing Apps (Top 9)
- A Dive Into History The Definitive List of Student-Friendly Channels #1-10 for 2024
- Eliminate YouTube Short Headaches with These Tips for 2024
- Enhancing Presentations Adding YouTube to Google Slides for 2024
- Digital Dollar First Steps in YouTubers' Revenue
- [Updated] Beginner's Ultimate List of Must-Have Video Tech
- Mastering the Art of Analyzing YouTube Numbers Views & Money
- How to Find YouTube Partners and Make Collab Videos?
- The Frugal Filmmaker's Choice Best Cameras at Low Costs
- Transparency in Tracking YouTube Viewers
- 2024 Approved Creating Engaging YouTube Trailers in Filmora
- [Updated] Elevating Views, Amplifying Impact A Youtube Case Study
- Free YouTube Image Saver Compilation
- In 2024, Beyond Blockbuster Horizons Favorite Films
- The Ultimate Guide for Uploading Twitch to YouTube
- Enhancing YouTube Beauty Mastering Video Color Dynamics for 2024
- Achieve Seamless Transitions Premiere Videos on YouTube for 2024
- UniquePC Vision Editing with Flawless Sound
- In 2024, Enhance Viewer Engagement The Top 6 Methods for Higher YouTube Audience Retention
- The Future of Development Understanding the Impact of Next-Gen Frameworks
- 2024 Approved Compare & Contrast Leading Online & Desktop GIF Tools
- [Updated] In 2024, Insta Style The Essential Guide to Instagram Story Magnification
- [New] In 2024, Orchestrating Visuals & VO in Powerpoint
- In 2024, Fake Android Location without Rooting For Your Honor Magic 5 | Dr.fone
- In 2024, 4 solution to get rid of pokemon fail to detect location On Poco C65 | Dr.fone
- [Updated] 2024 Approved A Comprehensive Guide to Facebook's Full Screen Feature
- [Updated] 2024 Approved Mastering Your Game Library The Finest PC-Based GBA Emulation Tools
- [New] Correcting iPhone Camera Focusing Errors Effectively
- [Updated] Tycoon Titans The #12 Game Series for Budding Business Masters
- A Curated Collection of 15 Dynamic News Music Pieces
- New In 2024, The Ultimate Aspect Ratio Calculator Simplifying Image Editing
- New Elevate Your Video Editing Top 10 Free Green Screen Apps for Android/iOS
- In 2024, How to Transfer Contacts from Vivo T2 5G to iPhone XS/11 | Dr.fone
- How to Use Pokémon Emerald Master Ball Cheat On Lava Yuva 2 | Dr.fone
- [Updated] Quick Tips for Twitter Video Uploads on Instagram
- In 2024, Designing Instagram's Ideal Square Video with iMovie
- Top 10 Telegram Spy Tools On Realme Narzo 60 Pro 5G for Parents | Dr.fone
- Title: "2024 Approved 15 Best Free Tools for Downloading High-Fidelity Soundtracks Directly From YouTube"
- Author: Brian
- Created at : 2024-05-25 10:56:27
- Updated at : 2024-05-26 10:56:27
- Link: https://youtube-video-recordings.techidaily.com/2024-approved-15-best-free-tools-for-downloading-high-fidelity-soundtracks-directly-from-youtube/
- License: This work is licensed under CC BY-NC-SA 4.0.
